clock HONDA PRELUDE 1998 Owners Manual
[x] Cancel search | Manufacturer: HONDA, Model Year: 1998, Model line: PRELUDE, Model: HONDA PRELUDE 1998Pages: 278, PDF Size: 2.61 MB
Page 50 of 278
Instruments and Controls
This section gives information about the controls and displays that
contribute to the daily operation of
your Honda. All the essential controls are within easy reach.
Control Locations............................ 50
Indicator Lights................................ 51
Gauges.............................................. 56
Speedometer................................ 56
Tachometer.................................. 56
Odometer...................................... 56
Trip Meter.................................... 56
Fuel Gauge................................... 57
Temperature Gauge.................... 57 Maintenance Required Indicator.................................... 58
Controls Near the Steering
Wheel........................................ 59
Headlights.................................... 60
Daytime Running Lights............. 60
Instrument Panel Brightness..... 61
Turn Signals................................. 61
Windshield Wipers...................... 62
Windshield Washers................... 63
Hazard Warning........................... 63
Rear Window Defogger.............. 63
Steering Wheel Adjustment....... 64
Steering Wheel Controls ................ 65
Cruise Control.............................. 65
Keys and Locks................................ 68
Keys...............................................68
Learning Key................................ 69
Immobilizer System..................... 69
Ignition Switch............................. 70
Power Door Locks....................... 72
Lockout Prevention..................... 73
Trunk............................................73
Glove Box.....................................74
Seat Adjustments............................. 75 Front Seat Adjustments.............. 75Driver's Seat Height Adjustment............................... 76
Rear Seat Access .........................
76
Head Restraints...........................
77
Seat Heaters..................................... 78
Folding Rear Seat............................ 79
Power Windows............................... 80
Moonroof..........................................82
Mirrors.............................................. 83
Adjusting the Power Mirrors.....
83
Parking Brake..................................
84
Digital Clock..................................... 85
Beverage Holder.............................. 86 Console Compartment.................... 87
Coin Box........................................... 88
Accessory Power Socket................ 88
Ashtrays............................................ 89
Interior Lights.................................. 89 Ceiling Lights............................... 89
Courtesy Lights........................... 90
Instruments and ControlsProCarManuals.comMain Menu s t
Page 51 of 278
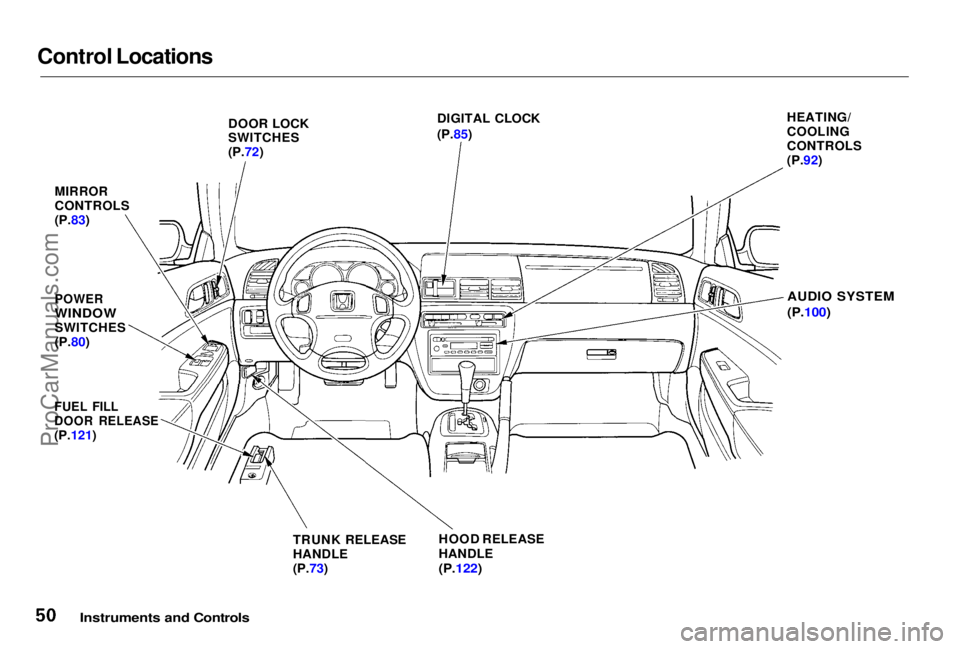
Control Locations
DOOR LOCK
SWITCHES
(P.72) DIGITAL CLOCK
(P.85)
MIRROR
CONTROLS
(P.83)
POWER
WINDOW
SWITCHES
(P.80)
FUEL FILL
DOOR RELEASE
(P.121) HEATING/
COOLING
CONTROLS
(P.92)
AUDIO SYSTEM
(P.100)
TRUNK RELEASE
HANDLE
(P.73) HOOD RELEASE
HANDLE
(P.122)
Instruments and ControlsProCarManuals.comMain Menu Table of Contents s t
Page 64 of 278
Controls Near the Steering Wheel
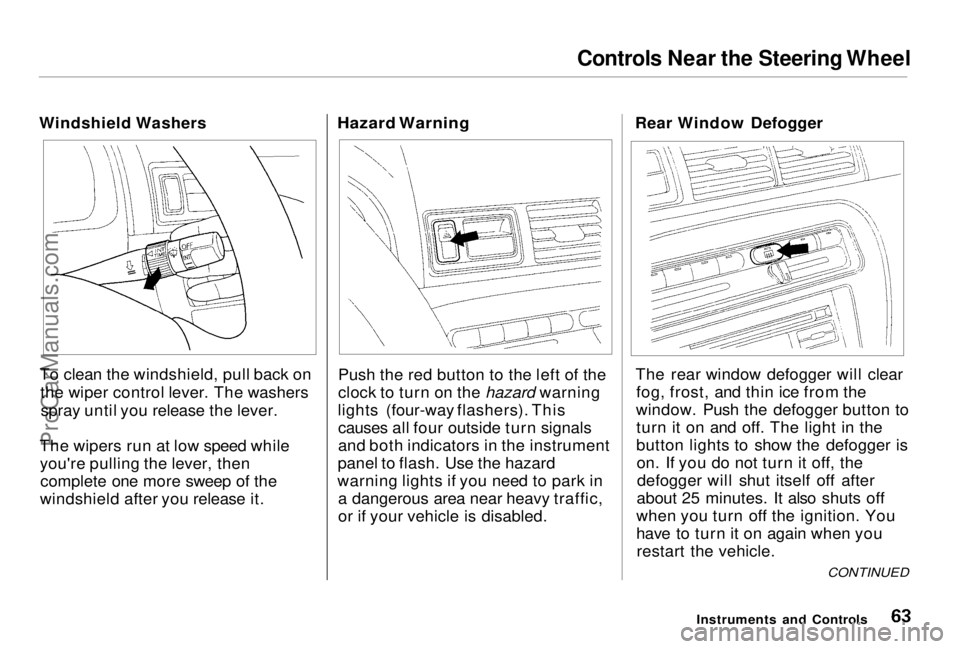
Windshield Washers
To clean the windshield, pull back on the wiper control lever. The washersspray until you release the lever.
The wipers run at low speed while you're pulling the lever, thencomplete one more sweep of the
windshield after you release it.
Hazard Warning
Push the red button to the left of the
clock to turn on the hazard warning
lights (four-way flashers). This causes all four outside turn signals
and both indicators in the instrument
panel to flash. Use the hazard
warning lights if you need to park in a dangerous area near heavy traffic,
or if your vehicle is disabled. Rear Window Defogger
The rear window defogger will clear fog, frost, and thin ice from the
window. Push the defogger button to turn it on and off. The light in the
button lights to show the defogger ison. If you do not turn it off, thedefogger will shut itself off after
about 25 minutes. It also shuts off
when you turn off the ignition. You
have to turn it on again when you restart the vehicle.
Instruments and Controls
CONTINUEDProCarManuals.comMain Menu Table of Contents s t
Page 80 of 278
Folding Rear Seat
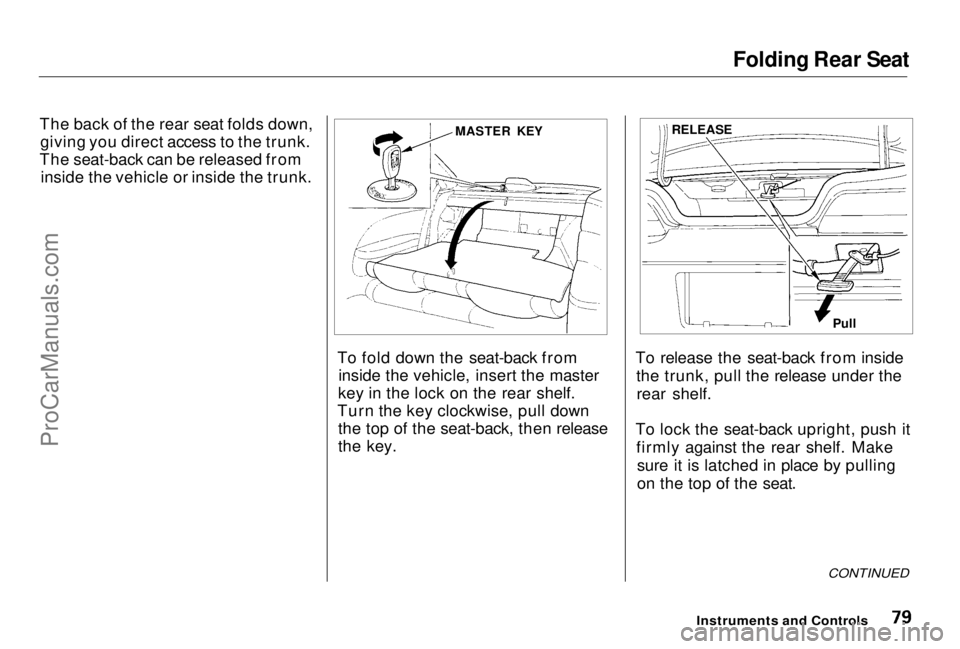
The back of the rear seat folds down, giving you direct access to the trunk.
The seat-back can be released from inside the vehicle or inside the trunk.
To fold down the seat-back frominside the vehicle, insert the master
key in the lock on the rear shelf.
Turn the key clockwise, pull down the top of the seat-back, then release
the key. To release the seat-back from inside
the trunk, pull the release under therear shelf.
To lock the seat-back upright, push it firmly against the rear shelf. Makesure it is latched in place by pulling
on the top of the seat.
CONTINUED
Instruments and Controls
MASTER KEY
RELEASE
PullProCarManuals.comMain Menu Table of Contents s t
Page 86 of 278
Digital Clock
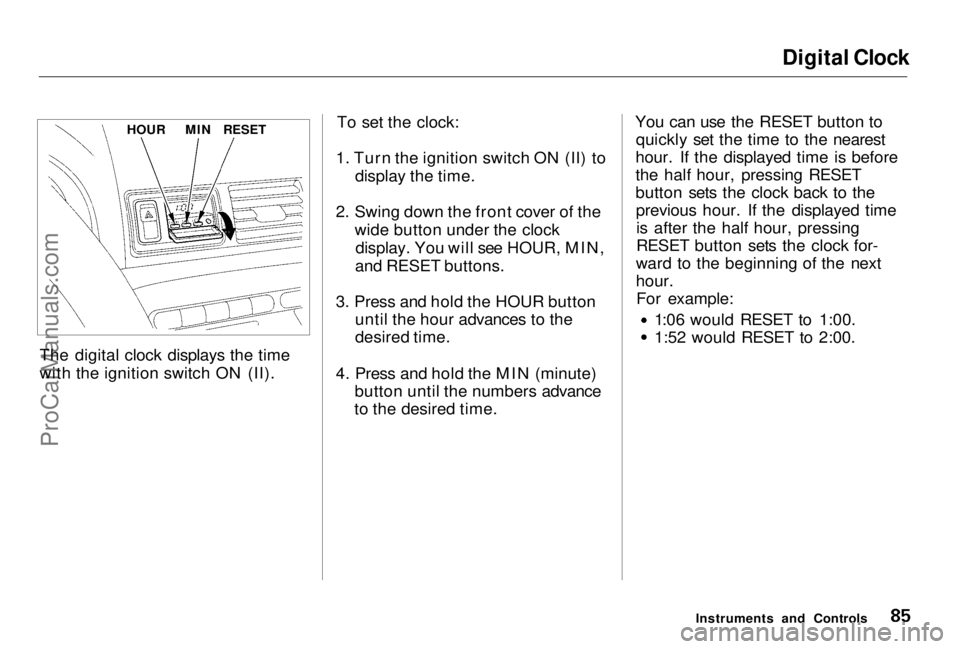
The digital clock displays the time
with the ignition switch ON (II). To set the clock:
1. Turn the ignition switch ON (II) to display the time.
2. Swing down the front cover of the wide button under the clockdisplay. You will see HOUR, MIN,
and RESET buttons.
3. Press and hold the HOUR button until the hour advances to the
desired time.
4. Press and hold the MIN (minute) button until the numbers advance
to the desired time. You can use the RESET button to
quickly set the time to the nearest
hour. If the displayed time is before
the half hour, pressing RESET
button sets the clock back to the previous hour. If the displayed timeis after the half hour, pressing
RESET button sets the clock for-
ward to the beginning of the next
hour. For example: 1:06 would RESET to 1:00.
1:52 would RESET to 2:00.
Instruments and Controls
HOUR
MIN
RESETProCarManuals.comMain Menu Table of Contents s t
Page 177 of 278
Cooling System
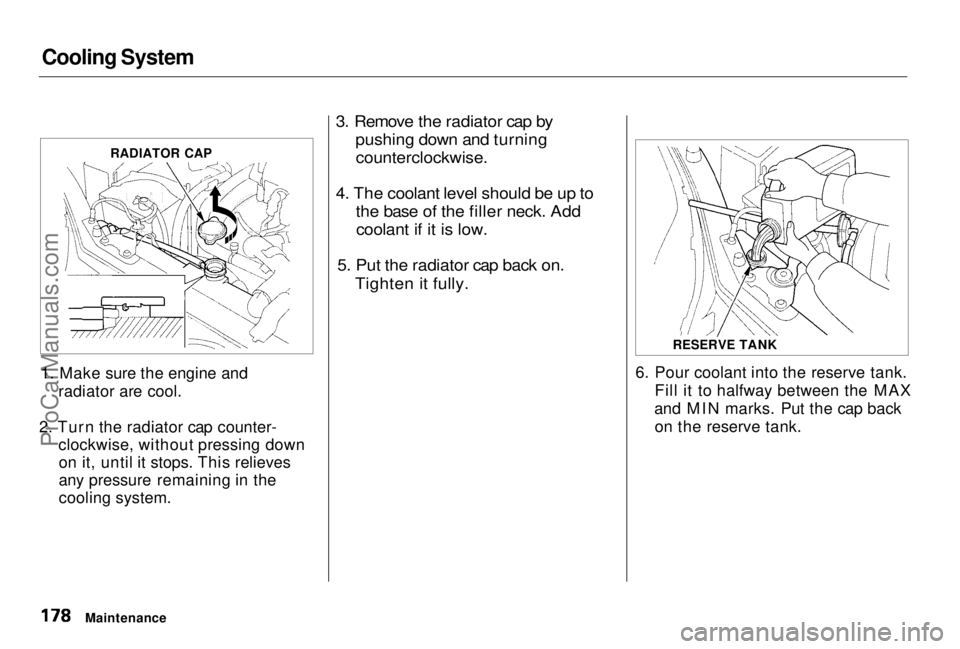
1. Make sure the engine and radiator are cool.
2. Turn the radiator cap counter- clockwise, without pressing downon it, until it stops. This relieves
any pressure remaining in the
cooling system.
3. Remove the radiator cap by
pushing down and turning
counterclockwise.
4. The coolant level should be up to the base of the filler neck. Addcoolant if it is low.
5. Put the radiator cap back on. Tighten it fully.
6. Pour coolant into the reserve tank.Fill it to halfway between the MAX
and MIN marks. Put the cap back on the reserve tank.
Maintenance RADIATOR CAP
RESERVE TANKProCarManuals.comMain Menu Table of Contents s t
Page 207 of 278
Lights
Replacing a Parking Light Bulb
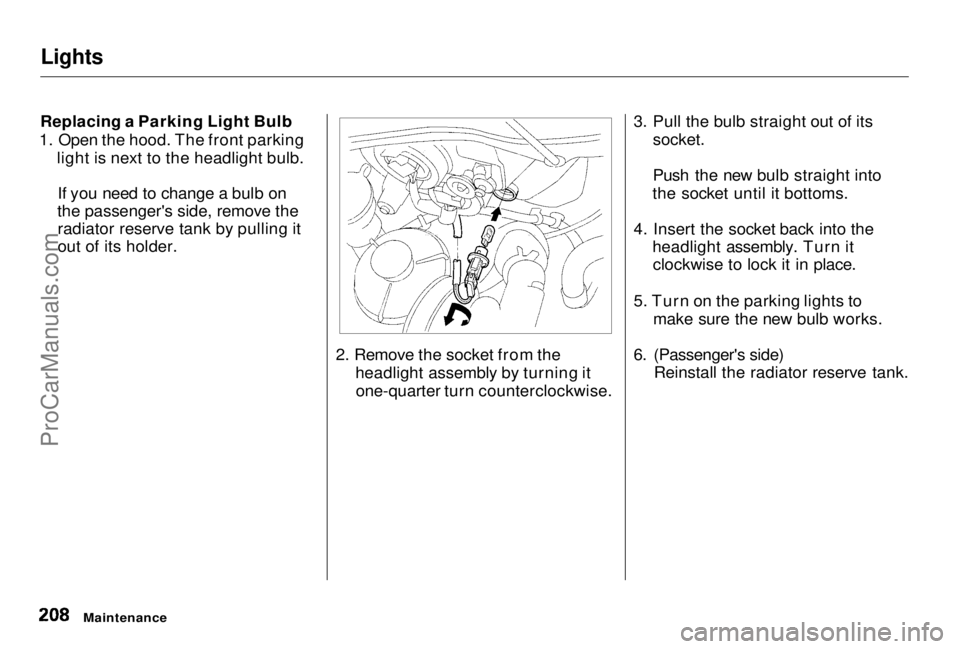
1. Open the hood. The front parking light is next to the headlight bulb.
If you need to change a bulb on
the passenger's side, remove the radiator reserve tank by pulling it
out of its holder.
2. Remove the socket from theheadlight assembly by turning itone-quarter turn counterclockwise. 3. Pull the bulb straight out of its
socket.
Push the new bulb straight into
the socket until it bottoms.
4. Insert the socket back into the headlight assembly. Turn itclockwise to lock it in place.
5. Turn on the parking lights to make sure the new bulb works.
6. (Passenger's side) Reinstall the radiator reserve tank.
MaintenanceProCarManuals.comMain Menu Table of Contents s t
Page 208 of 278
Lights
Replacing a Front Side Marker Light Bulb
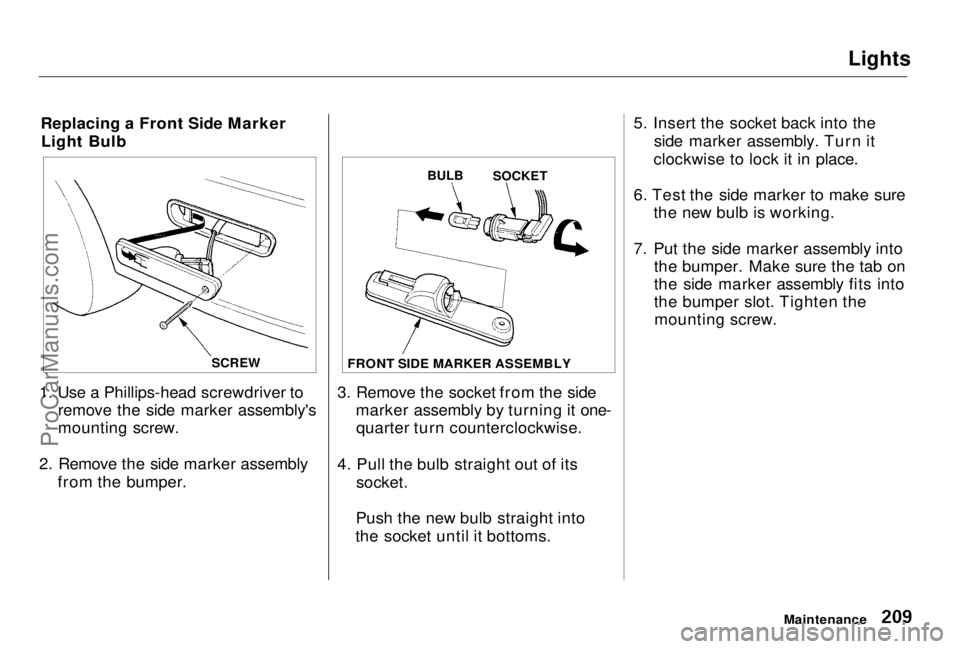
1. Use a Phillips-head screwdriver to remove the side marker assembly's
mounting screw.
2. Remove the side marker assembly from the bumper. 3. Remove the socket from the side
marker assembly by turning it one-quarter turn counterclockwise.
4. Pull the bulb straight out of its socket.
Push the new bulb straight into
the socket until it bottoms. 5. Insert the socket back into the
side marker assembly. Turn it
clockwise to lock it in place.
6. Test the side marker to make sure the new bulb is working.
7. Put the side marker assembly into the bumper. Make sure the tab on
the side marker assembly fits into
the bumper slot. Tighten themounting screw.
Maintenance
SCREW
BULB
SOCKET
FRONT SIDE MARKER ASSEMBLYProCarManuals.comMain Menu Table of Contents s t
Page 209 of 278
Lights
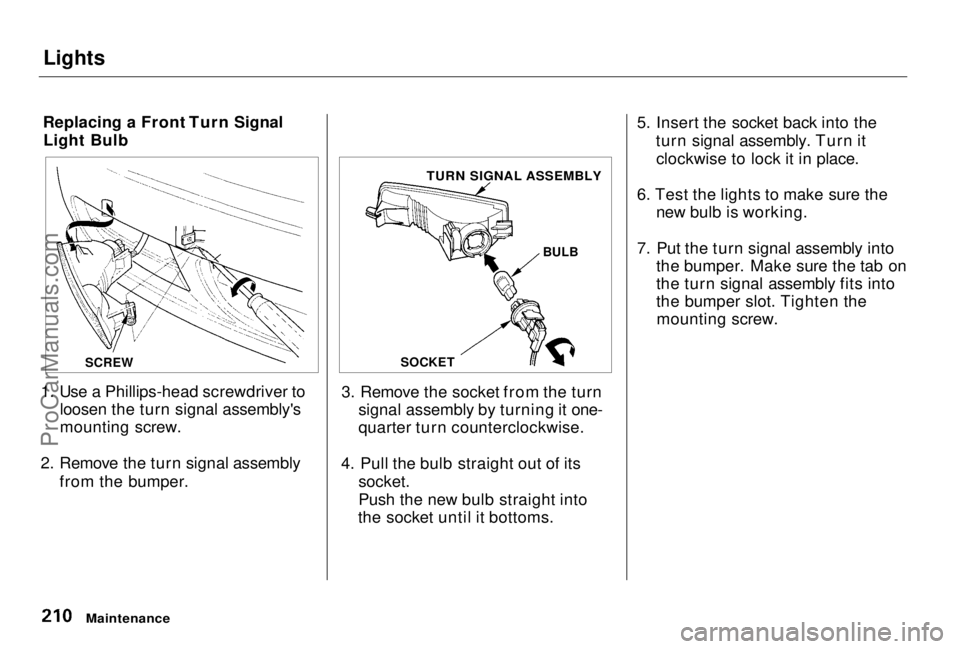
Replacing a Front Turn Signal Light Bulb
1. Use a Phillips-head screwdriver to loosen the turn signal assembly's
mounting screw.
2. Remove the turn signal assembly from the bumper. 3. Remove the socket from the turn
signal assembly by turning it one-
quarter turn counterclockwise.
4. Pull the bulb straight out of its socket.
Push the new bulb straight into
the socket until it bottoms. 5. Insert the socket back into the
turn signal assembly. Turn itclockwise to lock it in place.
6. Test the lights to make sure the new bulb is working.
7. Put the turn signal assembly into the bumper. Make sure the tab on
the turn signal assembly fits into
the bumper slot. Tighten themounting screw.
Maintenance
SCREW
SOCKETBULB
TURN SIGNAL ASSEMBLYProCarManuals.comMain Menu Table of Contents s t
Page 210 of 278
Lights
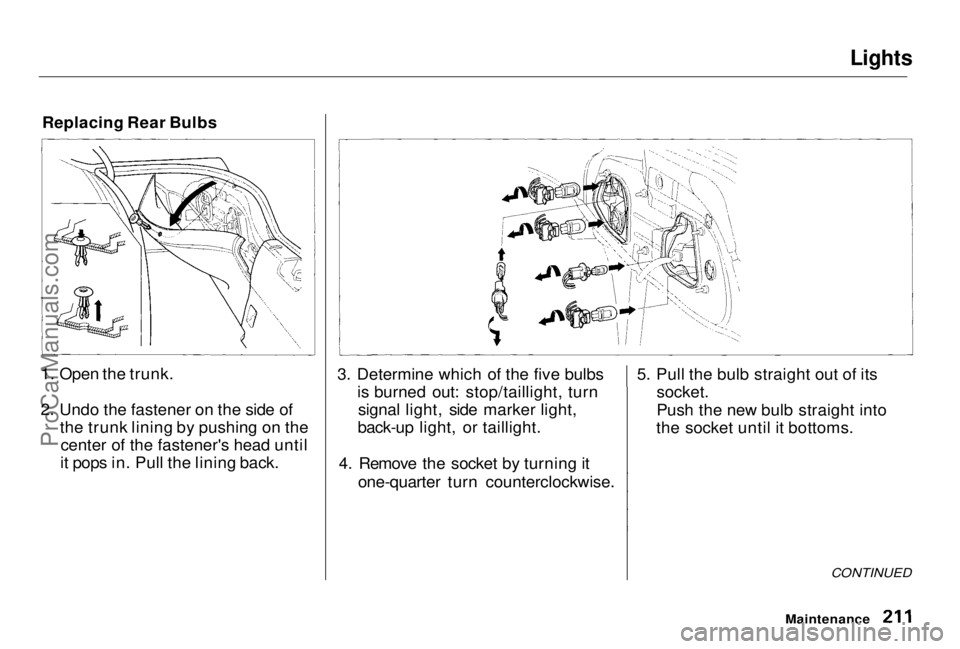
Replacing Rear Bulbs
1. Open the trunk.
2. Undo the fastener on the side of the trunk lining by pushing on thecenter of the fastener's head until
it pops in. Pull the lining back. 3. Determine which of the five bulbs
is burned out: stop/taillight, turnsignal light, side marker light,
back-up light, or taillight.
4. Remove the socket by turning it one-quarter turn counterclockwise. 5. Pull the bulb straight out of its
socket.
Push the new bulb straight into
the socket until it bottoms.
CONTINUED
MaintenanceProCarManuals.comMain Menu Table of Contents s t