headlight aiming HONDA PRELUDE 1998 Owners Manual
[x] Cancel search | Manufacturer: HONDA, Model Year: 1998, Model line: PRELUDE, Model: HONDA PRELUDE 1998Pages: 278, PDF Size: 2.61 MB
Page 204 of 278

Lights
Headlight Aiming
The headlights were properly aimed
when your vehicle was new. You should check their aim if you
regularly carry heavy items in the
trunk or pull a trailer. Each headlight
assembly has horizontal and vertical
adjustment indicators. These are set to their "0" positions after the
headlights are aimed at the factory.
To check these settings:
1. Make sure the fuel tank is full. Park the vehicle on level ground.
2. The driver or someone who weighs the same should be sitting
in the driver's seat for all checks
and adjustments.Load the trunk with the items you
normally carry. If you usually pull a trailer, load it as
you would normally and attach it to the vehicle. Push down on the frontand rear bumpers several times tomake sure the vehicle is sitting
normally.
3. Open the hood.
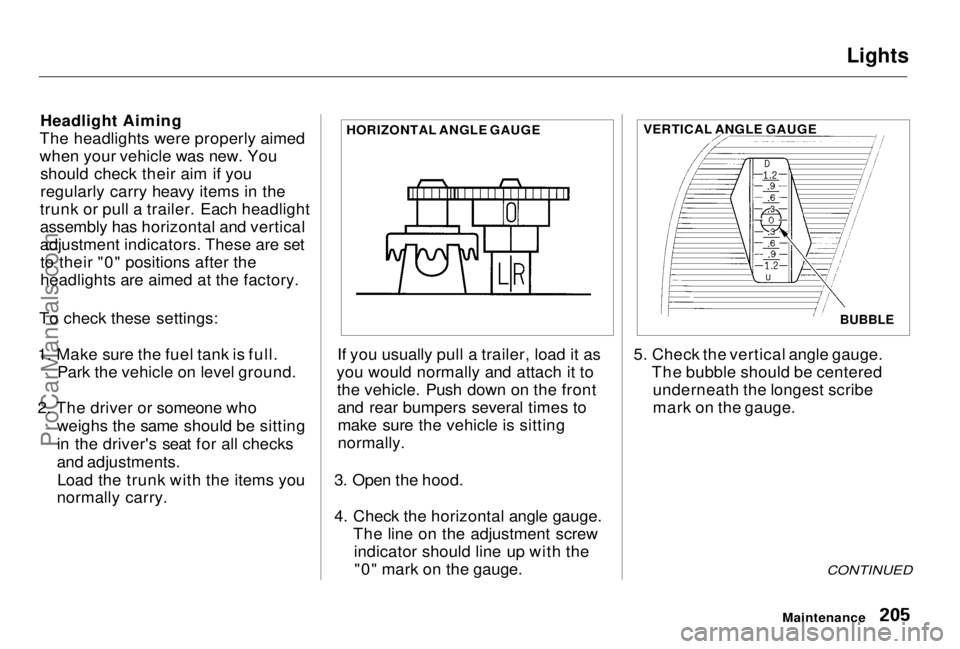
4. Check the horizontal angle gauge. The line on the adjustment screwindicator should line up with the"0" mark on the gauge. 5. Check the vertical angle gauge.
The bubble should be centeredunderneath the longest scribe
mark on the gauge.
CONTINUED
Maintenance
HORIZONTAL ANGLE GAUGE
BUBBLE
VERTICAL ANGLE GAUGEProCarManuals.comMain Menu Table of Contents s t
Page 273 of 278

Index
Halogen Headlight Bulbs.............. 206
Hazard Warning Flashers............... 63
Headlights
Aiming......................................... 205
Daytime Running Lights............. 60
High Beam Indicator................... 60
High Beams, Turning on............ 60
Low Beams, Turning on ............. 60
Reminder Chime.......................... 60
Replacing Halogen Bulbs ......... 206
Turning on.................................... 60
Head Restraints............................... 77
Heating and Cooling........................ 92
High Altitude, Starting at.............. 133
High-Low Beam Switch .................. 60
High-mount Brake Light............... 213
Hood, Opening the ........................ 122
Horn................................................... 59
Hot Coolant, Warning About........ 177
Hydraulic Clutch............................ 186
Hydroplaning.................................. 151 Identification Number, Vehicle.... 252
If Your Car Has to be Towed....... 250
Ignition Keys............................................... 68
Switch............................................ 70
Timing Control System............. 262
Immobilizer System......................... 69
Indicator Lights, Instrument Panel.............................................. 51
Infant Restraint................................ 19 Inflation, Proper Tire ....................
197
High Speed
Driving................... 257
Normal Driving.......................... 198
Inside Mirror.................................... 83
Inspection, Tire.............................. 198
Instrument Panel............................. 50
Instrument Panel Brightness......... 61
Interior Cleaning............................ 222
Interior Lights.................................. 89
Introduction.........................................
i
Jacking up
the Car......................... 231
Jack, Tire........................................ 230
Jump Starting................................. 236
Keys................................................... 68
Label, Certification........................ 252
Lane Change, Signaling.................. 61
Lap/Shoulder Belts......................... 40Leaking of Exhaust into Car.......... 47
Learning Key.................................... 69
Lights Bulb Replacement..................... 206
Indicator........................................ 51
Parking.......................................... 60
Turn Signal................................... 61
Loading Cargo................................ 128
LOCK (Ignition Key Position)....... 71
CONTINUEDProCarManuals.comMain Menu s t