maintenance reset HONDA PRELUDE 1998 Owners Manual
[x] Cancel search | Manufacturer: HONDA, Model Year: 1998, Model line: PRELUDE, Model: HONDA PRELUDE 1998Pages: 278, PDF Size: 2.61 MB
Page 57 of 278
Gauges
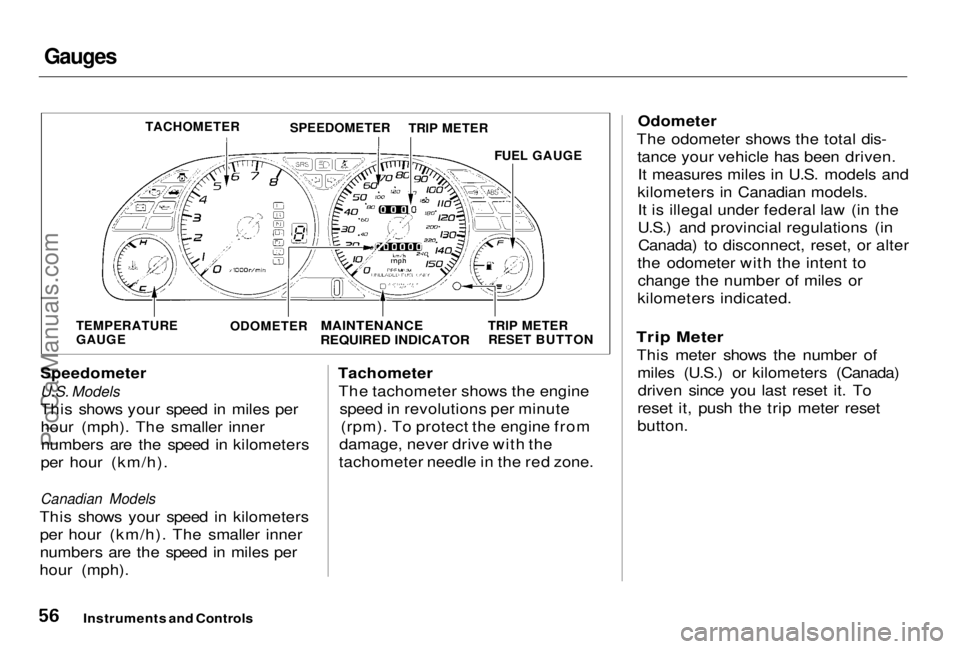
Speedometer
U.S. Models
This shows your speed in miles per hour (mph). The smaller innernumbers are the speed in kilometers
per hour (km/h).
Canadian Models
This shows your speed in kilometers per hour (km/h). The smaller inner
numbers are the speed in miles per
hour (mph). Tachometer
The tachometer shows the engine speed in revolutions per minute(rpm). To protect the engine from
damage, never drive with the
tachometer needle in the red zone. Odometer
The odometer shows the total dis- tance your vehicle has been driven.It measures miles in U.S. models and
kilometers in Canadian models. It is illegal under federal law (in the
U.S.) and provincial regulations (inCanada) to disconnect, reset, or alter
the odometer with the intent to change the number of miles or
kilometers indicated.
Trip Meter
This meter shows the number of miles (U.S.) or kilometers (Canada)driven since you last reset it. To
reset it, push the trip meter reset
button.
Instruments and Controls
TACHOMETER
SPEEDOMETER
TRIP METER
FUEL GAUGE
TEMPERATURE
GAUGE
ODOMETER
MAINTENANCE
REQUIRED INDICATOR
TRIP METER
RESET BUTTONProCarManuals.comMain Menu Table of Contents s t
Page 58 of 278
Gauges
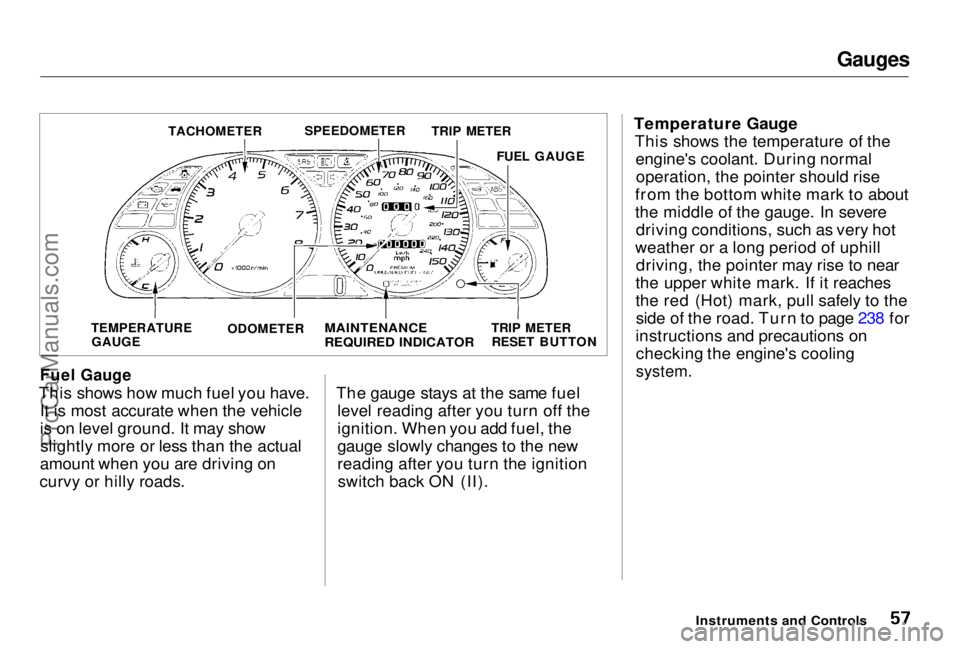
Fuel Gauge
This shows how much fuel you have. It is most accurate when the vehicle
is on level ground. It may showslightly more or less than the actual
amount when you are driving on
curvy or hilly roads. The gauge stays at the same fuel
level reading after you turn off the
ignition. When you add fuel, the
gauge slowly changes to the new
reading after you turn the ignitionswitch back ON (II). Temperature Gauge
This shows the temperature of theengine's coolant. During normaloperation, the pointer should rise
from the bottom white mark to about
the middle of the gauge. In severe driving conditions, such as very hot
weather or a long period of uphill driving, the pointer may rise to near
the upper white mark. If it reaches
the red (Hot) mark, pull safely to the side of the road. Turn to page 238 for
instructions and precautions on checking the engine's cooling
system.
Instruments and Controls
TACHOMETER
SPEEDOMETER
TRIP METER
FUEL GAUGE
TEMPERATURE GAUGE ODOMETER
MAINTENANCE
REQUIRED INDICATOR
TRIP METER
RESET BUTTONProCarManuals.comMain Menu Table of Contents s t
Page 59 of 278
Gauges
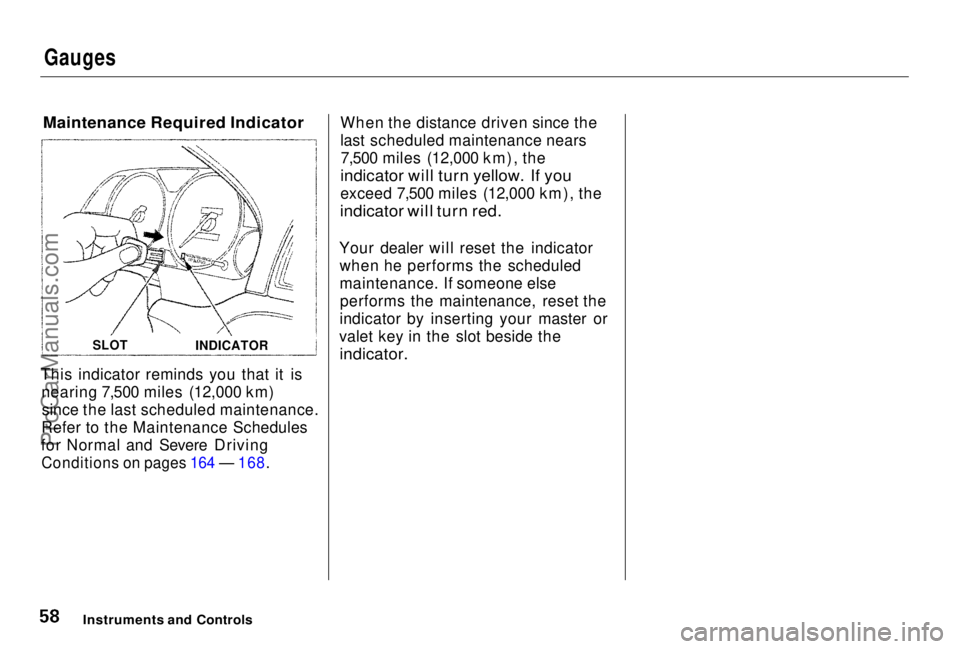
Maintenance Required Indicator
This indicator reminds you that it is nearing 7,500 miles (12,000 km)since the last scheduled maintenance.
Refer to the Maintenance Schedules
for Normal and Severe Driving
Conditions on pages 164 — 168.
When the distance driven since the
last scheduled maintenance nears
7,500 miles (12,000 km), the
indicator will turn yellow. If you
exceed 7,500 miles (12,000 km), the
indicator will turn red.
Your dealer will reset the indicator when he performs the scheduled
maintenance. If someone elseperforms the maintenance, reset the
indicator by inserting your master or
valet key in the slot beside the
indicator.
Instruments and Controls
SLOT
INDICATORProCarManuals.comMain Menu Table of Contents s t
Page 191 of 278
Battery
If your vehicle's battery is discon-
nected or goes dead, the audio system will disable itself. The next
time you turn on the radio you will see "Code" in the frequency display.Use the Preset buttons to enter the
five-digit code (see page 117).
Charging the battery with the cables
connected can seriously damage your vehicle's electronic controls. Detach
the battery cables before connecting
the battery to a charger.
Maintenance
NOTICEProCarManuals.comMain Menu Table of Contents s t
Page 211 of 278
Lights
6. Reinstall the socket into the light assembly by turning it clockwise
until it locks.
7. Test the lights to make sure the new bulb is working.
8. Reinstall the trunk lining.
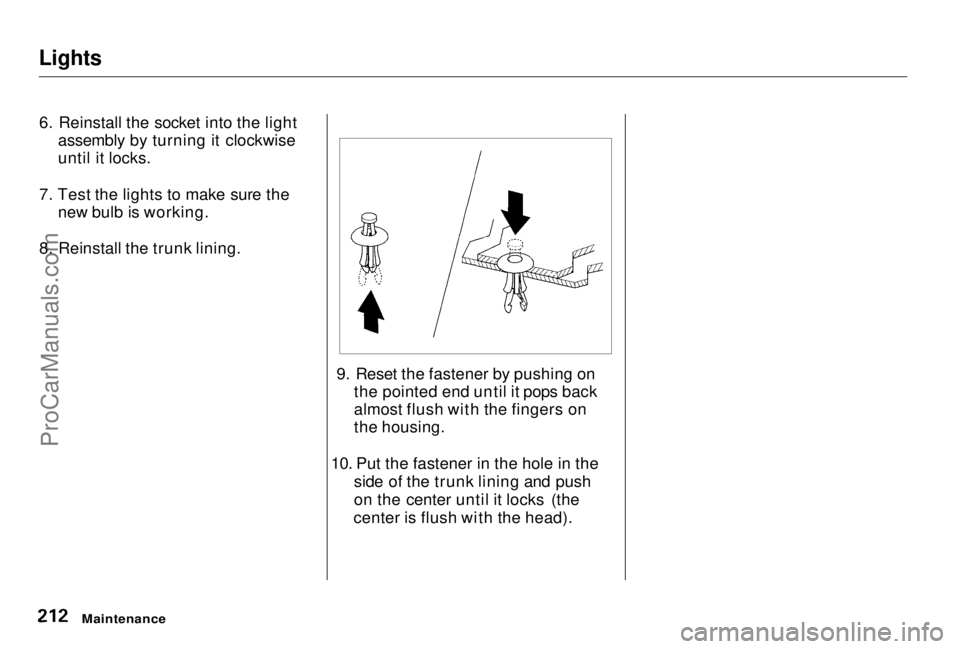
9. Reset the fastener by pushing onthe pointed end until it pops back
almost flush with the fingers on
the housing.
10. Put the fastener in the hole in the side of the trunk lining and push
on the center until it locks (the
center is flush with the head).
MaintenanceProCarManuals.comMain Menu Table of Contents s t