headlights HONDA RIDGELINE 2017 2.G Quick Guide
[x] Cancel search | Manufacturer: HONDA, Model Year: 2017, Model line: RIDGELINE, Model: HONDA RIDGELINE 2017 2.GPages: 85, PDF Size: 8.35 MB
Page 23 of 85
VEHICLE CONTROLS
38 || 39
V
EHICLE CONTROLS
Interior and Exterior Lights
Operate interior and exterior lights when the vehicle is on or off.
n
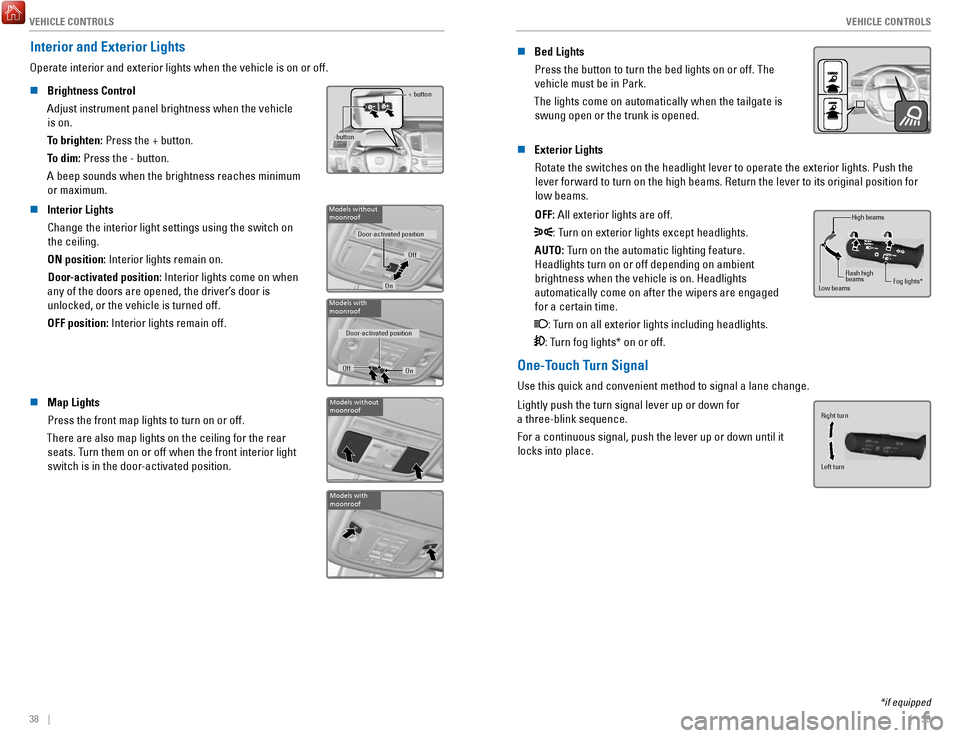
Brightness Control
Adjust instrument panel brightness when the vehicle is on.
To brighten: Press the + button.
To dim: Press the - button.
A beep sounds when the brightness reaches minimum or maximum.+ button
-button
n Interior Lights Change the interior light settings using the switch on the ceiling.
ON position: Interior lights remain on. Door-activated position: Interior lights come on when
any of the doors are opened, the driver’s door is unlocked, or the vehicle is turned off.
OFF position:
Interior lights remain off.Models without moonroof
Door-activated position
Off
On
Models with
moonroof
Door-activated position
Off On
n Map Lights
Press the front map lights to turn on or off.
There are also map lights on the ceiling for the rear seats. Turn them on or off when the front interior light
switch is in the door-activated position.Models without
moonroof
Models with
moonroof
n Bed Lights
Press the button to turn the bed lights on or off. The vehicle must be in Park.
The lights come on automatically when the tailgate is swung open or the trunk is opened.
n Exterior Lights
Rotate the switches on the headlight lever to operate the exterior light\
s. Push the lever forward to turn on the high beams. Return the lever to its origina\
l position for low beams.
OFF: All exterior lights are off.
: Turn on exterior lights except headlights.
AUTO: Turn on the automatic lighting feature. Headlights turn on or off depending on ambient brightness when the vehicle is on. Headlights
automatically come on after the wipers are engaged for a certain time.
: Turn on all exterior lights including headlights.
: Turn fog lights* on or off.
High beams
Low beams Flash high
beams
Fog lights*
One-Touch Turn Signal
Use this quick and convenient method to signal a lane change.
Lightly push the turn signal lever up or down for
a three-blink sequence.
For a continuous signal, push the lever up or down until it locks into place.
Right turn
Left turn
*if equipped
Page 24 of 85
VEHICLE CONTROLS
40 || 41
V
EHICLE CONTROLS
Auto High Beam System*
Automatically changes the low beam headlights to high beam headlights wh\
en
necessary.
n
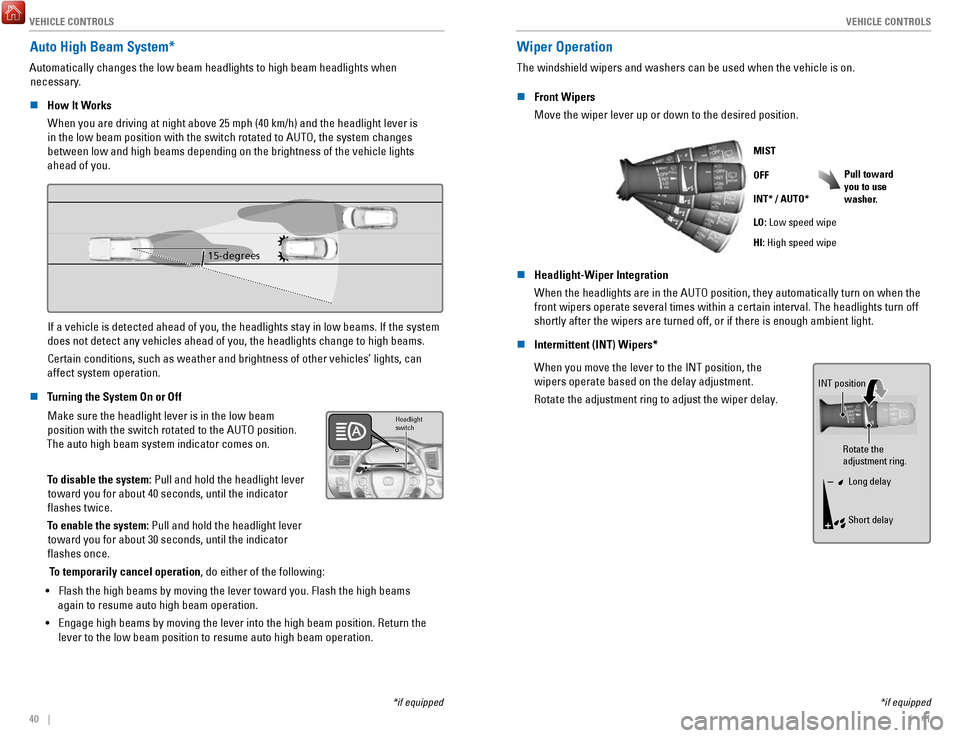
How It Works When you are driving at night above 25 mph (40 km/h) and the headlight\
lever is
in the low beam position with the switch rotated to AUTO, the system cha\
nges
between low and high beams depending on the brightness of the vehicle li\
ghts
ahead of you.
15-degrees
If a vehicle is detected ahead of you, the headlights stay in low beams.\
If the system does not detect any vehicles ahead of you, the headlights change to high\
beams.
Certain conditions, such as weather and brightness of other vehicles’\
lights, can
affect system operation.
n
Turning the System On or Off Make sure the headlight lever is in the low beam position with the switch rotated to the AUTO position.
The auto high beam system indicator comes on.
To disable the system: Pull and hold the headlight lever toward you for about 40 seconds, until the indicator
flashes twice.
To enable the system:
Pull and hold the headlight lever
toward you for about 30 seconds, until the indicator
flashes once.
Headlight
switch
To temporarily cancel operation, do either of the following:
•
Flash the high beams by moving the lever toward you. Flash the high beams
again to resume auto high beam operation.
•
Engage high beams by moving the lever into the high beam position. Retur\
n the
lever to the low beam position to resume auto high beam operation.
*if equipped
*if equipped
Wiper Operation
The windshield wipers and washers can be used when the vehicle is on.
n
Front Wipers
Move the wiper lever up or down to the desired position.
Pull toward
you to use
washer.
MIST
OFF
INT* / AUTO*
LO: Low speed wipe
HI: High speed wipe
n Headlight-Wiper Integration
When the headlights are in the AUTO position, they automatically turn on\
when the
front wipers operate several times within a certain interval. The headli\
ghts turn off
shortly after the wipers are turned off, or if there is enough ambient l\
ight.
n
Intermittent (INT) Wipers*
When you move the lever to the INT position, the
wipers operate based on the delay adjustment.
Rotate the adjustment ring to adjust the wiper delay.
Rotate the
adjustment ring.
Long delay
Short delay
INT position
Page 28 of 85
VEHICLE CONTROLS
48 || 49
V
EHICLE CONTROLS
Adjusting the Mirrors
Adjust the angle of the mirrors for the best visibility when you are sit\
ting in the correct
driving position.
n Rearview Mirror with Day/Night Positions*
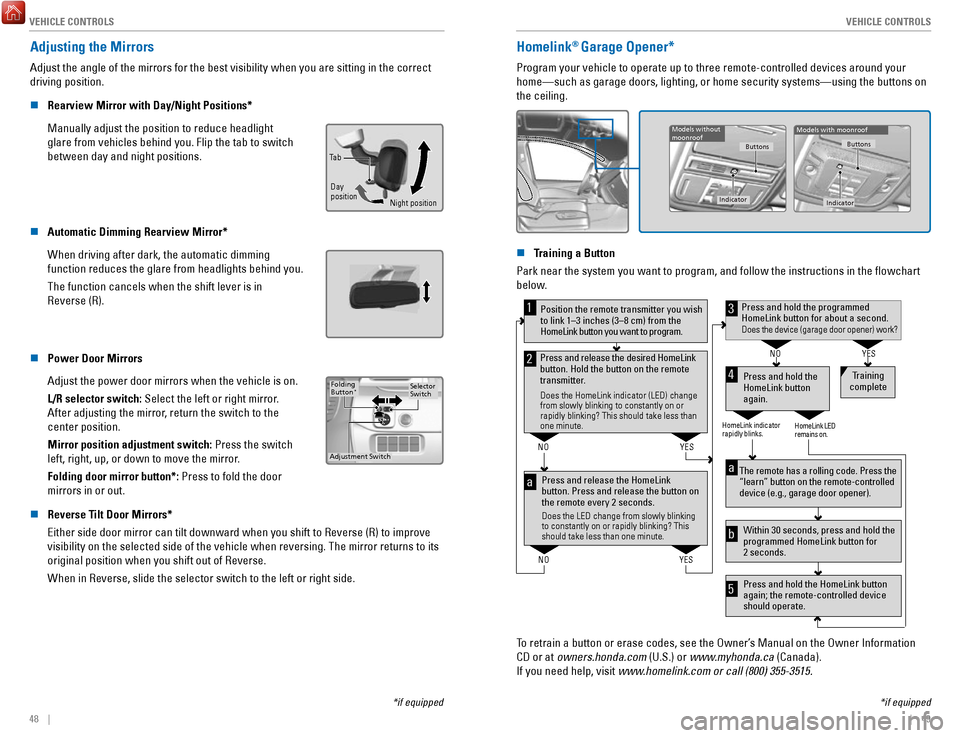
Manually adjust the position to reduce headlight
glare from vehicles behind you. Flip the tab to switch
between day and night positions.
n Automatic Dimming Rearview Mirror*
When driving after dark, the automatic dimming
function reduces the glare from headlights behind you.
The function cancels when the shift lever is in
Reverse (R).
n Power Door Mirrors
Adjust the power door mirrors when the vehicle is on.
L/R selector switch: Select the left or right mirror.
After adjusting the mirror, return the switch to the
center position.
Mirror position adjustment switch: Press the switch
left, right, up, or down to move the mirror
.
Folding door mirror button*: Press to fold the door
mirrors in or out.
SwitchSelector
Adjustment Switch
Folding
Button*
n Reverse Tilt Door Mirrors*
Either side door mirror can tilt downward when you shift to Reverse (R)\
to improve
visibility on the selected side of the vehicle when reversing. The mirro\
r returns to its
original position when you shift out of Reverse.
When in Reverse, slide the selector switch to the left or right side.
Homelink® Garage Opener*
Program your vehicle to operate up to three remote-controlled devices ar\
ound your
home—such as garage doors, lighting, or home security systems—usin\
g the buttons on
the ceiling.
Models without
moonroof
Buttons
Indicator
Models with moonroof
Buttons
Indicator
n Training a Button
Park near the system you want to program, and follow the instructions in\
the flowchart below.
Press and release the HomeLink
button. Press and release the button on
the remote every 2 seconds.
Does the LED change from slowly blinking
to constantly on or rapidly blinking? This
should take less than one minute.
Press and hold the
HomeLink button
again. Training
complete
YES
NO
HomeLink indicator
rapidly blinks. HomeLink LED
remains on.
YES
NO
YES
NO
Position the remote transmitter you wish
to link 1–3 inches (3–8 cm) from the
HomeLink button you want to program.1
Press and release the desired HomeLink
button. Hold the button on the remote
transmitter.
Does the HomeLink indicator (LED) change
from slowly blinking to constantly on or
rapidly blinking? This should take less than
one minute.
2
aThe remote has a rolling code. Press the
“learn” button on the remote-controlled
device (e.g., garage door opener) .
Press and hold the HomeLink button
again; the remote-controlled device
should operate. Within 30 seconds, press and hold the
programmed HomeLink button for
2 seconds.a
Press and hold the programmed
HomeLink button for about a second.
Does the device (garage door opener) work?
3
b
4
5
To retrain a button or erase codes, see the Owner’s Manual on the Owner Information
CD or at owners.honda.com (U.S.) or www.myhonda.ca (Canada).
If you need help, visit www.homelink.com or call (800) 355-3515.
*if equipped *if equipped
Night position
Ta b
Day
position
Page 81 of 85
SPECIFICATIONS
154 || 155
S
PECIFICATIONS
SPECIFICATIONS
*if equipped
�
* *
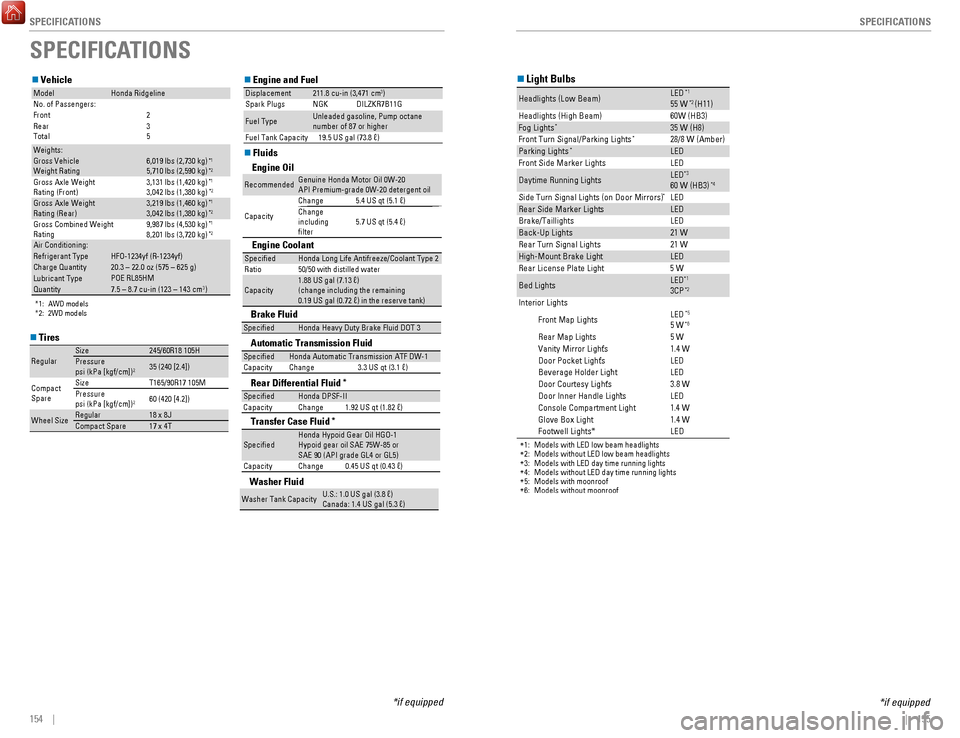
Vehicle
2: 2WD models
1: AWD models
ModelHonda Ridgeline
Front No. of Passengers: 2
Rear 3
6,019 lbs (2,730 kg)*25,710 lbs (2,590 kg)*1
3,131 lbs (1,420 kg)*13,042 lbs (1,380 kg)*2
3,219 lbs (1,460 kg)*13,042 lbs (1,380 kg)*2
9,987 lbs (4,530 kg)*18,201 lbs (3,720 kg)*2
Air Conditioning:
Weights:
Gross Vehicle
Weight Rating
Gross Axle Weight
Rating (Front)
Gross Axle Weight
Rating (Rear)
Gross Combined Weight
Rating
Refrigerant TypeCharge Quantit yLubricant TypeQuantity
�
�
HFO-1234yf (R-1234yf )
20.3 – 22.0 oz (575 – 625 g)
POE RL85HM
7.5 – 8.7 cu-in (123 – 143 cm
3)
Engine and Fuel
Fluids
Displacemen t211.8 cu-in (3,471 cm3)
Spark Plugs NGKDILZKR7B11GUnleaded gasoline, Pump octane
Fuel Type
Washer Tank Capacity
number of 87 or higher
Fuel Tank Capacity 19.5 US gal (73.8 �)
�
U.S.: 1.0 US gal (3.8 �)
Canada: 1.4 US gal (5.3 �)
Light Bulbs
*
*1: Models with LED low beam headlights
* 2: Models without LED low beam headlights
* 3: Models with LED day time running lights
*
* 4: Models without LED day time running lights
5: Models with moonroof
6: Models without moonroof
Headlights (L
ow Beam) LE
D*155 W*2 (H11)
60W (HB3 )
35 W (H8)
28/8 W (Amber)
LE D
LE D
LE D
*3Daytime Running Lights
60 W (HB3)*4
Headlights (High Beam)
Fog Lights*
Front Turn Signal/Parking Light s*
Parking Lights*
Front Side Marker Lights
LED
LE D
LE D
21 W
21 W
LE D
5 W
Bed Lights LE
D
*13C P*2
Front Map Lights LE
D*55 W*6
In teri or Lights
5 W
1.4 W
LE D
Side Turn Signal Lights (on Door Mirrors)
*
Rear Side Marker Light
s
Brake/Taillights
Back-Up Lights
Rear Turn Signal Lights
High-M ount Brake Ligh t
Rear License Plate Ligh t
LED
3.8 W
LE D
1.4 W
1.4 W
Rear Map Lights
Vanity Mirror Lights
*
Door Pocket Lights*
Beverage Holder Light*
Door Courtesy Light
s*
Door Inner Handle Light s*
Console Compartment Light
Glove Box Light
Engine Oil
Recommende d·
Engine Coolan
t
·
Genuine Honda Motor Oil 0W-20
Change
Capacity API Premium-grade 0W-20 detergent oi
l
5.4 US qt (5.1 �)
Change
�lter including
5.7 US qt (5.4 �)
Speci�e d
Ratio
Capacity
Honda Long Life Antifreeze/Coolant Type 2
50/50 with distilled wate r
1.88 US gal (7.13 �)
(change including the remaining
0.19 US gal (0.72 �) in the reserve tank )
Brake Fluid
Automatic Transmission Fluid
Rear Differential Fluid*
Transfer Case Fluid*
Speci�edHonda Heavy Duty Brake Fluid DOT 3
Speci�ed
CapacityHonda Automatic Transmission ATF DW- 1
Chang e3 .3 US qt (3.1 �)
Speci�ed Honda DPSF-II
Capacit yC hange
1.92 US qt (1.82 �)
·
Speci�e d· Honda Hypoid Gear Oil HGO-1
SAE 90 (API grade GL4 or GL5)
Capacit y Hypoid gear oil SAE 75W-85 or
Change
0.45 US qt (0.43 �)
Washer Flui d
�Tires
RegularSize245/60R18 105 H
Pressure
35 (240 [2.4])
psi (kPa [kgf/cm2])
Spar e
Compact
Size
T165/90R17 105M
Pressure 60 (420 [4.2])
psi (kPa [kgf/cm2])
Wheel SizeRegular18 x 8J17 x 4TCompact Spare
Total5
LED
Footwell Lights*
*if equipped
�
* *
Vehicle
2: 2WD models
1: AWD models
Model Honda Ridgeline
Front No. of Passengers: 2
Rear 3
6,019 lbs (2,730 kg)
*25,710 lbs (2,590 kg)*1
3,131 lbs (1,420 kg)*1
3,042 lbs (1,380 kg)*2
3,219 lbs (1,460 kg)*1
3,042 lbs (1,380 kg)*2
9,987 lbs (4,530 kg)*1
8,201 lbs (3,720 kg)*2
Air Conditioning: Weights :
Gross Vehicle
Weight Rating
Gross Axle Weight
Rating (Front)
Gross Axle Weight
Rating (Rear)
Gross Combined Weight
Rating
Refrigerant Type
Charge Quantit y
Lubricant Type
Quantity
�
�
HFO-1234yf (R-1234yf )
20.3 – 22.0 oz (575 – 625 g)
POE RL85HM
7.5 – 8.7 cu-in (123 – 143 cm
3)
Engine and Fuel
Fluids
Displacemen t211.8 cu-in (3,471 cm3)
Spark Plugs NGK DILZKR7B11G
Unleaded gasoline, Pump octane
Fuel Type
Washer Tank Capacity number of 87
or higher
Fuel Tank Capacity 19.5 US gal (73.8 �)
�
U.S.: 1.0 US gal (3.8 �)
Canada: 1.4 US gal (5.3 �)
Light Bulbs
*
*1: Models with LED low beam headlights
* 2: Models without LED low beam headlights
* 3: Models with LED day time running lights
*
*
4: Models without LED day time running lights
5: Models with moonroof
6: Models without moonroof
Headlights (L ow Beam) LE
D*1
55 W*2 (H11)60W (HB3 )35 W (H8)28/8 W (Amber)LEDLEDLE D*3Daytime Running Lights
60 W (HB3)*4
Headlights (High Beam)
Fog Lights*
Front Turn Signal/Parking Light s*
Parking Lights*
Front Side Marker Lights
LEDLED
LE D
21 W21 WLED5 W
Bed LightsLE D*1
3C P*2
Front Map Lights LE
D*5
5 W*6
In teri or Lights
5 W
1.4 W
LE D
Side Turn Signal Lights (on Door Mirrors)
*
Rear Side Marker Light
s
Brake/Taillights
Back-Up Lights
Rear Turn Signal Lights
High-M ount Brake Ligh t
Rear License Plate Ligh t
LED
3.8 W
LE D
1.4 W
1.4 W
Rear Map Lights
Vanity Mirror Lights*
Door Pocket Lights*
Beverage Holder Light*
Door Courtesy Light s*
Door Inner Handle Light s*
Console Compartment Light
Glove Box Light
Engine Oil
Recommende d·
Engine Coolan
t
·
Genuine Honda Motor Oil 0W-20
Change
Capacity API Premium-grade 0W-20 detergent oi
l
5.4 US qt (5.1 �)
Change
�lter including 5.7 US qt (5.4 �)
Speci�e d
Ratio
Capacity Honda Long Life Antifreeze/Coolant Type
2
50/50 with distilled wate r
1.88 US gal (7.13 �)
(change including the remaining
0.19 US gal (0.72 �) in the reserve tank )
Brake Fluid
Automatic Transmission Fluid
Rear Differential Fluid
*
Transfer Case Flui d*
Speci�edHonda Heavy Duty Brake Fluid DOT 3
Speci�ed
Capacit yHonda Automatic Transmission ATF DW-
1
Chang e3 .3 US qt (3.1 �)
Speci�ed Honda DPSF-II
Capacit yC hange 1.92 US qt (1.82 �)
·
Speci�e d· Honda Hypoid Gear Oil HGO-1
SAE 90 (API grade GL4 or GL5)
Capacit y Hypoid gear oil SAE 75W-85 or
Change 0.45 US qt (0.43 �)
Washer Fluid
�
Tire s
Regular Size
245/60R18 105H
Pressure 35 (240 [2.4])
psi (kPa [kgf/cm2])
Spar e
Compact
Size
T165/90R17 105M
Pressure 60 (420 [4.2])
psi (kPa [kgf/cm
2])
Wheel Size Regular
18 x 8J
17 x 4T
Compact Spar e
Total5LED
Footwell Lights*
Page 84 of 85
VOICE COMMAND INDEX
160 || 161
INDEX
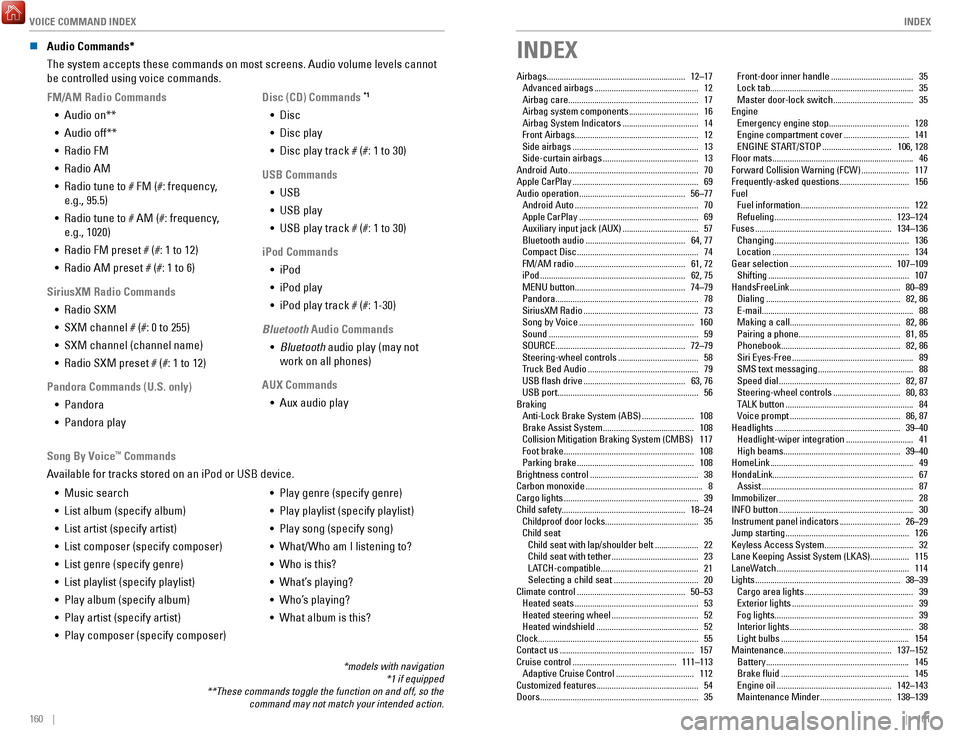
n Audio Commands*
The system accepts these commands on most screens. Audio volume levels c\
annot
be controlled using voice commands.
FM/AM Radio Commands •
Audio on**
•
Audio off**
•
Radio FM
•
Radio AM
•
Radio tune to # FM (#: frequency,
e.g., 95.5)
•
Radio tune to # AM (#: frequency,
e.g., 1020)
•
Radio FM preset # (#: 1 to 12)
•
Radio AM preset # (#: 1 to 6)
SiriusXM Radio Commands •
Radio SXM
•
SXM channel # (#: 0 to 255)
•
SXM channel (channel name)
•
Radio SXM preset # (#: 1 to 12)
Pandora Commands (U.S. only) •
Pandora
•
Pandora play Disc (CD) Commands
*1
• Disc
•
Disc play
•
Disc play track # (#: 1 to 30)
USB Commands •
USB
•
USB play
•
USB play track # (#: 1 to 30)
iPod Commands •
iPod
•
iPod play
•
iPod play track # (#: 1-30)
Bluetooth Audio Commands •
Bluetooth audio play (may not
work on all phones)
AUX Commands •
Aux audio play
•
Music search
•
List album (specify album)
•
List artist (specify artist)
•
List composer (specify composer)
•
List genre (specify genre)
•
List playlist (specify playlist)
•
Play album (specify album)
•
Play artist (specify artist)
•
Play composer (specify composer) •
Play genre (specify genre)
•
Play playlist (specify playlist)
•
Play song (specify song)
•
What/Who am I listening to?
•
Who is this?
•
What’s playing?
•
Who’s playing?
•
What album is this?
Song By Voice
™ Commands
Available for tracks stored on an iPod or USB device.
*models with navigation *1 if equipped
**These commands toggle the function on and off, so the command may not match your intended action.
INDEX
Airbags................................................................ 12–17Advanced airbags ................................................ 12
Airbag care ............................................................ 17
Airbag system components ................................ 16
Airbag System Indicators ................................... 14
Front Airbags ......................................................... 12
Side airbags .......................................................... 13
Side-curtain airbags ............................................ 13
Android Auto ............................................................ 70
Apple CarPlay .......................................................... 69
Audio operation ................................................. 56–77
Android Auto ......................................................... 70
Apple CarPlay ....................................................... 69
Auxiliary input jack (AUX) ................................... 57
Bluetooth audio .............................................. 64, 77
Compact Disc ........................................................ 74
FM/AM radio ................................................... 61, 72
iPod ................................................................... 62, 75
MENU button ................................................... 74–79
Pandora .................................................................. 78
SiriusXM Radio ..................................................... 73
Song by Voice ..................................................... 160
Sound ..................................................................... 59
SOURCE ............................................................ 72–79
Steering-wheel controls ..................................... 58
Truck Bed Audio ................................................... 79
USB flash drive ............................................... 63, 76
USB port ................................................................. 56
Braking Anti-Lock Brake System (ABS)
........................ 108
Brake Assist System .......................................... 108
Collision Mitigation Braking System (CMBS) 117
Foot brake ............................................................ 108
Parking brake ...................................................... 108
Brightness control .................................................. 38
Carbon monoxide ...................................................... 8
Cargo lights .............................................................. 39
Child safety......................................................... 18–24 Childproof door locks
........................................... 35
Child seat Child seat with lap/shoulder belt
.................... 22
Child seat with tether ........................................ 23
LATCH-compatible ............................................. 21
Selecting a child seat ....................................... 20
Climate control .................................................. 50–53
Heated seats ......................................................... 53
Heated steering wheel ........................................ 52
Heated windshield ............................................... 52
Clock........................................................................\
.. 55 Contact us
.............................................................. 157
Cruise control ................................................ 111–113
Adaptive Cruise Control .................................... 112
Customized features ............................................... 54
Doors ........................................................................\
. 35Front-door inner handle
......................................
35
Lock tab .................................................................. 35
Master door-lock switch ..................................... 35
Engine Emergency engine stop
..................................... 128
Engine compartment cover .............................. 141
ENGINE START/STOP ................................ 106, 128
Floor mats ................................................................. 46
Forward Collision Warning (FCW) ...................... 117
Frequently-asked questions ................................ 156
Fuel Fuel information
.................................................. 122
Refueling ...................................................... 123–124
Fuses ............................................................... 134–136
Changing .............................................................. 136
Location ............................................................... 134
Gear selection ............................................... 107–109
Shifting ................................................................. 107
HandsFreeLink ................................................... 80–89
Dialing .............................................................. 82, 86
E-mail ...................................................................... 88
Making a call ................................................... 82, 86
Pairing a phone ............................................... 81, 85
Phonebook ....................................................... 82, 86
Siri Eyes-Free ........................................................ 89
SMS text messaging ............................................ 88
Speed dial ........................................................ 82, 87
Steering-wheel controls ............................... 80, 83
TALK button ........................................................... 84
Voice prompt ................................................... 86, 87
Headlights .......................................................... 39–40
Headlight-wiper integration ............................... 41
High beams ...................................................... 39–40
HomeLink .................................................................. 49
HondaLink................................................................. 67 Assist
...................................................................... 87
Immobilizer ............................................................... 28
INFO button .............................................................. 30
Instrument panel indicators ............................ 26–29
Jump starting ......................................................... 126
Keyless Access System ......................................... 32
Lane Keeping Assist System (LKAS).................. 115
LaneWatch
............................................................. 114
Lights ................................................................... 38–39
Cargo area lights .................................................. 39
Exterior lights ........................................................ 39
Fog lights ................................................................ 39
Interior lights ......................................................... 38
Light bulbs ........................................................... 154
Maintenance.................................................. 137–152 Battery
.................................................................. 145
Brake fluid ........................................................... 145
Engine oil ..................................................... 142–143
Maintenance Minder ................................. 138–139