HONDA RIDGELINE 2020 Owner's Manual (in English)
Manufacturer: HONDA, Model Year: 2020, Model line: RIDGELINE, Model: HONDA RIDGELINE 2020Pages: 591, PDF Size: 32.88 MB
Page 411 of 591
409
uuWhen Driving uTire Pressure Monitoring System (TPMS) with Tire Fill Assist
Driving
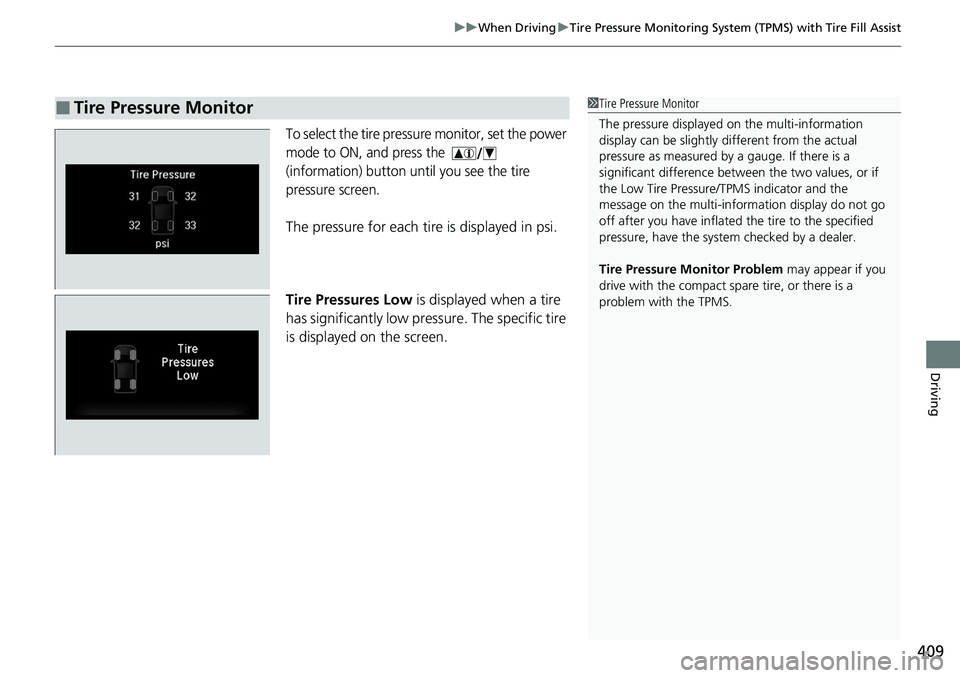
To select the tire pressure monitor, set the power
mode to ON, and press the
(information) button until you see the tire
pressure screen.
The pressure for each tire is displayed in psi.
Tire Pressures Low is displayed when a tire
has significantly low pressure. The specific tire
is displayed on the screen.
■Tire Pressure Monitor1 Tire Pressure Monitor
The pressure displayed on the multi-information
display can be slightly different from the actual
pressure as measured by a gauge. If there is a
significant di fference between the two values, or if
the Low Tire Pressure/TPMS indicator and the
message on the multi-inform ation display do not go
off after you have inflated the tire to the specified
pressure, have the system checked by a dealer.
Tire Pressure Monitor Problem may appear if you
drive with the compact spare tire, or there is a
problem with the TPMS.
Page 412 of 591
410
uuWhen Driving uTire Pressure Monitoring System (TPMS) - Required Federal Explanation
Driving
Tire Pressure Monitoring System (TPMS) - Required
Federal Explanation
Each tire, including the spare (i f provided), should be checked
monthly when cold and inflated to the inflation pressure
recommended by the vehicle manufacturer on the vehicle placard
or tire inflation pressure label.
(If your vehicle has tires of a different size than the size indicated
on the vehicle placard or tire infl ation pressure label, you should
determine the proper tire inflat ion pressure for those tires.)
As an added safety feature, your vehicle has been equipped with
a tire pressure monitoring system (TPMS) that illuminates a low
tire pressure telltale
when one or more of your tire s is significantly under-inflated.
Accordingly, when the low tire pr essure telltale illuminates, you
should stop and check your tires as soon as possible, and inflate
them to the proper pressure.
Driving on a significantly under-in flated tire causes the tire to
overheat and can lead to tire fail ure. Under-inflation also reduces
fuel efficiency and tire tread li fe, and may affect the vehicle’s
handling and stopping ability.
Page 413 of 591
411
uuWhen Driving uTire Pressure Monitoring System (TPMS) - Required Federal Explanation
Driving
Please note that the TPMS is not a substitute for proper tire
maintenance, and it is the driver ’s responsibility to maintain
correct tire pressure, even if un der-inflation has not reached the
level to trigger illumination of th e TPMS low tire pressure telltale.
Your vehicle has also been equi pped with a TPMS malfunction
indicator to indicate when the system is not operating properly.
The TPMS malfunction indicator is combined with the low tire
pressure telltale. When the syst em detects a malfunction, the
telltale will flash fo r approximately one minute and then remain
continuously illumina ted. This sequence will continue upon
subsequent vehicle start-ups as long as the malfunction exists.
When the malfunction indicator is illuminated, the system may
not be able to detect or signal low tire pressure as intended.
TPMS malfunctions may occur for a variety of reasons, including
the installation of replacement or alternate tires or wheels on the
vehicle that prevent the TPMS from functioning properly.
Always check the TPMS malfunction telltale after replacing one or
more tires or wheels on your vehicle to ensure that the
replacement or alternate tires and wheels allow the TPMS to
continue to function properly.
Page 414 of 591
412
uuWhen Driving uBlind spot information System*
Driving
Blind spot information System*
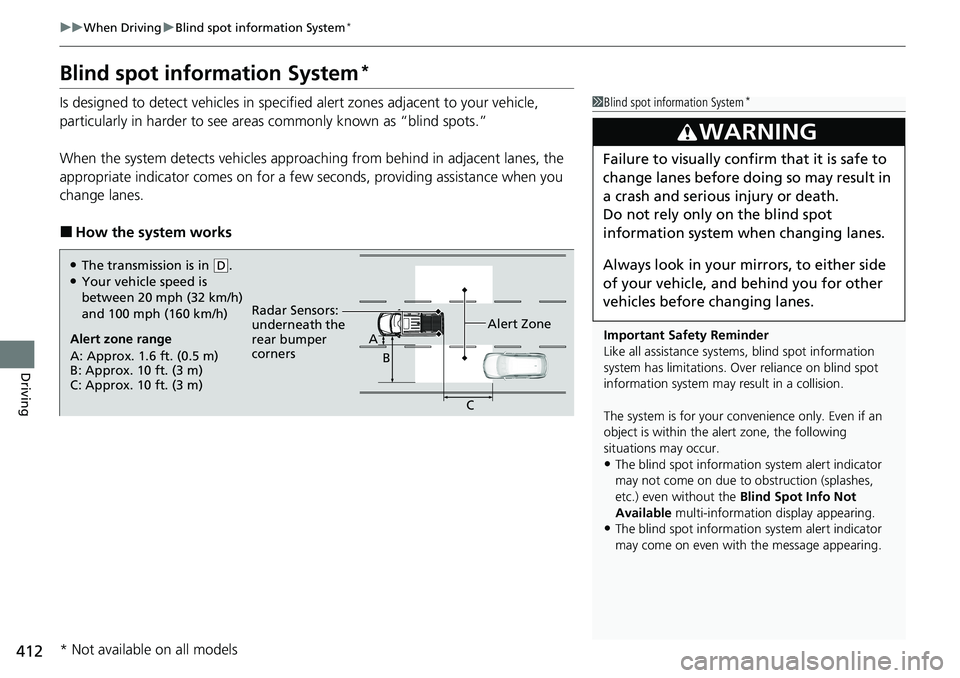
Is designed to detect vehicles in specified alert zones adjacent to your vehicle,
particularly in harder to see area s commonly known as “blind spots.”
When the system detects vehi cles approaching from behind in adjacent lanes, the
appropriate indicator comes on for a few seconds, providing assistance when you
change lanes.
■How the system works
1 Blind spot information System*
Important Safety Reminder
Like all assistance systems, blind spot information
system has limitations. Over reliance on blind spot
information system may result in a collision.
The system is for your convenience only. Even if an
object is within the alert zone, the following
situations may occur.
•The blind spot informatio n system alert indicator
may not come on due to obstruction (splashes,
etc.) even without the Blind Spot Info Not
Available multi-information display appearing.
•The blind spot informatio n system alert indicator
may come on even with the message appearing.
3WARNING
Failure to visually confirm that it is safe to
change lanes before doing so may result in
a crash and serious injury or death.
Do not rely only on the blind spot
information system wh en changing lanes.
Always look in your mi rrors, to either side
of your vehicle, and behind you for other
vehicles before changing lanes.
Alert zone range
A: Approx. 1.6 ft. (0.5 m)
B: Approx. 10 ft. (3 m)
C: Approx. 10 ft. (3 m) Radar Sensors:
underneath the
rear bumper
corners
Alert ZoneA
B
C
●The transmission is in (D.●Your vehicle speed is
between 20 mph (32 km/h)
and 100 mph (160 km/h)
* Not available on all models
Page 415 of 591
Continued413
uuWhen Driving uBlind spot information System*
Driving
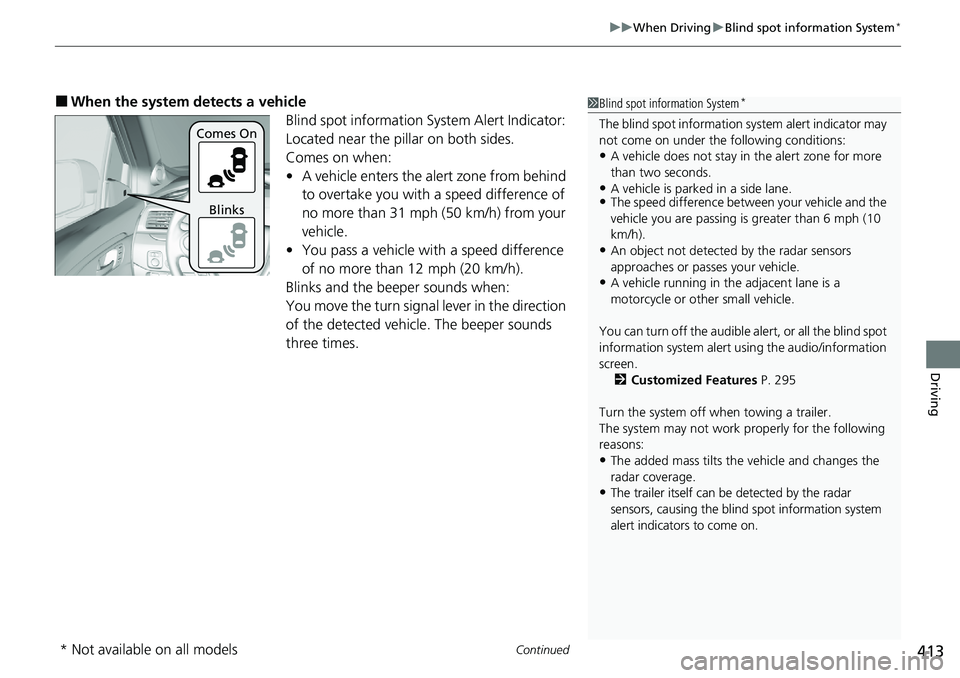
■When the system detects a vehicle
Blind spot information System Alert Indicator:
Located near the pillar on both sides.
Comes on when:
•A vehicle enters the alert zone from behind
to overtake you with a speed difference of
no more than 31 mph (50 km/h) from your
vehicle.
• You pass a vehicle with a speed difference
of no more than 12 mph (20 km/h).
Blinks and the beeper sounds when:
You move the turn signal lever in the direction
of the detected vehicle. The beeper sounds
three times.1 Blind spot information System*
The blind spot information system alert indicator may
not come on under the following conditions:
•A vehicle does not stay in the alert zone for more
than two seconds.
•A vehicle is parked in a side lane.•The speed difference betw een your vehicle and the
vehicle you are passing is greater than 6 mph (10
km/h).
•An object not detected by the radar sensors
approaches or passes your vehicle.
•A vehicle running in the adjacent lane is a
motorcycle or other small vehicle.
You can turn off the audible al ert, or all the blind spot
information system alert using the audio/information
screen. 2 Customized Features P. 295
Turn the system off when towing a trailer.
The system may not work properly for the following
reasons:
•The added mass tilts the vehicle and changes the
radar coverage.
•The trailer itself can be detected by the radar
sensors, causing the blind spot information system
alert indicators to come on.
Comes On
Blinks
* Not available on all models
Page 416 of 591
uuWhen Driving uBlind spot information System*
414
Driving
1Blind spot information System*
Blind spot information sy stem may be adversely
affected when:
•Objects (guard rails, poles, trees, etc,.) are
detected.
•An object that does not re flect radio waves well,
such as a motorcycle, is in the alert zone.
•Driving on a curved road.•A vehicle is moving from a far lane to the adjacent
lane.
•The system picks up external electrical interference.•The rear bumper or the sens ors have been improperly
repaired or the rear bu mper has been deformed.
•The orientation of the sensors has been changed.•In bad weather (Heavy rain, snow, and fog).
For a proper blind spot in formation system operation:
•Always keep the rear bumper corner area clean.
•Do not cover the rear bumper corner area with
labels or stickers of any kind.
•Take your vehicle to a dealer if you need the rear
bumper corner area or the radar sensors to be repaired,
or the rear bumper corner area is strongly impacted.
* Not available on all models
Page 417 of 591
415
uuWhen Driving uLaneWatchTM*
Continued
Driving
LaneWatchTM*
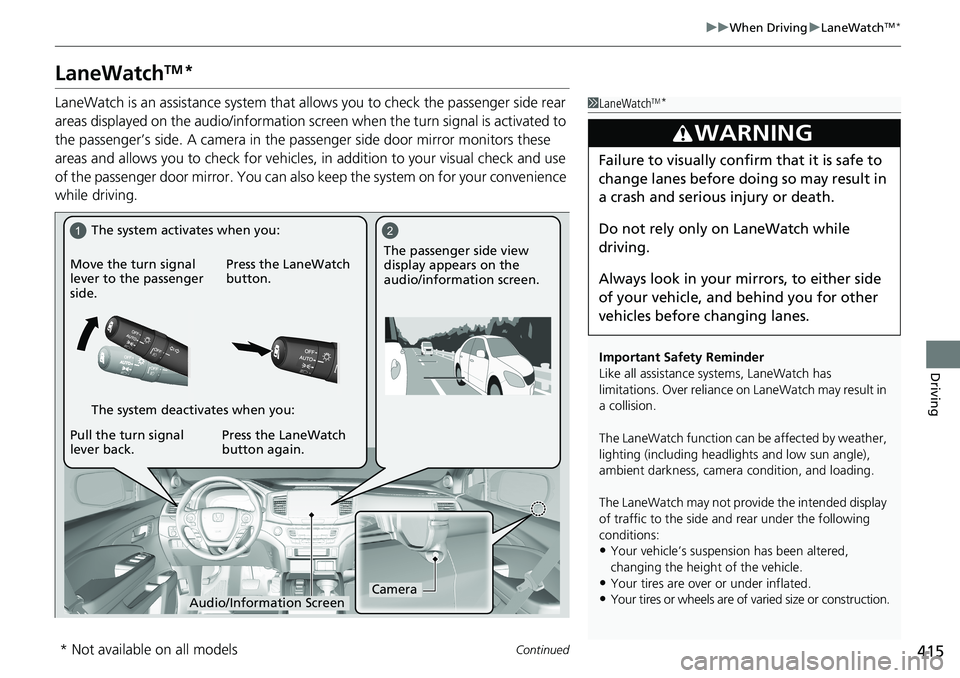
LaneWatch is an assistance system that al lows you to check the passenger side rear
areas displayed on the audio/information screen when the turn signal is activated to
the passenger’s side. A camera in the pa ssenger side door mirror monitors these
areas and allows you to check for vehicles, in addition to your visual check and use
of the passenger door mirror. You can also keep the system on for your convenience
while driving.1 LaneWatchTM*
Important Safety Reminder
Like all assistance systems, LaneWatch has
limitations. Over reliance on LaneWatch may result in
a collision.
The LaneWatch func tion can be affected by weather,
lighting (including headli ghts and low sun angle),
ambient darkness, camera condition, and loading.
The LaneWatch may not prov ide the intended display
of traffic to the side and rear under the following
conditions:
•Your vehicle’s suspension has been altered,
changing the height of the vehicle.
•Your tires are over or under inflated.
•Your tires or wheels are of varied size or construction.
3WARNING
Failure to visually confirm that it is safe to
change lanes before doing so may result in
a crash and serious injury or death.
Do not rely only on LaneWatch while
driving.
Always look in your mi rrors, to either side
of your vehicle, and behind you for other
vehicles before changing lanes.
12
CameraAudio/Information Screen
Move the turn signal
lever to the passenger
side.
Press the LaneWatch
button.
Pull the turn signal
lever back. Press the LaneWatch
button again. The passenger side view
display appears on the
audio/information screen.
The system activates when you:
The system deactivates when you:
* Not available on all models
Page 418 of 591
uuWhen Driving uLaneWatchTM*
416
Driving
■Customizing the LaneWatch settings
You can customize the following items using the audio/information screen.
• Show with Turn Signal : Selects whether LaneWatch monitor comes on when
you operate the turn signal lever.
• Display Time after Turn Signal Off : Changes the remaining LaneWatch display
time after you pull the turn signal lever back.
• Reference Line : Selects whether the reference lines appear on the LaneWatch
monitor.
• Display : Adjusts display settings.
2Customized Features P. 295
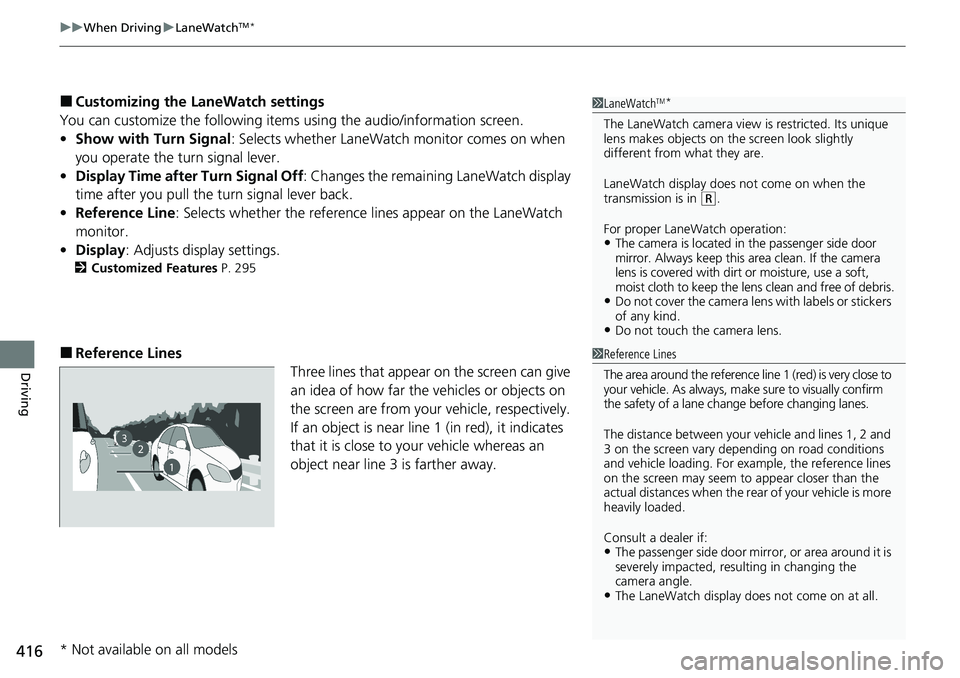
■Reference Lines
Three lines that appear on the screen can give
an idea of how far the vehicles or objects on
the screen are from your vehicle, respectively.
If an object is near line 1 (in red), it indicates
that it is close to your vehicle whereas an
object near line 3 is farther away.
1 LaneWatchTM*
The LaneWatch camera view is restricted. Its unique
lens makes objects on the screen look slightly
different from what they are.
LaneWatch display does not come on when the
transmission is in
( R.
For proper LaneWatch operation:
•The camera is located in the passenger side door
mirror. Always keep this area clean. If the camera
lens is covered with dirt or moisture, use a soft,
moist cloth to keep the lens clean and free of debris.
•Do not cover the camera lens with labels or stickers
of any kind.
•Do not touch the camera lens.
1Reference Lines
The area around the reference line 1 (red) is very close to
your vehicle. As always, m ake sure to visually confirm
the safety of a lane chan ge before changing lanes.
The distance betwee n your vehicle and lines 1, 2 and
3 on the screen vary depending on road conditions
and vehicle loading. For ex ample, the reference lines
on the screen may seem to appear closer than the
actual distances when the rear of your vehicle is more
heavily loaded.
Consult a dealer if:
•The passenger side door mirr or, or area around it is
severely impacted, resulting in changing the
camera angle.
•The LaneWatch display doe s not come on at all.
23
1
* Not available on all models
Page 419 of 591
417Continued
Driving
Honda Sensing®
Honda Sensing® is a driver support system which employs the use of two distinctly
different kinds of sensors: a radar sensor located behind the emblem and a front
sensor camera mounted to the interior side of the windshield, behind the rearview
mirror.
Honda Sensing ® has following functions.
■The functions which do not requir e switch operations to activate
• Collision Mitigation Braking SystemTM (CMBS)TM 2 P. 420
• Road Departure Mitigation (RDM) System 2 P. 454
■The functions wh ich require switch operations to activate
• Adaptive Cruise Control (ACC)
2 P. 432
• Lane Keeping Assist System (LKAS) 2 P. 445
Page 420 of 591
418
uuHonda Sensing ®u
Driving
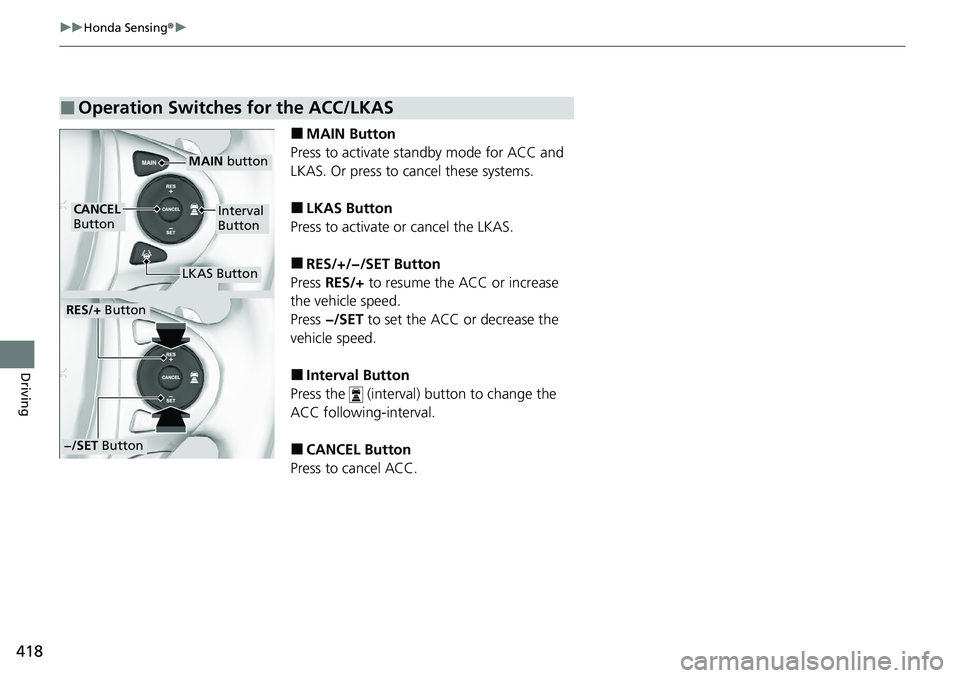
■MAIN Button
Press to activate standby mode for ACC and
LKAS. Or press to cancel these systems.
■LKAS Button
Press to activate or cancel the LKAS.
■RES/+/−/SET Button
Press RES/+ to resume the ACC or increase
the vehicle speed.
Press −/SET to set the ACC or decrease the
vehicle speed.
■Interval Button
Press the (interval) button to change the
ACC following-interval.
■CANCEL Button
Press to cancel ACC.
■Operation Switches for the ACC/LKAS
MAIN button
Interval
ButtonCANCEL
Button
LKAS Button
RES/+ Button
−/SET Button