headlight HONDA RIDGELINE 2021 (in English) User Guide
[x] Cancel search | Manufacturer: HONDA, Model Year: 2021, Model line: RIDGELINE, Model: HONDA RIDGELINE 2021Pages: 597, PDF Size: 12.5 MB
Page 156 of 597
Continued155
uuOperating the Switches Around the Steering Wheel uAuto High-Beam (High Beam Support System)
Controls
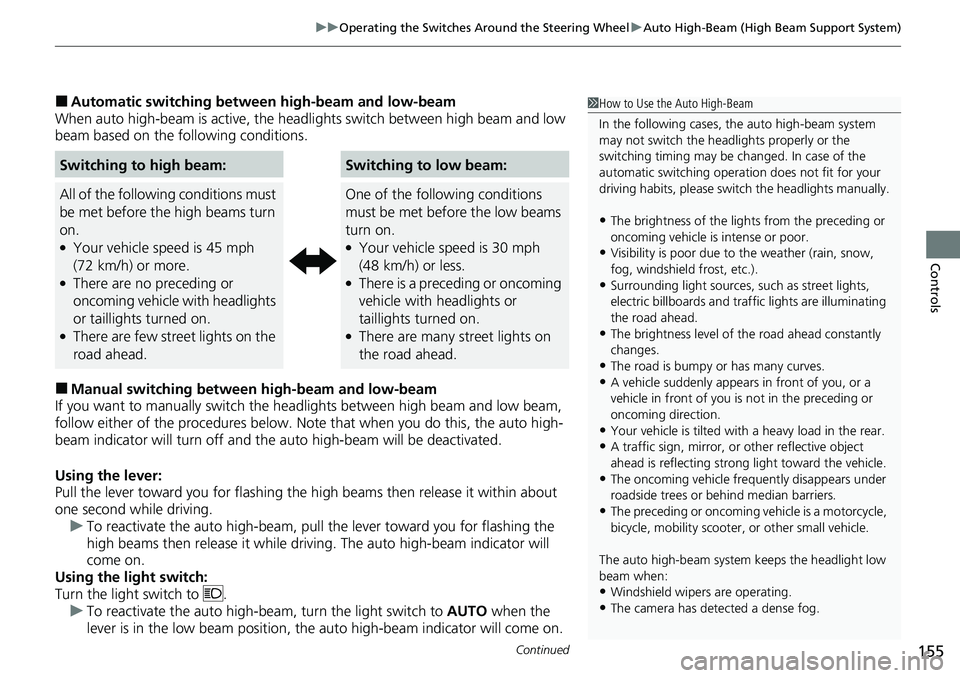
■Automatic switching between high-beam and low-beam
When auto high-beam is active, the head lights switch between high beam and low
beam based on the following conditions.
■Manual switching between high-beam and low-beam
If you want to manually switch the h eadlights between high beam and low beam,
follow either of the procedur es below. Note that when you do this, the auto high-
beam indicator will turn off and the auto high-beam will be deactivated.
Using the lever:
Pull the lever toward you for flashing the hi gh beams then release it within about
one second while driving. u To reactivate the auto hi gh-beam, pull the lever toward you for flashing the
high beams then release it while driv ing. The auto high-beam indicator will
come on.
Using the light switch:
Turn the light switch to . u To reactivate the au to high-beam, turn the light switch to AUTO when the
lever is in the low beam position, the auto high-beam indicator will come on.
Switching to high beam:Switching to low beam:
All of the following conditions must
be met before the high beams turn
on.
●Your vehicle speed is 45 mph
(72 km/h) or more.
●There are no preceding or
oncoming vehicle with headlights
or taillights turned on.
●There are few street lights on the
road ahead.
One of the following conditions
must be met before the low beams
turn on.
●Your vehicle speed is 30 mph
(48 km/h) or less.
●There is a preceding or oncoming
vehicle with headlights or
taillights turned on.
●There are many street lights on
the road ahead.
1How to Use the Auto High-Beam
In the following cases, th e auto high-beam system
may not switch the head lights properly or the
switching timing may be ch anged. In case of the
automatic switching operati on does not fit for your
driving habits, please swit ch the headlights manually.
•The brightness of the lights from the preceding or
oncoming vehicle is intense or poor.
•Visibility is poor due to the weather (rain, snow,
fog, windshield frost, etc.).
•Surrounding light sources, such as street lights,
electric billboards and traf fic lights are illuminating
the road ahead.
•The brightness level of th e road ahead constantly
changes.
•The road is bumpy or has many curves.•A vehicle suddenly appears in front of you, or a
vehicle in front of you is not in the preceding or
oncoming direction.
•Your vehicle is tilted with a heavy load in the rear.•A traffic sign, mirror, or other reflective object
ahead is reflecting strong light toward the vehicle.
•The oncoming vehicle freq uently disappears under
roadside trees or be hind median barriers.
•The preceding or oncoming vehicle is a motorcycle,
bicycle, mobility scooter, or other small vehicle.
The auto high-beam system keeps the headlight low
beam when:
•Windshield wipers are operating.
•The camera has dete cted a dense fog.
Page 165 of 597
164
Controls
Mirrors
Interior Rearview Mirror
Adjust the angle of the rearview mirror when you are sitting in the correct driving
position.
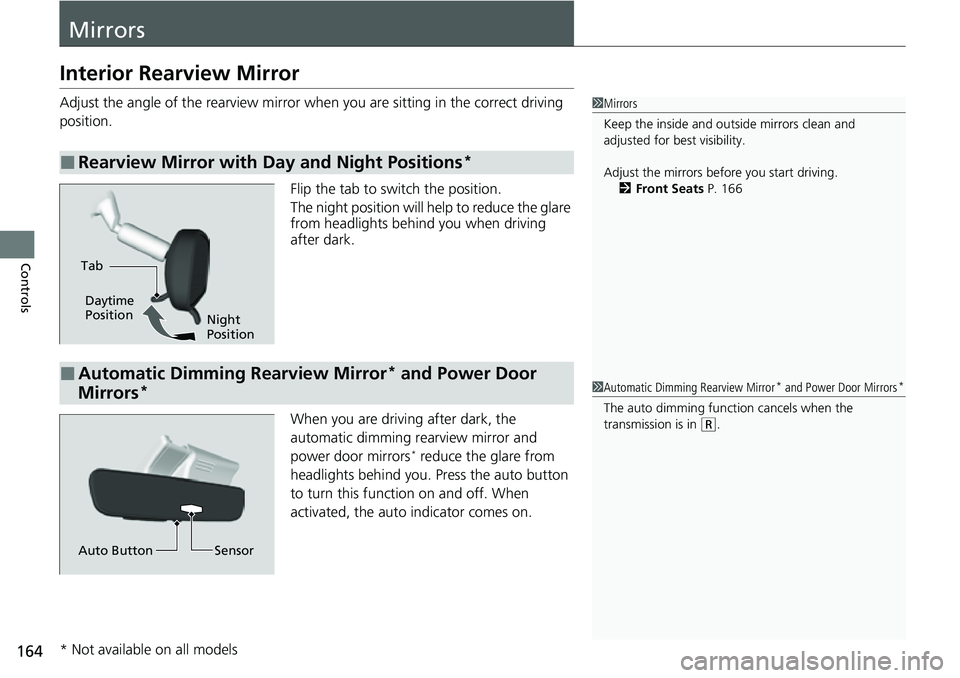
Flip the tab to switch the position.
The night position will help to reduce the glare
from headlights behind you when driving
after dark.
When you are driving after dark, the
automatic dimming rearview mirror and
power door mirrors
* reduce the glare from
headlights behind you. Press the auto button
to turn this function on and off. When
activated, the auto indicator comes on.
■Rearview Mirror with Day and Night Positions*
1 Mirrors
Keep the inside and out side mirrors clean and
adjusted for best visibility.
Adjust the mirrors before you start driving. 2 Front Seats P. 166
Tab
Daytime
Position
Night
Position
■Automatic Dimming Rearview Mirror* and Power Door
Mirrors*1 Automatic Dimming Rearview Mirror* and Power Door Mirrors*
The auto dimming function cancels when the
transmission is in
(R.
Sensor
Auto Button
* Not available on all models
Page 303 of 597
302
uuCustomized Features u
Features
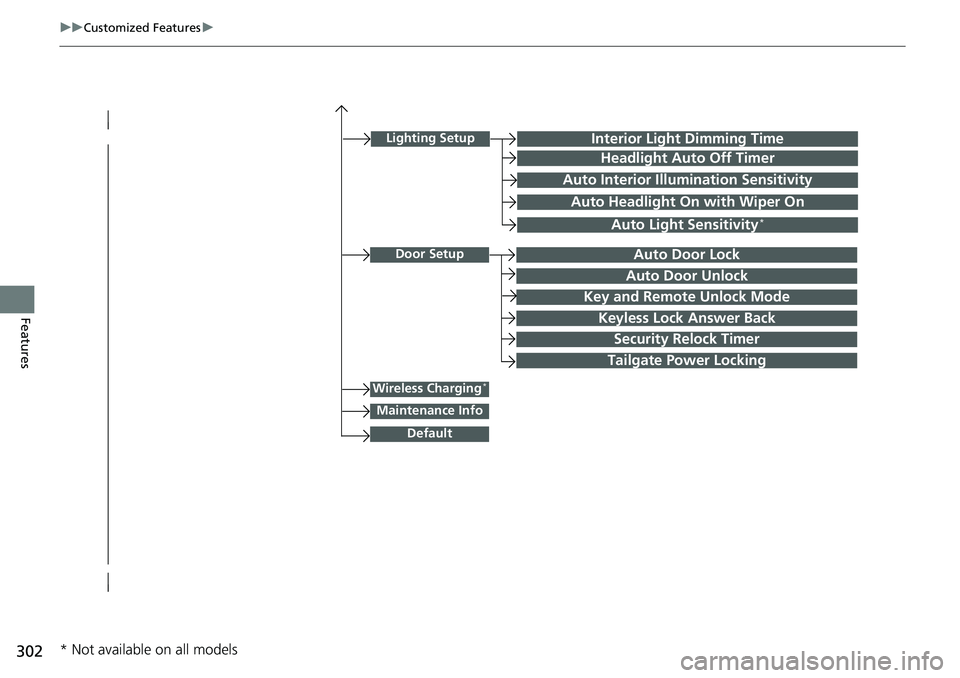
Lighting SetupInterior Light Dimming Time
Headlight Auto Off Timer
Auto Interior Illumination Sensitivity
Auto Headlight On with Wiper On
Auto Light Sensitivity*
Door SetupAuto Door Lock
Auto Door Unlock
Key and Remote Unlock Mode
Keyless Lock Answer Back
Security Relock Timer
Wireless Charging*
Default
Tailgate Power Locking
Maintenance Info
* Not available on all models
Page 315 of 597
314
uuCustomized Features u
Features
*1:Default SettingSetup
Group Customizable Features Descri
ption Selectable Settings
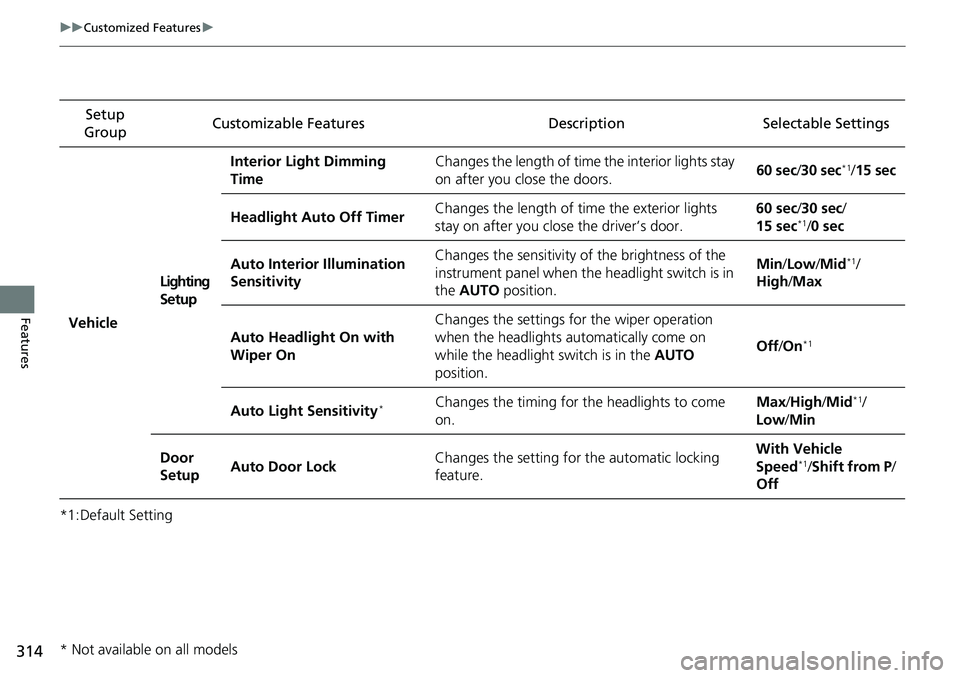
VehicleLighting
SetupInterior Light Dimming
Time
Changes the length of time
the interior lights stay
on after you close the doors. 60 sec
/30 sec
*1/ 15 sec
Headlight Auto Off Timer Changes the length of time the exterior lights
stay on after you close the driver’s door. 60 sec
/30 sec/
15 sec
*1/ 0 sec
Auto Interior Illumination
Sensitivity Changes the sensitivity of the brightness of the
instrument panel when the headlight switch is in
the
AUTO position. Min/
Low/Mid
*1/
High /Max
Auto Headlight On with
Wiper On Changes the settings fo
r the wiper operation
when the headlights automatically come on
while the headlight switch is in the AUTO
position. Off
/On
*1
Auto Light Sensitivity*Changes the timing for the headlights to come
on. Max
/High /Mid*1/
Low /Min
Door
Setup Auto Door Lock Changes the setting for the automatic locking
feature. With Vehicle
Speed
*1/
Shift from P/
Off
* Not available on all models
Page 366 of 597
Continued365
uuBefore Driving uDriving Preparation
Driving
• Store or secure all items on board properly.
u Carrying too much cargo, or improperly storing it, can affect your vehicle’s
handling, stability, sto pping distance, and tires, and make it unsafe.
2Maximum Load Limit P. 367
•Do not pile items higher than the seat height.
u They can block your view and may be thrown forward in the event of sudden
braking.
• Do not place anything in the front seat footwells. Make sure to secure the floor
mat.
u An object or unsecured floor mat can in terfere with your brake and accelerator
pedal operation while driving.
• If you have any animals on board, do not let them move around in the vehicle.
u They may interfere with driving and a crash could occur.
• Securely close and lock all doors.
2Locking/Unlocking the Doors from the Inside P. 127
•Adjust your seating position properly.
u Adjust the head restraint, too.
2Seats P. 166
2 Adjusting the front head restraint positions P. 171
•Adjust the mirrors and steering wheel properly.
u Adjust them while sitting in the proper driving position.
2 Adjusting the Steering Wheel P. 163
2 Mirrors P. 164
■Interior Checks1Interior Checks
The headlight aim is set by the factory, and does not
need to be adjusted. Howeve r, if you regularly carry
heavy items in the cargo area or tow a trailer, have
the aiming readjusted at a dealer or by a qualified
technician.
Page 432 of 597
431
uuHonda Sensing ®u Collision Mitigation Braking SystemTM (CMBSTM)
Continued
Driving
■Vehicle conditions
• Headlight lenses are dirty or the h eadlights are not properly adjusted.
• The outside of the windshield is blocked by dirt, mud, leaves, wet snow, etc.
• The inside of the windshield is fogged.
• An abnormal tire or wheel condition (wrong size, varied size or construction,
improperly inflated, co mpact spare tire, etc.).
• When tire chains are installed.
• The vehicle is tilted due to a heavy load or suspension modifications.
• The camera temperature gets too high.
• Driving with the parking brake applied.
• When the radar sensor behind the emblem gets dirty.
• The vehicle is towing a trailer.
Page 460 of 597
459
uuHonda Sensing ®u Lane Keeping Assist System (LKAS)
Driving
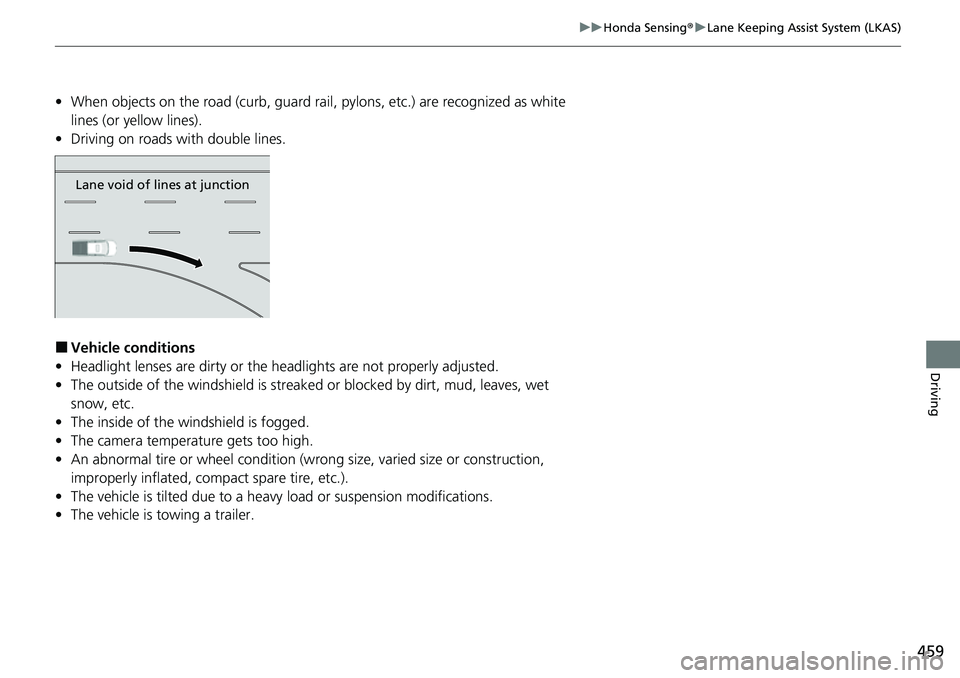
• When objects on the road (curb, guard rail, pylons, etc.) are recognized as white
lines (or yellow lines).
• Driving on roads with double lines.
■Vehicle conditions
• Headlight lenses are dirty or the h eadlights are not properly adjusted.
• The outside of the windshield is streaked or blocked by dirt, mud, leaves, wet
snow, etc.
• The inside of the windshield is fogged.
• The camera temperature gets too high.
• An abnormal tire or wheel condition (wrong size, varied size or construction,
improperly inflated, co mpact spare tire, etc.).
• The vehicle is tilted due to a heavy load or suspension modifications.
• The vehicle is towing a trailer.
Lane void of lines at junction
Page 465 of 597
464
uuHonda Sensing ®u Road Departure Mitigation System
Driving
■Roadway conditions
• Driving on a snowy or wet roadway (obs cured lane marking, vehicle tracks,
reflected lights, road spray, high contrast).
• Driving on a road with temporary lane markings.
• Faint, multiple, or varied lane markings are visible on the roadway due to road
repairs or old lane markings.
• The roadway has merging, split, or crossing lines (e.g., such as at an intersection
or crosswalk).
• The lane markings are extremely narrow, wide, or changing.
• The vehicle in front of you is driving near the lane lines.
• The road is hilly or the vehicle is approaching the crest of a hill.
• Driving on rough or unpaved roads, or over bumpy surfaces.
• When objects on the road (curb, guard rail, pylons, etc.) are recognized as white
lines (or yellow lines).
• Driving on roads with double lines.
■Vehicle conditions
• Headlight lenses are dirty or the headlights are not properly adjusted.
• The outside of the windshield is streake d or blocked by dirt, mud, leaves, wet
snow, etc.
• The inside of the windshield is fogged.
• The camera temperature gets too high.
• An abnormal tire or wheel condition (wrong size, varied size or construction,
improperly inflated, comp act spare tire, etc.).
• The vehicle is tilted due to a heav y load or suspension modifications.
• When tire chains are installed.
• The vehicle is towing a trailer.
Page 509 of 597
508
Maintenance
Replacing Light Bulbs
Headlight Bulbs
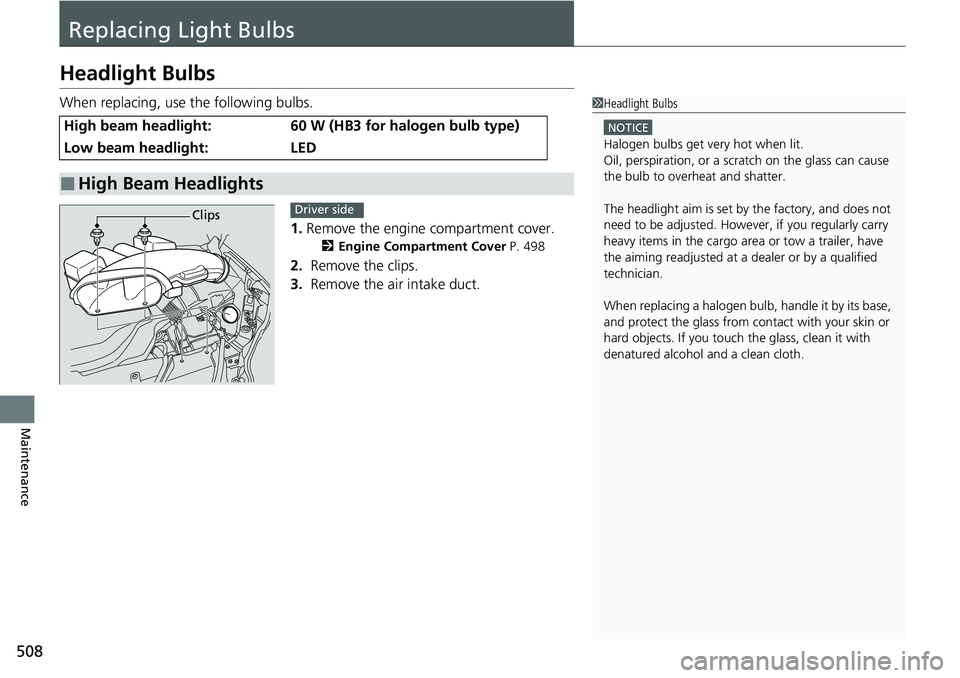
When replacing, use the following bulbs.1.Remove the engine compartment cover.
2 Engine Compartment Cover P. 498
2. Remove the clips.
3. Remove the air intake duct.
High beam headlight:60 W (HB3 for halogen bulb type)
Low beam headlight:LED
■High Beam Headlights
1Headlight Bulbs
NOTICE
Halogen bulbs get very hot when lit.
Oil, perspiration, or a scratch on the glass can cause
the bulb to overhe at and shatter.
The headlight aim is set by the factory, and does not
need to be adjusted. Howeve r, if you regularly carry
heavy items in the cargo area or tow a trailer, have
the aiming readjusted at a dealer or by a qualified
technician.
When replacing a halogen bu lb, handle it by its base,
and protect the glass from c ontact with your skin or
hard objects. If you touch the glass, clean it with
denatured alcohol and a clean cloth.
ClipsDriver side
Page 510 of 597
509
uuReplacing Light Bulbs uHeadlight Bulbs
Maintenance
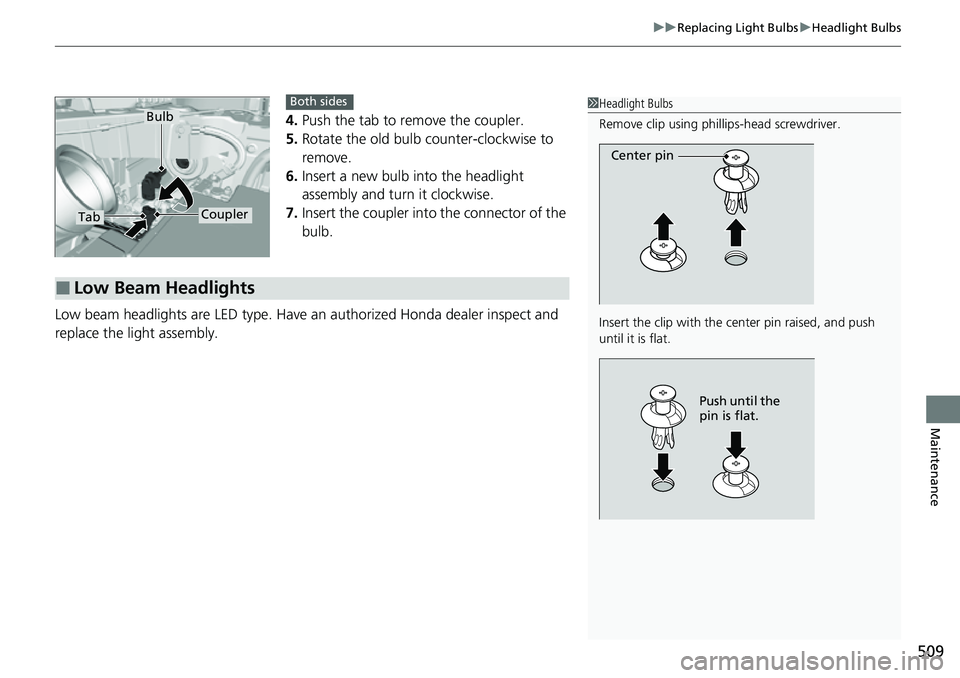
4. Push the tab to remove the coupler.
5. Rotate the old bulb counter-clockwise to
remove.
6. Insert a new bulb into the headlight
assembly and turn it clockwise.
7. Insert the coupler into the connector of the
bulb.
Low beam headlights are LED type. Have an authorized Honda dealer inspect and
replace the light assembly.
1 Headlight Bulbs
Remove clip using phill ips-head screwdriver.
Insert the clip with the center pin raised, and push
until it is flat.
Center pin
Push until the
pin is flat.
TabCoupler
BulbBoth sides
■Low Beam Headlights