turn signal HUMMER H2 2009 User Guide
[x] Cancel search | Manufacturer: HUMMER, Model Year: 2009, Model line: H2, Model: HUMMER H2 2009Pages: 524, PDF Size: 3.1 MB
Page 219 of 524
TRACTION CONTROL OFF
This message displays when you turn off the Traction
Control System (TCS) or when the TCS has been
automatically disabled. Adjust your driving accordingly.
SeeTraction Control System (TCS) on page 4-9
andStabiliTrak
®System on page 4-6for more
information.
TCS may be automatically disabled due to overheating,
which could occur if the TCS activates continuously
for an extended period of time.
TRANSMISSION HOT IDLE ENGINE
Notice:If you drive your vehicle while the
transmission uid is overheating and the
transmission temperature warning is displayed
on the instrument panel cluster and/or DIC, you
can damage the transmission. This could lead to
costly repairs that would not be covered by your
warranty. Do not drive your vehicle with overheated
transmission uid or while the transmission
temperature warning is displayed.This message displays along with a continuous chime
if the transmission uid in the vehicle gets hot. Driving
with the transmission uid temperature high can cause
damage to the vehicle. Stop the vehicle and let it idle to
allow the transmission to cool. This message clears and
the chime stops when the uid temperature reaches a
safe level.
TURN SIGNAL ON
This message displays and a chime sounds if a turn
signal is left on for 3/4 of a mile (1.2 km). Move the turn
signal/multifunction lever to the off position.
WASHER FLUID LOW ADD FLUID
This message displays when the windshield washer uid
is low. Fill the windshield washer uid reservoir as soon
as possible. SeeEngine Compartment Overview on
page 5-14for the location of the windshield washer
uid reservoir. Also, seeWindshield Washer Fluid
on page 5-37for more information.
3-63
Page 234 of 524
Noise Compensated Technology (Radio with CD and
DVD):Radio’s with a Bose®Audio System include Bose
AudioPilot®noise compensation technology. When
turned ON, AudioPilot®continuously adjusts the audio
system equalization, to compensate for background
noise, so that the music always sounds the same at the
set volume level.
This feature is most effective at lower radio volume
settings where background noise can affect how well
the music is heard. At higher volume settings, where the
music is much louder than the background noise, there
might be little or no adjustments by AudioPilot
®.
To activate AudioPilot
®:
1. Set the radio volume to the desired level.
2. Press the MENU button to display the radio
setup menu.
3. Press the pushbutton under the AUTO VOLUM
label on the radio display.
4. Press the pushbutton under the ON label. The
display times out after approximately 10 seconds.
For additional information on AudioPilot
®, please visit
bose.com/audiopilot.
Finding a Station
BAND:Press this button to switch between AM, FM, or
XM (if equipped). The selection displays.
f(Tune):Turn this knob to select radio stations.
©SEEK¨:Press either SEEK arrow to go to the
previous or to the next station and stay there.
To scan stations, press and hold either SEEK arrow for
a few seconds until a beep sounds. The radio goes to a
station, plays for a few seconds, then goes to the next
station. Press either SEEK arrow again to stop scanning.
The radio only seeks and scans stations with a strong
signal that are in the selected band.
4(Information) (XM Satellite Radio Service, MP3,
and RDS Features):Press to switch the display
between the radio station frequency and the time. When
the ignition is in the OFF position, press
4to display the
time. For vehicles with XM, MP3, WMA or RDS features,
press
4to display additional text information related to the
current FM-RDS or XM station; or CD, MP3 or WMA
song. If information is available during XM, CD, MP3 or
WMA playback, the song title information displays on
the top line of the display and artist information displays
on the bottom line. When information is not available,
“NO INFO” displays.
3-78
Page 236 of 524
Setting the Tone
(Bass/Midrange/Treble)
BASS/MID/TREB (Bass, Midrange, or Treble):To
adjust bass, midrange, or treble, press the
fknob until
the tone control labels display. Continue pressing to
highlight the desired label, or press the pushbutton
positioned under the desired label. Turn the
fknob
clockwise or counterclockwise to adjust the highlighted
setting, or adjust the highlighted setting by pressing either
SEEK arrow,
\FWD (forward), orsREV (reverse)
button until the desired levels are obtained. If a station’s
frequency is weak or if there is static, decrease the treble.
To quickly adjust bass, midrange, or treble to the middle
position, press the pushbutton positioned under the
BASS, MID, or TREB label for more than two seconds.
A beep sounds and the level adjusts to the middle
position.
To quickly adjust all tone and speaker controls to
the middle position, press the
fknob for more than
two seconds.EQ (Equalization) (Radio with Six-Disc CD Player):
Press this button to choose bass and treble equalization
settings designed for different types of music. Selecting
MANUAL or changing bass or treble, returns the EQ
to the manual bass and treble settings.
EQ (Equalization) (Radio with CD and DVD):Press
to change Digital Signal Processing (DSP) settings
(Bose
®sound systems only). DSP settings provide
a choice of different listening experiences.
The following DSP settings are available:
Normal— Select this setting to adjust the audio for
normal mode. This provides the best sound quality
for all seating positions.
Driver— Select this setting to adjust the audio for
the driver to receive the best possible sound quality.
Rear— Select this setting to adjust the audio for the
rear seat passengers to receive the best possible
sound quality.
Surround (Centerpoint®)— Select this setting to
enable Bose Centerpoint®. Centerpoint®signal
processing circuitry produces a surround sound
listening experience from a CD or XM stereo digital
audio source. Centerpoint
®delivers ve independent
audio channels from conventional two channel stereo
recordings. (Not available for AM, FM.)
3-80
Page 261 of 524

DVD/CD AUX (Auxiliary):Press this button to cycle
through DVD, CD, or Auxiliary when listening to the radio.
The DVD/CD text label and a message showing track or
chapter number displays when a disc is in either slot.
Press this button again and the system automatically
searches for an auxiliary input device, such as a portable
audio player. If a portable audio player is not connected,
“No Aux Input Device” displays. If a disc is in both the
DVD slot and the CD slot the DVD/CD AUX button cycles
between the two sources and not indicate “No Aux Input
Device”. If a front auxiliary device is connected, the
DVD/CD AUX button cycles through all available options,
such as: DVD slot, CD slot, Front Auxiliary, and Rear
Auxiliary (if available). See “Using the Auxiliary Input
Jack(s)” earlier in this section, or “Audio/Video (A/V)
Jacks” under,Rear Seat Entertainment (RSE) System
on page 3-118for more information.
If a MP3/WMA is inserted into top DVD slot, the rear seat
operator can turn on the video screen and use the remote
control to navigate the CD (tracks only) through the
remote control.XM Radio Messages
XL (Explicit Language Channels):These channels,
or any others, can be blocked at a customer’s request,
by calling 1-800-852-XMXM (9696).
XM Updating:The encryption code in the receiver is
being updated, and no action is required. This process
should take no longer than 30 seconds.
No XM Signal:The system is functioning correctly, but
the vehicle is in a location that is blocking the XM™
signal. When the vehicle is moved into an open area,
the signal should return.
Loading XM:The audio system is acquiring and
processing audio and text data. No action is needed.
This message should disappear shortly.
Channel Off Air:This channel is not currently in
service. Tune in to another channel.
Channel Unauth:This channel is blocked or cannot be
received with your XM Subscription package.
3-105
Page 275 of 524
Headphones
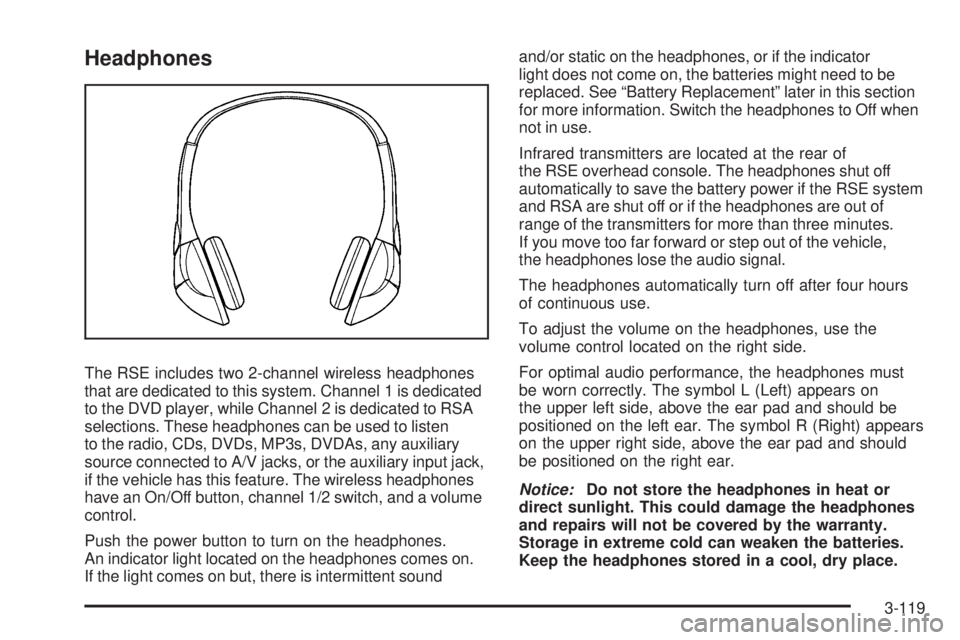
The RSE includes two 2-channel wireless headphones
that are dedicated to this system. Channel 1 is dedicated
to the DVD player, while Channel 2 is dedicated to RSA
selections. These headphones can be used to listen
to the radio, CDs, DVDs, MP3s, DVDAs, any auxiliary
source connected to A/V jacks, or the auxiliary input jack,
if the vehicle has this feature. The wireless headphones
have an On/Off button, channel 1/2 switch, and a volume
control.
Push the power button to turn on the headphones.
An indicator light located on the headphones comes on.
If the light comes on but, there is intermittent soundand/or static on the headphones, or if the indicator
light does not come on, the batteries might need to be
replaced. See “Battery Replacement” later in this section
for more information. Switch the headphones to Off when
not in use.
Infrared transmitters are located at the rear of
the RSE overhead console. The headphones shut off
automatically to save the battery power if the RSE system
and RSA are shut off or if the headphones are out of
range of the transmitters for more than three minutes.
If you move too far forward or step out of the vehicle,
the headphones lose the audio signal.
The headphones automatically turn off after four hours
of continuous use.
To adjust the volume on the headphones, use the
volume control located on the right side.
For optimal audio performance, the headphones must
be worn correctly. The symbol L (Left) appears on
the upper left side, above the ear pad and should be
positioned on the left ear. The symbol R (Right) appears
on the upper right side, above the ear pad and should
be positioned on the right ear.
Notice:Do not store the headphones in heat or
direct sunlight. This could damage the headphones
and repairs will not be covered by the warranty.
Storage in extreme cold can weaken the batteries.
Keep the headphones stored in a cool, dry place.
3-119
Page 276 of 524
If the foam ear pads attached to the headphones
become worn or damaged, the pads can be replaced
separately from the headphone set. Refer to your
dealer/retailer for more information.
Battery Replacement
To change the batteries on the headphones, do the
following:
1. Turn the screw to loosen the battery door located
on the left side of the headphones. Slide the
battery door open.
2. Replace the two batteries in the compartment.
Make sure that they are installed correctly,
using the diagram on the inside of the battery
compartment.
3. Replace the battery door and tighten the door
screw.
If the headphones are to be stored for a long period of
time, remove the batteries and keep them in a cool,
dry place.
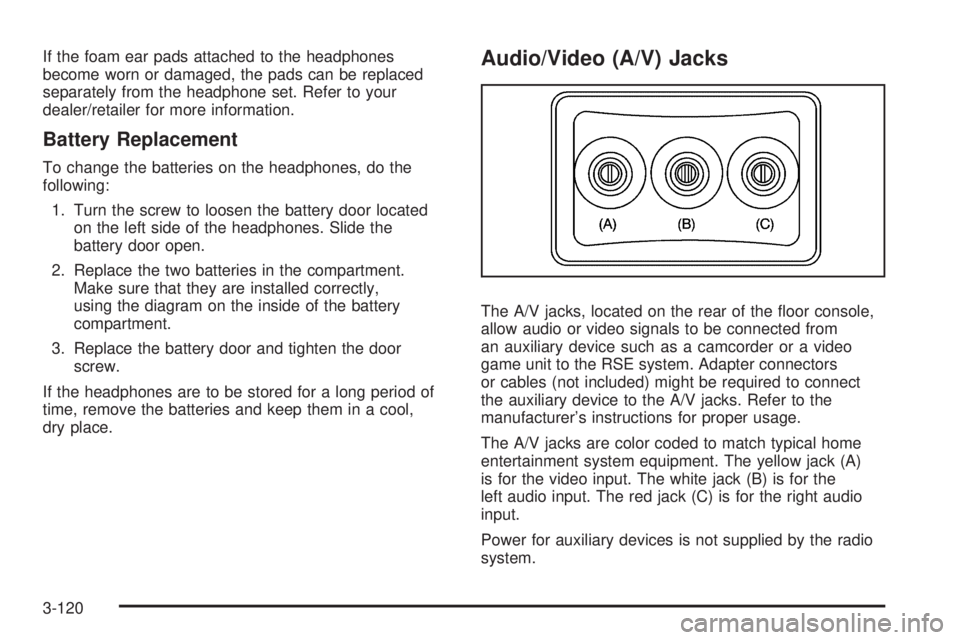
Audio/Video (A/V) Jacks
The A/V jacks, located on the rear of the oor console,
allow audio or video signals to be connected from
an auxiliary device such as a camcorder or a video
game unit to the RSE system. Adapter connectors
or cables (not included) might be required to connect
the auxiliary device to the A/V jacks. Refer to the
manufacturer’s instructions for proper usage.
The A/V jacks are color coded to match typical home
entertainment system equipment. The yellow jack (A)
is for the video input. The white jack (B) is for the
left audio input. The red jack (C) is for the right audio
input.
Power for auxiliary devices is not supplied by the radio
system.
3-120
Page 277 of 524
To use the auxiliary inputs of the RSE system, connect
an external auxiliary device to the color-coded A/V jacks
and turn both the auxiliary device and the video screen
power on. If the video screen is in the DVD player mode,
pressing the AUX (auxiliary) button on the remote control
switches the video screen from the DVD player mode to
the auxiliary device. The radio can listen to the audio of
the connected auxiliary device by sourcing to auxiliary.
SeeRadio(s) on page 3-75for more information.
How to Change the RSE Video Screen
Settings
The screen display mode (normal, full, and zoom),
screen brightness, and setup menu language can be
changed from the on screen setup menu. To change
any feature, do the following:
1. Press the
z(display menu) button on the remote
control.
2. Use the remote control
n,q,p,o(navigation)
arrows and the enter button to use the setup menu.
3. Press the
zbutton again to remove the setup
menu from the screen.
Audio Output
Audio from the DVD player or auxiliary inputs can be
heard through the following possible sources:
Wireless Headphones
Vehicle Speakers
Vehicle wired headphone jacks on the rear seat
audio system, if the vehicle has this feature.
The RSE system always transmits the audio signal to
the wireless headphones, if there is audio available.
See “Headphones” earlier in this section for more
information.
The DVD player is capable of outputting audio to the
wired headphone jacks on the RSA system, if the vehicle
has this feature. The DVD player can be selected as an
audio source on the RSA system. SeeRear Seat Audio
(RSA) on page 3-127for more information.
When a device is connected to the A/V jacks, or the
radio’s auxiliary input jack, if the vehicle has this feature,
the rear seat passengers are able to hear audio from
the auxiliary device through the wireless or wired
headphones. The front seat passengers are able to
listen to playback from this device through the vehicle
speakers by selecting AUX as the source on the radio.
3-121
Page 278 of 524
Video Screen
The video screen is located in the overhead console.
To use the video screen, do the following:
1. Push the release button located on the overhead
console.
2. Move the screen to the desired position.
When the video screen is not in use, push it up into its
locked position.
If a DVD is playing and the screen is raised to its locked
position, the screen remains on. This is normal, and
the DVD continues to play through the previous audio
source. Use the remote control power button or eject
the disc to turn off the screen.
The overhead console contains the infrared transmitters
for the wireless headphones and the infrared receivers
for the remote control. They are located at the rear
of the console.
Notice:Avoid directly touching the video screen,
as damage may occur. See “Cleaning the Video
Screen” later in this section for more information.
Remote Control
To use the remote control, aim it at the transmitter
window at the rear of the RSE overhead console and
press the desired button. Direct sunlight or very bright
light could affect the ability of the RSE transmitter to
receive signals from the remote control. If the remote
control does not seem to be working, the batteries might
need to be replaced. See “Battery Replacement” later in
this section. Objects blocking the line of sight could also
affect the function of the remote control.
If a CD or DVD is in the Radio DVD slot, the remote
control power button can be used to turn on the video
screen display and start the disc. The radio can also
turn on the video screen display. SeeRadio(s) on
page 3-75for more information.
Notice:Storing the remote control in a hot area or
in direct sunlight can damage it, and the repairs will
not be covered by the warranty. Storage in extreme
cold can weaken the batteries. Keep the remote
control stored in a cool, dry place.
If the remote control becomes lost or damaged, a
new universal remote control can be purchased. If this
happens, make sure the universal remote control uses
a code set of Toshiba
®.
3-122
Page 286 of 524
AM
The range for most AM stations is greater than for FM,
especially at night. The longer range can cause station
frequencies to interfere with each other. For better radio
reception, most AM radio stations boost the power levels
during the day, and then reduce these levels during the
night. Static can also occur when things like storms and
power lines interfere with radio reception. When this
happens, try reducing the treble on the radio.
FM Stereo
FM signals only reach about 10 to 40 miles
(16 to 65 km). Although the radio has a built-in electronic
circuit that automatically works to reduce interference,
some static can occur, especially around tall buildings
or hills, causing the sound to fade in and out.
XM™ Satellite Radio Service
XM Satellite Radio Service gives digital radio reception
from coast-to-coast in the 48 contiguous United States,
and in Canada. Just as with FM, tall buildings or hills can
interfere with satellite radio signals, causing the sound to
fade in and out. In addition, traveling or standing under
heavy foliage, bridges, garages, or tunnels may cause
loss of the XM signal for a period of time.
Cellular Phone Usage
Cellular phone usage may cause interference with the
vehicle’s radio. This interference may occur when making
or receiving phone calls, charging the phone’s battery,
or simply having the phone on. This interference causes
an increased level of static while listening to the radio.
If static is received while listening to the radio, unplug
the cellular phone and turn it off.
Fixed Mast Antenna
The xed mast antenna can withstand most car washes
without being damaged as long as it is securely attached
to the base. If the mast becomes slightly bent, straighten
it out by hand. If the mast is badly bent, replace it.
Occasionally check to make sure the antenna is
tightened to its base. If tightening is required, tighten
by hand until fully seated plus one quarter turn.
XM™ Satellite Radio Antenna
System
The XM Satellite Radio antenna is located on the roof of
the vehicle. Keep the antenna clear of obstructions for
clear radio reception.
If the vehicle has a sunroof, the performance of the XM
system may be affected if the sunroof is open.
3-130
Page 309 of 524

Surface Obstacles:Unseen or hidden obstacles can
be hazardous. A rock, log, hole, rut, or bump can startle
you if you are not prepared for them. Often these
obstacles are hidden by grass, bushes, snow, or even
the rise and fall of the terrain itself.
Some things to consider:
Is the path ahead clear?
Will the surface texture change abruptly up ahead?
Does the travel take you uphill or downhill?
Will you have to stop suddenly or change direction
quickly?
When driving over obstacles or rough terrain, keep a rm
grip on the steering wheel. Ruts, troughs, or other surface
features can jerk the wheel out of your hands.
When driving over bumps, rocks, or other obstacles, the
wheels can leave the ground. If this happens, even with
one or two wheels, you cannot control the vehicle as well
or at all.
Because you will be on an unpaved surface, it is
especially important to avoid sudden acceleration,
sudden turns, or sudden braking.
Off-roading requires a different kind of alertness from
driving on paved roads and highways. There are no road
signs, posted speed limits, or signal lights. Use good
judgment about what is safe and what is not.
Crossing Obstacles
Approach Angle — a Key to Mobility
If you encounter a large dip in the terrain, do not
enter straight on; enter at an angle — 15° minimum
approach (A), 75° maximum approach angle (B). For
very large dips, ditches or small washes, coast in, using
the engine as a brake (transmission and transfer case
lowest gears). Then, use the low ranges in the
transmission and transfer case to power out.
4-23