turn signal HUMMER H2 2009 Owners Manual
[x] Cancel search | Manufacturer: HUMMER, Model Year: 2009, Model line: H2, Model: HUMMER H2 2009Pages: 524, PDF Size: 3.1 MB
Page 91 of 524
Remote Keyless Entry (RKE)
System Operation
The Remote Keyless Entry (RKE) transmitter functions
work up to 195 feet (60 m) away from the vehicle.
There are other conditions which can affect the
performance of the transmitter. SeeRemote Keyless
Entry (RKE) System on page 2-4.
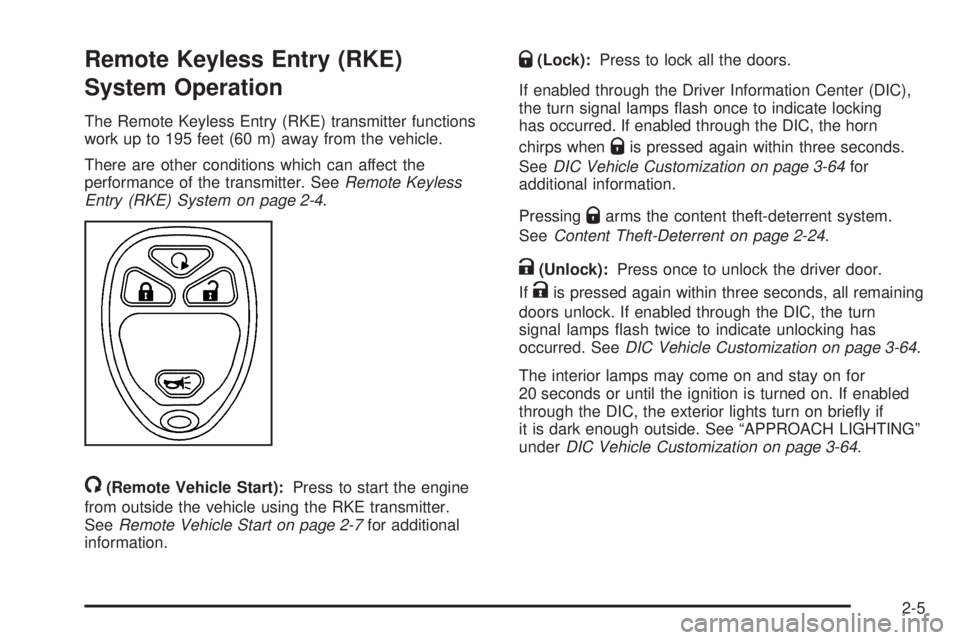
/(Remote Vehicle Start):Press to start the engine
from outside the vehicle using the RKE transmitter.
SeeRemote Vehicle Start on page 2-7for additional
information.
Q(Lock):Press to lock all the doors.
If enabled through the Driver Information Center (DIC),
the turn signal lamps �ash once to indicate locking
has occurred. If enabled through the DIC, the horn
chirps when
Qis pressed again within three seconds.
SeeDIC Vehicle Customization on page 3-64for
additional information.
Pressing
Qarms the content theft-deterrent system.
SeeContent Theft-Deterrent on page 2-24.
K(Unlock):Press once to unlock the driver door.
If
Kis pressed again within three seconds, all remaining
doors unlock. If enabled through the DIC, the turn
signal lamps �ash twice to indicate unlocking has
occurred. SeeDIC Vehicle Customization on page 3-64.
The interior lamps may come on and stay on for
20 seconds or until the ignition is turned on. If enabled
through the DIC, the exterior lights turn on brie�y if
it is dark enough outside. See “APPROACH LIGHTING”
underDIC Vehicle Customization on page 3-64.
2-5
Page 92 of 524
PressingKon the RKE transmitter disarms the content
theft-deterrent system. SeeContent Theft-Deterrent
on page 2-24.
Press and hold
Kto lower the windows. SeePower
Windows on page 2-20for additional information.
The remote recall memory feature may adjust the seats
and mirrors if it is on and the RKE transmitter is used to
enter the vehicle. See “MEMORY SEAT RECALL” under
DIC Vehicle Customization on page 3-64for additional
information.
L(Vehicle Locator/Panic Alarm):Press and release
to locate the vehicle. The turn signal lamps �ash and
the horn sounds three times.
Press and hold
Lfor more than two seconds to
activate the panic alarm. The turn signal lamps �ash
and the horn sounds repeatedly for 30 seconds.
The alarm turns off when the ignition is moved to
RUN or
Lis pressed again. The ignition must be
in OFF for the panic alarm to work.
Programming Transmitters to the
Vehicle
Only RKE transmitters programmed to the vehicle will
work. If a transmitter is lost or stolen, a replacement
can be purchased and programmed through your
dealer/retailer. When the replacement transmitter is
programmed to the vehicle, all remaining transmitters
must also be programmed. Any lost or stolen
transmitters no longer work once the new transmitter
is programmed. Each vehicle can have up to eight
transmitters programmed to it. See “Relearn Remote
Key” underDIC Operation and Displays (Using
DIC Buttons) on page 3-47orDIC Operation and
Displays (Using Trip Odometer Reset Stem) on
page 3-52.
Battery Replacement
Replace the battery if the REPLACE BATTERY
IN REMOTE KEY message displays in the DIC.
See “REPLACE BATTERY IN REMOTE KEY” under
DIC Warnings and Messages on page 3-56for additional
information.
Notice:When replacing the battery, do not touch
any of the circuitry on the transmitter. Static
from your body could damage the transmitter.
2-6
Page 94 of 524

Laws in some communities may restrict the use of
remote starters. For example, some laws may require
a person using the remote start to have the vehicle
in view when doing so. Check local regulations for
any requirements on remote starting of vehicles.
Do not use the remote start feature if your vehicle is low
on fuel. Your vehicle may run out of fuel.
If your vehicle has the remote start feature, the RKE
transmitter functions will have an increased range
of operation. However, the range may be less while
the vehicle is running.
There are other conditions which can affect the
performance of the transmitter, seeRemote Keyless
Entry (RKE) System on page 2-4for additional
information.
/(Remote Start):Press and release the lock button
and then press and hold the remote start button to
start the vehicle.To start the vehicle using the remote start feature:
1. Aim the transmitter at the vehicle.
2. Press and release the transmitter’s lock button,
then immediately press and hold the transmitter’s
remote start button until the turn signal lights �ash.
If you cannot see the vehicle’s lights, press and hold
the remote start button for at least four seconds.
The vehicle’s doors will lock. Pressing the remote
start button again after the vehicle has started will
turn off the ignition.
When the vehicle starts, the parking lamps will turn
on and remain on while the vehicle is running.
3. If it is the �rst remote start since the vehicle has
been driven, repeat these steps, while the engine
is still running, to extend the engine running time
by 10 minutes. Remote start can be extended
one time.
After entering the vehicle during a remote start, insert
and turn the key to ON/RUN to drive the vehicle.
2-8
Page 140 of 524

The rear vision camera system display in the rearview
mirror may turn off or not appear as expected due to a
loss of video signal, or no video signal present during
the reverse cycle. The display will be blank and the left
indicator light will slowly �ash as long as the vehicle is
in R (Reverse) or until the condition returns to normal.
Pressing and holding
zwhen the left indicator light
is �ashing will turn off the video display along with the
left indicator light.
OnStar®System
OnStar uses several innovative technologies and live
advisors to provide a wide range of safety, security,
information, and convenience services. If the airbags
deploy, the system is designed to make an automatic
call to OnStar Emergency advisors who can request
emergency services be sent to your location. If the keys
are locked in the vehicle, call OnStar at 1-888-4-ONSTAR
to have a signal sent to unlock the doors. OnStarHands-Free Calling, including 30 trial minutes good
for 60 days, is available on most vehicles. OnStar
Turn-by-Turn Navigation service, with one trial route,
is available on most vehicles. Press the OnStar button
to have an OnStar advisor contact Roadside Service.
OnStar service is provided subject to the OnStar Terms
and Conditions included in the OnStar Subscriber glove
box literature.
Some services such as Remote Door Unlock or Stolen
Vehicle Location Assistance may not be available until
the owner of the vehicle registers with OnStar. After the
�rst prepaid year, contact OnStar to select a monthly or
annual subscription payment plan. If a payment plan
is not selected, the OnStar system and all services,
including airbag noti�cation and emergency services,
may be deactivated and no longer available. For more
information visit onstar.com (U.S.) or onstar.ca (Canada),
or press the OnStar button to speak with an advisor.
Not all OnStar services are available on all vehicles.
To check if this vehicle is able to provide the services
described below, or for a full description of OnStar
services and system limitations, see the OnStar Owner’s
Guide in the glove box or visit onstar.com (U.S.) or
onstar.ca (Canada), contact OnStar at 1-888-4-ONSTAR
(1-888-466-7827) or TTY 1-877-248-2080, or press the
OnStar button to speak with an OnStar advisor 24 hours
a day, 7 days a week.
2-54
Page 149 of 524

4. The indicator lights will blink slowly. Enter each
switch setting from Step 2 into your vehicle’s
Universal Home Remote. You will have two and
one-half minutes to complete Step 4. Now press
one button on the Universal Home Remote for
each switch setting as follows:
If you wrote “Left,” press the left button in
the vehicle.
If you wrote “Right,” press the right button in
the vehicle.
If you wrote “Middle,” press the middle button in
the vehicle.5. After entering all of the switch positions, again,
�rmly press and release all three buttons at the
same time. The indicator lights will turn on.
6. Press and hold the button you would like to use to
control the garage door until the garage door moves.
The indicator light above the selected button should
slowly blink. You may need to hold the button from
�ve to 55 seconds.
7. Immediately release the button when the garage
door moves. The indicator light will blink rapidly
until programming is complete.
8. Press and release the same button again.
The garage door should move, con�rming
that programming is successful and complete.
To program another Fixed Code device such as an
additional garage door opener, a security device,
or home automation device, repeat Steps 1-8, choosing
a different button in Step 6 than what you used for
the garage door opener.
Using Universal Home Remote
Press and hold the appropriate button for at least
half of a second. The indicator light will come on
while the signal is being transmitted.
2-63
Page 157 of 524
Instrument Panel Overview...............................3-4
Hazard Warning Flashers................................3-6
Horn .............................................................3-6
Tilt Wheel.....................................................3-6
Heated Steering Wheel...................................3-7
Turn Signal/Multifunction Lever.........................3-8
Turn and Lane-Change Signals........................3-8
Headlamp High/Low-Beam Changer..................3-9
Flash-to-Pass.................................................3-9
Windshield Wipers........................................3-10
Windshield Washer.......................................3-10
Rear Window Wiper/Washer...........................3-11
Cruise Control..............................................3-12
Exterior Lamps.............................................3-15
Headlamps on Reminder................................3-16
Daytime Running Lamps (DRL).......................3-16
Automatic Headlamp System..........................3-17
Instrument Panel Brightness...........................3-17
Dome Lamps ...............................................3-18
Dome Lamp Override....................................3-18
Entry/Exit Lighting.........................................3-18
Reading Lamps............................................3-18
Electric Power Management...........................3-19
Battery Run-Down Protection..........................3-19
Accessory Power Outlet(s).............................3-20
Ashtray(s) and Cigarette Lighter......................3-21
Analog Clock...............................................3-21Climate Controls............................................3-22
Dual Automatic Climate Control System...........3-22
Outlet Adjustment.........................................3-27
Rear Air Conditioning and Heating System
and Electronic Climate Controls....................3-28
Warning Lights, Gages, and Indicators............3-29
Instrument Panel Cluster................................3-30
Speedometer and Odometer...........................3-31
Trip Odometer..............................................3-31
Tachometer.................................................3-31
Safety Belt Reminders...................................3-32
Airbag Readiness Light..................................3-32
Airbag Off Light............................................3-33
Charging System Light..................................3-35
Voltmeter Gage............................................3-36
Brake System Warning Light..........................3-37
Antilock Brake System (ABS) Warning Light.....3-38
StabiliTrak
®Indicator Light.............................3-38
Engine Coolant Temperature Gage..................3-39
Tire Pressure Light.......................................3-39
Malfunction Indicator Lamp.............................3-40
Oil Pressure Gage........................................3-42
Oil Pressure Light.........................................3-43
Security Light...............................................3-44
Cruise Control Light......................................3-44
Highbeam On Light.......................................3-44
Section 3 Instrument Panel
3-1
Page 161 of 524
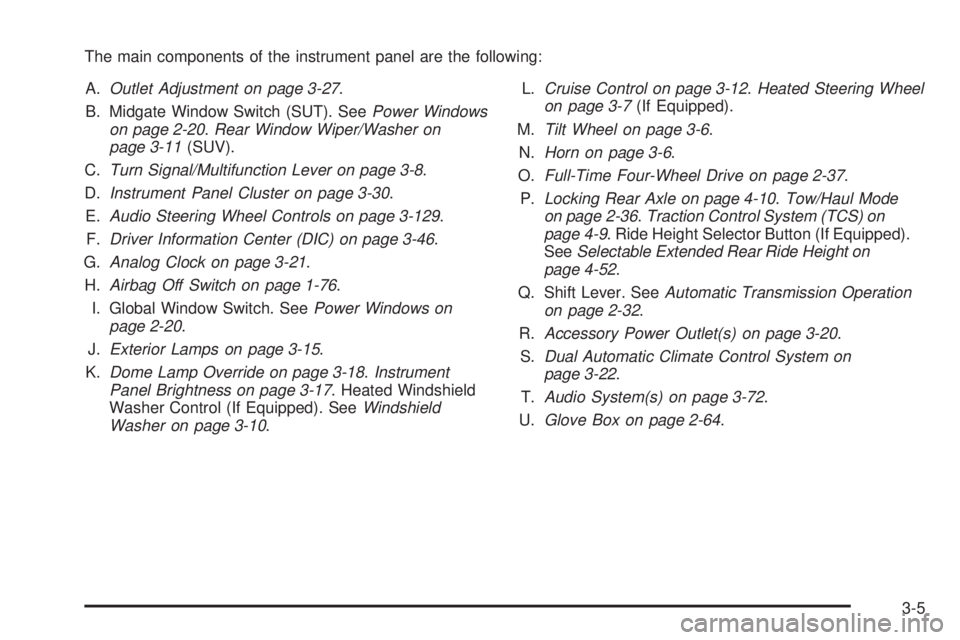
The main components of the instrument panel are the following:
A.Outlet Adjustment on page 3-27.
B. Midgate Window Switch (SUT). SeePower Windows
on page 2-20.Rear Window Wiper/Washer on
page 3-11(SUV).
C.Turn Signal/Multifunction Lever on page 3-8.
D.Instrument Panel Cluster on page 3-30.
E.Audio Steering Wheel Controls on page 3-129.
F.Driver Information Center (DIC) on page 3-46.
G.Analog Clock on page 3-21.
H.Airbag Off Switch on page 1-76.
I. Global Window Switch. SeePower Windows on
page 2-20.
J.Exterior Lamps on page 3-15.
K.Dome Lamp Override on page 3-18.Instrument
Panel Brightness on page 3-17. Heated Windshield
Washer Control (If Equipped). SeeWindshield
Washer on page 3-10.L.Cruise Control on page 3-12.Heated Steering Wheel
on page 3-7(If Equipped).
M.Tilt Wheel on page 3-6.
N.Horn on page 3-6.
O.Full-Time Four-Wheel Drive on page 2-37.
P.Locking Rear Axle on page 4-10.Tow/Haul Mode
on page 2-36.Traction Control System (TCS) on
page 4-9. Ride Height Selector Button (If Equipped).
SeeSelectable Extended Rear Ride Height on
page 4-52.
Q. Shift Lever. SeeAutomatic Transmission Operation
on page 2-32.
R.Accessory Power Outlet(s) on page 3-20.
S.Dual Automatic Climate Control System on
page 3-22.
T.Audio System(s) on page 3-72.
U.Glove Box on page 2-64.
3-5
Page 162 of 524
Hazard Warning Flashers
|(Hazard Warning Flasher):Press this button located
on top of the steering column, to make the front and rear
turn signal lamps �ash on and off. This warns others
that you are having trouble. Press again to turn the
�ashers off.
When the hazard warning �ashers are on, the vehicle’s
turn signals will not work.
Horn
Press on or near the horn symbols on the steering
wheel pad to sound the horn.
Tilt Wheel
The tilt steering wheel lets the steering wheel be
adjusted.
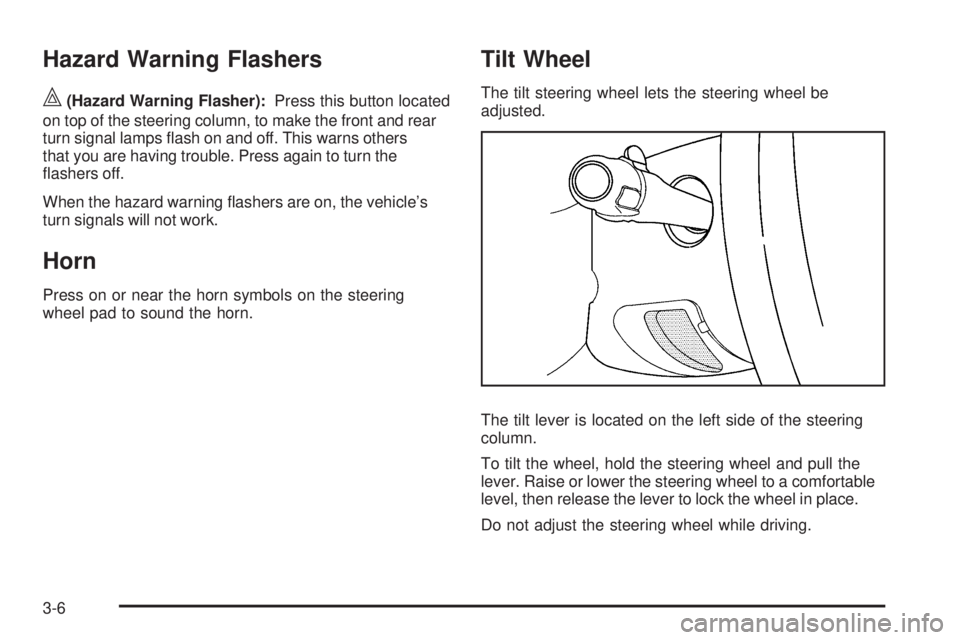
The tilt lever is located on the left side of the steering
column.
To tilt the wheel, hold the steering wheel and pull the
lever. Raise or lower the steering wheel to a comfortable
level, then release the lever to lock the wheel in place.
Do not adjust the steering wheel while driving.
3-6
Page 164 of 524
Turn Signal/Multifunction Lever
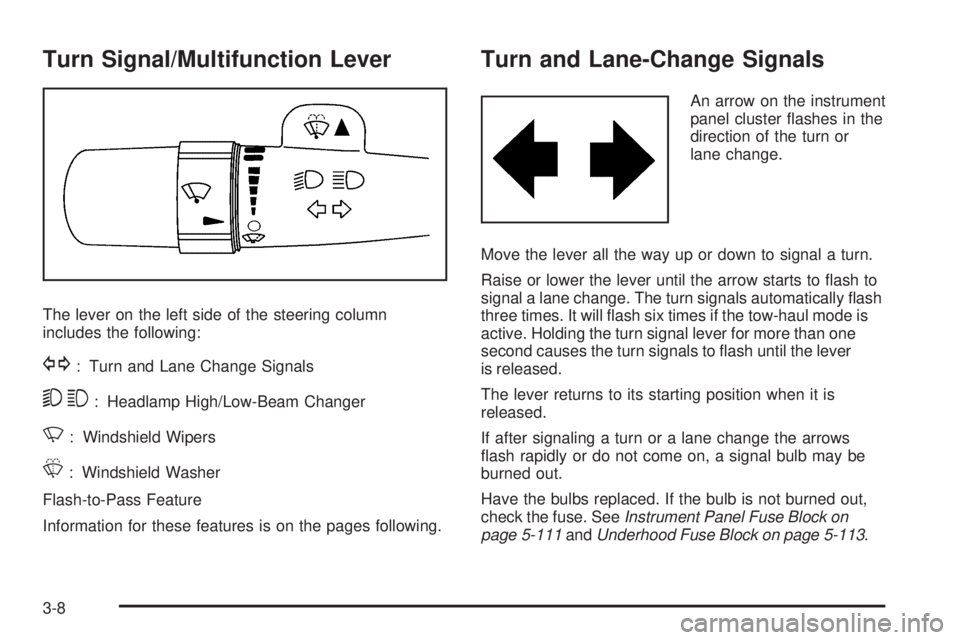
The lever on the left side of the steering column
includes the following:
G: Turn and Lane Change Signals
53: Headlamp High/Low-Beam Changer
N: Windshield Wipers
L: Windshield Washer
Flash-to-Pass Feature
Information for these features is on the pages following.
Turn and Lane-Change Signals
An arrow on the instrument
panel cluster �ashes in the
direction of the turn or
lane change.
Move the lever all the way up or down to signal a turn.
Raise or lower the lever until the arrow starts to �ash to
signal a lane change. The turn signals automatically �ash
three times. It will �ash six times if the tow-haul mode is
active. Holding the turn signal lever for more than one
second causes the turn signals to �ash until the lever
is released.
The lever returns to its starting position when it is
released.
If after signaling a turn or a lane change the arrows
�ash rapidly or do not come on, a signal bulb may be
burned out.
Have the bulbs replaced. If the bulb is not burned out,
check the fuse. SeeInstrument Panel Fuse Block on
page 5-111andUnderhood Fuse Block on page 5-113.
3-8
Page 165 of 524
Turn Signal On Chime
If the turn signal is left on for more than 3/4 of a mile
(1.2 km), a chime will sound at each �ash of the turn
signal and the message TURN SIGNAL ON will also
appear in the DIC. SeeDIC Warnings and Messages
on page 3-56. To turn the chime and message off, move
the turn signal lever to the off position.
Headlamp High/Low-Beam Changer
53(Headlamp High/Low Beam Changer):
To change the headlamps from low to high beam,
push the lever toward the instrument panel. To return
to low-beam headlamps, pull the multifunction lever
toward you. Then release it.
When the high beams are
on, this indicator light on
the instrument panel
cluster will also be on.
Flash-to-Pass
This feature lets you use your high-beam headlamps
to signal a driver in front of you that you want to pass.
It works even if your headlamps are in the automatic
position.
To use it, pull the turn signal lever toward you, then
release it.
If your headlamps are in the automatic position or on
low beam, your high-beam headlamps will turn on.
They will stay on as long as you hold the lever toward
you. The high-beam indicator on the instrument
panel cluster will come on. Release the lever to
return to normal operation.
3-9