parking brake Hyundai Accent 2006 Owner's Guide
[x] Cancel search | Manufacturer: HYUNDAI, Model Year: 2006, Model line: Accent, Model: Hyundai Accent 2006Pages: 599, PDF Size: 17.59 MB
Page 214 of 599

5
VEHICLE MAINTENANCE REQUIREMENTS
7
ENGINE OIL AND FILTER AIR CLEANER FILTER SPARK PLUGS TIMING BELTBRAKE PADS, CALIPERS AND ROTORS REAR BRAKE DRUMS/LININGS, PARKING BRAKE STEERING GEAR BOX, LINKAGE & BOOTS/LOWER ARM BALL JOINT DRIVESHAFTS AND BOOTS MANUAL TRANSAXLE OILAUTOMATIC TRANSAXLE FLUID
AIR CONDITIONER FILTER (For Evaporator and Blower unit)
SEVERE DRIVING CONDITIONS
A - Repeatly driving short distance of less than 8km(5miles) in normal temperature or less than 16km(10miles) in freezing temperature
B - Extensive engine idling or low speed driving for long distances
C - Driving on rough, dusty, muddy, unpaved, graveled or salt-spread roads D - Driving in areas using salt or other corrosive materials or in very
cold weather
E - Driving in sandy areas
F - Driving in heavy traffic area over 32°C(90°F)G - Driving on uphill, downhill, or mountain roadH - Towing a Trailer, or using a camper, or roof rack
I - Driving as a patrol car, taxi, other commercial use or vehicle towing
J - Driving over 170 Km/h(100 MPH)K - Frequently driving in stop-and-go conditions R R R R
I I I I
RR R
European community Only Except European community
MAINTENANCE ITEM
EVERY 7,500 KM OR 6 MONTHS MORE FREQUENTLY MORE FREQUENTLY EVERY 60,000 KM OR 48 MONTHSMORE FREQUENTLY MORE FREQUENTLY MORE FREQUENTLY EVERY 15,000 KM OR 12 MONTHS EVERY 100,000 KM EVERY 45,000 KM EVERY 40,000 KMMORE FREQUENTLY A, B, C, D, E, F, G, H, I, KA, B, C, F, H, I, JC, E B, H D, E, F, GC, D, G, H C, D, G, H C, D, E, F C, D, E, F A, C, D, E, F, G, H, I, J A, C, E, F, G, H, I C, E
MAINTENANCE
INTERVALS DRIVING
CONDITION
MAINTENANCE
OPERATIONGASOLINE DIESEL
MAINTENANCE UNDER SEVERE USAGE CONDITIONS
F040A08A-GAT The following items must be serviced more frequently on cars normally used under severe driving conditions. Refer to the
chart below for the appropriate maintenance intervals.
R : Replace I : Inspect and, after inspection, clean, adjust, repair or replace if necessary
Page 217 of 599
5VEHICLE MAINTENANCE REQUIREMENTS
10
F070L01A-AAT
o Suspension Mounting Bolts
Check the suspension connections
for looseness or damage. Retighten to the specified torque. F070J01A-AAT
o Brake Pads, Calipers and
Rotors
Check the pads for excessive wear,
discs for run out and wear, and cali- pers for fluid leakage.
F070K01A-AAT
o Exhaust Pipe and Muffler
Visually inspect the exhaust pipes,
muffler and hangers for cracks, dete-rioration, or damage. Start the engine and listen carefully for any exhaustgas leakage. Tighten connections or replace parts as necessary.
F070F01A-AAT
o Brake Hoses and Lines
Visually check for proper installation, chafing, cracks, deterioration and any leakage. Replace any deteriorated or damaged parts immediately. F070G02A-AAT
o Brake Fluid
Check brake fluid level in the brake fluid reservoir. The level should be between "MIN" and "MAX" marks on the side of the reservoir. Use onlyhydraulic brake fluid conforming to DOT 3 or DOT 4. F070H01A-AAT
o Rear Brake Drums/Linings
Parking Brake
Check the rear brake drums and lin- ings for scoring, burning, leaking fluid, broken parts, and excessive wear. Inspect the parking brake system in-cluding the parking brake lever and cables. For detailed service proce- dures, refer to the Shop Manual.
F070D01A-AAT
o Manual Transaxle Oil Inspect the manual transaxle oil ac- cording to the maintenance schedule. NOTE: If the oil level is low, check for possible leaks before adding oil. Do not overfill. F070E05A-AAT
o Automatic Transaxle Fluid The fluid level should be in the "HOT" range of the dipstick, after the engine and transaxle are at normal operating temperature. Check the automatictransaxle fluid level with the engine running and the transaxle in neutral, with the parking brake properly ap-plied. Use Hyundai Genuine ATF SP- III, DIAMOND ATF SP-III, SK ATF SP-III or other brands appraoved byHyundai Motor Co., when adding or changing fluid.
Page 224 of 599
6 DO-IT-YOURSELF MAINTENANCE
6
G020A01A-AAT Engine Compartment The following should be checked regu- larly:
o Engine oil level and condition
o Transaxle fluid level and condition
o Brake fluid level
o Clutch fluid level
o Engine coolant level
o Windshield washer fluid level
o Accessory drive belt condition
o Engine coolant hose condition
o Fluid leaks (on or below compo-
nents)
o Power steering fluid level
o Battery condition
o Air filter condition G020C01A-AAT Vehicle Interior The following should be checked each time when the vehicle is driven:
o Lights operation
o Windshield wiper operation
o Horn operation
o Defroster, heater system operation
(and air conditioning, if installed)
o Steering operation and condition
o Mirror condition and operation
o Turn signal operation
o Accelerator pedal operation
o Brake operation, including parking
brake
o Manual transaxle operation, includ- ing clutch operation
o Automatic transaxle operation, in- cluding "Park" mechanism opera-tion
o Seat control condition and opera- tion
o Seat belt condition and operation
o Sunvisor operation If you notice anything that does not operate correctly or appears to befunctioning incorrectly, inspect it care- fully and seek assistance from your Hyundai dealer if service is needed.
G020B01A-AAT Vehicle Exterior The following should be checked monthly:
o Overall appearance and condition
o Wheel condition and wheel nut torque
o Exhaust system condition
o Light condition and operation
o Windshield glass condition
o Wiper blade condition
o Paint condition and body corrosion
o Fluid leaks
o Door and hood lock condition
o Tire pressure and condition
(including spare tire)
GENERAL CHECKS
Page 228 of 599
6 DO-IT-YOURSELF MAINTENANCE
10
!
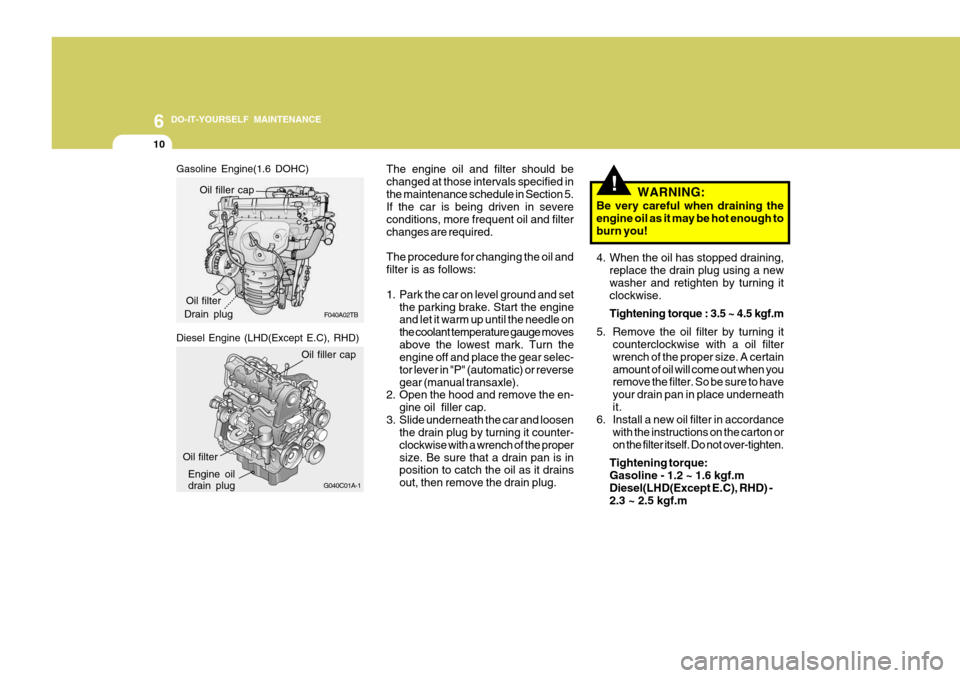
The engine oil and filter should be changed at those intervals specified inthe maintenance schedule in Section 5. If the car is being driven in severe conditions, more frequent oil and filterchanges are required. The procedure for changing the oil and filter is as follows:
1. Park the car on level ground and set
the parking brake. Start the engine and let it warm up until the needle on the coolant temperature gauge movesabove the lowest mark. Turn the engine off and place the gear selec- tor lever in "P" (automatic) or reversegear (manual transaxle).
2. Open the hood and remove the en-
gine oil filler cap.
3. Slide underneath the car and loosen the drain plug by turning it counter-clockwise with a wrench of the propersize. Be sure that a drain pan is in position to catch the oil as it drains out, then remove the drain plug. WARNING:
Be very careful when draining the engine oil as it may be hot enough to burn you!
4. When the oil has stopped draining, replace the drain plug using a new washer and retighten by turning it clockwise.
Tightening torque : 3.5 ~ 4.5 kgf.m
5. Remove the oil filter by turning it counterclockwise with a oil filter wrench of the proper size. A certainamount of oil will come out when you remove the filter. So be sure to have your drain pan in place underneathit.
6. Install a new oil filter in accordance
with the instructions on the carton oron the filter itself. Do not over-tighten.
Tightening torque:Gasoline - 1.2 ~ 1.6 kgf.m Diesel(LHD(Except E.C), RHD) - 2.3 ~ 2.5 kgf.m
Diesel Engine (LHD(Except E.C), RHD)
G040C01A-1
Engine oil drain plug
Oil filter
Oil filler cap
Gasoline Engine(1.6 DOHC)
F040A02TB
Oil filler cap
Drain plug Oil filter
.........
Page 229 of 599
6
DO-IT-YOURSELF MAINTENANCE
11
!
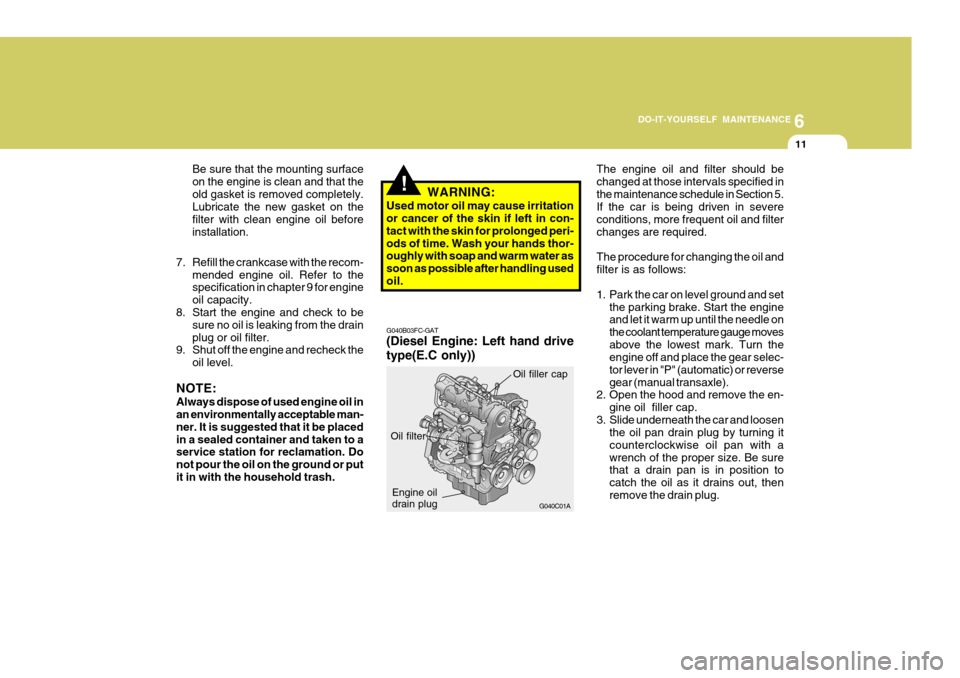
G040B03FC-GAT
(Diesel Engine: Left hand drive type(E.C only)) The engine oil and filter should be changed at those intervals specified inthe maintenance schedule in Section 5. If the car is being driven in severe conditions, more frequent oil and filterchanges are required. The procedure for changing the oil and filter is as follows:
1. Park the car on level ground and set
the parking brake. Start the engine and let it warm up until the needle on the coolant temperature gauge movesabove the lowest mark. Turn the engine off and place the gear selec- tor lever in "P" (automatic) or reversegear (manual transaxle).
2. Open the hood and remove the en-
gine oil filler cap.
3. Slide underneath the car and loosen the oil pan drain plug by turning itcounterclockwise oil pan with awrench of the proper size. Be sure that a drain pan is in position to catch the oil as it drains out, thenremove the drain plug.
Engine oil drain plug
Oil filter
G040C01A
7. Refill the crankcase with the recom-mended engine oil. Refer to the specification in chapter 9 for engine oil capacity.
8. Start the engine and check to be sure no oil is leaking from the drainplug or oil filter.
9. Shut off the engine and recheck the
oil level.
NOTE: Always dispose of used engine oil in an environmentally acceptable man- ner. It is suggested that it be placedin a sealed container and taken to a service station for reclamation. Do not pour the oil on the ground or putit in with the household trash. WARNING:
Used motor oil may cause irritation or cancer of the skin if left in con- tact with the skin for prolonged peri-ods of time. Wash your hands thor- oughly with soap and warm water as soon as possible after handling usedoil.
Oil filler cap
Be sure that the mounting surface on the engine is clean and that theold gasket is removed completely. Lubricate the new gasket on the filter with clean engine oil beforeinstallation.
Page 232 of 599
6 DO-IT-YOURSELF MAINTENANCE
14
G050D01A
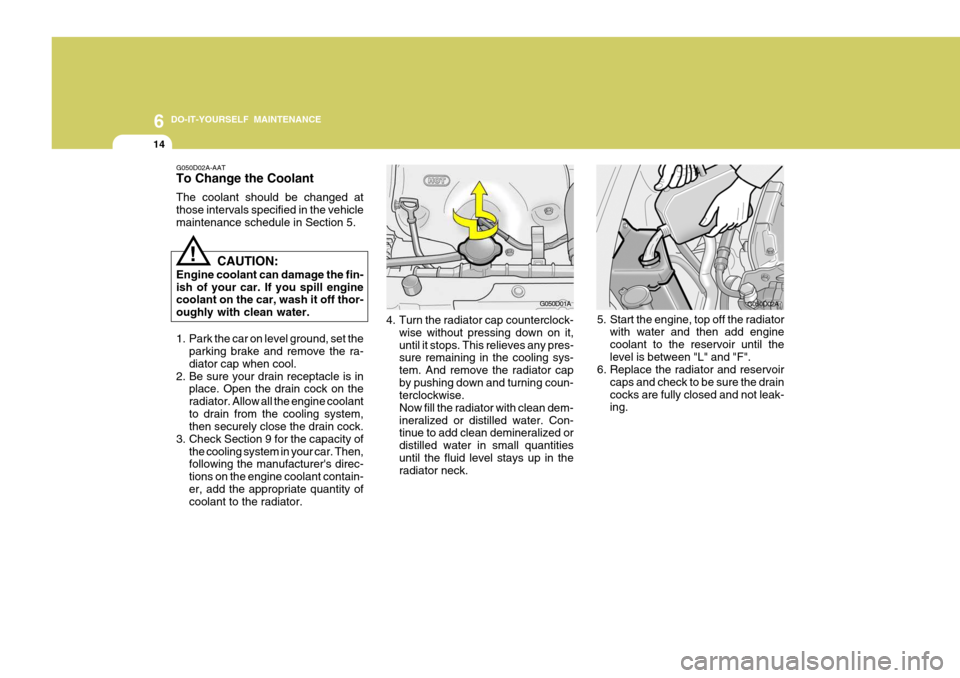
G050D02A-AAT To Change the Coolant The coolant should be changed at those intervals specified in the vehiclemaintenance schedule in Section 5.
CAUTION:
Engine coolant can damage the fin-ish of your car. If you spill engine coolant on the car, wash it off thor- oughly with clean water.
!
1. Park the car on level ground, set the parking brake and remove the ra- diator cap when cool.
2. Be sure your drain receptacle is in place. Open the drain cock on theradiator. Allow all the engine coolantto drain from the cooling system, then securely close the drain cock.
3. Check Section 9 for the capacity of the cooling system in your car. Then,following the manufacturer's direc- tions on the engine coolant contain-er, add the appropriate quantity of coolant to the radiator. 4. Turn the radiator cap counterclock-
wise without pressing down on it, until it stops. This relieves any pres- sure remaining in the cooling sys- tem. And remove the radiator capby pushing down and turning coun- terclockwise. Now fill the radiator with clean dem-ineralized or distilled water. Con- tinue to add clean demineralized or distilled water in small quantitiesuntil the fluid level stays up in the radiator neck. G050D02A
5. Start the engine, top off the radiator with water and then add engine coolant to the reservoir until thelevel is between "L" and "F".
6. Replace the radiator and reservoir
caps and check to be sure the draincocks are fully closed and not leak- ing.
Page 238 of 599
6 DO-IT-YOURSELF MAINTENANCE
20
!
CHECKING THE TRANSAXLE FLUID (AUTOMATIC)
G110A01E-AAT Transaxle fluid in the automatic transaxle should be checked at those intervals specified in the vehicle main- tenance schedule in Section 5. NOTE: Automatic transaxle fluid is basi- cally a red color. As driving distance increases, the fluid color turns dark-ish red gradually. It is normal condi- tion and you should not judge the need to replace based upon thechanging color. You must replace the automatic transaxle fluid in accordance withintervals specified in the vehicle maintenance schedule in section 5. G110B03A-AAT Recommended Fluid Your Hyundai automatic transaxle is specially designed to operate withHyundai Genuine ATF SP III, DIA- MOND ATF SP III or other brands approved by Hyundai Motor Co. Dam-age caused by a nonspecified fluid is not covered by your new vehicle limited warranty.
G110C02A-GAT Transaxle Fluid Capacity The fluid capacity of the automatic transaxle is 6.1 liters.
WARNING:
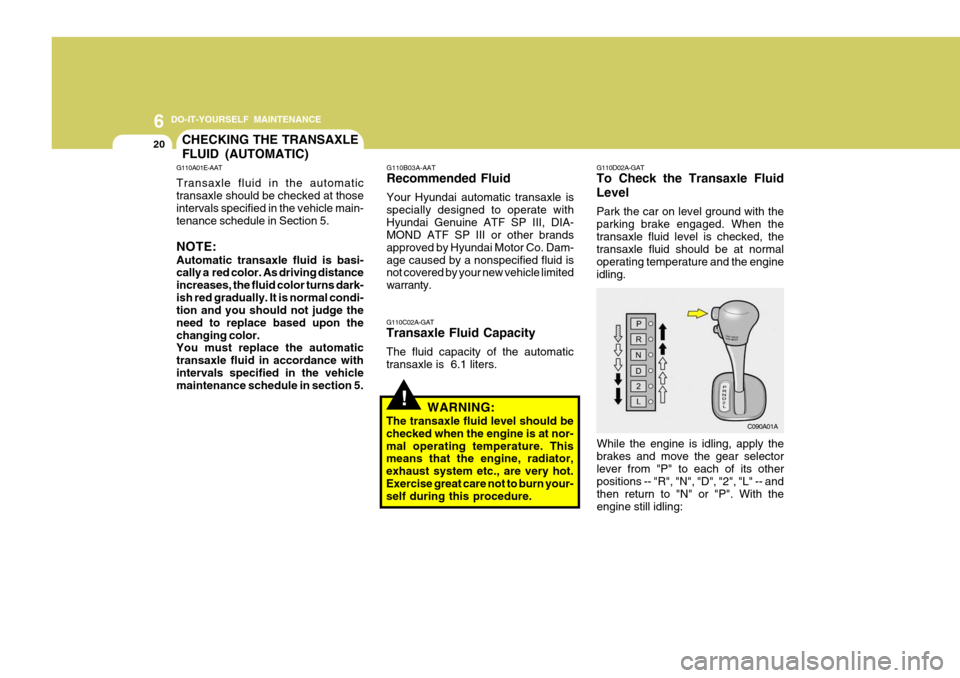
The transaxle fluid level should bechecked when the engine is at nor-mal operating temperature. This means that the engine, radiator, exhaust system etc., are very hot.Exercise great care not to burn your- self during this procedure. G110D02A-GAT To Check the Transaxle Fluid Level Park the car on level ground with the parking brake engaged. When thetransaxle fluid level is checked, the transaxle fluid should be at normal operating temperature and the engineidling.
While the engine is idling, apply thebrakes and move the gear selectorlever from "P" to each of its other positions -- "R", "N", "D", "2", "L" -- and then return to "N" or "P". With theengine still idling: C090A01A
Page 274 of 599
9 VEHICLE SPECIFICATIONS
2
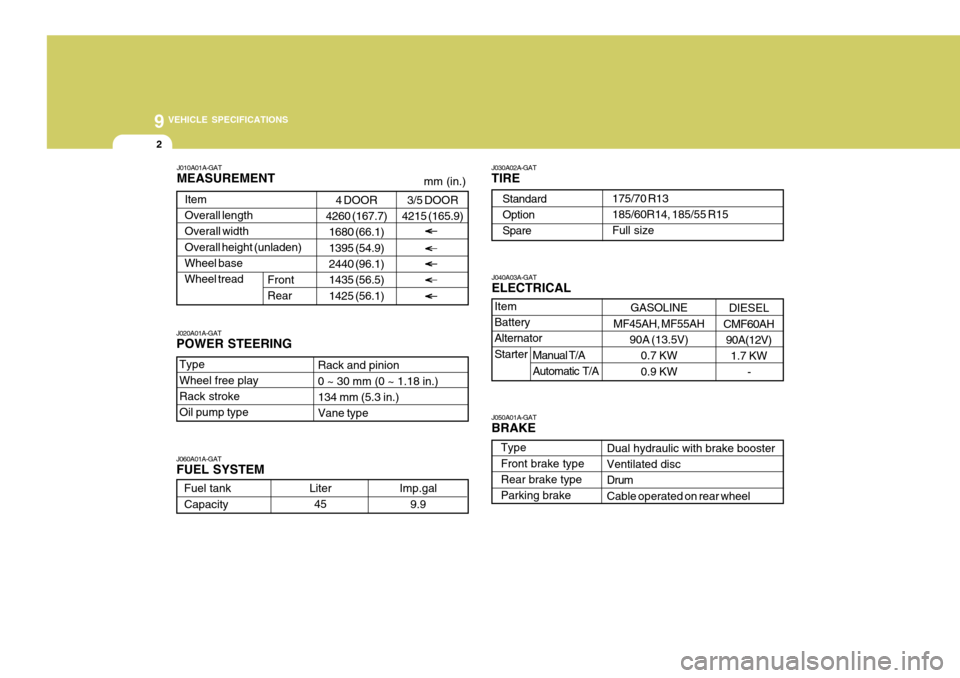
Type Wheel free playRack stroke Oil pump type 4 DOOR
4260 (167.7)
1680 (66.1) 1395 (54.9) 2440 (96.1) 1435 (56.5)1425 (56.1)
ItemOverall length Overall width Overall height (unladen)Wheel base Wheel tread J030A02A-GAT TIRE
GASOLINE
MF45AH, MF55AH 90A (13.5V)
0.7 KW 0.9 KW
Dual hydraulic with brake booster Ventilated disc DrumCable operated on rear wheel
J010A01A-GAT MEASUREMENT
J060A01A-GAT FUEL SYSTEM
Rack and pinion 0 ~ 30 mm (0 ~ 1.18 in.) 134 mm (5.3 in.) Vane type
175/70 R13 185/60R14, 185/55 R15 Full size
StandardOption Spare
Front Rear
mm (in.)
J020A01A-GAT POWER STEERING Fuel tank Capacity Liter
45 Imp.gal
9.9
J040A03A-GAT ELECTRICAL
Item Battery Alternator Starter
J050A01A-GAT BRAKE Type Front brake typeRear brake type Parking brake
3/5 DOOR
4215 (165.9)
DIESEL
CMF60AH 90A(12V) 1.7 KW
-
Manual T/A Automatic T/A
Page 280 of 599
10INDEX
4
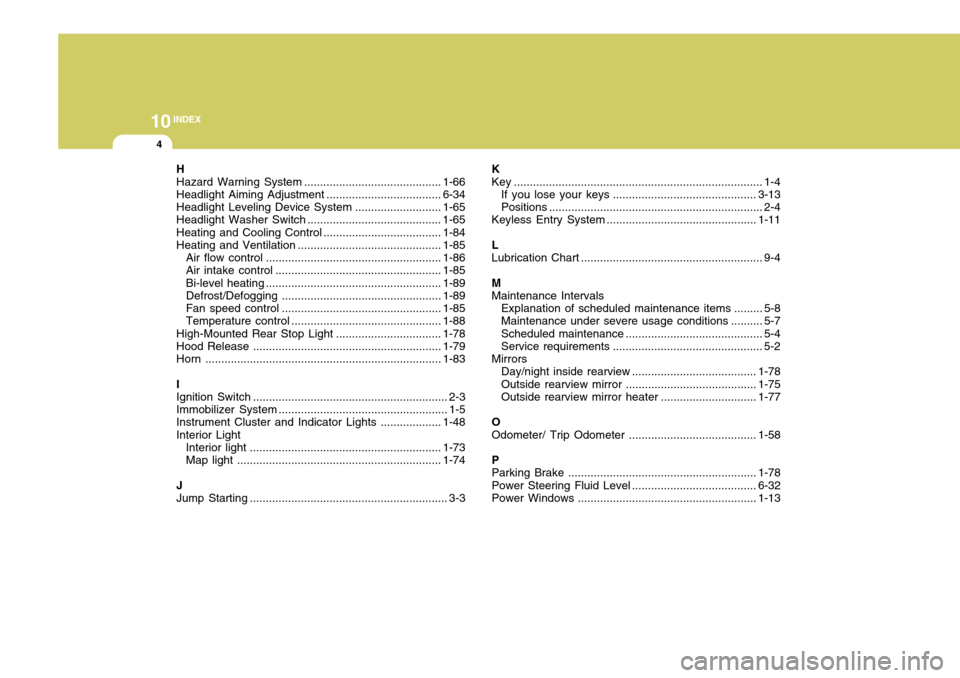
H Hazard Warning Syst em ........................................... 1-66
Headlight Aiming Adjustment ....................................6-34
Headlight Leveling Device Syst em ...........................1-65
Headlight Washer Switch ............ .............................. 1-65
Heating and Cooling Control ..................................... 1-84
Heating and Ventilation ............................................. 1-85
Air flow control ....................................................... 1-86
Air intake control .................................................... 1-85
Bi-level heating ....................................................... 1-89
Defrost/Defogging .................................................. 1-89
Fan speed control .................................................. 1-85
Temperature control ............................................... 1-88
High-Mounted Rear Stop Light................................. 1-78
Hood Release ........................................................... 1-79
Horn .......................................................................... 1-83
I Ignition Sw itch ............................................................. 2-3
Immobilizer S ystem ..................................................... 1-5
Instrument Cluster and Indicator Li ghts................... 1-48
Interior Light Interior light ............................................................ 1-73
Map light ................................................................ 1-74
JJump Starting .............................................................. 3-3 K
Key .............................................................................. 1-4
If you lose your keys ............................................. 3-13
Positions ................................................................... 2-4
Keyless Entry System ............................................... 1-11
LLubrication Chart ......................................................... 9-4
M Maintenance Intervals Explanation of scheduled maintenance items ......... 5-8
Maintenance under severe usage conditions .......... 5-7 Scheduled maintenance ........................................... 5-4
Service requ irements............................................... 5-2
Mirrors Day/night inside rearview .......................................1-78
Outside rearview mirror .................... ..................... 1-75
Outside rearview mirror heater .............................. 1-77
O
Odometer/ Trip Odometer ......... ...............................1-58
P Parking Brake ........................................................... 1-78
Power Steering Fluid Level .......................................6-32
Power Windows ........................................................ 1-13
Page 331 of 599
1
FEATURES OF YOUR HYUNDAI
49
1. Tachometer (If Installed)
2. Turn Signal Indicator Light
3. Speedometer
4. Odometer/Trip Odometer /Trip Computer (If Installed)
5. Fuel Gauge
6. Temperature Gauge
7. SRS (Airbag) Warning Light (If Installed)
8. ABS Warning Light (If Installed)
9. Immobilizer Warning Light (If Installed)
10. Overdrive Off Indicator Light (Automatic Transaxle only) 11. High Beam Indicator Light
12. Door Ajar Warning Light
13. Parking Brake/Low Brake Fluid Level Warning Light
14. Charging System Warning Light
15. Seat Belt Warning Light (If Installed)
16. Low Oil Pressure Warning Light
17. Trip Odometer Reset Switch/
Trip Computer Reset Switch (If Installed)
18. Low Fuel Warning Light
19. Malfunction Indicator Light (MIL) (If Installed)