ABS Hyundai Accent 2006 Owner's Manual
[x] Cancel search | Manufacturer: HYUNDAI, Model Year: 2006, Model line: Accent, Model: Hyundai Accent 2006Pages: 599, PDF Size: 17.59 MB
Page 14 of 599

YOUR VEHICLE AT A GLANCE
B255A01A-GAT INDICATOR SYMBOLS ON THE INSTRUMENT PANEL * More detailed explanations of these items will be found begining on page 1-52.Turn Signal Indicator Lights
SRS (Airbag) Service Reminder Indicator (If Installed) O/D OFF Indicator Light (Automatic transaxle only) High Beam Indicator Light
Low Oil Pressure Warning Light
ABS Service Reminder Indicator (If Installed)
Door Ajar Warning Light
Parking Brake/Low Brake Fluid Level Warning Light Charging System Warning Light Seat Belt Warning Light (If Installed)
Fuel Filter Warning Light (Diesel only)
Low Fuel Level Warning Light Diesel Pre-heat Indicator Light (Diesel only)
Malfunction Indicator Light (If Installed)
Immobilizer Warning Indicator Light (If Installed)
Page 44 of 599
1FEATURES OF YOUR HYUNDAI
30
!WARNING:
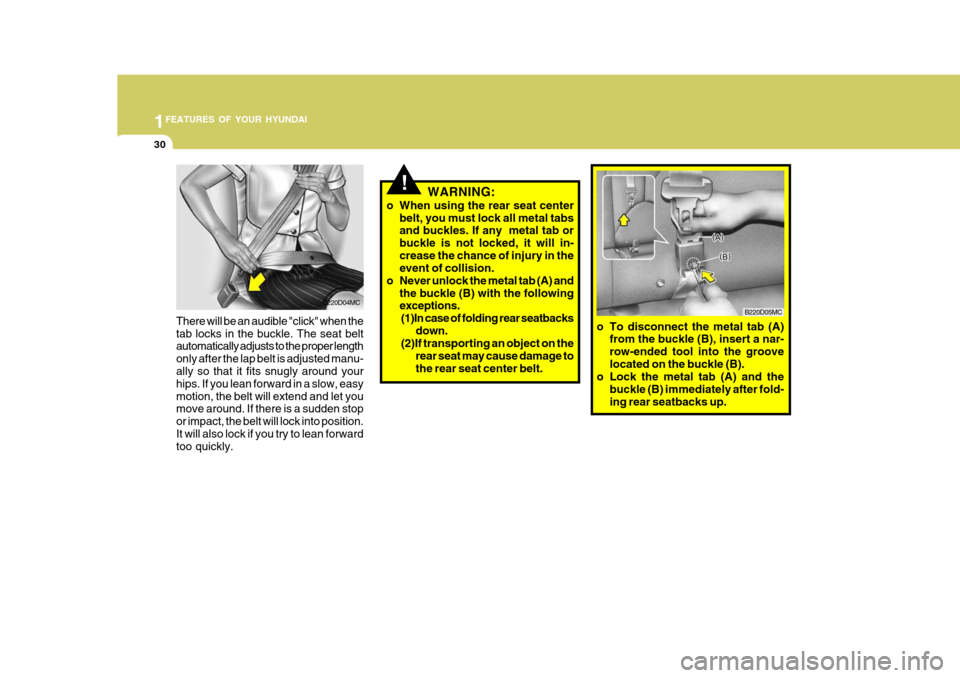
o When using the rear seat center belt, you must lock all metal tabs and buckles. If any metal tab or buckle is not locked, it will in-crease the chance of injury in the event of collision.
o Never unlock the metal tab (A) and
the buckle (B) with the followingexceptions.(1)In case of folding rear seatbacks
down.
(2)If transporting an object on the
rear seat may cause damage to the rear seat center belt.
B220D04MC
There will be an audible "click" when thetab locks in the buckle. The seat belt automatically adjusts to the proper length only after the lap belt is adjusted manu- ally so that it fits snugly around your hips. If you lean forward in a slow, easymotion, the belt will extend and let you move around. If there is a sudden stop or impact, the belt will lock into position.It will also lock if you try to lean forward too quickly.
B220D05MC
o To disconnect the metal tab (A) from the buckle (B), insert a nar- row-ended tool into the groovelocated on the buckle (B).
o Lock the metal tab (A) and the
buckle (B) immediately after fold-ing rear seatbacks up.
Page 51 of 599
1
FEATURES OF YOUR HYUNDAI
37
WARNING:
o Do not install a child restraint seat at the center of the rear seat using the vehicle's ISOFIX anchors. The ISOFIX anchors are only providedfor the left and right outboard rear seating positions. Do not misuse the ISOFIX anchors by attemptingto attach a child restraint seat in the middle of the rear seat to the ISOFIX anchors. In a crash, thechild restraint seat ISOFIX attach- ments may not be strong enough to secure the child restraint seatproperly in the center of the rear seat and may break, causing seri- ous injury or death.
o When using the vehicle’s "ISOFIX" system to install a child restraintsystem in the rear seat, all unusedvehicle rear seat belt metal latch plates or tabs must be latched securely in their seat belt bucklesand the seat belt webbing must be retracted behind the child restraint to prevent the child from reachingand taking hold of unretracted seat
belts. Unlatched metal latch plates
B230D03MC
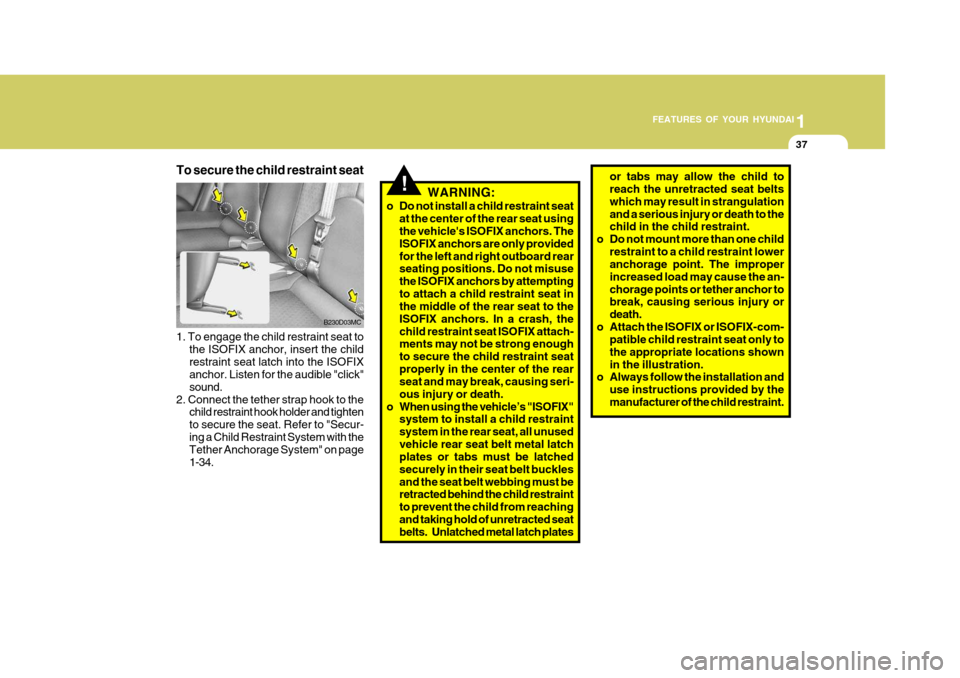
1. To engage the child restraint seat to the ISOFIX anchor, insert the child restraint seat latch into the ISOFIX anchor. Listen for the audible "click" sound.
2. Connect the tether strap hook to the child restraint hook holder and tightento secure the seat. Refer to "Secur-ing a Child Restraint System with the Tether Anchorage System" on page 1-34.
To secure the child restraint seat!or tabs may allow the child to reach the unretracted seat belts which may result in strangulationand a serious injury or death to the child in the child restraint.
o Do not mount more than one child
restraint to a child restraint loweranchorage point. The improper increased load may cause the an-chorage points or tether anchor to break, causing serious injury or death.
o Attach the ISOFIX or ISOFIX-com- patible child restraint seat only tothe appropriate locations shownin the illustration.
o Always follow the installation and
use instructions provided by themanufacturer of the child restraint.
Page 67 of 599
1
FEATURES OF YOUR HYUNDAI
53
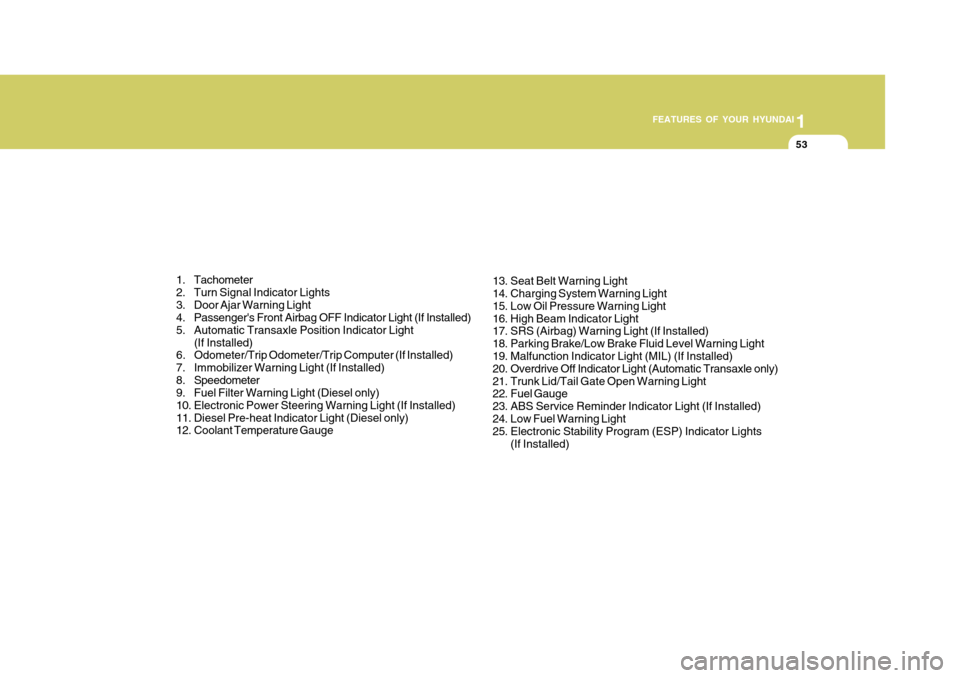
1. Tachometer
2. Turn Signal Indicator Lights
3. Door Ajar Warning Light
4. Passenger's Front Airbag OFF Indicator Light (If Installed)
5. Automatic Transaxle Position Indicator Light (If Installed)
6. Odometer/Trip Odometer/Trip Computer (If Installed)
7. Immobilizer Warning Light (If Installed)
8. Speedometer
9. Fuel Filter Warning Light (Diesel only)
10. Electronic Power Steering Warning Light (If Installed)
11. Diesel Pre-heat Indicator Light (Diesel only)
12. Coolant Temperature Gauge 13. Seat Belt Warning Light
14. Charging System Warning Light
15. Low Oil Pressure Warning Light
16. High Beam Indicator Light
17. SRS (Airbag) Warning Light (If Installed)
18. Parking Brake/Low Brake Fluid Level Warning Light
19. Malfunction Indicator Light (MIL) (If Installed)
20. Overdrive Off Indicator Light (Automatic Transaxle only)
21. Trunk Lid/Tail Gate Open Warning Light
22. Fuel Gauge
23. ABS Service Reminder Indicator Light (If Installed)
24. Low Fuel Warning Light
25. Electronic Stability Program (ESP) Indicator Lights
(If Installed)
Page 69 of 599
1
FEATURES OF YOUR HYUNDAI
55
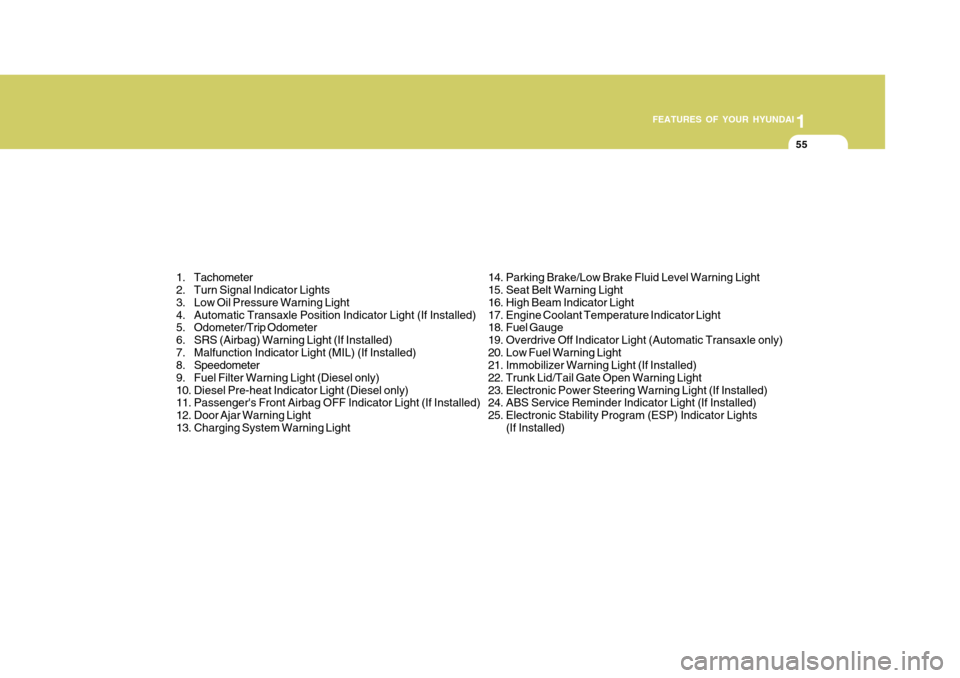
1. Tachometer
2. Turn Signal Indicator Lights
3. Low Oil Pressure Warning Light
4. Automatic Transaxle Position Indicator Light (If Installed)
5. Odometer/Trip Odometer
6. SRS (Airbag) Warning Light (If Installed)
7. Malfunction Indicator Light (MIL) (If Installed)
8. Speedometer
9. Fuel Filter Warning Light (Diesel only)
10. Diesel Pre-heat Indicator Light (Diesel only)
11. Passenger's Front Airbag OFF Indicator Light (If Installed)
12. Door Ajar Warning Light
13. Charging System Warning Light 14. Parking Brake/Low Brake Fluid Level Warning Light
15. Seat Belt Warning Light
16. High Beam Indicator Light
17. Engine Coolant Temperature Indicator Light
18. Fuel Gauge
19. Overdrive Off Indicator Light (Automatic Transaxle only)
20. Low Fuel Warning Light
21. Immobilizer Warning Light (If Installed)
22. Trunk Lid/Tail Gate Open Warning Light
23. Electronic Power Steering Warning Light (If Installed)
24. ABS Service Reminder Indicator Light (If Installed)
25. Electronic Stability Program (ESP) Indicator Lights
(If Installed)
Page 71 of 599
1
FEATURES OF YOUR HYUNDAI
57
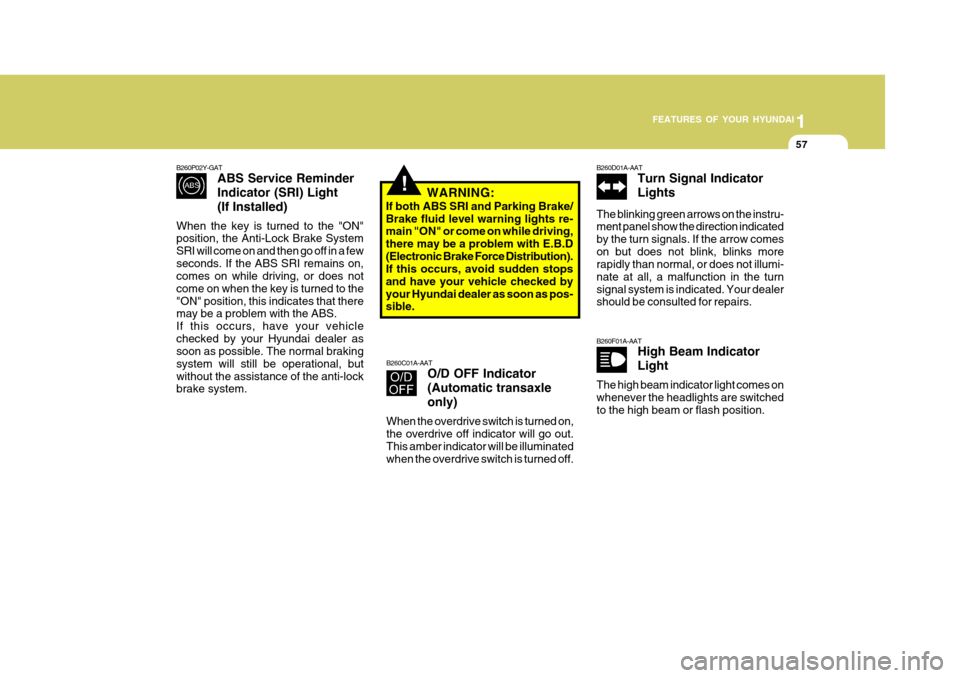
B260F01A-AAT High Beam Indicator Light
The high beam indicator light comes on whenever the headlights are switched to the high beam or flash position.
B260D01A-AAT Turn Signal Indicator Lights
The blinking green arrows on the instru- ment panel show the direction indicated by the turn signals. If the arrow comeson but does not blink, blinks more rapidly than normal, or does not illumi- nate at all, a malfunction in the turnsignal system is indicated. Your dealer should be consulted for repairs.
!
B260P02Y-GAT ABS Service Reminder Indicator (SRI) Light(If Installed)
When the key is turned to the "ON" position, the Anti-Lock Brake System SRI will come on and then go off in a fewseconds. If the ABS SRI remains on, comes on while driving, or does not come on when the key is turned to the"ON" position, this indicates that there may be a problem with the ABS. If this occurs, have your vehiclechecked by your Hyundai dealer as soon as possible. The normal braking system will still be operational, butwithout the assistance of the anti-lock brake system. B260C01A-AAT
O/D OFF Indicator (Automatic transaxleonly)
When the overdrive switch is turned on, the overdrive off indicator will go out. This amber indicator will be illuminatedwhen the overdrive switch is turned off. WARNING:
If both ABS SRI and Parking Brake/Brake fluid level warning lights re- main "ON" or come on while driving, there may be a problem with E.B.D(Electronic Brake Force Distribution). If this occurs, avoid sudden stops and have your vehicle checked byyour Hyundai dealer as soon as pos- sible.
Page 163 of 599
2
Before Starting the Engine ........................................... 2-3
Key Position ................................................................. 2-4Starting......................................................................... 2-5
Operating the Manual Transaxle ................................. 2-9
Automatic Transaxle .................................................. 2-11
Good Braking Practices ............................................. 2-15
Anti-lock Brake System (ABS) ...................................2-16
Driving for Economy ................................................... 2-17
Winter Driving ............................................................. 2-18
Trailer or Vehicle Towing ........................................... 2-21
DRIVING YOUR HYUNDAI
2
Page 178 of 599
2 DRIVING YOUR HYUNDAI
16
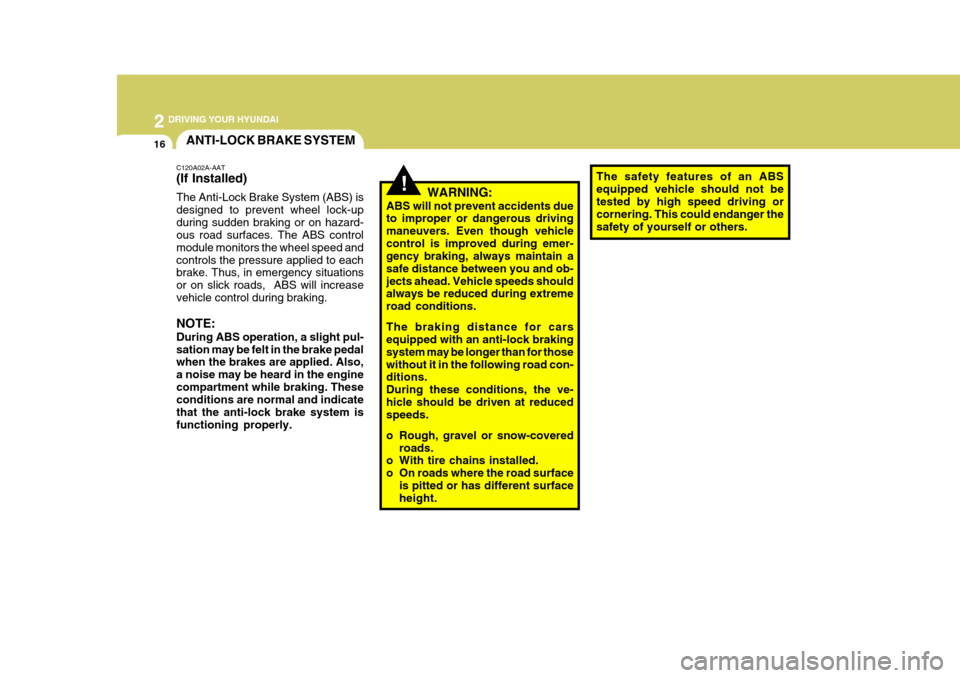
!WARNING:
ABS will not prevent accidents due to improper or dangerous driving maneuvers. Even though vehiclecontrol is improved during emer- gency braking, always maintain a safe distance between you and ob-jects ahead. Vehicle speeds should always be reduced during extreme road conditions. The braking distance for cars equipped with an anti-lock braking system may be longer than for thosewithout it in the following road con- ditions. During these conditions, the ve-hicle should be driven at reduced speeds.
o Rough, gravel or snow-covered roads.
o With tire chains installed.
o On roads where the road surface
is pitted or has different surface height. The safety features of an ABS equipped vehicle should not betested by high speed driving or cornering. This could endanger the safety of yourself or others.
ANTI-LOCK BRAKE SYSTEM
C120A02A-AAT (If Installed) The Anti-Lock Brake System (ABS) is designed to prevent wheel lock-upduring sudden braking or on hazard- ous road surfaces. The ABS control module monitors the wheel speed andcontrols the pressure applied to each brake. Thus, in emergency situations or on slick roads, ABS will increasevehicle control during braking. NOTE: During ABS operation, a slight pul- sation may be felt in the brake pedal when the brakes are applied. Also, a noise may be heard in the enginecompartment while braking. These conditions are normal and indicate that the anti-lock brake system isfunctioning properly.
Page 204 of 599

44CORROSION PREVENTION AND APPEARANCE CARE
4WASHING AND WAXING
E030A01A-AAT Washing Your Hyundai Never wash your car when the surface is hot from being in the sun. Alwayswash your car in the shade. Wash your car frequently. Dirt is abra- sive and can scratch the paint if it is not removed. Air pollution or acid rain may damage the paint and trim throughchemical action if pollutants are al- lowed to remain in contact with the surface. If you live near the ocean or inan area where road salts or dust con- trol chemicals are used, you should pay particular attention to the under-side of the car. Start by rinsing the car to remove dust and loose dirt. In win- ter, or if you have driven through mudor muddy water, be sure to thoroughly clean the underside as well. Use a hard direct stream of water to removeaccumulations of mud or corrosive materials. Use a good quality car-washing solu-tion and follow the manufacturer's di- rections on the package. These are available at your Hyundai dealer orauto parts outlet. Don't use strong household detergents, gasoline, strongsolvents or abrasive cleaning powdersas these may damage the finish. Use a clean sponge or cloth, rinse it frequently and don't damage the finishby rubbing too hard. For stubborn spots, dampen them frequently and remove them a little at a time.To clean whitewall tires, use a stiff brush or soapy steel-wool scouring pad.To clean plastic wheel covers, use a clean sponge or soft cloth and water. To clean cast aluminum alloy wheels, use a mild soap or neutral detergent. Do not use abrasive cleaners. Protectthe bare-metal surfaces by cleaning, polishing and waxing. Because alumi- num is subject to corrosion, be sure togive aluminum alloy wheels special attention in winter. If you drive on salted roads, clean the wheels thor-oughly afterwards. After washing, be sure to rinse thor- oughly. If soapy water dries on the finish, streaking will result.
When the weather is warm and the humidity low, you may find it neces-sary to rinse each section immediately after washing to avoid streaking. After rinsing, dry the car using a damp chamois or soft, absorbent cloth. The reason for drying the car is to removewater from the car so it will dry without water spots. Don't rub, this can dam- age the finish. If you find any nicks or scratches in the paint, use touch-up paint to cover themto prevent corrosion. To protect the paintwork of the car against corrosion, you must clean your Hyundai (at leastonce a month). Give special attention to the removal of salt, mud and other substances on the underside of thesplashboards of the car. Make sure that the outlets and the underside of the doors are open. Paint damage canbe caused by small accumulation of tar, industrial precipitation, tree resin, insects and bird droppings, when notremoved immediately. If water alone is not strong enough to remove the accu-
Page 260 of 599

6 DO-IT-YOURSELF MAINTENANCE
42
G200C02A-GAT Engine Compartment (Gasoline Engine)
HLC5027
NOTE:
Not all fuse panel descriptions in this manual may be applicable to your vehicle. It is accurate at the time of printing.
When you inspect the fuse box on your vehicle, refer to the fuse box label.FUSE RATING 120A50A 50A20A30A20A 30A 30A30A30A20A 10A 10A 10A 10A10A 10A10A15A 10A15A 15A 10A 25A PROTECTED COMPONENTS
Charging (Generator) Fuse 6, 7, 8, 9, Horn fuse, Room lamp fuse
Head lamp fuse, Front fog lamp fuse, Tail lamp relay, H/LP washer fuse
Engine control relay, Generator, Fuel pump relay, ECU #3 fuse Ignition power source, Start relayRadiator fan control Blower control ABS control, ABS bleeding connectorABS control, ABS bleeding connector Power window Condenser fan controlRadiator fan, Condenser fan, ECM, Oxygen sensor, Purge control valve,
SMATRA, Glow plug relay, Heater relay, Stop lamp switch A/C relayHorn relay Illumination lamps, Left rear combination lamp, License lamp, DRL control, Position lamp, H/LP washer relayRight rear combination lamp, License lamp, Position lamp Left head lamp, DRL control, Instrument cluster Right head lampFront fog lamp relay
Instrument cluster, Courtesy lamp, Trunk room lamp, ETACM, DLC, Door warning, Multipurpose check connectorAudio, Digital clock, Power antenna, A/C switch, Rear fog lamp switch Idle speed actuator, ECM, Camshaft position sensor, EGR actuator, Throttle plate actuatorECM Head lamp washer motor
Fuel pump relay, Fuel pump motor
ALT
BATTERY LAMPECU
IGN
RAD FAN
BLOWER
ABS ABS
P/WDW
COND FAN
ECU #1
A/CON COMP HORN
TAIL LH
TAIL RH
H/LP LH
H/LP RH
FRONT FOG
ROOM LP AUDIO
ECU #2 ECU#3
H/L WASHER
FUSIBLE
LINK
FUSE
DESCRIPTION
F/PUMP CHK (E50)
FUSE PANEL DESCRIPTION