Head Hyundai Accent 2008 Owner's Manual
[x] Cancel search | Manufacturer: HYUNDAI, Model Year: 2008, Model line: Accent, Model: Hyundai Accent 2008Pages: 273, PDF Size: 9.36 MB
Page 24 of 273
1FEATURES OF YOUR HYUNDAI12
!
WARNING:
o Passengers can be injured if their
head, hands or other body parts are
trapped by a closing window. Al-
ways check for obstructions before
raising any window.
o NEVER leave the ignition key in the
vehicle.
o NEVER leave any child unattended
in the vehicle. Even very young
children may inadvertently cause the
vehicle to move, entangle them-
selves in the windows, or otherwise
injure themselves or others.
o Do not attempt to operate the main
switch on the driver's door and a
switch on another door in opposing
directions at the same time. If this is
done, the window will stop and can-
not be opened or closed.
OMC025015
NOTE:The power windows can be operated for
30 seconds after the ignition key is
turned to the "ACC" or "LOCK" posi-
tions, or removed from the ignition
switch. If the front doors are opened
during this 30 second period, the power
windows can no longer be operated with-
out the ignition key turned to the "ON"
position.
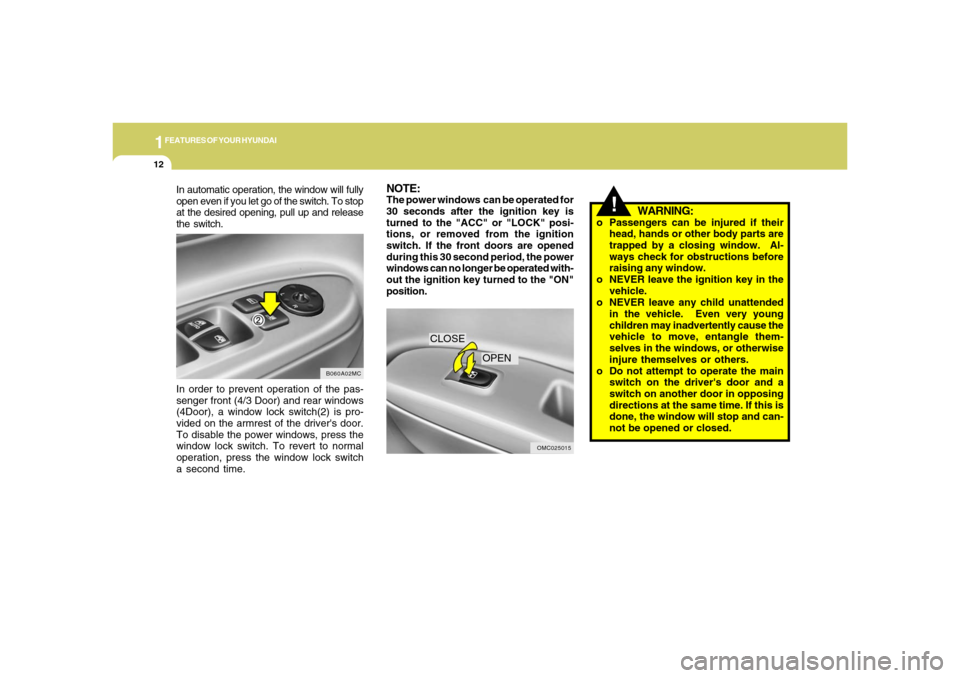
In order to prevent operation of the pas-
senger front (4/3 Door) and rear windows
(4Door), a window lock switch(2) is pro-
vided on the armrest of the driver's door.
To disable the power windows, press the
window lock switch. To revert to normal
operation, press the window lock switch
a second time.
B060A02MC
In automatic operation, the window will fully
open even if you let go of the switch. To stop
at the desired opening, pull up and release
the switch.
CLOSE
OPEN
Page 27 of 273
1
FEATURES OF YOUR HYUNDAI
151
FEATURES OF YOUR HYUNDAI
15
To recline the seatback, lean forward to
take your weight off it, then pull up on the
recliner control lever at the outside edge
of the seat. Now lean back until the de-
sired seatback angle is achieved. To lock
the seatback into position, release the
recliner control lever.
!
WARNING:
Riding with a reclined seatback in-
creases your chance of serious or fatal
injuries in the event of a collision or
sudden stop. The protection of your
restraint system (seat belts and airbags)
is greatly reduced by reclining your seat.
Seat belts must be snug against your
hips and chest to work properly. The
more the seatback is reclined, the greater
the chance that an occupant's hips will
slide under the lap belt or the occupant's
neck will strike the shoulder belt. Driv-
ers and passengers should always sit
well back in their seats, properly belted,
and with the seatbacks upright.
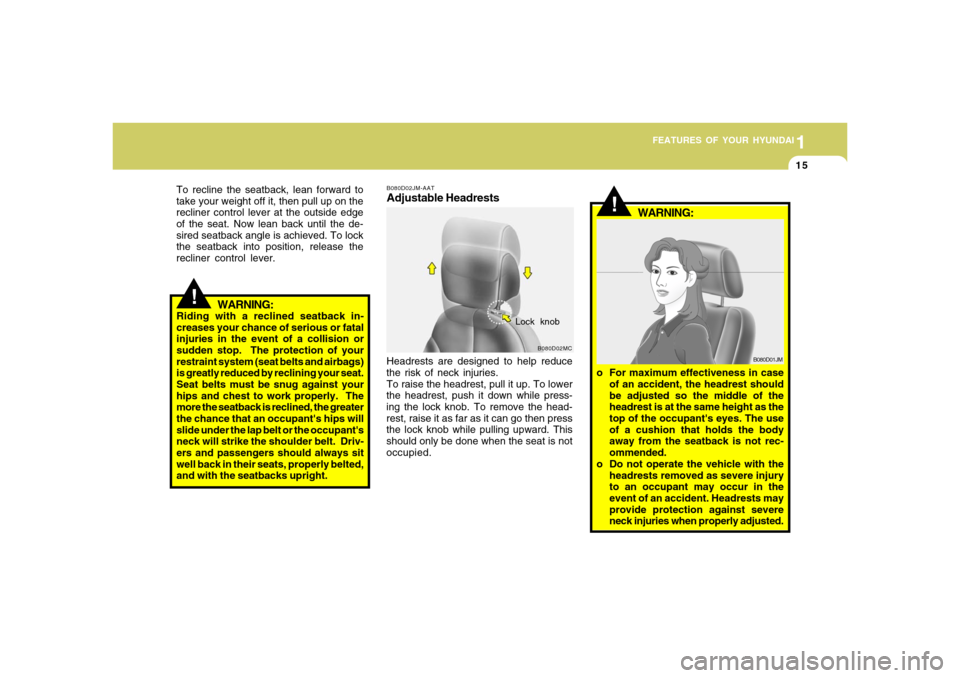
B080D02JM-AATAdjustable HeadrestsHeadrests are designed to help reduce
the risk of neck injuries.
To raise the headrest, pull it up. To lower
the headrest, push it down while press-
ing the lock knob. To remove the head-
rest, raise it as far as it can go then press
the lock knob while pulling upward. This
should only be done when the seat is not
occupied.
B080D02MC
Lock knob
!
WARNING:
o For maximum effectiveness in case
of an accident, the headrest should
be adjusted so the middle of the
headrest is at the same height as the
top of the occupant's eyes. The use
of a cushion that holds the body
away from the seatback is not rec-
ommended.
o Do not operate the vehicle with the
headrests removed as severe injury
to an occupant may occur in the
event of an accident. Headrests may
provide protection against severe
neck injuries when properly adjusted.
B080D01JM
Page 28 of 273
1FEATURES OF YOUR HYUNDAI16
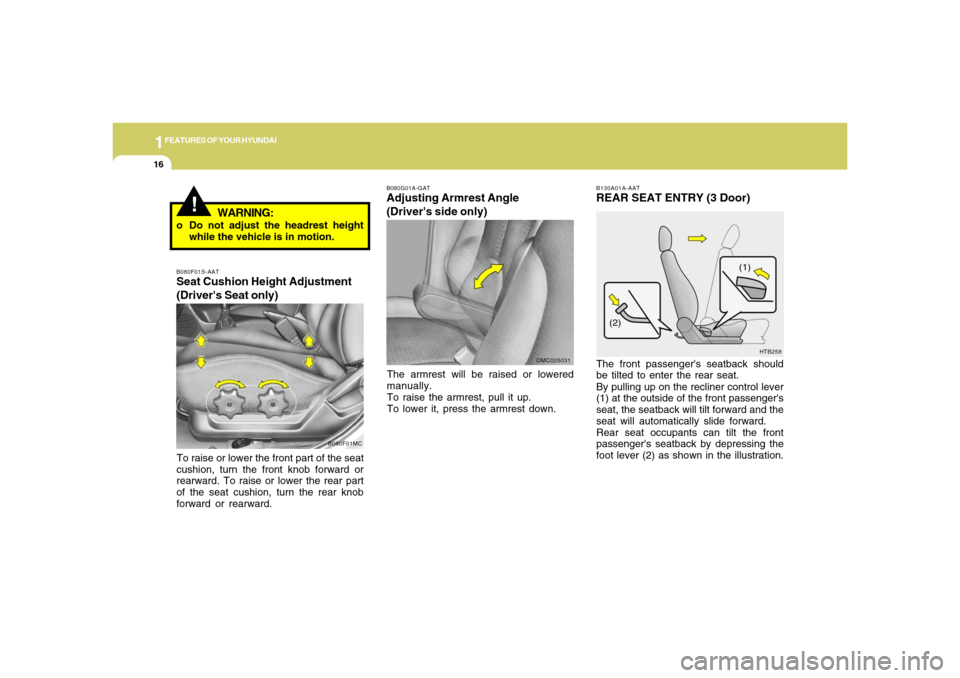
B130A01A-AATREAR SEAT ENTRY (3 Door)The front passenger's seatback should
be tilted to enter the rear seat.
By pulling up on the recliner control lever
(1) at the outside of the front passenger's
seat, the seatback will tilt forward and the
seat will automatically slide forward.
Rear seat occupants can tilt the front
passenger's seatback by depressing the
foot lever (2) as shown in the illustration.
HTB258
(1)
(2)
!
WARNING:
B080F01S-AATSeat Cushion Height Adjustment
(Driver's Seat only)To raise or lower the front part of the seat
cushion, turn the front knob forward or
rearward. To raise or lower the rear part
of the seat cushion, turn the rear knob
forward or rearward.
B080F01MCB080G01A-GAT
Adjusting Armrest Angle
(Driver's side only)The armrest will be raised or lowered
manually.
To raise the armrest, pull it up.
To lower it, press the armrest down.
OMC025031
o Do not adjust the headrest height
while the vehicle is in motion.
Page 29 of 273
1
FEATURES OF YOUR HYUNDAI
171
FEATURES OF YOUR HYUNDAI
17
!
WARNING:
Passengers sitting in the rear seat should
be careful not to accidentally press the
foot lever (2) while the vehicle is moving,
as this may cause the seatback to move
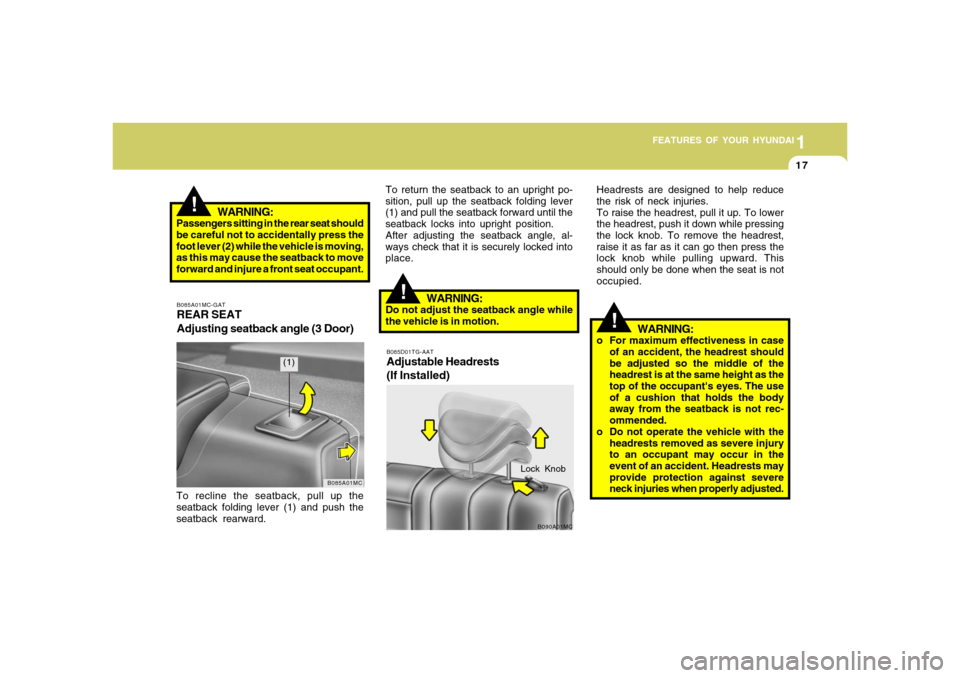
forward and injure a front seat occupant.B085A01MC-GATREAR SEAT
Adjusting seatback angle (3 Door)To recline the seatback, pull up the
seatback folding lever (1) and push the
seatback rearward.
B085A01MC
(1)
To return the seatback to an upright po-
sition, pull up the seatback folding lever
(1) and pull the seatback forward until the
seatback locks into upright position.
After adjusting the seatback angle, al-
ways check that it is securely locked into
place.
!
WARNING:
Do not adjust the seatback angle while
the vehicle is in motion.
Lock Knob
B085D01TG-AATAdjustable Headrests
(If Installed)
B090A01MC
Headrests are designed to help reduce
the risk of neck injuries.
To raise the headrest, pull it up. To lower
the headrest, push it down while pressing
the lock knob. To remove the headrest,
raise it as far as it can go then press the
lock knob while pulling upward. This
should only be done when the seat is not
occupied.
!
WARNING:
o For maximum effectiveness in case
of an accident, the headrest should
be adjusted so the middle of the
headrest is at the same height as the
top of the occupant's eyes. The use
of a cushion that holds the body
away from the seatback is not rec-
ommended.
o Do not operate the vehicle with the
headrests removed as severe injury
to an occupant may occur in the
event of an accident. Headrests may
provide protection against severe
neck injuries when properly adjusted.
Page 30 of 273
1FEATURES OF YOUR HYUNDAI18
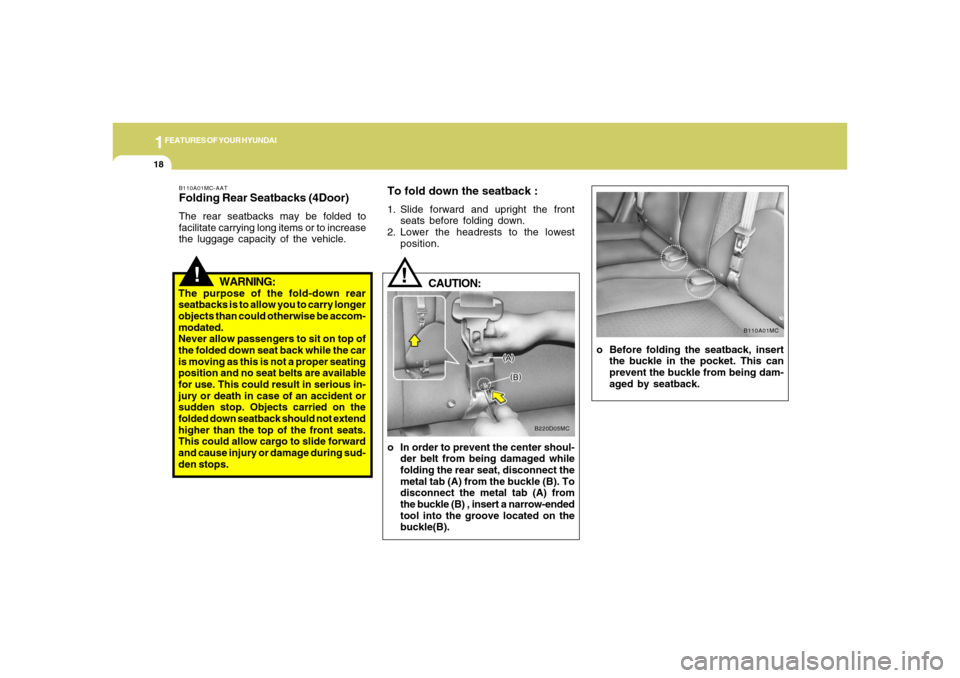
o Before folding the seatback, insert
the buckle in the pocket. This can
prevent the buckle from being dam-
aged by seatback.
B110A01MC
!
B110A01MC-AATFolding Rear Seatbacks (4Door)The rear seatbacks may be folded to
facilitate carrying long items or to increase
the luggage capacity of the vehicle.
WARNING:
The purpose of the fold-down rear
seatbacks is to allow you to carry longer
objects than could otherwise be accom-
modated.
Never allow passengers to sit on top of
the folded down seat back while the car
is moving as this is not a proper seating
position and no seat belts are available
for use. This could result in serious in-
jury or death in case of an accident or
sudden stop. Objects carried on the
folded down seatback should not extend
higher than the top of the front seats.
This could allow cargo to slide forward
and cause injury or damage during sud-
den stops.
To fold down the seatback :1. Slide forward and upright the front
seats before folding down.
2. Lower the headrests to the lowest
position.
B220D05MC
o In order to prevent the center shoul-
der belt from being damaged while
folding the rear seat, disconnect the
metal tab (A) from the buckle (B). To
disconnect the metal tab (A) from
the buckle (B) , insert a narrow-ended
tool into the groove located on the
buckle(B).
!
CAUTION:
Page 33 of 273
1
FEATURES OF YOUR HYUNDAI
211
FEATURES OF YOUR HYUNDAI
21
B080G01MC
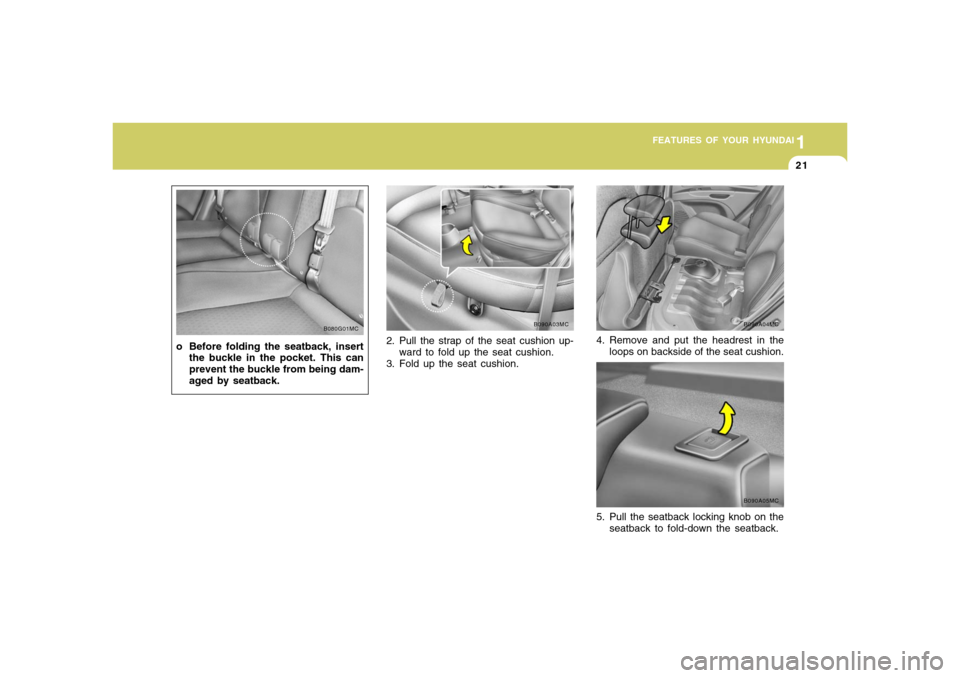
o Before folding the seatback, insert
the buckle in the pocket. This can
prevent the buckle from being dam-
aged by seatback.
B090A03MC
2. Pull the strap of the seat cushion up-
ward to fold up the seat cushion.
3. Fold up the seat cushion.
B090A04MC
4. Remove and put the headrest in the
loops on backside of the seat cushion.
B090A05MC
5. Pull the seatback locking knob on the
seatback to fold-down the seatback.
Page 46 of 273
1FEATURES OF YOUR HYUNDAI34
B230E02MC-AATInstalling a Child Restraint Seat with
the "Tether Anchorage" System
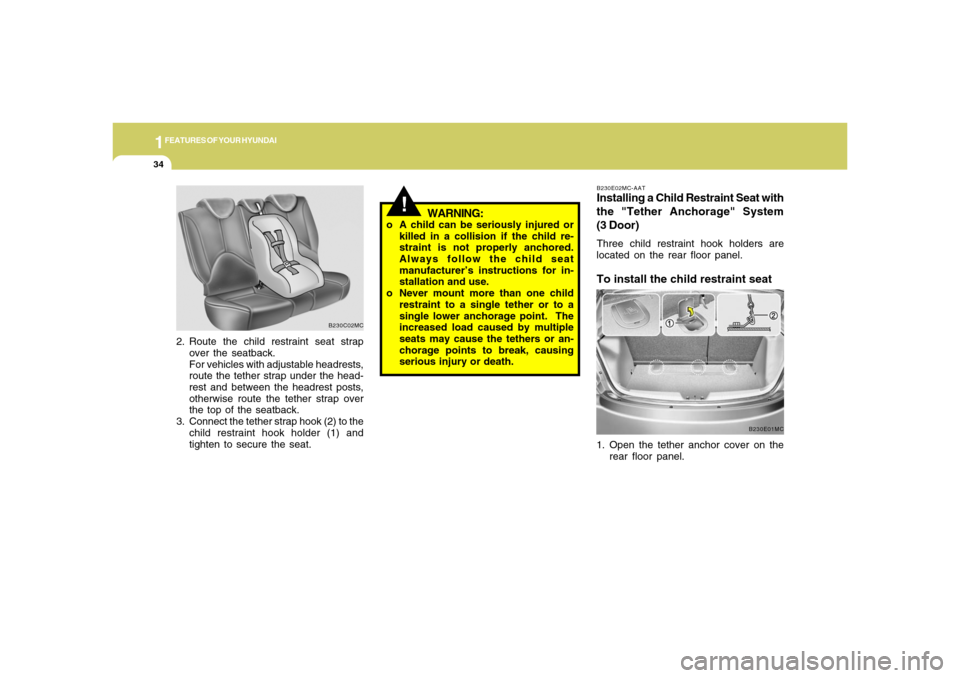
(3 Door)Three child restraint hook holders are
located on the rear floor panel.To install the child restraint seat
!
WARNING:
o A child can be seriously injured or
killed in a collision if the child re-
straint is not properly anchored.
Always follow the child seat
manufacturer’s instructions for in-
stallation and use.
o Never mount more than one child
restraint to a single tether or to a
single lower anchorage point. The
increased load caused by multiple
seats may cause the tethers or an-
chorage points to break, causing
serious injury or death.
1. Open the tether anchor cover on the
rear floor panel.
B230E01MC
2. Route the child restraint seat strap
over the seatback.
For vehicles with adjustable headrests,
route the tether strap under the head-
rest and between the headrest posts,
otherwise route the tether strap over
the top of the seatback.
3. Connect the tether strap hook (2) to the
child restraint hook holder (1) and
tighten to secure the seat.
B230C02MC
Page 47 of 273
1
FEATURES OF YOUR HYUNDAI
351
FEATURES OF YOUR HYUNDAI
35
B230C02MC
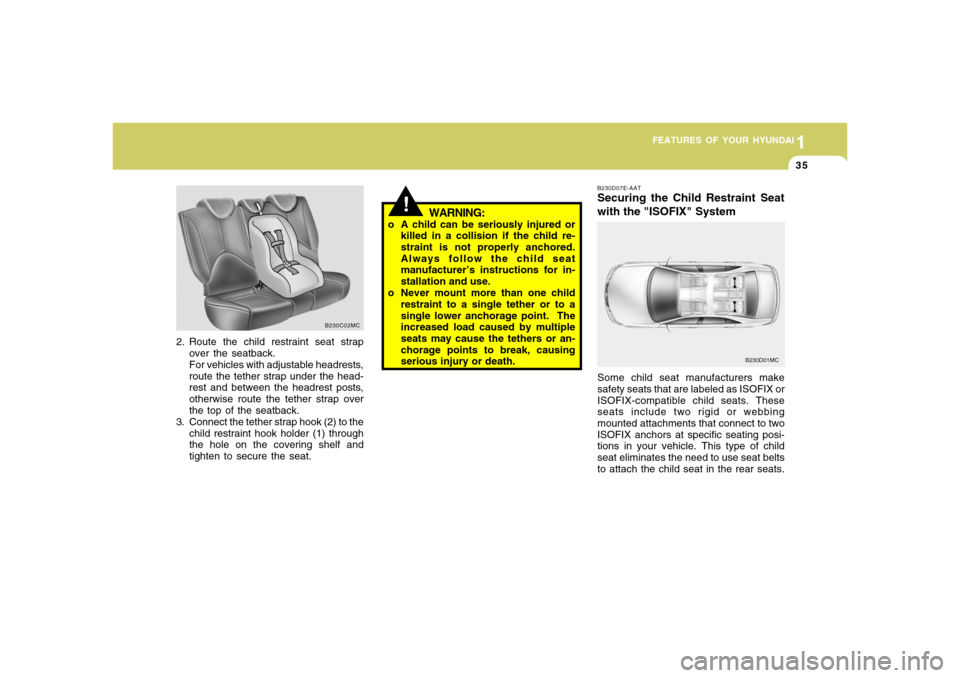
2. Route the child restraint seat strap
over the seatback.
For vehicles with adjustable headrests,
route the tether strap under the head-
rest and between the headrest posts,
otherwise route the tether strap over
the top of the seatback.
3. Connect the tether strap hook (2) to the
child restraint hook holder (1) through
the hole on the covering shelf and
tighten to secure the seat.
!
WARNING:
o A child can be seriously injured or
killed in a collision if the child re-
straint is not properly anchored.
Always follow the child seat
manufacturer’s instructions for in-
stallation and use.
o Never mount more than one child
restraint to a single tether or to a
single lower anchorage point. The
increased load caused by multiple
seats may cause the tethers or an-
chorage points to break, causing
serious injury or death.
B230D07E-AATSecuring the Child Restraint Seat
with the "ISOFIX" SystemSome child seat manufacturers make
safety seats that are labeled as ISOFIX or
ISOFIX-compatible child seats. These
seats include two rigid or webbing
mounted attachments that connect to two
ISOFIX anchors at specific seating posi-
tions in your vehicle. This type of child
seat eliminates the need to use seat belts
to attach the child seat in the rear seats.
B230D01MC
Page 50 of 273
1FEATURES OF YOUR HYUNDAI38
!
WARNING:
o If the retractor is not in the Auto-
matic Locking mode, the child re-
straint can move when your vehicle
turns or stops suddenly. A child can
be seriously injured or killed if the
child restraint is not properly an-
chored to the car, including setting
the retractor to the Automatic Lock-
ing mode.
o Do not install any child restraint sys-
tem in the front passenger seat.
Should an accident occur and cause
the passenger side airbag to deploy,
it could severely injure or kill an
infant or child seated in an infant or
child seat. Therefore, only use a child
restraint system in the rear seat of
your vehicle.
o Before installing Child Restraint Sys-
tem to vehicles fitted with Curtain
Airbags, always refer to safety no-
tices for Curtain Airbag systems on
this manual. Whenever installing child
restraints, use only approved devices
and refer to "Child Restraint System"
to ensure correct installation and oc-
cupant protection is maximized. the retractor has engaged the automatic
locking feature by trying to extend web-
bing out of the retractor. If the retractor is
in the automatic locking mode, the belt
will be locked. After installation of the
child restraint system, try to move it in all
directions to be sure the child restraint
system is securely installed. If you need
to tighten the belt, pull more webbing
toward the retractor. When you unbuckle
the seat belt and allow it to retract, the
retractor will automatically revert back to
its normal seated passenger emergency
locking usage condition.
NOTE:o Before installing the child restraint
system, read the instructions sup-
plied by the child restraint system
manufacturer.
o If the seat belt does not operate as
described, have the system checked
immediately by your authorized
Hyundai dealer.
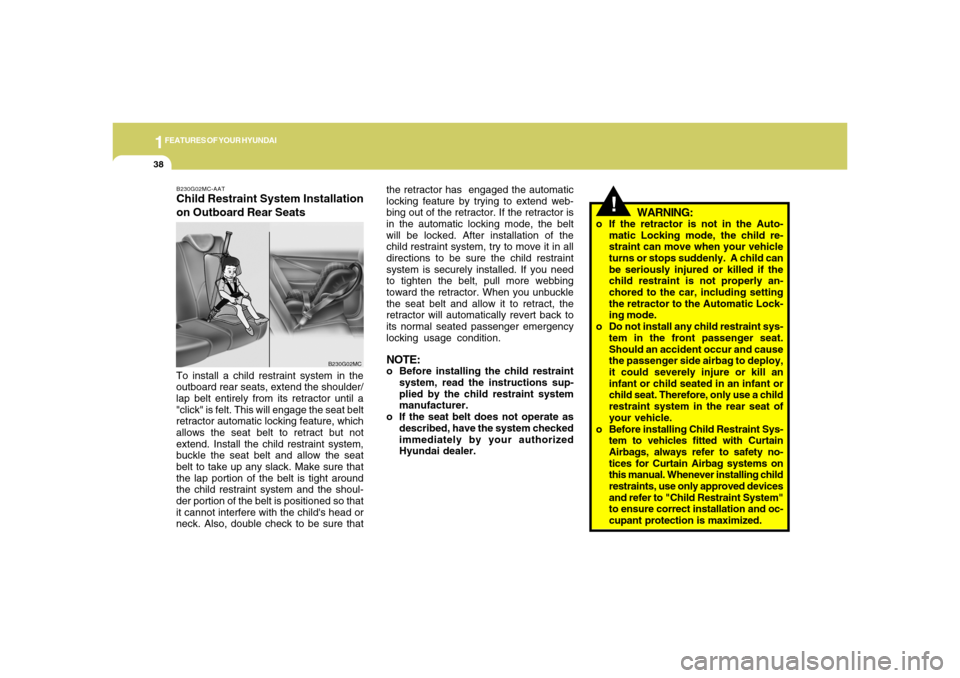
To install a child restraint system in the
outboard rear seats, extend the shoulder/
lap belt entirely from its retractor until a
"click" is felt. This will engage the seat belt
retractor automatic locking feature, which
allows the seat belt to retract but not
extend. Install the child restraint system,
buckle the seat belt and allow the seat
belt to take up any slack. Make sure that
the lap portion of the belt is tight around
the child restraint system and the shoul-
der portion of the belt is positioned so that
it cannot interfere with the child's head or
neck. Also, double check to be sure thatB230G02MC-AATChild Restraint System Installation
on Outboard Rear Seats
B230G02MC
Page 59 of 273
1
FEATURES OF YOUR HYUNDAI
471
FEATURES OF YOUR HYUNDAI
47
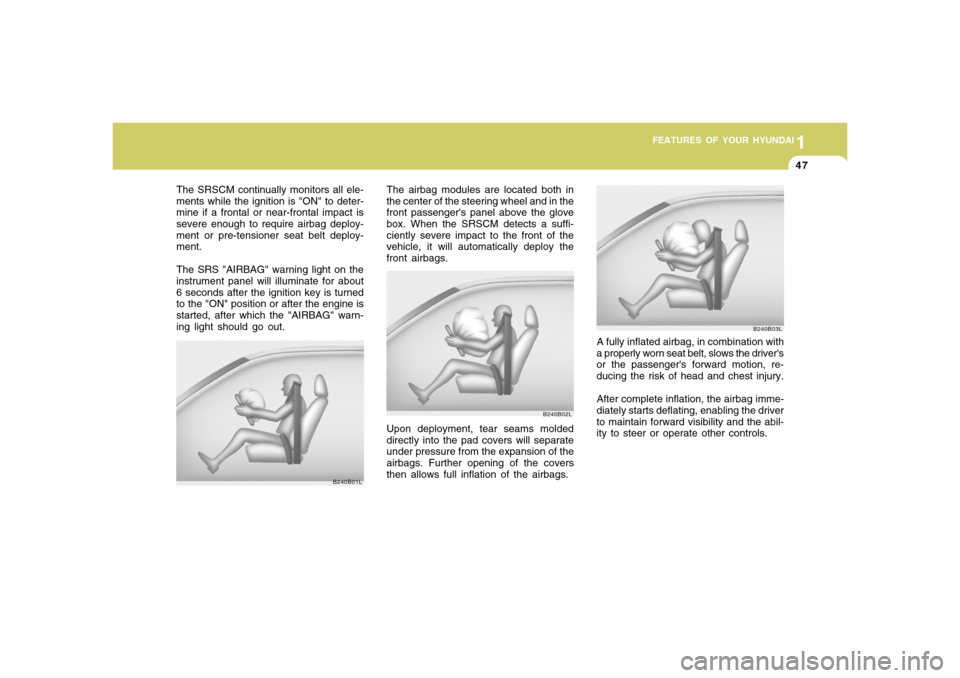
The SRSCM continually monitors all ele-
ments while the ignition is "ON" to deter-
mine if a frontal or near-frontal impact is
severe enough to require airbag deploy-
ment or pre-tensioner seat belt deploy-
ment.
The SRS "AIRBAG" warning light on the
instrument panel will illuminate for about
6 seconds after the ignition key is turned
to the "ON" position or after the engine is
started, after which the "AIRBAG" warn-
ing light should go out.
B240B01L
Upon deployment, tear seams molded
directly into the pad covers will separate
under pressure from the expansion of the
airbags. Further opening of the covers
then allows full inflation of the airbags. The airbag modules are located both in
the center of the steering wheel and in the
front passenger's panel above the glove
box. When the SRSCM detects a suffi-
ciently severe impact to the front of the
vehicle, it will automatically deploy the
front airbags.
B240B02L
A fully inflated airbag, in combination with
a properly worn seat belt, slows the driver's
or the passenger's forward motion, re-
ducing the risk of head and chest injury.
After complete inflation, the airbag imme-
diately starts deflating, enabling the driver
to maintain forward visibility and the abil-
ity to steer or operate other controls.
B240B03L