brake Hyundai Accent 2012 Owner's Manual - RHD (UK. Australia)
[x] Cancel search | Manufacturer: HYUNDAI, Model Year: 2012, Model line: Accent, Model: Hyundai Accent 2012Pages: 367, PDF Size: 25.39 MB
Page 13 of 367
Introduction
6
1
No special run-in period is needed. By
following a few simple precautions for the
first 1,000 km (600 miles) you may add to
the performance, economy and life of
your vehicle.
Do not race the engine.
Whilst driving, keep your engine speed
(rpm, or revolutions per minute)
between 2,000 rpm and 4,000 rpm.
Do not maintain a single speed for long periods of time, either fast or slow.
Varying engine speed is needed to
properly run-in the engine.
Avoid hard stops, except in emergen- cies, to allow the brakes to seat prop-
erly.
Don't let the engine idle longer than 3 minutes at one time.
Don't tow a trailer during the first 2,000 km (1,200 miles) of operation.
VEHICLE RUN-IN PROCESS
Page 14 of 367
17
Introduction
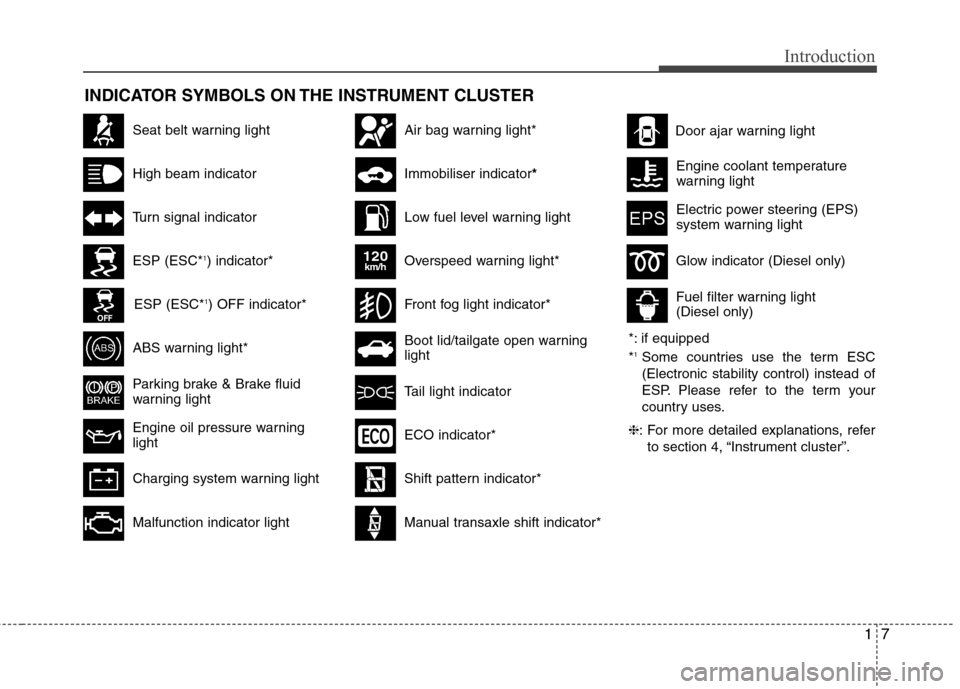
INDICATOR SYMBOLS ON THE INSTRUMENT CLUSTER
Seat belt warning light
High beam indicator
Turn signal indicator
ABS warning light*
Parking brake & Brake fluid
warning light
Engine oil pressure warning light
ESP (ESC*1
) indicator*
ESP (ESC* 1
) OFF indicator*
Malfunction indicator light
Air bag warning light*
Immobiliser indicator *
Low fuel level warning light
*: if equipped *1
Some countries use the term ESC (Electronic stability control) instead of
ESP. Please refer to the term your
country uses.
❈ : For more detailed explanations, refer
to section 4, “Instrument cluster”.
Charging system warning light Overspeed warning light*
120km/h
Tail light indicator
Boot lid/tailgate open warning light
Front fog light indicator*
Glow indicator (Diesel only)
Fuel filter warning light (Diesel only)
Shift pattern indicator*
Electric power steering (EPS)
system warning light
Door ajar warning light
ECO indicator*
Manual transaxle shift indicator*
Engine coolant temperature
warning light
Page 16 of 367
Your vehicle at a glance
2
2
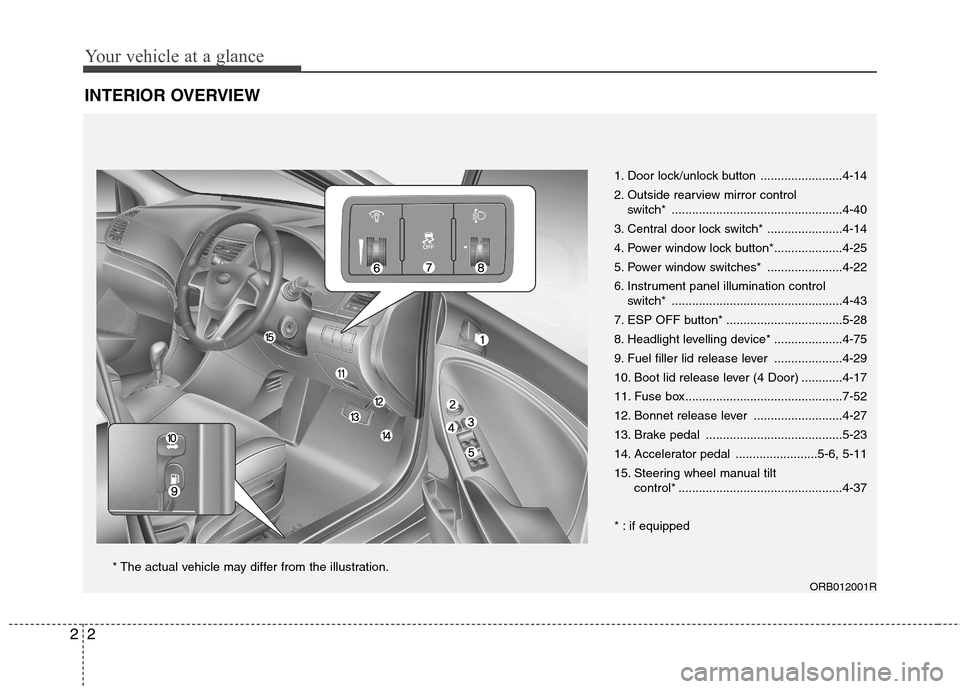
INTERIOR OVERVIEW
1. Door lock/unlock button ........................4-14
2. Outside rearview mirror control
switch* ..................................................4-40
3. Central door lock switch* ......................4-14
4. Power window lock button*....................4-25
5. Power window switches* ......................4-22
6. Instrument panel illumination control switch* ..................................................4-43
7. ESP OFF button* ..................................5-28
8. Headlight levelling device* ....................4-75
9. Fuel filler lid release lever ....................4-29
10. Boot lid release lever (4 Door) ............4-17
11. Fuse box..............................................7-52
12. Bonnet release lever ..........................4-27
13. Brake pedal ........................................5-23
14. Accelerator pedal ........................5-6, 5-11
15. Steering wheel manual tilt control* ................................................4-37
* : if equipped
ORB012001R
* The actual vehicle may differ from the illustration.
Page 17 of 367
23
Your vehicle at a glance
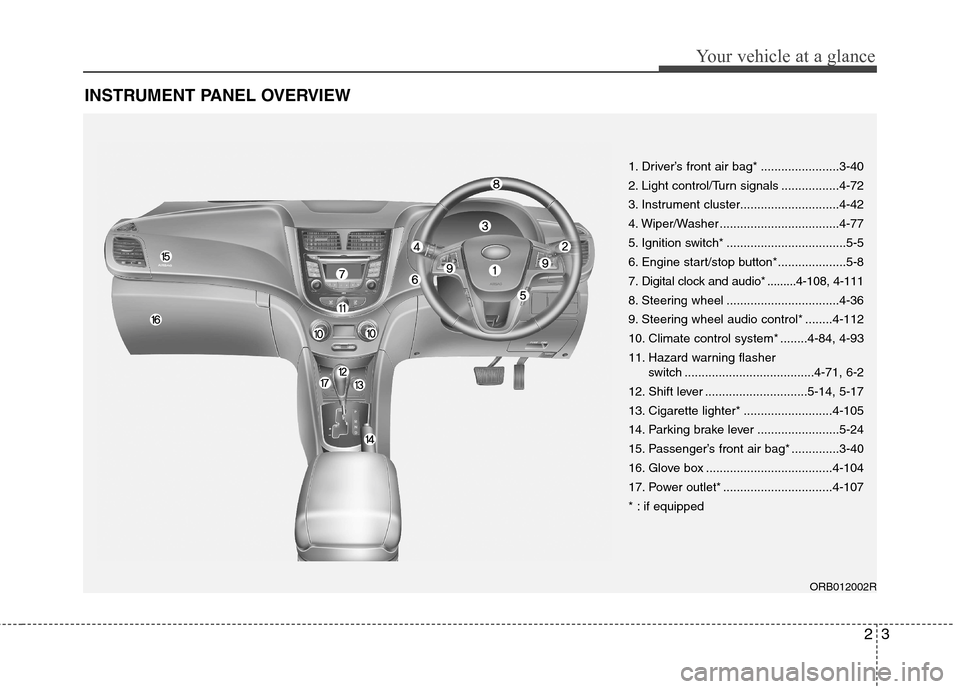
INSTRUMENT PANEL OVERVIEW
1. Driver’s front air bag* .......................3-40
2. Light control/Turn signals .................4-72
3. Instrument cluster.............................4-42
4. Wiper/Washer ...................................4-77
5. Ignition switch* ...................................5-5
6. Engine start/stop button*....................5-8
7. Digital clock and audio* .........4-108, 4-111
8. Steering wheel .................................4-36
9. Steering wheel audio control* ........4-112
10. Climate control system* ........4-84, 4-93
11. Hazard warning flasher switch ......................................4-71, 6-2
12. Shift lever ..............................5-14, 5-17
13. Cigarette lighter* ..........................4-105
14. Parking brake lever ........................5-24
15. Passenger’s front air bag* ..............3-40
16. Glove box .....................................4-104
17. Power outlet* ................................4-107
* : if equipped
ORB012002R
Page 18 of 367
Your vehicle at a glance
4
2
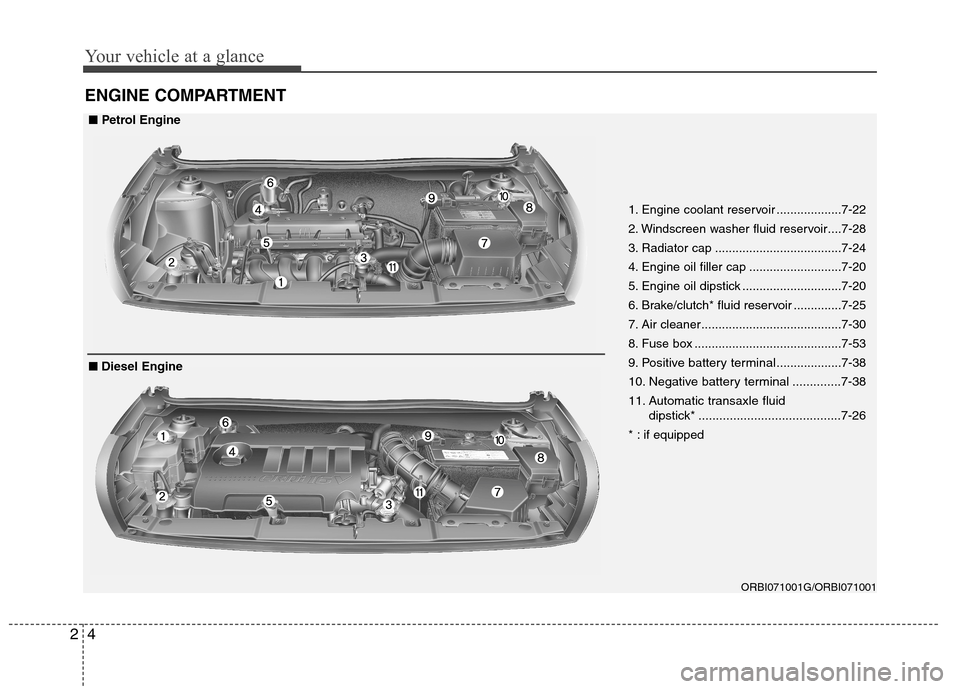
ENGINE COMPARTMENT
ORBI071001G/ORBI071001
1. Engine coolant reservoir ...................7-22
2. Windscreen washer fluid reservoir....7-28
3. Radiator cap .....................................7-24
4. Engine oil filler cap ...........................7-20
5. Engine oil dipstick .............................7-20
6. Brake/clutch* fluid reservoir ..............7-25
7. Air cleaner.........................................7-30
8. Fuse box ...........................................7-539.
Positive battery terminal...................7-38
10. Negative battery terminal ..............7-38
11. Automatic transaxle fluid
dipstick* .........................................7-26
* : if equipped
■ Petrol Engine
■ Diesel Engine
Page 28 of 367
Safety features of your vehicle
10
3
WARNING
When you return the rear seatback to its upright position after being
folded down:
Be careful not to damage the seat
belt webbing or buckle. Do not
allow the seat belt webbing or
buckle to get caught or pinched in
the rear seat. Ensure that the seat-
back is completely locked into its
upright position by pushing on the
top of the seatback. Otherwise, in
an accident or sudden stop, the
seat could fold down and allow
cargo to enter the passenger com-
partment, which could result in
serious injury or death.
CAUTION - Rear seat belts
When returning the rear seatbacks
to the upright position, rememberto return the rear shoulder belts to their proper position. Routing the
seat belt webbing through the rearseat belt guides will help keep thebelts from being trapped behind orunder the seats.
CAUTION - Damaging rear
seat belt buckles
When you fold the rear seatback or put luggage on the rear seat cush-
ion, insert the buckle in the pocketbetween the rear seatback andcushion. Doing so can prevent the buckle from being damaged by the
rear seatback or luggage.
WARNING - Cargo loading
Make sure the engine is off, the
automatic transaxle is in P (Park) or
the manual transaxle is in 1st, andthe parking brake is applied when-
ever loading or unloading cargo.
Failure to take these steps may
allow the vehicle to move if the shift
lever is inadvertently moved toanother position.
WARNING - Cargo
Cargo should always be secured to
prevent it from being thrown about
the vehicle in a collision and caus-
ing injury to the vehicle occupants.Special care of objects should betaken when placing them in the rear
seats, since they may hit the front
seat occupants in a frontal colli-sion.
Page 68 of 367
Safety features of your vehicle
50
3
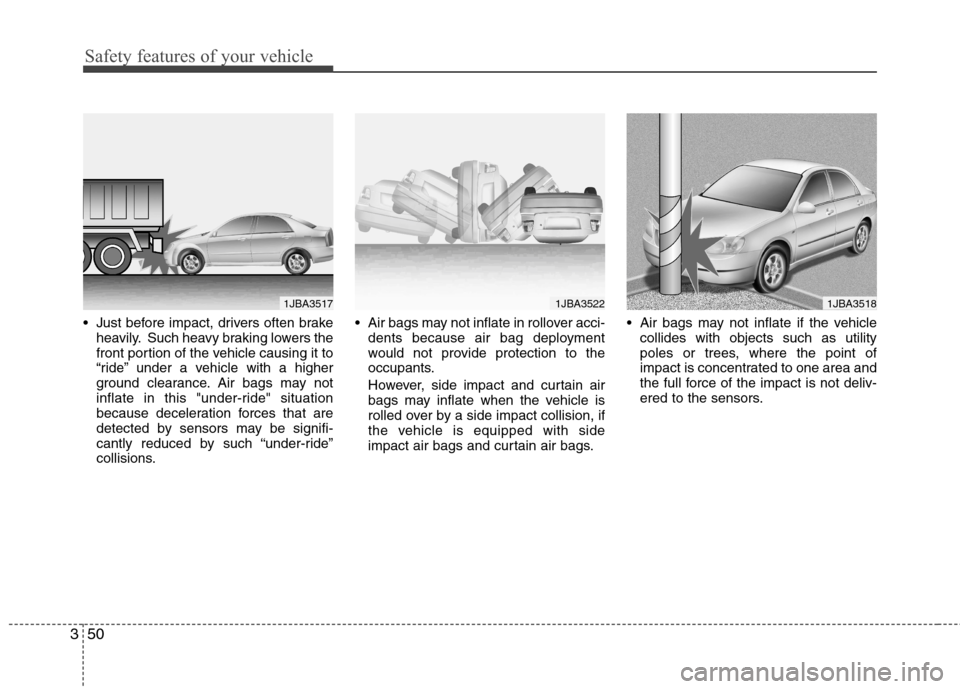
Just before impact, drivers often brake
heavily. Such heavy braking lowers the
front portion of the vehicle causing it to
“ride” under a vehicle with a higher
ground clearance. Air bags may not
inflate in this "under-ride" situation
because deceleration forces that are
detected by sensors may be signifi-
cantly reduced by such “under-ride”
collisions. Air bags may not inflate in rollover acci-
dents because air bag deployment
would not provide protection to the
occupants.
However, side impact and curtain air bags may inflate when the vehicle is
rolled over by a side impact collision, if
the vehicle is equipped with side
impact air bags and curtain air bags. Air bags may not inflate if the vehicle
collides with objects such as utility
poles or trees, where the point of
impact is concentrated to one area and
the full force of the impact is not deliv-
ered to the sensors.
1JBA35171JBA35221JBA3518
Page 86 of 367
415
Features of your vehicle
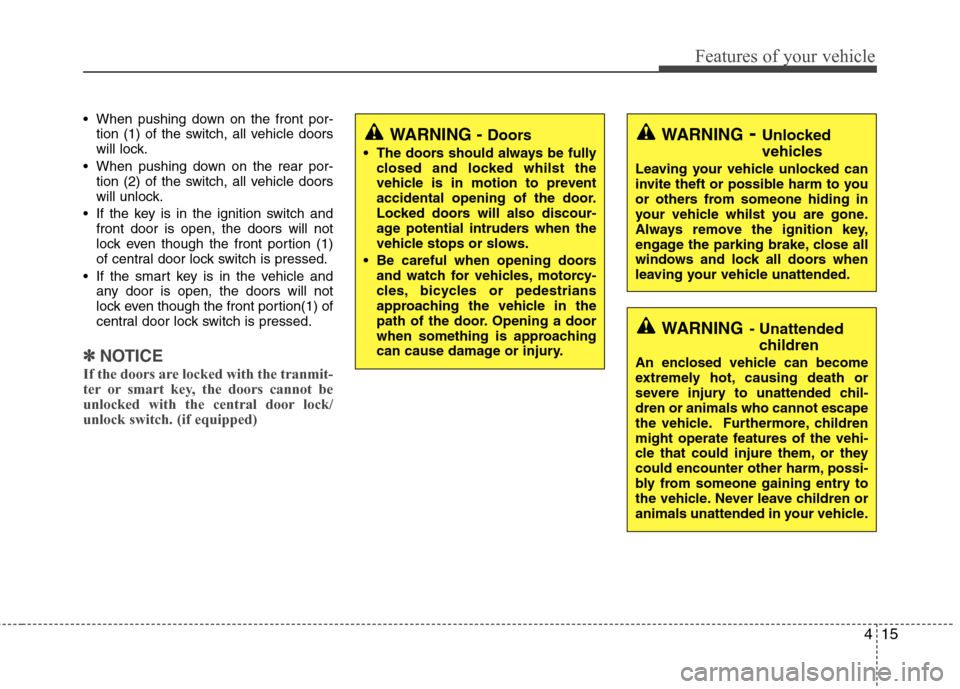
When pushing down on the front por-tion (1) of the switch, all vehicle doors
will lock.
When pushing down on the rear por- tion (2) of the switch, all vehicle doors
will unlock.
If the key is in the ignition switch and front door is open, the doors will not
lock even though the front portion (1)
of central door lock switch is pressed.
If the smart key is in the vehicle and any door is open, the doors will not
lock even though the front portion(1) of
central door lock switch is pressed.
✽✽ NOTICE
If the doors are locked with the tranmit-
ter or smart key, the doors cannot be
unlocked with the central door lock/unlock switch. (if equipped)
WARNING - Unlocked
vehicles
Leaving your vehicle unlocked can
invite theft or possible harm to you
or others from someone hiding in
your vehicle whilst you are gone.
Always remove the ignition key,
engage the parking brake, close all
windows and lock all doors when
leaving your vehicle unattended.
WARNING - Unattended
children
An enclosed vehicle can become
extremely hot, causing death or
severe injury to unattended chil-dren or animals who cannot escape
the vehicle. Furthermore, children
might operate features of the vehi-
cle that could injure them, or they
could encounter other harm, possi-
bly from someone gaining entry to
the vehicle. Never leave children or
animals unattended in your vehicle.
WARNING - Doors
The doors should always be fully closed and locked whilst the
vehicle is in motion to prevent
accidental opening of the door.
Locked doors will also discour-
age potential intruders when the
vehicle stops or slows.
Be careful when opening doors and watch for vehicles, motorcy-
cles, bicycles or pedestrians
approaching the vehicle in the
path of the door. Opening a door
when something is approaching
can cause damage or injury.
Page 98 of 367
427
Features of your vehicle
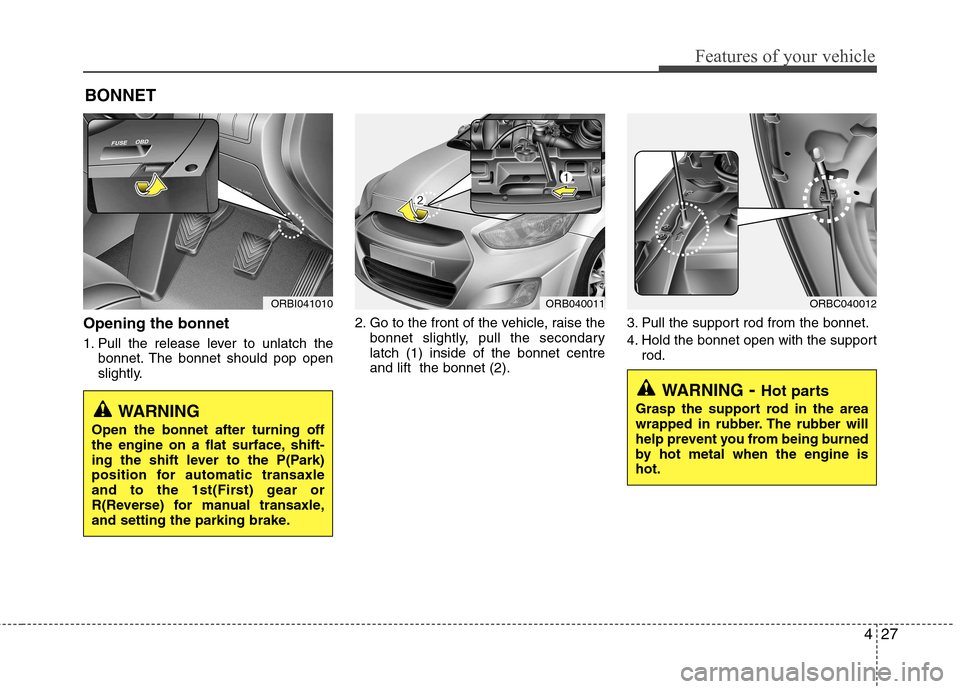
Opening the bonnet
1. Pull the release lever to unlatch thebonnet. The bonnet should pop open
slightly. 2. Go to the front of the vehicle, raise the
bonnet slightly, pull the secondarylatch (1) inside of the bonnet centreand lift the bonnet (2). 3. Pull the support rod from the bonnet.
4. Hold the bonnet open with the support
rod.
BONNET
ORBI041010ORB040011ORBC040012
WARNING
- Hot parts
Grasp the support rod in the area
wrapped in rubber. The rubber will
help prevent you from being burned
by hot metal when the engine ishot.
WARNING
Open the bonnet after turning off
the engine on a flat surface, shift-
ing the shift lever to the P(Park)
position for automatic transaxle
and to the 1st(First) gear or
R(Reverse) for manual transaxle,
and setting the parking brake.
Page 122 of 367
451
Features of your vehicle
Warnings and indicators
All warning lights are checked by turning
the ignition switch ON (do not start the
engine). Any light that does not illuminate
should be checked by an authorised
HYUNDAI dealer.
After starting the engine, check to make
sure that all warning lights are off. If anyare still on, this indicates a situation that
needs attention. When releasing the
parking brake, the brake system warning
light should go off. The fuel warning light
will stay on if the fuel level is low.ECO indicator (if equipped)
The ECO indicator is a system that
informs you to drive economically.
It is displayed if you drive fuel efficiently
to help you improve fuel efficiency.
The ECO indicator (green) will turn on when you are driving fuel efficiently in
the ECO ON mode.
If you don't want the indicator dis-
played, you can turn the ECO ON
mode to OFF mode by pressing the
TRIP button.
As per ECO ON/OFF Mode operation,
refer to the previous page.
The fuel-efficiency can be changed by the driver's driving habit and road con-dition.
It doesn't work at the condition which doesn't meet economical driving such
as P (Park), N (Neutral), R (Reverse)
or sports mode.
Whilst the instant fuel consumption mode is displayed on the LCD screen,
the ECO indicator turns off.
WARNING
Don't keep watching the indicator
whilst driving. It will distract youwhilst driving and cause an acci-
dent that results in severe personal
injury.ECO