300 Hyundai Accent 2013 Owner's Manual
[x] Cancel search | Manufacturer: HYUNDAI, Model Year: 2013, Model line: Accent, Model: Hyundai Accent 2013Pages: 402, PDF Size: 8.49 MB
Page 20 of 402
Safety features of your vehicle
2 3
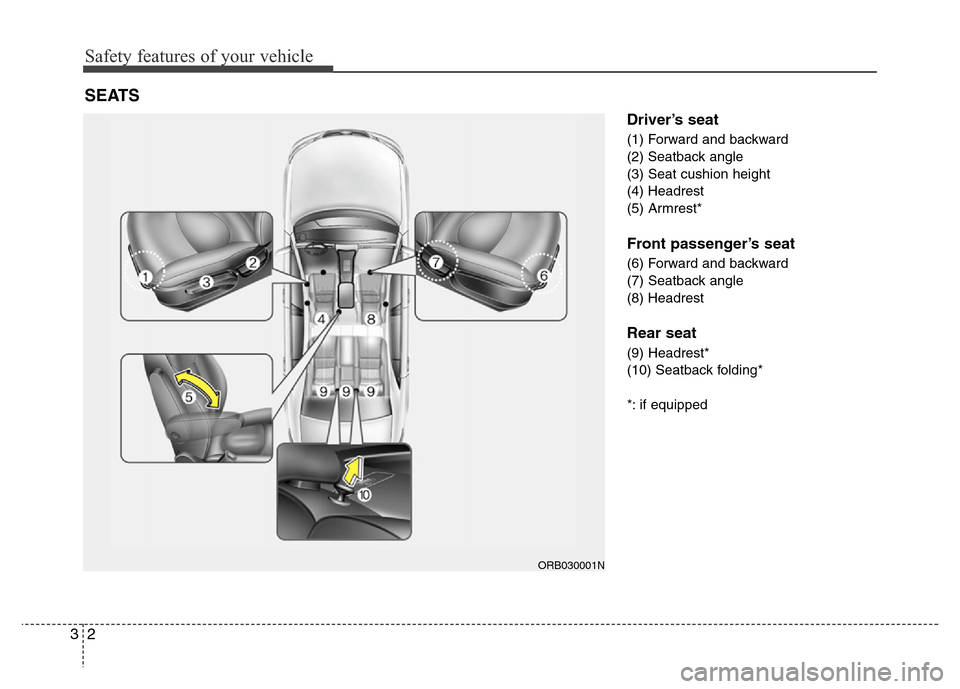
Driver’s seat
(1) Forward and backward
(2) Seatback angle
(3) Seat cushion height
(4) Headrest
(5) Armrest*
Front passenger’s seat
(6) Forward and backward
(7) Seatback angle
(8) Headrest
Rear seat
(9) Headrest*
(10) Seatback folding*
*: if equipped
SEATS
ORB030001N
Page 22 of 402
Safety features of your vehicle
4 3
Front seat
Manual adjustment
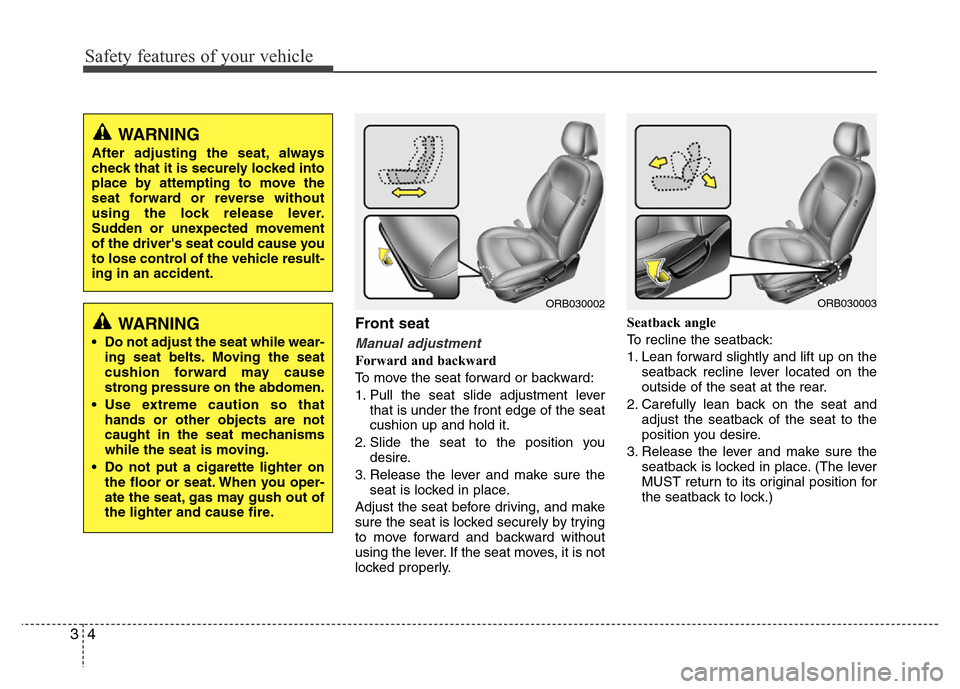
Forward and backward
To move the seat forward or backward:
1. Pull the seat slide adjustment lever
that is under the front edge of the seat
cushion up and hold it.
2. Slide the seat to the position you
desire.
3. Release the lever and make sure the
seat is locked in place.
Adjust the seat before driving, and make
sure the seat is locked securely by trying
to move forward and backward without
using the lever. If the seat moves, it is not
locked properly.Seatback angle
To recline the seatback:
1. Lean forward slightly and lift up on the
seatback recline lever located on the
outside of the seat at the rear.
2. Carefully lean back on the seat and
adjust the seatback of the seat to the
position you desire.
3. Release the lever and make sure the
seatback is locked in place. (The lever
MUST return to its original position for
the seatback to lock.)
ORB030003ORB030002
WARNING
After adjusting the seat, always
check that it is securely locked into
place by attempting to move the
seat forward or reverse without
using the lock release lever.
Sudden or unexpected movement
of the driver's seat could cause you
to lose control of the vehicle result-
ing in an accident.
WARNING
• Do not adjust the seat while wear-
ing seat belts. Moving the seat
cushion forward may cause
strong pressure on the abdomen.
• Use extreme caution so that
hands or other objects are not
caught in the seat mechanisms
while the seat is moving.
• Do not put a cigarette lighter on
the floor or seat. When you oper-
ate the seat, gas may gush out of
the lighter and cause fire.
Page 23 of 402
35
Safety features of your vehicle
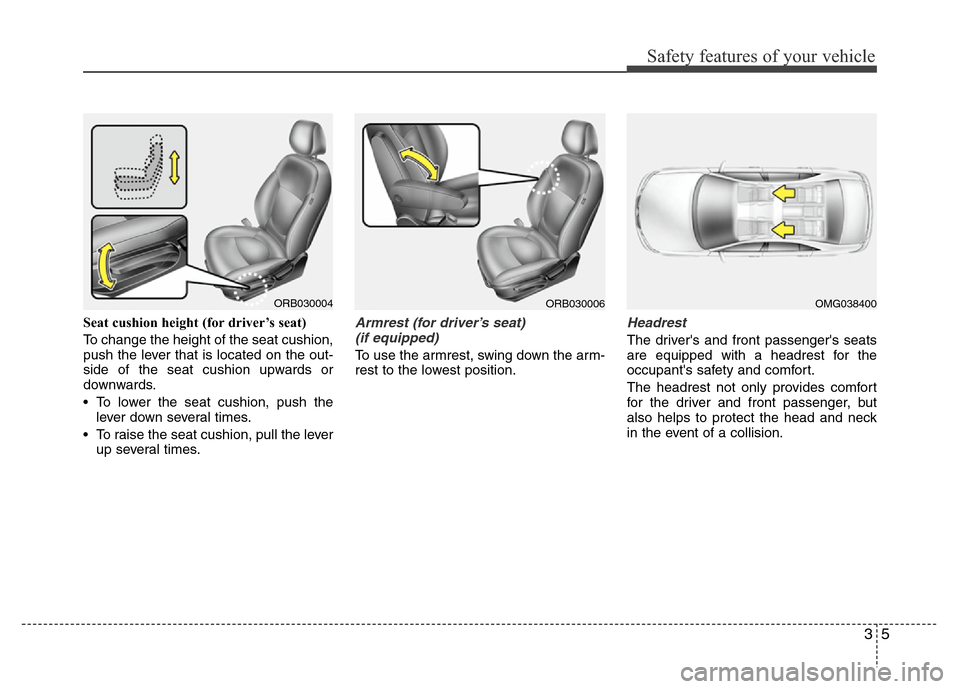
Seat cushion height (for driver’s seat)
To change the height of the seat cushion,
push the lever that is located on the out-
side of the seat cushion upwards or
downwards.
• To lower the seat cushion, push the
lever down several times.
• To raise the seat cushion, pull the lever
up several times.Armrest (for driver’s seat)
(if equipped)
To use the armrest, swing down the arm-
rest to the lowest position.
Headrest
The driver's and front passenger's seats
are equipped with a headrest for the
occupant's safety and comfort.
The headrest not only provides comfort
for the driver and front passenger, but
also helps to protect the head and neck
in the event of a collision.
ORB030004ORB030006OMG038400
Page 24 of 402
Safety features of your vehicle
6 3
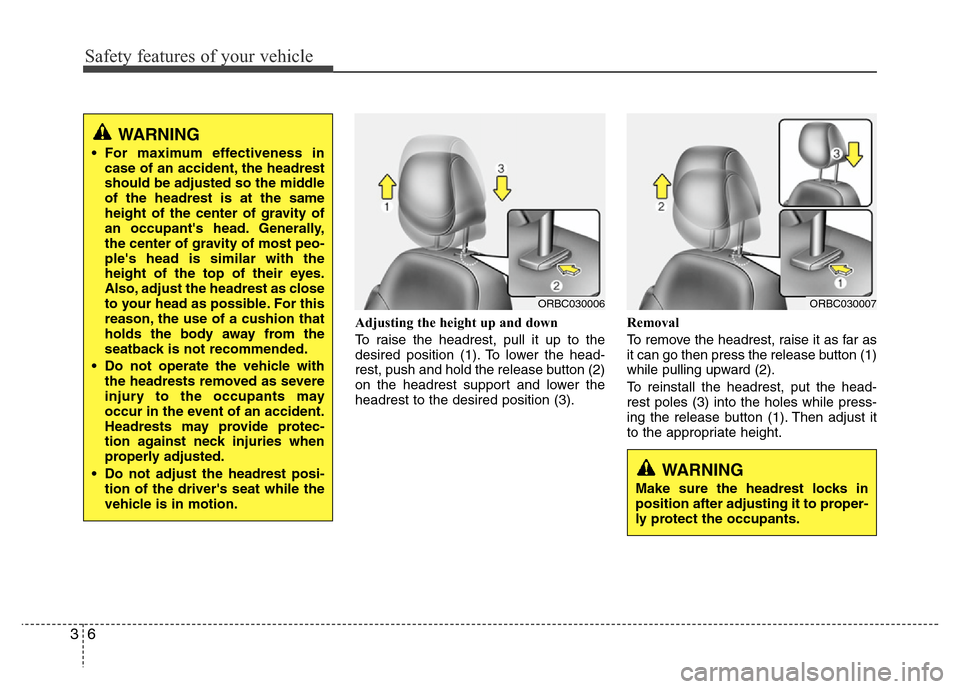
Adjusting the height up and down
To raise the headrest, pull it up to the
desired position (1). To lower the head-
rest, push and hold the release button (2)
on the headrest support and lower the
headrest to the desired position (3).Removal
To remove the headrest, raise it as far as
it can go then press the release button (1)
while pulling upward (2).
To reinstall the headrest, put the head-
rest poles (3) into the holes while press-
ing the release button (1). Then adjust it
to the appropriate height.
WARNING
• For maximum effectiveness in
case of an accident, the headrest
should be adjusted so the middle
of the headrest is at the same
height of the center of gravity of
an occupant's head. Generally,
the center of gravity of most peo-
ple's head is similar with the
height of the top of their eyes.
Also, adjust the headrest as close
to your head as possible. For this
reason, the use of a cushion that
holds the body away from the
seatback is not recommended.
• Do not operate the vehicle with
the headrests removed as severe
injury to the occupants may
occur in the event of an accident.
Headrests may provide protec-
tion against neck injuries when
properly adjusted.
• Do not adjust the headrest posi-
tion of the driver's seat while the
vehicle is in motion.
ORBC030006ORBC030007
WARNING
Make sure the headrest locks in
position after adjusting it to proper-
ly protect the occupants.
Page 25 of 402
37
Safety features of your vehicle
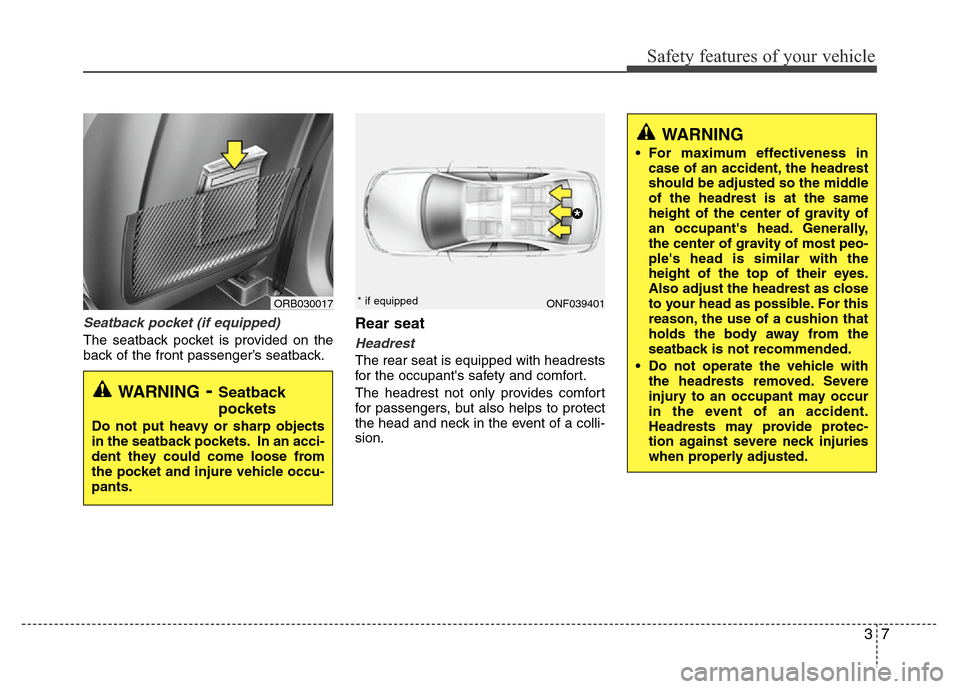
Seatback pocket (if equipped)
The seatback pocket is provided on the
back of the front passenger’s seatback.
Rear seat
Headrest
The rear seat is equipped with headrests
for the occupant's safety and comfort.
The headrest not only provides comfort
for passengers, but also helps to protect
the head and neck in the event of a colli-
sion.
WARNING- Seatback
pockets
Do not put heavy or sharp objects
in the seatback pockets. In an acci-
dent they could come loose from
the pocket and injure vehicle occu-
pants.
ORB030017
WARNING
• For maximum effectiveness in
case of an accident, the headrest
should be adjusted so the middle
of the headrest is at the same
height of the center of gravity of
an occupant's head. Generally,
the center of gravity of most peo-
ple's head is similar with the
height of the top of their eyes.
Also adjust the headrest as close
to your head as possible. For this
reason, the use of a cushion that
holds the body away from the
seatback is not recommended.
• Do not operate the vehicle with
the headrests removed. Severe
injury to an occupant may occur
in the event of an accident.
Headrests may provide protec-
tion against severe neck injuries
when properly adjusted.
ONF039401
*
* if equipped
Page 26 of 402
Safety features of your vehicle
8 3
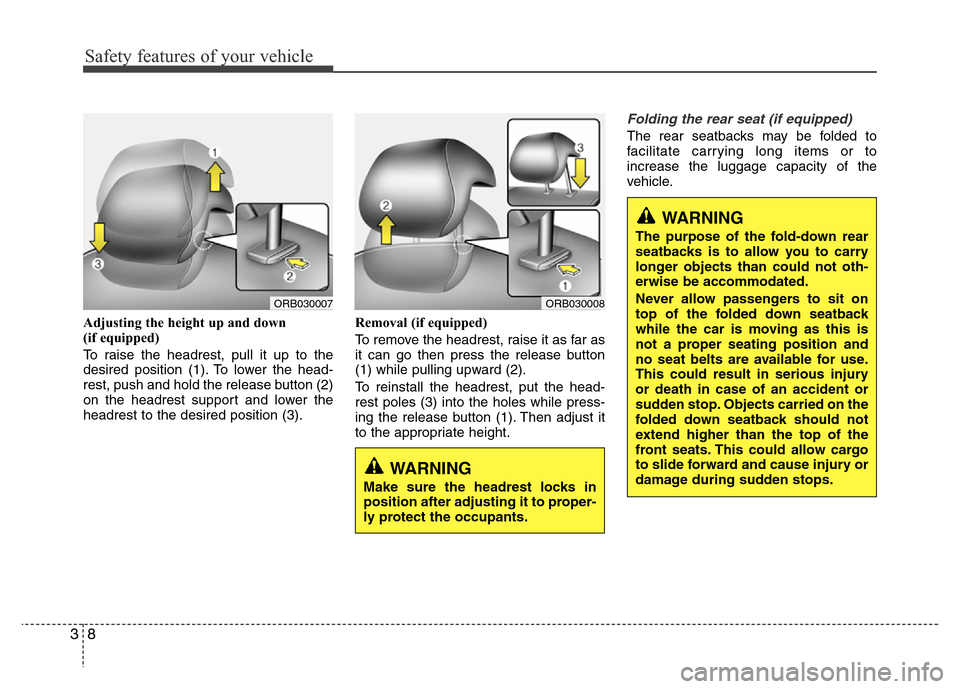
Adjusting the height up and down
(if equipped)
To raise the headrest, pull it up to the
desired position (1). To lower the head-
rest, push and hold the release button (2)
on the headrest support and lower the
headrest to the desired position (3).Removal (if equipped)
To remove the headrest, raise it as far as
it can go then press the release button
(1) while pulling upward (2).
To reinstall the headrest, put the head-
rest poles (3) into the holes while press-
ing the release button (1). Then adjust it
to the appropriate height.
Folding the rear seat (if equipped)
The rear seatbacks may be folded to
facilitate carrying long items or to
increase the luggage capacity of the
vehicle.
ORB030007
WARNING
Make sure the headrest locks in
position after adjusting it to proper-
ly protect the occupants.
ORB030008
WARNING
The purpose of the fold-down rear
seatbacks is to allow you to carry
longer objects than could not oth-
erwise be accommodated.
Never allow passengers to sit on
top of the folded down seatback
while the car is moving as this is
not a proper seating position and
no seat belts are available for use.
This could result in serious injury
or death in case of an accident or
sudden stop. Objects carried on the
folded down seatback should not
extend higher than the top of the
front seats. This could allow cargo
to slide forward and cause injury or
damage during sudden stops.
Page 27 of 402
39
Safety features of your vehicle
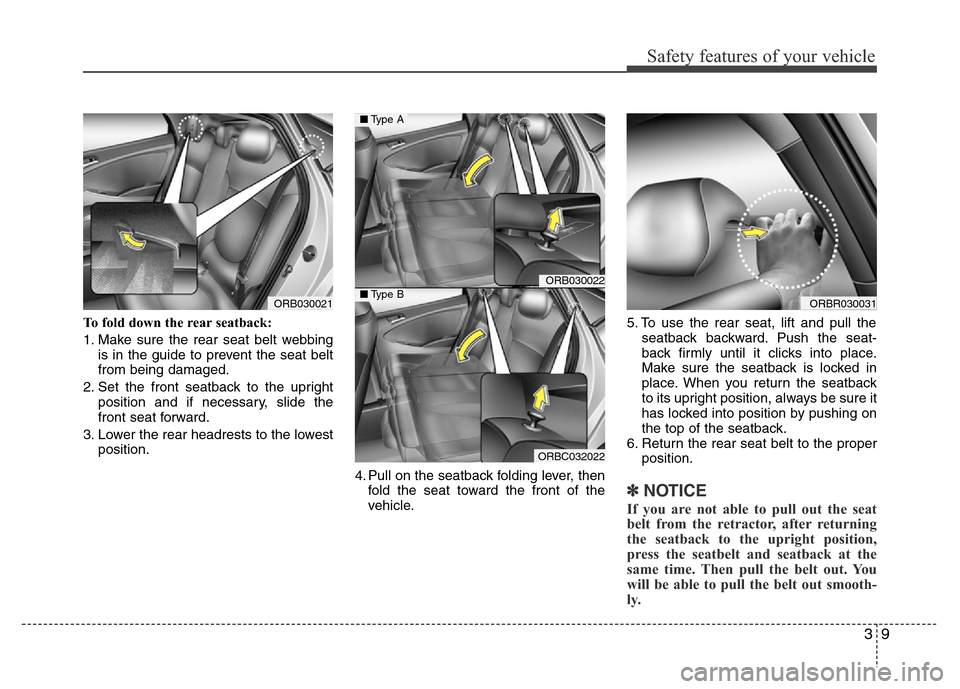
To fold down the rear seatback:
1. Make sure the rear seat belt webbing
is in the guide to prevent the seat belt
from being damaged.
2. Set the front seatback to the upright
position and if necessary, slide the
front seat forward.
3. Lower the rear headrests to the lowest
position.
4. Pull on the seatback folding lever, then
fold the seat toward the front of the
vehicle.5. To use the rear seat, lift and pull the
seatback backward. Push the seat-
back firmly until it clicks into place.
Make sure the seatback is locked in
place. When you return the seatback
to its upright position, always be sure it
has locked into position by pushing on
the top of the seatback.
6. Return the rear seat belt to the proper
position.
✽NOTICE
If you are not able to pull out the seat
belt from the retractor, after returning
the seatback to the upright position,
press the seatbelt and seatback at the
same time. Then pull the belt out. You
will be able to pull the belt out smooth-
ly.
ORB030021ORBR030031
ORB030022
ORBC032022
■Type A
■Type B
Page 31 of 402
313
Safety features of your vehicle
Lap/shoulder belt
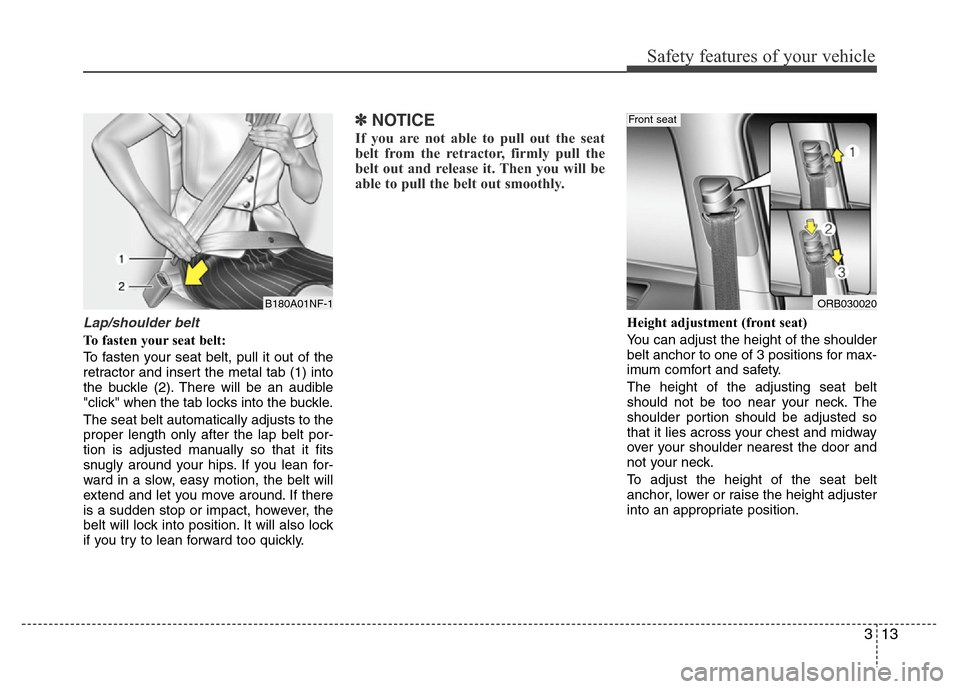
To fasten your seat belt:
To fasten your seat belt, pull it out of the
retractor and insert the metal tab (1) into
the buckle (2). There will be an audible
"click" when the tab locks into the buckle.
The seat belt automatically adjusts to the
proper length only after the lap belt por-
tion is adjusted manually so that it fits
snugly around your hips. If you lean for-
ward in a slow, easy motion, the belt will
extend and let you move around. If there
is a sudden stop or impact, however, the
belt will lock into position. It will also lock
if you try to lean forward too quickly.
✽NOTICE
If you are not able to pull out the seat
belt from the retractor, firmly pull the
belt out and release it. Then you will be
able to pull the belt out smoothly.
Height adjustment (front seat)
You can adjust the height of the shoulder
belt anchor to one of 3 positions for max-
imum comfort and safety.
The height of the adjusting seat belt
should not be too near your neck. The
shoulder portion should be adjusted so
that it lies across your chest and midway
over your shoulder nearest the door and
not your neck.
To adjust the height of the seat belt
anchor, lower or raise the height adjuster
into an appropriate position.
ORB030020
Front seat
B180A01NF-1
Page 35 of 402
317
Safety features of your vehicle
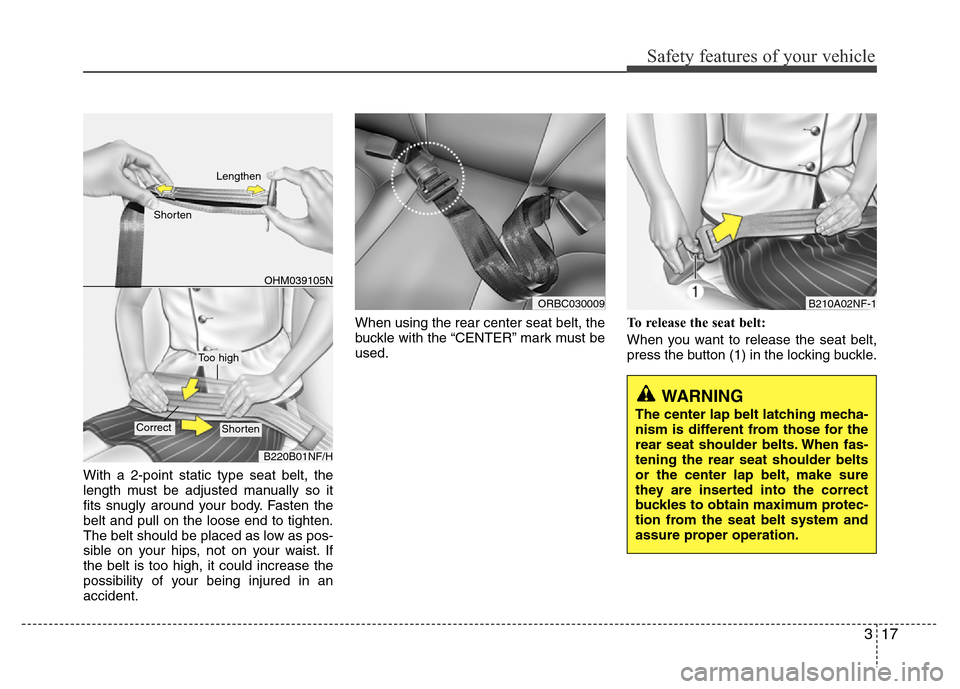
With a 2-point static type seat belt, the
length must be adjusted manually so it
fits snugly around your body. Fasten the
belt and pull on the loose end to tighten.
The belt should be placed as low as pos-
sible on your hips, not on your waist. If
the belt is too high, it could increase the
possibility of your being injured in an
accident.When using the rear center seat belt, the
buckle with the “CENTER” mark must be
used.To release the seat belt:
When you want to release the seat belt,
press the button (1) in the locking buckle.
OHM039105N
B220B01NF/H
Too high
ShortenCorrect
Lengthen
Shorten
ORBC030009B210A02NF-1
WARNING
The center lap belt latching mecha-
nism is different from those for the
rear seat shoulder belts. When fas-
tening the rear seat shoulder belts
or the center lap belt, make sure
they are inserted into the correct
buckles to obtain maximum protec-
tion from the seat belt system and
assure proper operation.
Page 36 of 402
Safety features of your vehicle
18 3
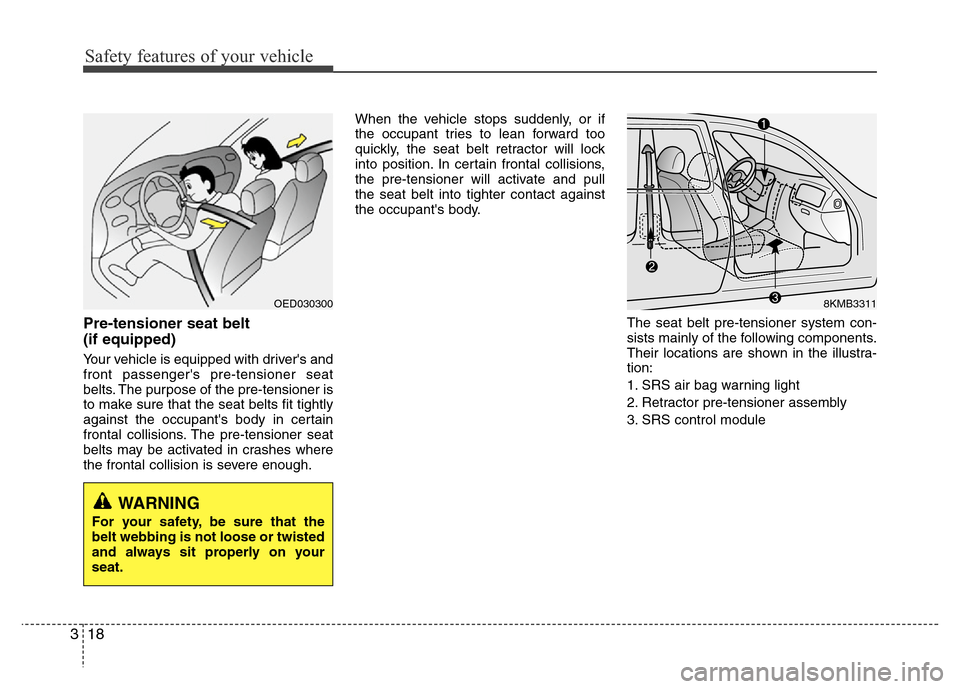
Pre-tensioner seat belt
(if equipped)
Your vehicle is equipped with driver's and
front passenger's pre-tensioner seat
belts. The purpose of the pre-tensioner is
to make sure that the seat belts fit tightly
against the occupant's body in certain
frontal collisions. The pre-tensioner seat
belts may be activated in crashes where
the frontal collision is severe enough.When the vehicle stops suddenly, or if
the occupant tries to lean forward too
quickly, the seat belt retractor will lock
into position. In certain frontal collisions,
the pre-tensioner will activate and pull
the seat belt into tighter contact against
the occupant's body.
The seat belt pre-tensioner system con-
sists mainly of the following components.
Their locations are shown in the illustra-
tion:
1. SRS air bag warning light
2. Retractor pre-tensioner assembly
3. SRS control module
OED030300
WARNING
For your safety, be sure that the
belt webbing is not loose or twisted
and always sit properly on your
seat.
8KMB3311