fog light bulb Hyundai Accent 2013 Owner's Manual
[x] Cancel search | Manufacturer: HYUNDAI, Model Year: 2013, Model line: Accent, Model: Hyundai Accent 2013Pages: 402, PDF Size: 8.49 MB
Page 128 of 402
Features of your vehicle
58 4
To check bulb operation, check whether
the parking brake and brake fluid warning
light illuminates when the ignition switch
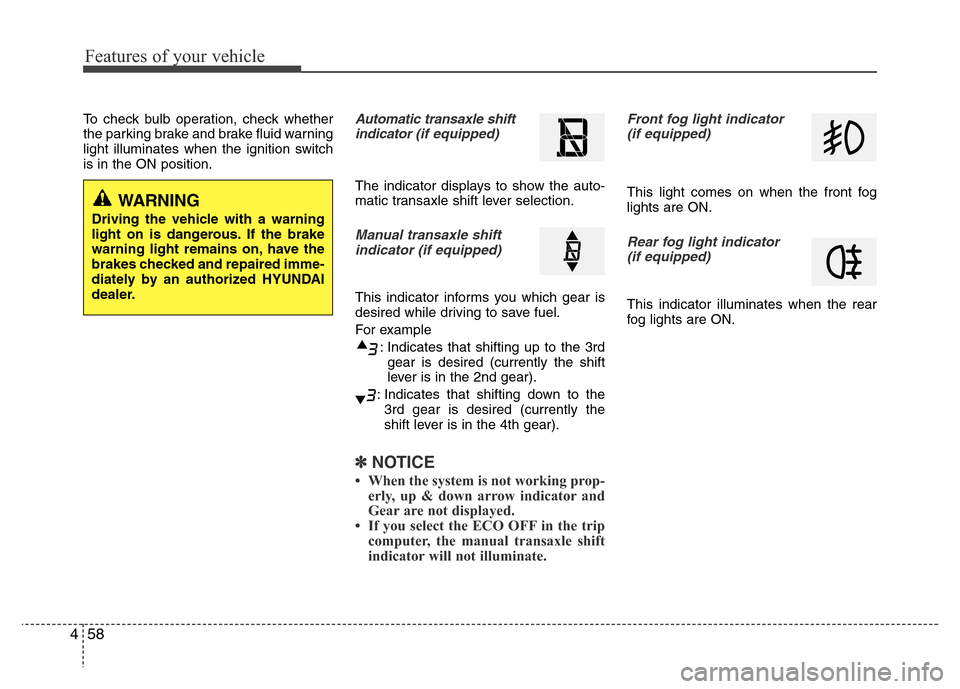
is in the ON position.Automatic transaxle shift
indicator (if equipped)
The indicator displays to show the auto-
matic transaxle shift lever selection.
Manual transaxle shift
indicator (if equipped)
This indicator informs you which gear is
desired while driving to save fuel.
For example
: Indicates that shifting up to the 3rd
gear is desired (currently the shift
lever is in the 2nd gear).
: Indicates that shifting down to the
3rd gear is desired (currently the
shift lever is in the 4th gear).
✽NOTICE
• When the system is not working prop-
erly, up & down arrow indicator and
Gear are not displayed.
• If you select the ECO OFF in the trip
computer, the manual transaxle shift
indicator will not illuminate.
Front fog light indicator
(if equipped)
This light comes on when the front fog
lights are ON.
Rear fog light indicator
(if equipped)
This indicator illuminates when the rear
fog lights are ON.
WARNING
Driving the vehicle with a warning
light on is dangerous. If the brake
warning light remains on, have the
brakes checked and repaired imme-
diately by an authorized HYUNDAI
dealer.
Page 148 of 402
Features of your vehicle
78 4
If the indicator continues to flash after a
turn, manually return the lever to the OFF
position.
To signal a lane change, move the turn
signal lever slightly and hold it in position
(B). The lever will return to the OFF posi-
tion when released.
If an indicator stays on and does not
flash or if it flashes abnormally, one of the
turn signal bulbs may be burned out and
will require replacement.
One-touch lane change function
(if equipped)
To activate an one-touch lane change
function, move the turn signal lever
slightly and then release it. The lane
change signals will blink 3 times.
✽NOTICE
If an indicator flash is abnormally quick
or slow, a bulb may be burned out or
have a poor electrical connection in the
circuit.
ORB040052/ORB040052D/ORB040052E/ORB040052L
■Type A
■Type B
■Type C
■Type D
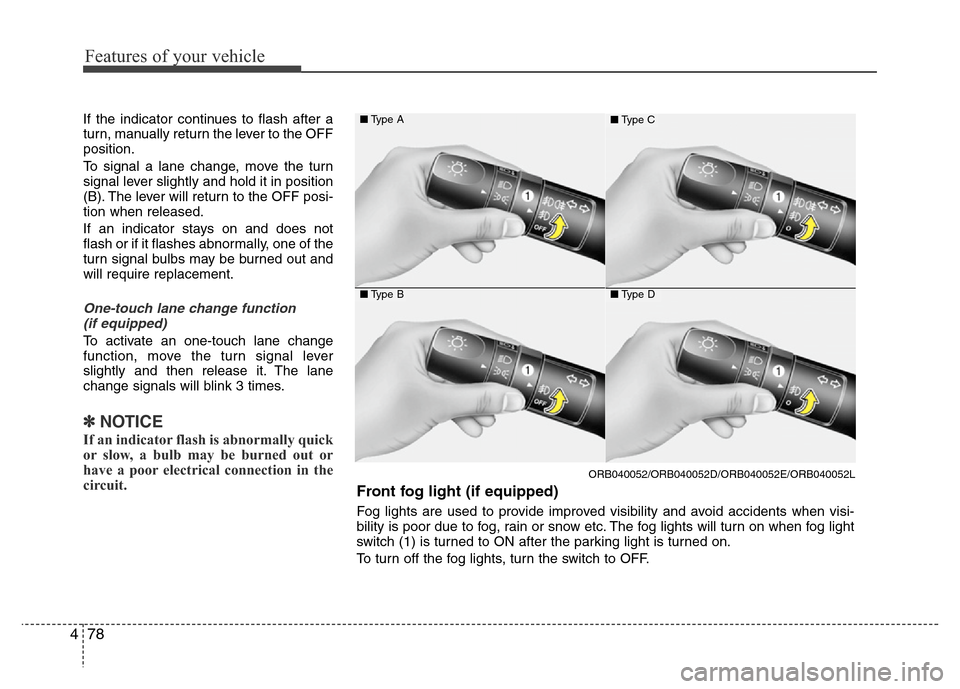
Front fog light (if equipped)
Fog lights are used to provide improved visibility and avoid accidents when visi-
bility is poor due to fog, rain or snow etc. The fog lights will turn on when fog light
switch (1) is turned to ON after the parking light is turned on.
To turn off the fog lights, turn the switch to OFF.
Page 370 of 402
779
Maintenance
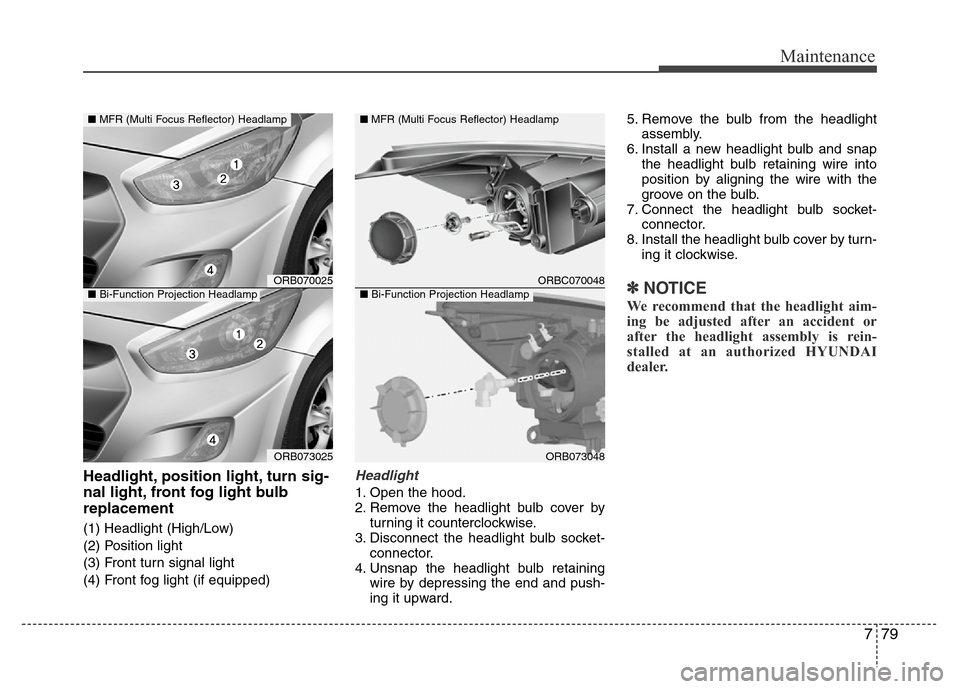
Headlight, position light, turn sig-
nal light, front fog light bulb
replacement
(1) Headlight (High/Low)
(2) Position light
(3) Front turn signal light
(4) Front fog light (if equipped)
Headlight
1. Open the hood.
2. Remove the headlight bulb cover by
turning it counterclockwise.
3. Disconnect the headlight bulb socket-
connector.
4. Unsnap the headlight bulb retaining
wire by depressing the end and push-
ing it upward.5. Remove the bulb from the headlight
assembly.
6. Install a new headlight bulb and snap
the headlight bulb retaining wire into
position by aligning the wire with the
groove on the bulb.
7. Connect the headlight bulb socket-
connector.
8. Install the headlight bulb cover by turn-
ing it clockwise.
✽NOTICE
We recommend that the headlight aim-
ing be adjusted after an accident or
after the headlight assembly is rein-
stalled at an authorized HYUNDAI
dealer.
ORB070025
ORB073025
■MFR (Multi Focus Reflector) Headlamp
■Bi-Function Projection HeadlampORBC070048
ORB073048 ■MFR (Multi Focus Reflector) Headlamp
■Bi-Function Projection Headlamp
Page 373 of 402
Maintenance
82 7
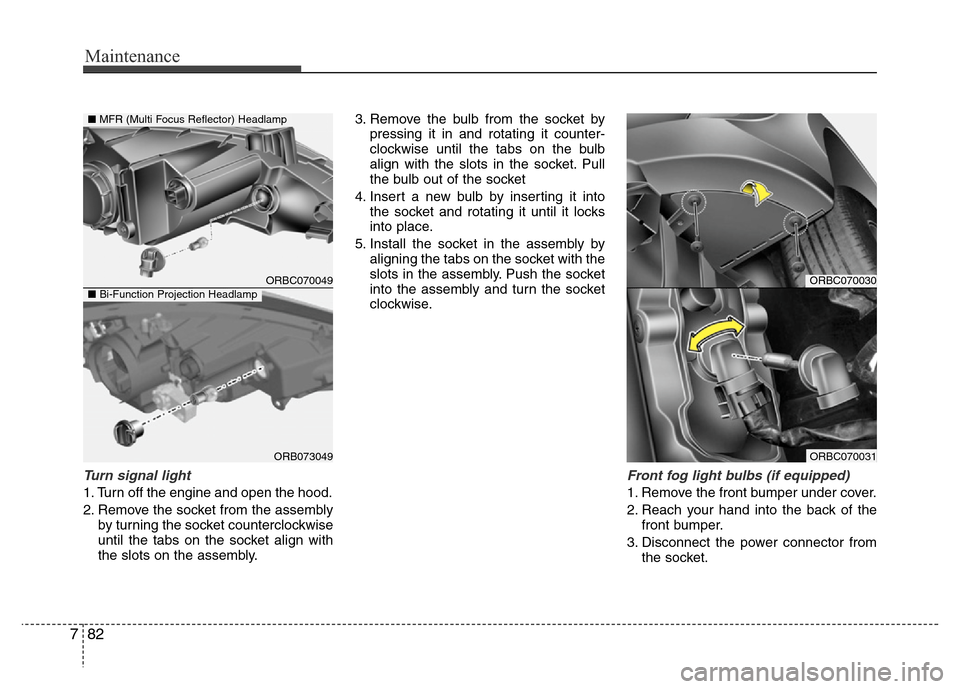
Turn signal light
1. Turn off the engine and open the hood.
2. Remove the socket from the assembly
by turning the socket counterclockwise
until the tabs on the socket align with
the slots on the assembly.3. Remove the bulb from the socket by
pressing it in and rotating it counter-
clockwise until the tabs on the bulb
align with the slots in the socket. Pull
the bulb out of the socket
4. Insert a new bulb by inserting it into
the socket and rotating it until it locks
into place.
5. Install the socket in the assembly by
aligning the tabs on the socket with the
slots in the assembly. Push the socket
into the assembly and turn the socket
clockwise.
Front fog light bulbs (if equipped)
1. Remove the front bumper under cover.
2. Reach your hand into the back of the
front bumper.
3. Disconnect the power connector from
the socket.
ORBC070030
ORBC070031
ORBC070049
ORB073049
■MFR (Multi Focus Reflector) Headlamp
■Bi-Function Projection Headlamp
Page 379 of 402
Maintenance
88 7
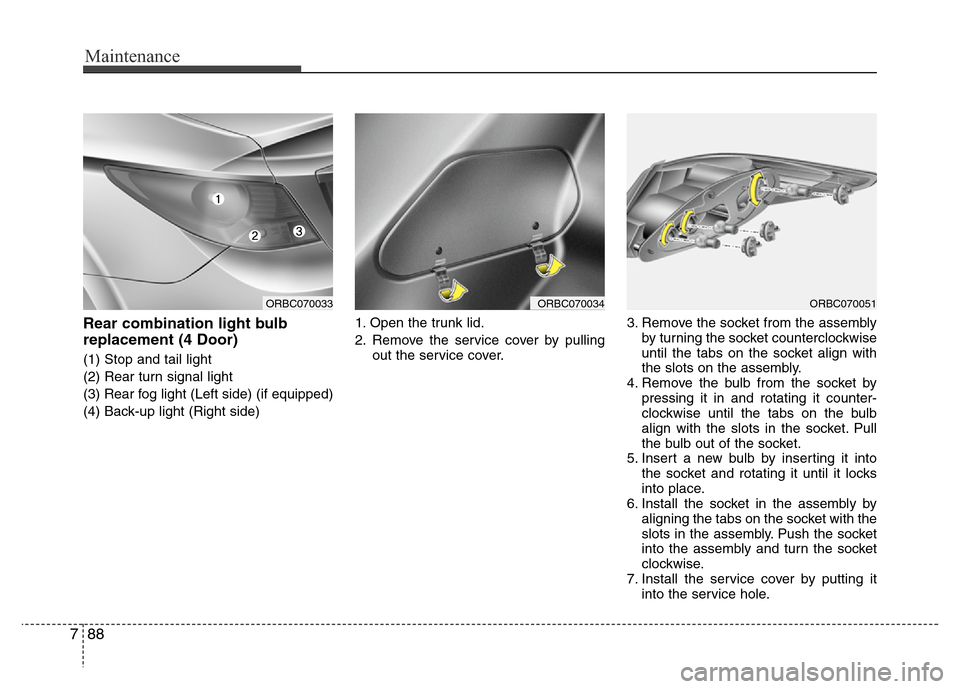
Rear combination light bulb
replacement (4 Door)
(1) Stop and tail light
(2) Rear turn signal light
(3) Rear fog light (Left side) (if equipped)
(4) Back-up light (Right side)1. Open the trunk lid.
2. Remove the service cover by pulling
out the service cover.3. Remove the socket from the assembly
by turning the socket counterclockwise
until the tabs on the socket align with
the slots on the assembly.
4. Remove the bulb from the socket by
pressing it in and rotating it counter-
clockwise until the tabs on the bulb
align with the slots in the socket. Pull
the bulb out of the socket.
5. Insert a new bulb by inserting it into
the socket and rotating it until it locks
into place.
6. Install the socket in the assembly by
aligning the tabs on the socket with the
slots in the assembly. Push the socket
into the assembly and turn the socket
clockwise.
7. Install the service cover by putting it
into the service hole.
ORBC070034ORBC070033ORBC070051
Page 380 of 402
789
Maintenance
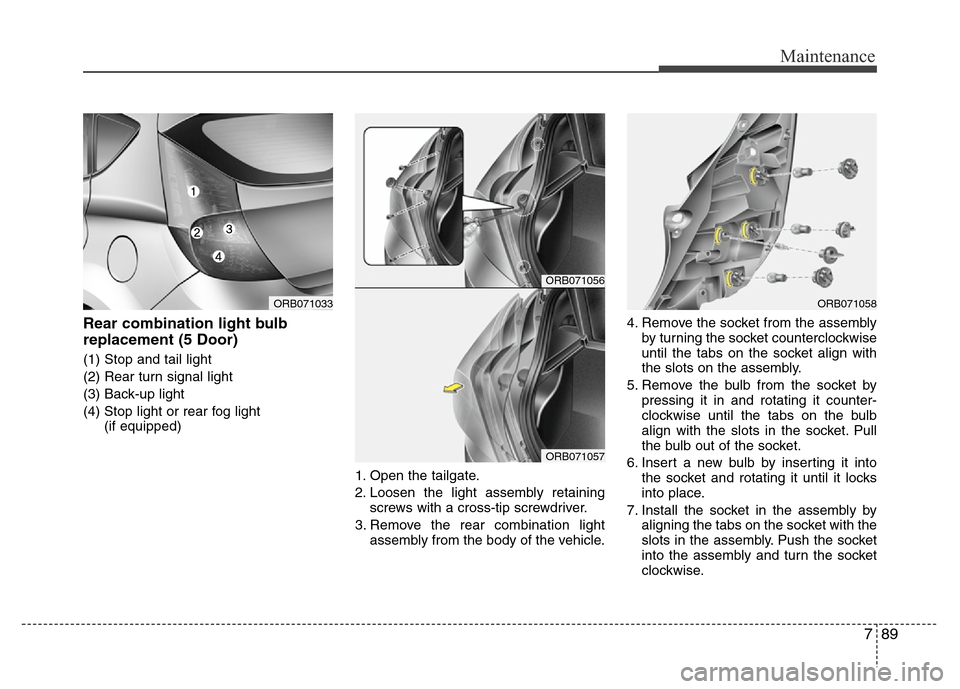
Rear combination light bulb
replacement (5 Door)
(1) Stop and tail light
(2) Rear turn signal light
(3) Back-up light
(4) Stop light or rear fog light
(if equipped)
1. Open the tailgate.
2. Loosen the light assembly retaining
screws with a cross-tip screwdriver.
3. Remove the rear combination light
assembly from the body of the vehicle.4. Remove the socket from the assembly
by turning the socket counterclockwise
until the tabs on the socket align with
the slots on the assembly.
5. Remove the bulb from the socket by
pressing it in and rotating it counter-
clockwise until the tabs on the bulb
align with the slots in the socket. Pull
the bulb out of the socket.
6. Insert a new bulb by inserting it into
the socket and rotating it until it locks
into place.
7. Install the socket in the assembly by
aligning the tabs on the socket with the
slots in the assembly. Push the socket
into the assembly and turn the socket
clockwise.
ORB071056
ORB071057
ORB071033ORB071058
Page 396 of 402
83
Specifications & Consumer information
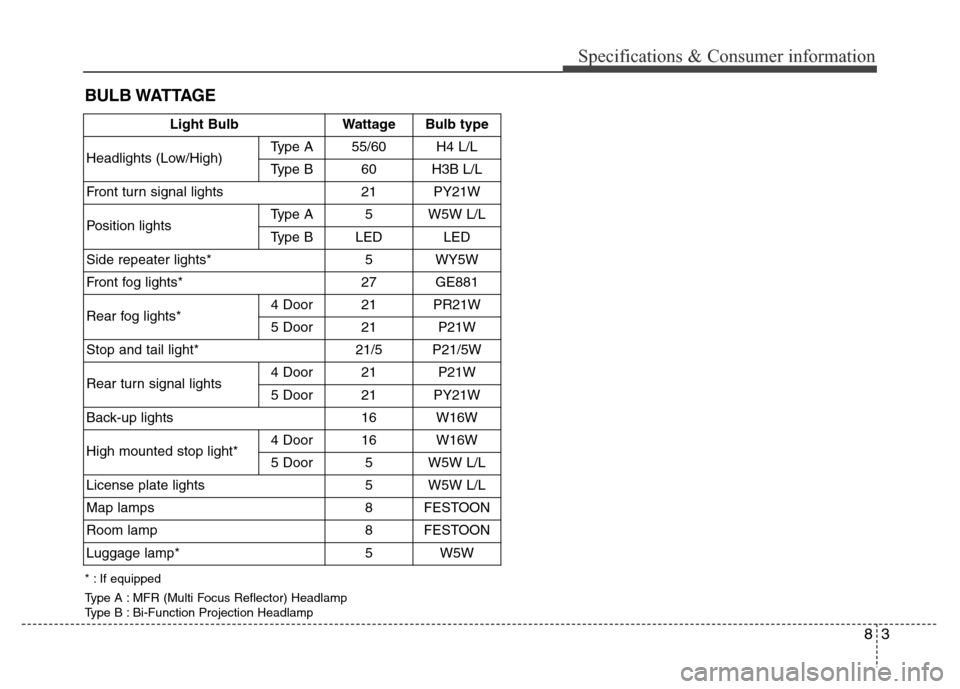
BULB WATTAGE
Light BulbWattageBulb type
Headlights (Low/High)Type A55/60H4 L/L
Type B60H3B L/L
Front turn signal lights21PY21W
Position lightsType A5W5W L/L
Type BLEDLED
Side repeater lights* 5WY5W
Front fog lights*27GE881
Rear fog lights* 4 Door21PR21W
5 Door21P21W
Stop and tail light* 21/5P21/5W
Rear turn signal lights 4 Door21P21W
5 Door21PY21W
Back-up lights16W16W
High mounted stop light*4 Door16W16W
5 Door5W5W L/L
License plate lights5W5W L/L
Map lamps8FESTOON
Room lamp8FESTOON
Luggage lamp*5W5W
* : If equipped
Type A : MFR (Multi Focus Reflector) Headlamp
Type B : Bi-Function Projection Headlamp