Hyundai Accent 2015 Owner's Manual - RHD (UK. Australia)
Manufacturer: HYUNDAI, Model Year: 2015, Model line: Accent, Model: Hyundai Accent 2015Pages: 425, PDF Size: 8.62 MB
Page 181 of 425
4111
Features of your vehicle
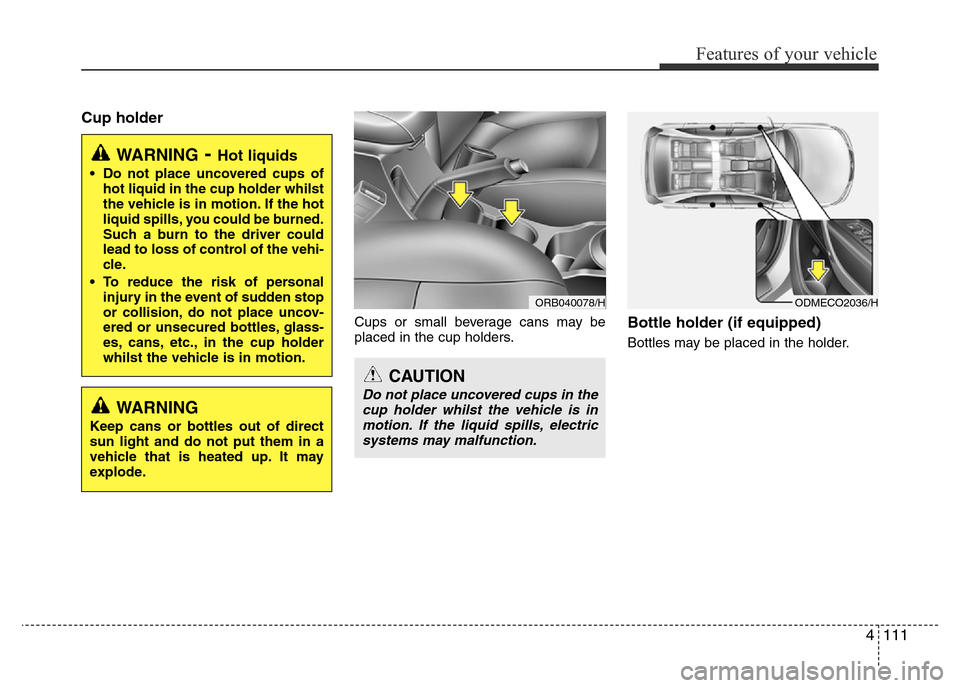
Cup holder
Cups or small beverage cans may be
placed in the cup holders.Bottle holder (if equipped)
Bottles may be placed in the holder.
WARNING- Hot liquids
• Do not place uncovered cups of
hot liquid in the cup holder whilst
the vehicle is in motion. If the hot
liquid spills, you could be burned.
Such a burn to the driver could
lead to loss of control of the vehi-
cle.
• To reduce the risk of personal
injury in the event of sudden stop
or collision, do not place uncov-
ered or unsecured bottles, glass-
es, cans, etc., in the cup holder
whilst the vehicle is in motion.
ORB040078/H
WARNING
Keep cans or bottles out of direct
sun light and do not put them in a
vehicle that is heated up. It may
explode.
CAUTION
Do not place uncovered cups in the
cup holder whilst the vehicle is in
motion. If the liquid spills, electric
systems may malfunction.
ODMECO2036/H
Page 182 of 425
Features of your vehicle
112 4
Sunvisor
Use the sunvisor to shield direct light
through the front or side windows.
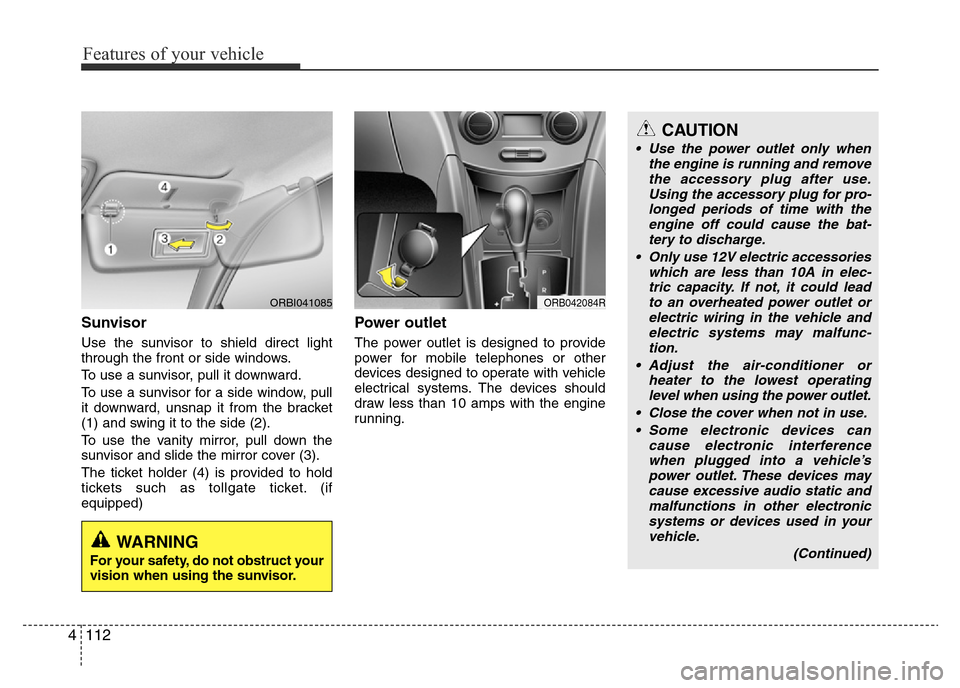
To use a sunvisor, pull it downward.
To use a sunvisor for a side window, pull
it downward, unsnap it from the bracket
(1) and swing it to the side (2).
To use the vanity mirror, pull down the
sunvisor and slide the mirror cover (3).
The ticket holder (4) is provided to hold
tickets such as tollgate ticket. (if
equipped)
Power outlet
The power outlet is designed to provide
power for mobile telephones or other
devices designed to operate with vehicle
electrical systems. The devices should
draw less than 10 amps with the engine
running.
CAUTION
• Use the power outlet only when
the engine is running and remove
the accessory plug after use.
Using the accessory plug for pro-
longed periods of time with the
engine off could cause the bat-
tery to discharge.
• Only use 12V electric accessories
which are less than 10A in elec-
tric capacity. If not, it could lead
to an overheated power outlet or
electric wiring in the vehicle and
electric systems may malfunc-
tion.
• Adjust the air-conditioner or
heater to the lowest operating
level when using the power outlet.
• Close the cover when not in use.
• Some electronic devices can
cause electronic interference
when plugged into a vehicle’s
power outlet. These devices may
cause excessive audio static and
malfunctions in other electronic
systems or devices used in your
vehicle.
(Continued)
ORB042084RORBI041085
WARNING
For your safety, do not obstruct your
vision when using the sunvisor.
Page 183 of 425
4113
Features of your vehicle
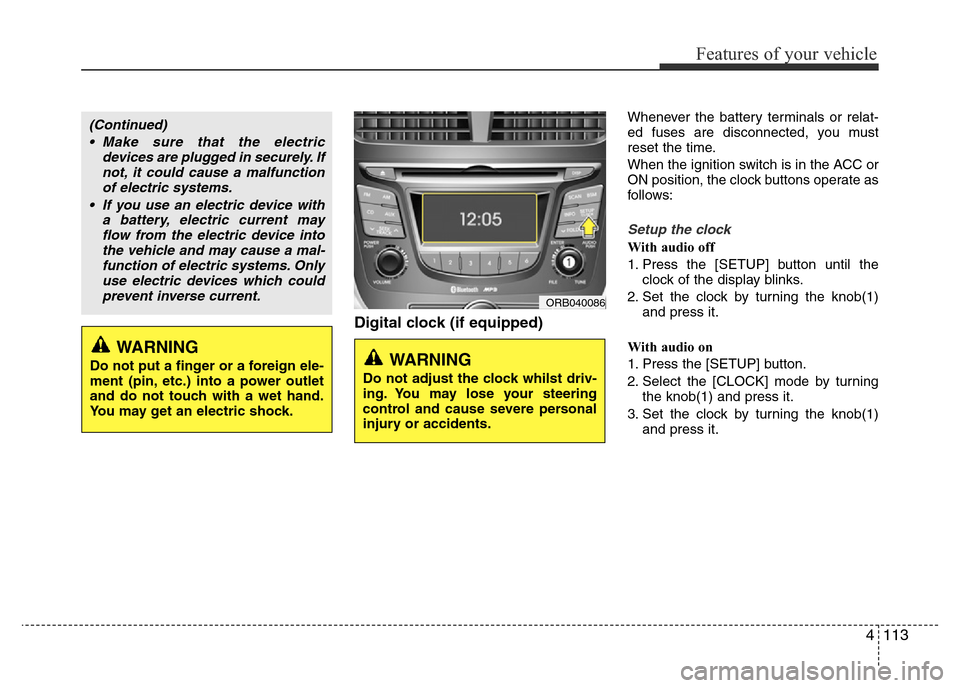
Digital clock (if equipped)
Whenever the battery terminals or relat-
ed fuses are disconnected, you must
reset the time.
When the ignition switch is in the ACC or
ON position, the clock buttons operate as
follows:
Setup the clock
With audio off
1. Press the [SETUP] button until the
clock of the display blinks.
2. Set the clock by turning the knob(1)
and press it.
With audio on
1. Press the [SETUP] button.
2. Select the [CLOCK] mode by turning
the knob(1) and press it.
3. Set the clock by turning the knob(1)
and press it.
WARNING
Do not put a finger or a foreign ele-
ment (pin, etc.) into a power outlet
and do not touch with a wet hand.
You may get an electric shock.
(Continued)
• Make sure that the electric
devices are plugged in securely. If
not, it could cause a malfunction
of electric systems.
• If you use an electric device with
a battery, electric current may
flow from the electric device into
the vehicle and may cause a mal-
function of electric systems. Only
use electric devices which could
prevent inverse current.
ORB040086
WARNING
Do not adjust the clock whilst driv-
ing. You may lose your steering
control and cause severe personal
injury or accidents.
Page 184 of 425
Features of your vehicle
114 4
Clothes hanger (if equipped)
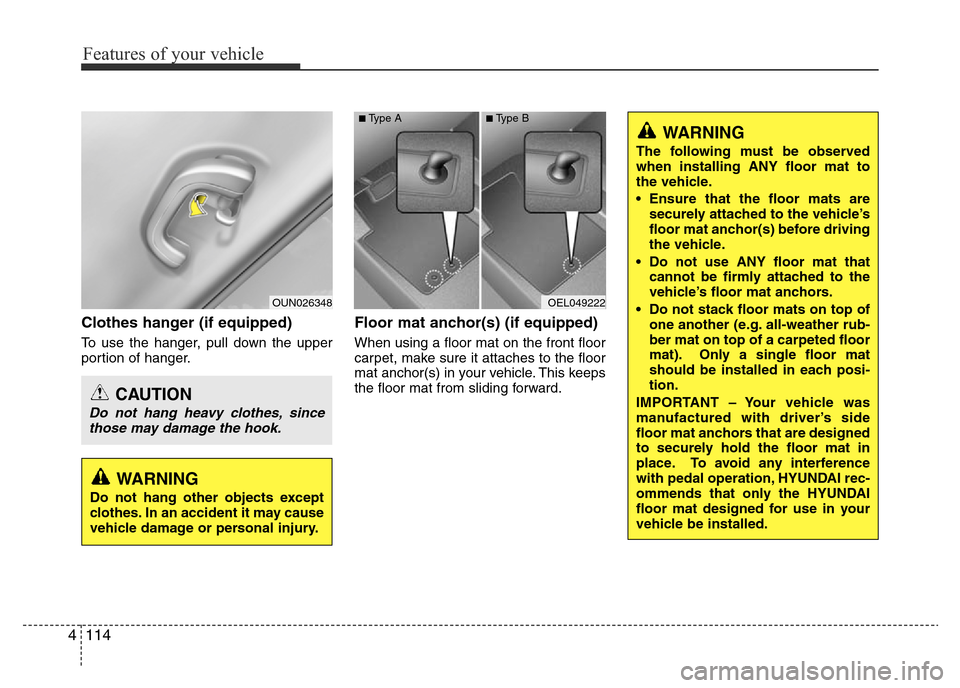
To use the hanger, pull down the upper
portion of hanger.
Floor mat anchor(s) (if equipped)
When using a floor mat on the front floor
carpet, make sure it attaches to the floor
mat anchor(s) in your vehicle. This keeps
the floor mat from sliding forward.
OUN026348
CAUTION
Do not hang heavy clothes, since
those may damage the hook.
WARNING
Do not hang other objects except
clothes. In an accident it may cause
vehicle damage or personal injury.
OEL049222
■Type A■Type B
WARNING
The following must be observed
when installing ANY floor mat to
the vehicle.
• Ensure that the floor mats are
securely attached to the vehicle’s
floor mat anchor(s) before driving
the vehicle.
• Do not use ANY floor mat that
cannot be firmly attached to the
vehicle’s floor mat anchors.
• Do not stack floor mats on top of
one another (e.g. all-weather rub-
ber mat on top of a carpeted floor
mat). Only a single floor mat
should be installed in each posi-
tion.
IMPORTANT – Your vehicle was
manufactured with driver’s side
floor mat anchors that are designed
to securely hold the floor mat in
place. To avoid any interference
with pedal operation, HYUNDAI rec-
ommends that only the HYUNDAI
floor mat designed for use in your
vehicle be installed.
Page 185 of 425
4115
Features of your vehicle
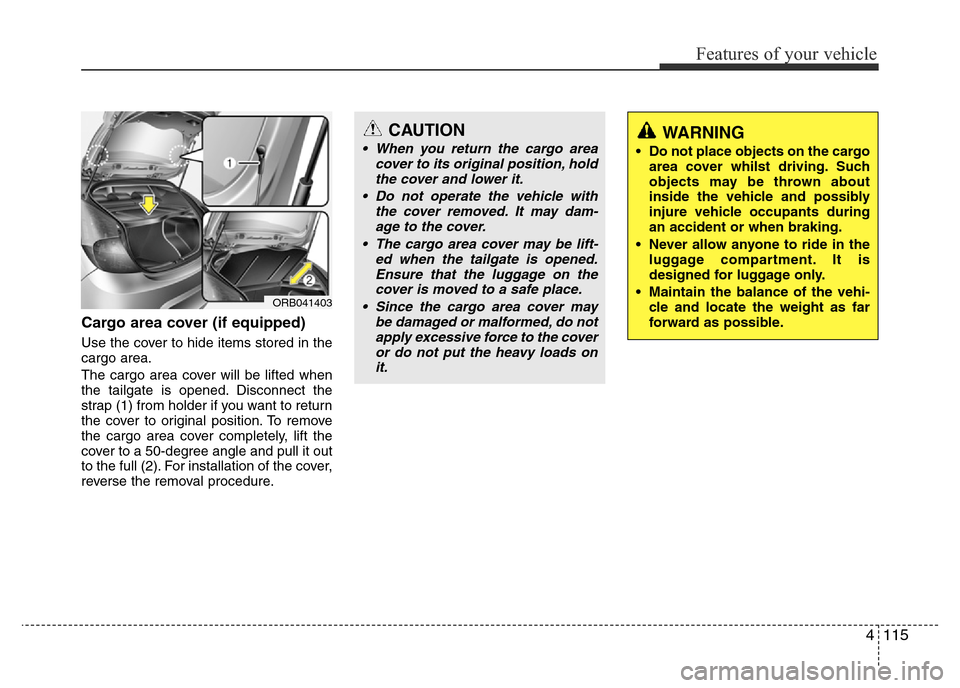
Cargo area cover (if equipped)
Use the cover to hide items stored in the
cargo area.
The cargo area cover will be lifted when
the tailgate is opened. Disconnect the
strap (1) from holder if you want to return
the cover to original position. To remove
the cargo area cover completely, lift the
cover to a 50-degree angle and pull it out
to the full (2). For installation of the cover,
reverse the removal procedure.
ORB041403
CAUTION
• When you return the cargo area
cover to its original position, hold
the cover and lower it.
• Do not operate the vehicle with
the cover removed. It may dam-
age to the cover.
• The cargo area cover may be lift-
ed when the tailgate is opened.
Ensure that the luggage on the
cover is moved to a safe place.
• Since the cargo area cover may
be damaged or malformed, do not
apply excessive force to the cover
or do not put the heavy loads on
it.WARNING
• Do not place objects on the cargo
area cover whilst driving. Such
objects may be thrown about
inside the vehicle and possibly
injure vehicle occupants during
an accident or when braking.
• Never allow anyone to ride in the
luggage compartment. It is
designed for luggage only.
• Maintain the balance of the vehi-
cle and locate the weight as far
forward as possible.
Page 186 of 425
Features of your vehicle
116 4
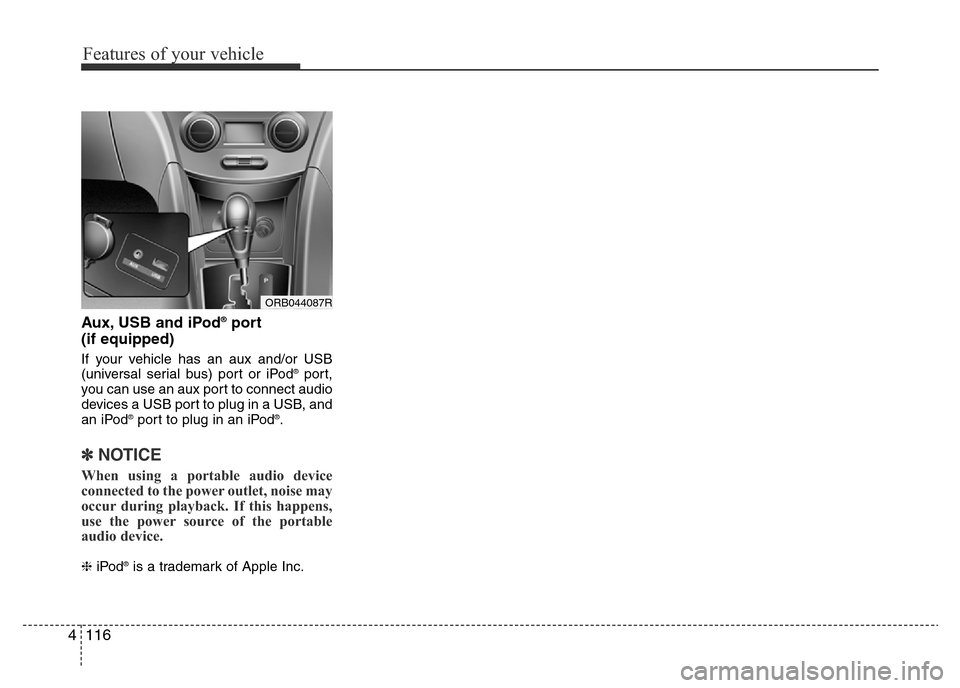
Aux, USB and iPod®port
(if equipped)
If your vehicle has an aux and/or USB
(universal serial bus) port or iPod®port,
you can use an aux port to connect audio
devices a USB port to plug in a USB, and
an iPod
®port to plug in an iPod®.
✽NOTICE
When using a portable audio device
connected to the power outlet, noise may
occur during playback. If this happens,
use the power source of the portable
audio device.
❈iPod®is a trademark of Apple Inc.
ORB044087R
Page 187 of 425
4117
Features of your vehicle
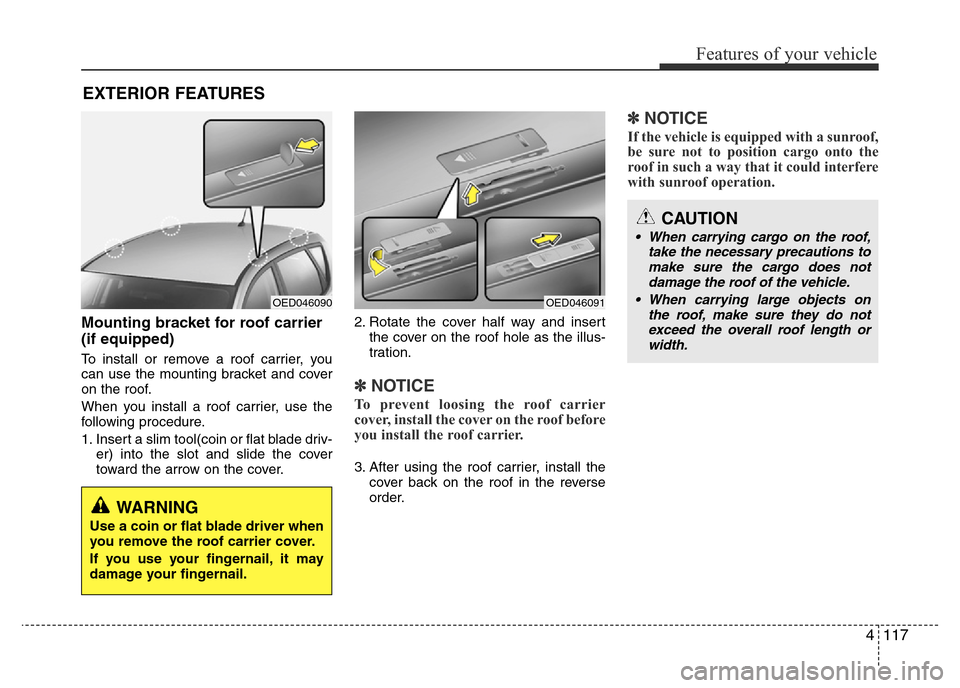
Mounting bracket for roof carrier
(if equipped)
To install or remove a roof carrier, you
can use the mounting bracket and cover
on the roof.
When you install a roof carrier, use the
following procedure.
1. Insert a slim tool(coin or flat blade driv-
er) into the slot and slide the cover
toward the arrow on the cover.2. Rotate the cover half way and insert
the cover on the roof hole as the illus-
tration.
✽NOTICE
To prevent loosing the roof carrier
cover, install the cover on the roof before
you install the roof carrier.
3. After using the roof carrier, install the
cover back on the roof in the reverse
order.
✽NOTICE
If the vehicle is equipped with a sunroof,
be sure not to position cargo onto the
roof in such a way that it could interfere
with sunroof operation.
EXTERIOR FEATURES
OED046090
WARNING
Use a coin or flat blade driver when
you remove the roof carrier cover.
If you use your fingernail, it may
damage your fingernail.
OED046091
CAUTION
• When carrying cargo on the roof,
take the necessary precautions to
make sure the cargo does not
damage the roof of the vehicle.
• When carrying large objects on
the roof, make sure they do not
exceed the overall roof length or
width.
Page 188 of 425
Features of your vehicle
118 4
WARNING
• The vehicle centre of gravity will
be higher when items are loaded
onto the roof. Avoid sudden
starts, braking, sharp turns,
abrupt maneuvers or high speeds
that may result in loss of vehicle
control or rollover resulting in an
accident.
• Always drive slowly and turn cor-
ners carefully when carrying
items on the roof. Severe wind
updrafts, caused by passing
vehicles or natural causes, can
cause sudden upward pressure
on items loaded on the roof. This
is especially true when carrying
large, flat items such as wood
panels or mattresses. This could
cause the items to fall off the roof
and cause damage to your vehi-
cle or others around you.
• To prevent damage or loss of
cargo whilst driving, check fre-
quently before or whilst driving to
make sure the items on the roof
are securely fastened.
Page 189 of 425
4119
Features of your vehicle
✽NOTICE
• If you install an aftermarket HID
head lamp, your vehicle’s audio and
electronic device may malfunction.
• Prevent chemicals such as perfume,
cosmetic oil, sun cream, hand cleaner,
and air freshener from contacting the
interior parts because they may cause
damage or discoloration.
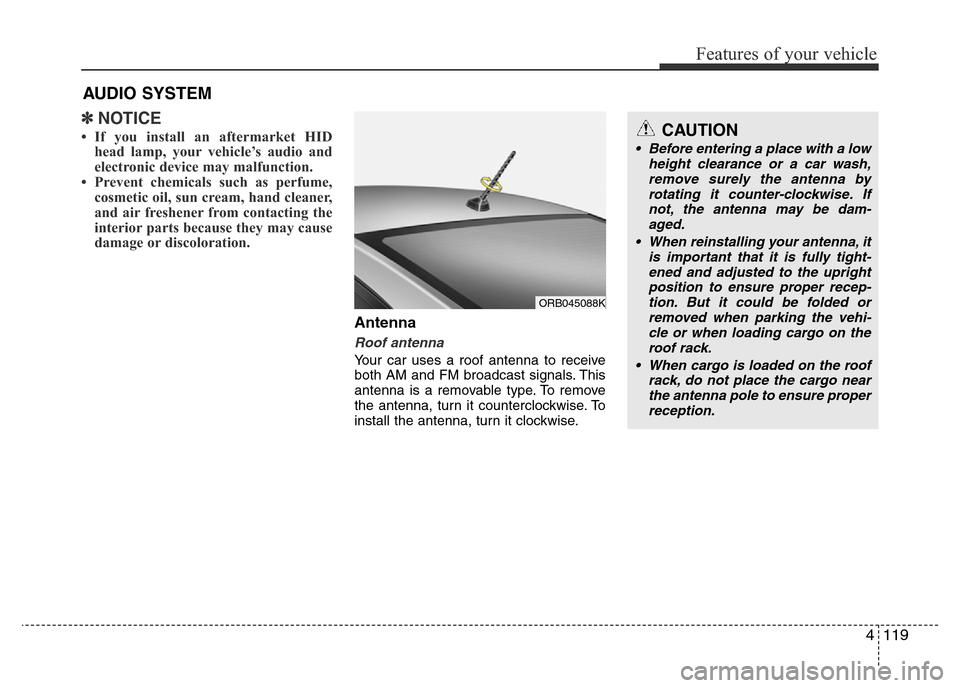
Antenna
Roof antenna
Your car uses a roof antenna to receive
both AM and FM broadcast signals. This
antenna is a removable type. To remove
the antenna, turn it counterclockwise. To
install the antenna, turn it clockwise.
AUDIO SYSTEM
CAUTION
• Before entering a place with a low
height clearance or a car wash,
remove surely the antenna by
rotating it counter-clockwise. If
not, the antenna may be dam-
aged.
• When reinstalling your antenna, it
is important that it is fully tight-
ened and adjusted to the upright
position to ensure proper recep-
tion. But it could be folded or
removed when parking the vehi-
cle or when loading cargo on the
roof rack.
• When cargo is loaded on the roof
rack, do not place the cargo near
the antenna pole to ensure proper
reception.
ORB045088K
Page 190 of 425
Features of your vehicle
120 4
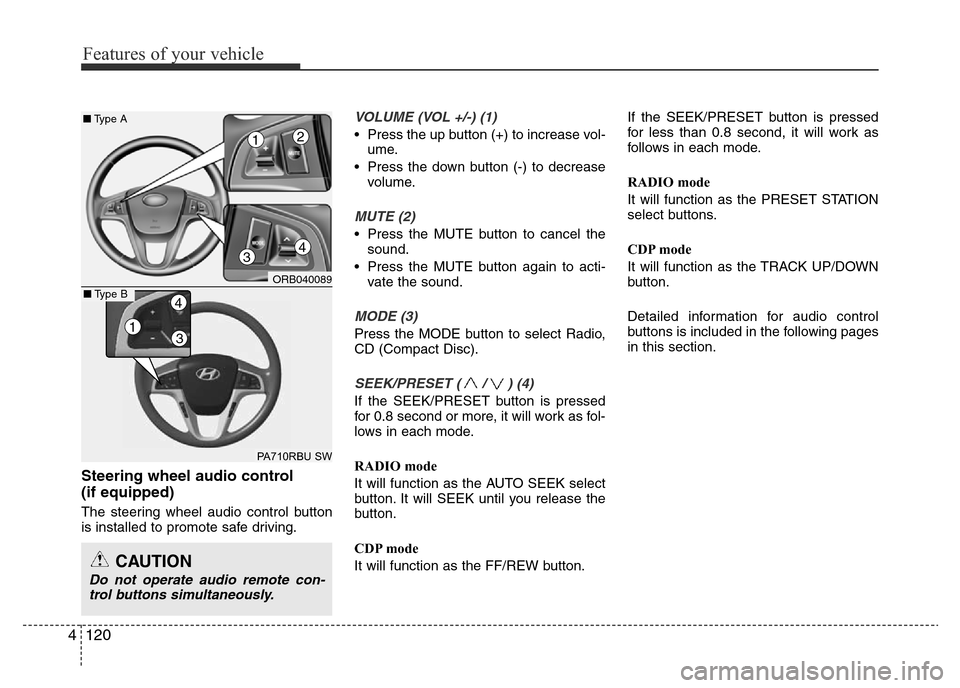
Steering wheel audio control
(if equipped)
The steering wheel audio control button
is installed to promote safe driving.
VOLUME (VOL +/-) (1)
• Press the up button (+) to increase vol-
ume.
• Press the down button (-) to decrease
volume.
MUTE (2)
• Press the MUTE button to cancel the
sound.
• Press the MUTE button again to acti-
vate the sound.
MODE (3)
Press the MODE button to select Radio,
CD (Compact Disc).
SEEK/PRESET ( / ) (4)
If the SEEK/PRESET button is pressed
for 0.8 second or more, it will work as fol-
lows in each mode.
RADIO mode
It will function as the AUTO SEEK select
button. It will SEEK until you release the
button.
CDP mode
It will function as the FF/REW button.If the SEEK/PRESET button is pressed
for less than 0.8 second, it will work as
follows in each mode.
RADIO mode
It will function as the PRESET STATION
select buttons.
CDP mode
It will function as the TRACK UP/DOWN
button.
Detailed information for audio control
buttons is included in the following pages
in this section.
CAUTION
Do not operate audio remote con-
trol buttons simultaneously.
ORB040089
PA710RBU SW
■Type A
4
12
3
13
4■Type B