door lock Hyundai Accent 2016 Owner's Manual - RHD (UK. Australia)
[x] Cancel search | Manufacturer: HYUNDAI, Model Year: 2016, Model line: Accent, Model: Hyundai Accent 2016Pages: 425, PDF Size: 8.62 MB
Page 14 of 425
Your vehicle at a glance
2 2
INTERIOR OVERVIEW
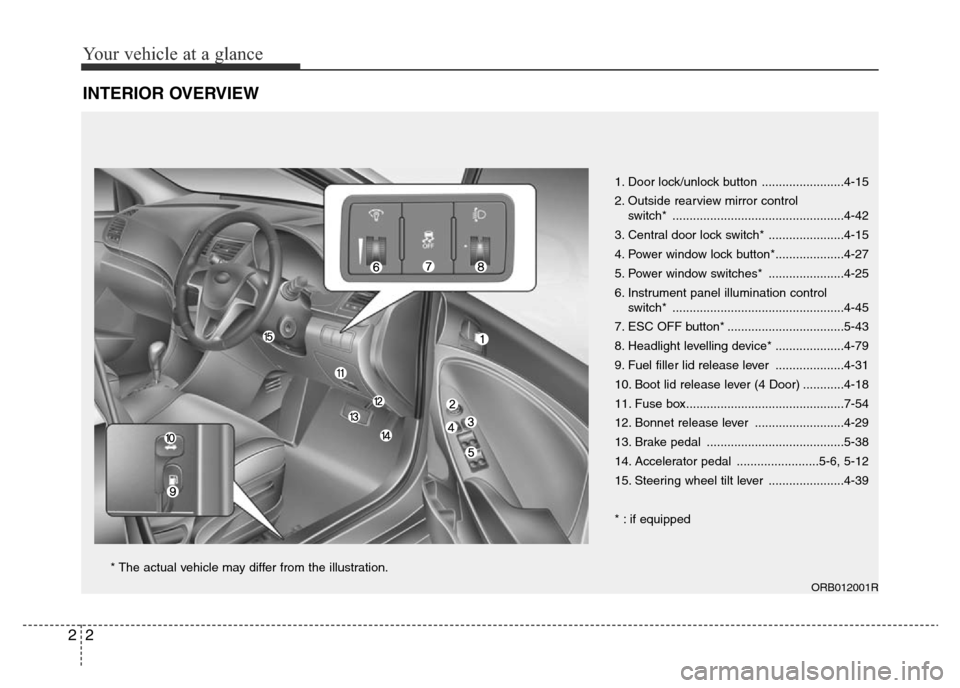
1. Door lock/unlock button ........................4-15
2. Outside rearview mirror control
switch* ..................................................4-42
3. Central door lock switch* ......................4-15
4. Power window lock button*....................4-27
5. Power window switches* ......................4-25
6. Instrument panel illumination control
switch* ..................................................4-45
7. ESC OFF button* ..................................5-43
8. Headlight levelling device* ....................4-79
9. Fuel filler lid release lever ....................4-31
10. Boot lid release lever (4 Door) ............4-18
11. Fuse box..............................................7-54
12. Bonnet release lever ..........................4-29
13. Brake pedal ........................................5-38
14. Accelerator pedal ........................5-6, 5-12
15. Steering wheel tilt lever ......................4-39
* : if equipped
ORB012001R
* The actual vehicle may differ from the illustration.
Page 33 of 425
Safety features of your vehicle
16 3
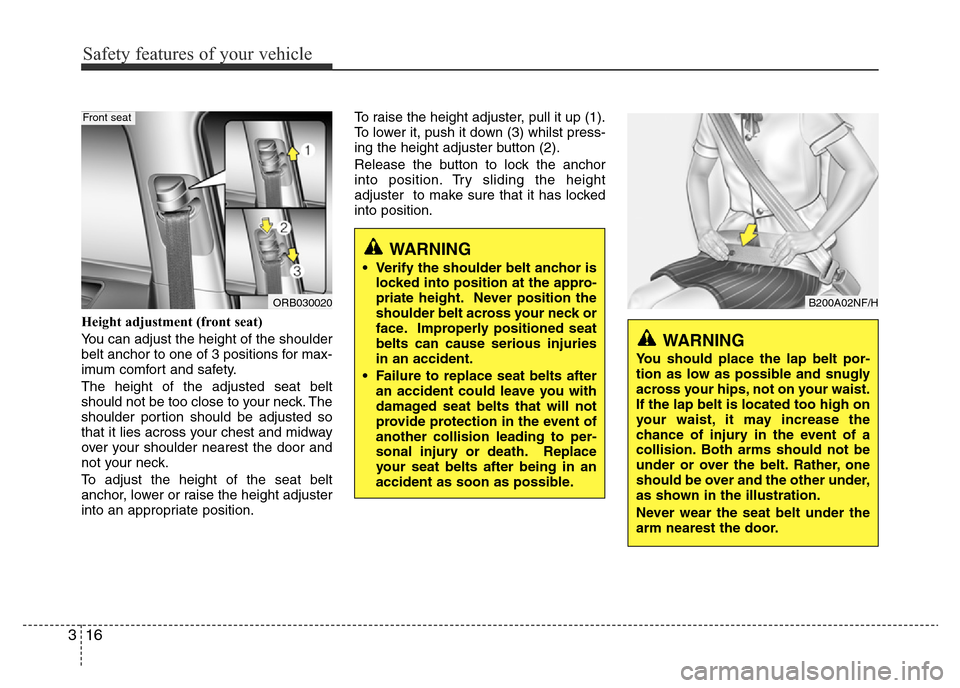
Height adjustment (front seat)
You can adjust the height of the shoulder
belt anchor to one of 3 positions for max-
imum comfort and safety.
The height of the adjusted seat belt
should not be too close to your neck. The
shoulder portion should be adjusted so
that it lies across your chest and midway
over your shoulder nearest the door and
not your neck.
To adjust the height of the seat belt
anchor, lower or raise the height adjuster
into an appropriate position.To raise the height adjuster, pull it up (1).
To lower it, push it down (3) whilst press-
ing the height adjuster button (2).
Release the button to lock the anchor
into position. Try sliding the height
adjuster to make sure that it has locked
into position.
ORB030020
Front seat
WARNING
You should place the lap belt por-
tion as low as possible and snugly
across your hips, not on your waist.
If the lap belt is located too high on
your waist, it may increase the
chance of injury in the event of a
collision. Both arms should not be
under or over the belt. Rather, one
should be over and the other under,
as shown in the illustration.
Never wear the seat belt under the
arm nearest the door.
WARNING
• Verify the shoulder belt anchor is
locked into position at the appro-
priate height. Never position the
shoulder belt across your neck or
face. Improperly positioned seat
belts can cause serious injuries
in an accident.
• Failure to replace seat belts after
an accident could leave you with
damaged seat belts that will not
provide protection in the event of
another collision leading to per-
sonal injury or death. Replace
your seat belts after being in an
accident as soon as possible.
B200A02NF/H
Page 54 of 425
337
Safety features of your vehicle
Air bag warning light
The purpose of the air bag warning light
in your instrument panel is to alert you of
a potential problem with your air bag -
Supplemental Restraint System (SRS).
When the ignition switch is turned ON,
the warning light should illuminate for
approximately 6 seconds, then go off.
Have the system checked if:
• The light does not turn on briefly when
you turn the ignition ON.
• The light stays on after illuminating for
approximately 6 seconds.
• The light comes on whilst the vehicle is
in motion.
• The light blinks when the ignition
switch is in ON position.
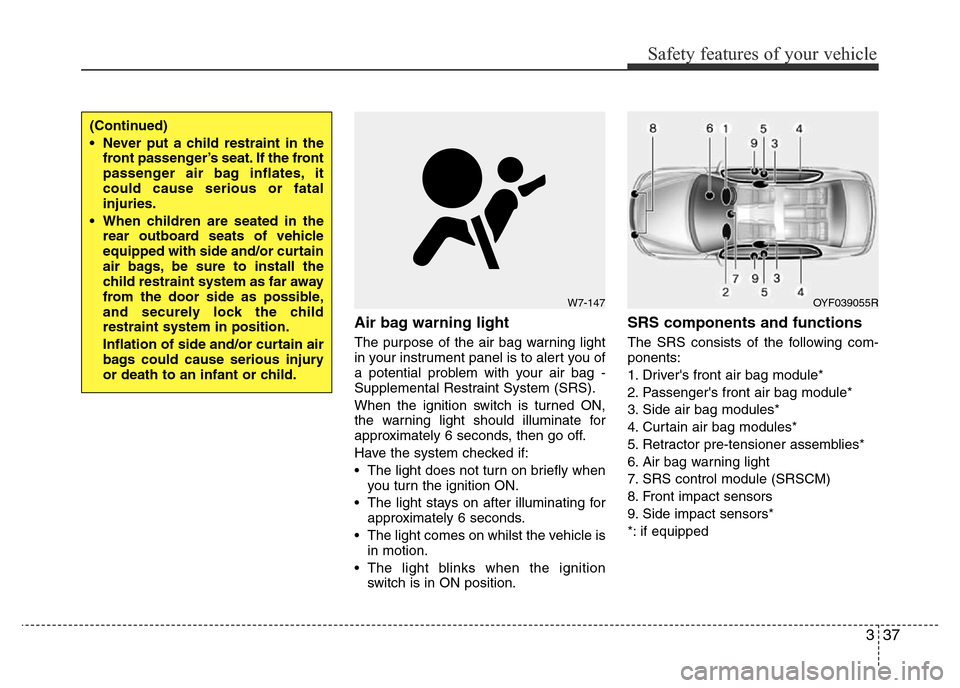
SRS components and functions
The SRS consists of the following com-
ponents:
1. Driver's front air bag module*
2. Passenger's front air bag module*
3. Side air bag modules*
4. Curtain air bag modules*
5. Retractor pre-tensioner assemblies*
6. Air bag warning light
7. SRS control module (SRSCM)
8. Front impact sensors
9. Side impact sensors*
*: if equipped
(Continued)
• Never put a child restraint in the
front passenger’s seat. If the front
passenger air bag inflates, it
could cause serious or fatal
injuries.
• When children are seated in the
rear outboard seats of vehicle
equipped with side and/or curtain
air bags, be sure to install the
child restraint system as far away
from the door side as possible,
and securely lock the child
restraint system in position.
Inflation of side and/or curtain air
bags could cause serious injury
or death to an infant or child.
W7-147OYF039055R
Page 60 of 425
343
Safety features of your vehicle
The side impact air bags are designed to
deploy only during certain side-impact
collisions, depending on the crash sever-
ity, angle, speed and point of impact. The
side impact air bags are not designed to
deploy in all side impact situations.
WARNING
Do not allow the passengers to lean
their heads or bodies onto doors,
put their arms on the doors, stretch
their arms out of the window, or
place objects between the doors
and passengers when they are
seated on seats equipped with side
and/or curtain air bags.
WARNING
• The side impact air bag is sup-
plemental to the seat belt sys-
tems and is not a substitute for
them. Therefore your seat belts
must be worn at all times whilst
the vehicle is in motion. The air
bags deploy only in certain side
impact conditions severe enough
to cause significant injury to the
vehicle occupants.
• For best protection from the side
impact air bag system and to
avoid being injured by the
deploying side impact air bag,
both front and all rear (if
equipped) seat occupants should
sit in an upright position with the
seat belt properly fastened. The
driver's hands should be placed
on the steering wheel at the 9 and
3 o’clock positions. The passen-
gers’ arms and hands should be
placed on their laps.
• Do not use any accessory seat
covers.
(Continued)
(Continued)
• Use of seat covers could reduce
or prevent the effectiveness of
the system.
• Do not install any accessories on
the side or near the side impact
air bag.
• Do not place any objects over the
air bag or between the air bag
and yourself.
• Do not place any objects (an
umbrella, bag, etc.) between the
front door and the front seat.
Such objects may become dan-
gerous projectiles and cause
injury if the supplemental side
impact air bag inflates.
• To prevent unexpected deploy-
ment of the side impact air bag
that may result in personal injury,
avoid impact to the side impact
sensor when the ignition switch
is on.
• If the seat or seat cover is dam-
aged, have the vehicle checked
and repaired by an authorised
HYUNDAI dealer because your
vehicle is equipped with side
impact air bags.
Page 62 of 425
345
Safety features of your vehicle
WARNING
• In order for side and curtain air
bags to provide the best protec-
tion, front seat occupants and
outboard rear occupants should
sit in an upright position with the
seat belts properly fastened.
Importantly, children should sit in
a proper child restraint system in
the rear seat.
• When children are seated in the
rear outboard seats, they must be
seated in the proper child
restraint system. Make sure to
position the child restraint sys-
tem as far away from the door
side as possible, and secure the
child restraint system in a locked
position.
(Continued)
(Continued)
• Do not allow the passengers to
lean their heads or bodies onto
doors, put their arms on the
doors, stretch their arms out of
the window, or place objects
between the doors and passen-
gers when they are seated on
seats equipped with side and/or
curtain air bags.
• Never try to open or repair any
components of the side curtain
air bag system. This should only
be done by an authorised
HYUNDAI dealer.
Failure to follow the above instruc-
tions can result in injury or death to
the vehicle occupants in an acci-
dent.(Continued)
• Do not install any accessories or
children’s toys in the Curtain
Airbag deployment zones, as this
may impair the operation of the
system or throw parts of them
into the vehicle cabin causing
injury to occupants if the system
is deployed.
• To maintain the integrity of the
Curtain Airbag system, any work,
removal or installation of the
airbag and associated compo-
nents (such as the roof lining and
side trims) should always be per-
formed by an authorised
HYUNDAI dealer.
Page 71 of 425
4
Keys / 4-3
Smart key / 4-6
Remote keyless entry / 4-11
Door locks / 4-14
Boot / 4-18
Tailgate / 4-21
Windows / 4-24
Bonnet / 4-29
Fuel filler lid / 4-31
Sunroof / 4-34
Steering wheel / 4-38
Mirrors / 4-40
Instrument cluster / 4-44
Rear parking assist system / 4-69
Rearview camera / 4-72
Hazard warning flasher / 4-73
Lighting / 4-74
Wipers and washers / 4-80
Interior light / 4-83
Defroster / 4-86
Manual climate control system / 4-87
Automatic climate control system / 4-96
Windscreen defrosting and defogging / 4-103
Features of your vehicle
Page 73 of 425
43
Features of your vehicle
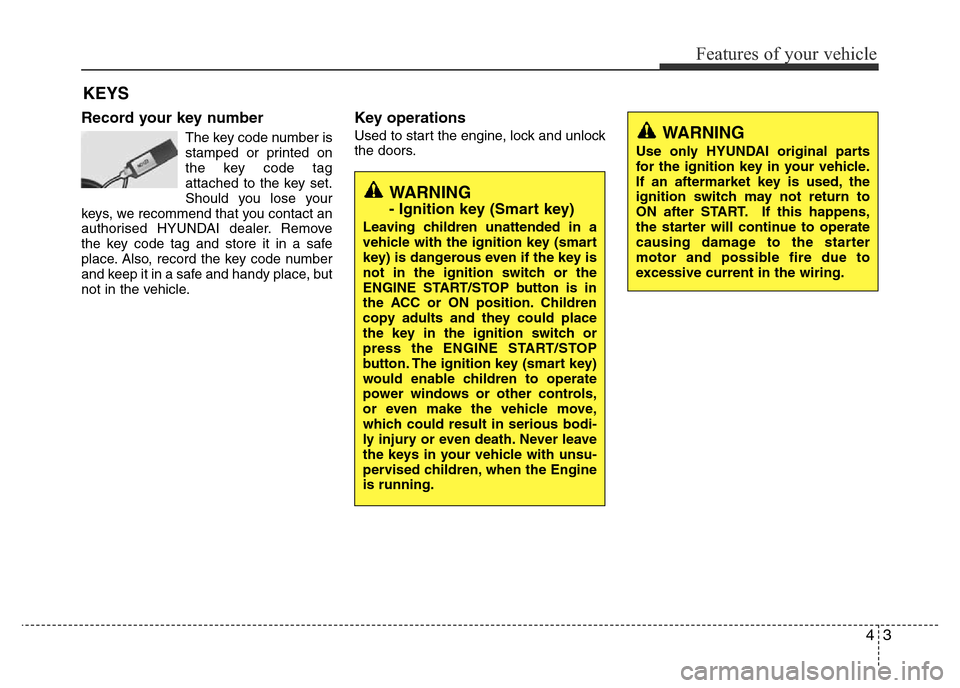
Record your key number
The key code number is
stamped or printed on
the key code tag
attached to the key set.
Should you lose your
keys, we recommend that you contact an
authorised HYUNDAI dealer. Remove
the key code tag and store it in a safe
place. Also, record the key code number
and keep it in a safe and handy place, but
not in the vehicle.
Key operations
Used to start the engine, lock and unlock
the doors.
KEYS
WARNING
Use only HYUNDAI original parts
for the ignition key in your vehicle.
If an aftermarket key is used, the
ignition switch may not return to
ON after START. If this happens,
the starter will continue to operate
causing damage to the starter
motor and possible fire due to
excessive current in the wiring.
WARNING
- Ignition key (Smart key)
Leaving children unattended in a
vehicle with the ignition key (smart
key) is dangerous even if the key is
not in the ignition switch or the
ENGINE START/STOP button is in
the ACC or ON position. Children
copy adults and they could place
the key in the ignition switch or
press the ENGINE START/STOP
button. The ignition key (smart key)
would enable children to operate
power windows or other controls,
or even make the vehicle move,
which could result in serious bodi-
ly injury or even death. Never leave
the keys in your vehicle with unsu-
pervised children, when the Engine
is running.
Page 76 of 425
Features of your vehicle
6 4
With a smart key, you can lock or unlock
a door (and boot/tailgate) and even start
the engine without inserting the key.
The functions of buttons on a smart key
are similar to the remote keyless entry.
(Refer to the “Remote keyless entry” in
this section.)
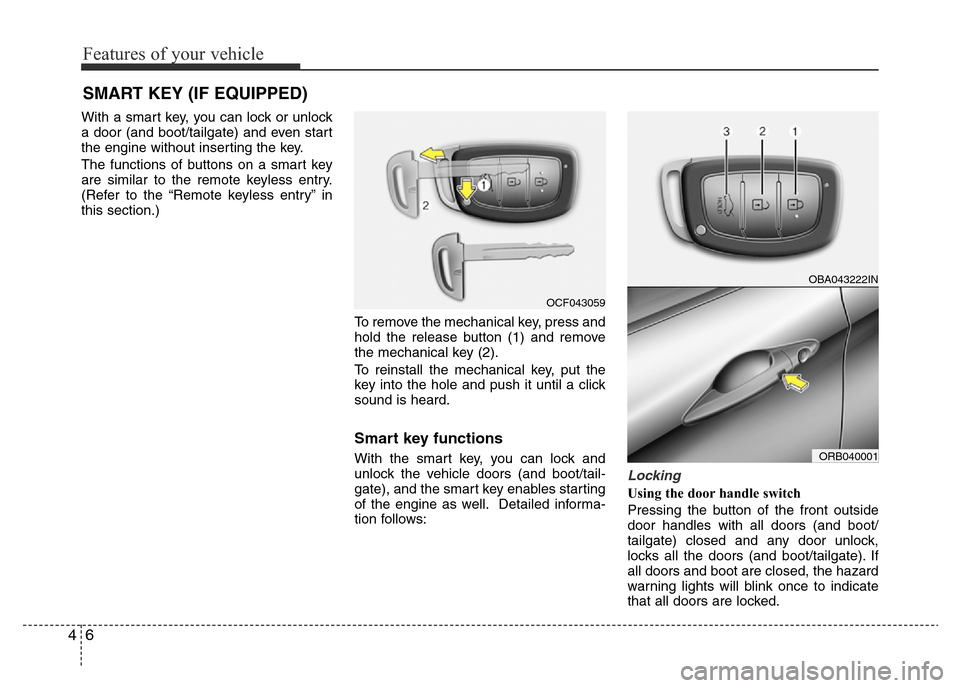
To remove the mechanical key, press and
hold the release button (1) and remove
the mechanical key (2).
To reinstall the mechanical key, put the
key into the hole and push it until a click
sound is heard.
Smart key functions
With the smart key, you can lock and
unlock the vehicle doors (and boot/tail-
gate), and the smart key enables starting
of the engine as well. Detailed informa-
tion follows:
Locking
Using the door handle switch
Pressing the button of the front outside
door handles with all doors (and boot/
tailgate) closed and any door unlock,
locks all the doors (and boot/tailgate). If
all doors and boot are closed, the hazard
warning lights will blink once to indicate
that all doors are locked.
SMART KEY (IF EQUIPPED)
OCF043059
OBA043222IN
ORB040001
Page 77 of 425
47
Features of your vehicle
However, if any door remains open, the
doors won't lock and the chime will sound
for 3 seconds. Close the door and try
again to lock the doors.
If boot/tailgate remains open, the hazard
warning light won't operate. After this,
boot/tailgate is closed, the hazard warn-
ing lights blink once.
The button will only operate when the
smart key is within 0.7~1 m (28~40 in.)
from the outside door handle. If you want
to make sure that a door has locked or
not, you should check the door lock but-
ton inside the vehicle or pull the outside
door handle.
Even though you press the outside door
handle buttons, the doors will not lock
and the chime will sound for 3 seconds if
any of following occur:
• The smart key is in the vehicle.
• The ignition switch is in ACC or ON
position.
• Any door except the boot/tailgate is
open.Using the button on the smart key
All doors (and boot/tailgate) are locked if
the lock button(1) is pressed. If all doors
(and boot/tailgate) are closed, the hazard
warning lights will blink once to indicate
that all doors are locked.
However, if any door (or boot/tailgate)
remains open, the hazard warning lights
will not operate. If all doors (and boot/
tailgate) are closed after the lock button
is pressed, the hazard warning lights
blink once.Unlocking
Using the door handle switch
Press the button of the front outside door
handles with all doors (and boot/tailgate)
closed and locked, unlocks all the doors
(and boot/tailgate). The hazard warning
lights blink twice to indicate that all doors
(and boot/tailgate) are unlocked. The but-
ton will only operate when the smart key
is within 0.7~1 m (28~40 in.) from the
outside door handle.
When the smart key is recognized in the
area of 0.7~1 m (28~40 in.) from the front
outside door handle, other people can
also open the door without possession of
the smart key.
After pressing the button, the doors will
lock automatically unless you open any
door within 30 seconds.
Using the button on the smart key
All doors (and boot/tailgate) are unlocked
if the unlock button (2) is pressed. The
hazard warning lights will blink twice to
indicate that all doors are unlocked.
After pressing this button, the doors will
lock automatically unless you open any
door within 30 seconds.
Page 78 of 425
Features of your vehicle
8 4
Boot unlocking (4 Door)
Using the boot handle switch
If you are within 0.7~1 m (28~40 in.) from
the outside boot handle with your smart
key in your possession, the boot will
unlock and open when you press the
boot handle switch. Once the boot is
opened and then closed, the boot will be
locked automatically.
If the boot is closed with the smart key in
the boot, the warning chime will sound
for about 5 seconds and the boot will not
locked.
Using the button on the smart key
The boot is opened if the boot unlock but-
ton (3) is pressed for more than 1 sec-
ond. Once the boot is opened and then
closed, the boot will lock automatically.
❈The word “HOLD” is written on the but-
ton to inform you that you must press
and hold the button for 1 second.
Tailgate unlocking (5 Door)
Using the tailgate handle switch
If you are within 0.7 m ~ 1 m (28 ~ 40 in.)
from the outside tailgate handle, with
your smart key in possession, the tail-
gate will unlock and open when you
press the tailgate handle switch.
The hazard warning lights will blink twice
to indicate that the tailgate is unlocked.
Once the tailgate is opened and then
closed, the tailgate will lock automatical-
ly.
Using the button on the smart key
The tailgate is unlocked if the tailgate
unlock button (3) is pressed for more
than 1 second. Once the tailgate is
opened and then closed, the tailgate will
lock automatically.
❈The word “HOLD” is written on the but-
ton to inform you that you must press
and hold the button for 1 second.
Start-up
You can start the engine without inserting
the key. For detailed information refer to
“Engine start/stop button” in section 5.
Smart key precautions
✽NOTICE
• If, for some reason, you happen to lose
your smart key, you will not be able to
start the engine. Tow the vehicle, if
necessary, and contact an authorised
HYUNDAI dealer.
• A maximum of 2 smart keys can be
registered to a single vehicle. If you
lose a smart key, you should immedi-
ately take the vehicle and remaining
key to your authorised HYUNDAI
dealer to protect it from potential
theft. If all keys are lost, have the vehi-
cle towed to the nearest authorised
HYUNDAI dealer for replacement
keys.
• The smart key will not work if any of
following occur:
- The smart key is close to a radio
transmitter such as a radio station or
an airport which can interfere with
normal operation of the smart key.
- You keep the smart key near a
mobile two-way radio system or a
mobile phone.
(Continued)