eps Hyundai Accent 2017 Owner's Manual
[x] Cancel search | Manufacturer: HYUNDAI, Model Year: 2017, Model line: Accent, Model: Hyundai Accent 2017Pages: 380, PDF Size: 12.45 MB
Page 28 of 380
Safety features of your vehicle
3-12
✽
✽NOTICE
If you are not able to pull out the seat
belt from the retractor, after returning
the seatback to the upright position,
press the seatbelt and seatback at the
same time. Then pull the belt out. You
will be able to pull the belt out smooth-
ly.
CAUTION- Rear seat belts
When returning the rear seatbacks
to the upright position, rememberto return the rear shoulder belts totheir proper position. Routing theseat belt webbing through the rearseat belt guides will help keep theseat belts from being trapped behind or under the seats.
CAUTION - Damaging rear
seat belt buckles
When folding the rear seatback,
insert the buckle in the pocketbetween the rear seatback andcushion. Doing so can prevent thebuckle from being damaged by the rear seatback.
WARNING- Cargo
Cargo should always be secured to
prevent it from being thrown about
the vehicle in a collision and caus-
ing injury to the vehicle occupants.
Do not place objects in the rear
seats, since they cannot be proper-
ly secured and may hit the front
seat occupants in a collision.
WARNING - Cargo loading
Make sure the engine is off, the
automatic transaxle is in P (Park)
or the manual transaxle is in R
(Reverse) or 1st, and the parking
brake is securely applied whenever
loading or unloading cargo. Failure
to take these steps may allow the
vehicle to move if the shift lever is
inadvertently moved to another
position.
WARNING
When you return the rear seatback
to its upright position after being
folded down:
Be careful not to damage the seat
belt webbing or buckle. Do not
allow the seat belt webbing or
buckle to get caught or pinched in
the rear seat. Ensure that the seat-
back is completely locked into its
upright position by pushing on the
top of the seatback. Otherwise, in
an accident or sudden stop, the
seat could fold down and allow
cargo to enter the passenger com-
partment, which could result in
serious injury or death.
Page 44 of 380
Safety features of your vehicle
3-28
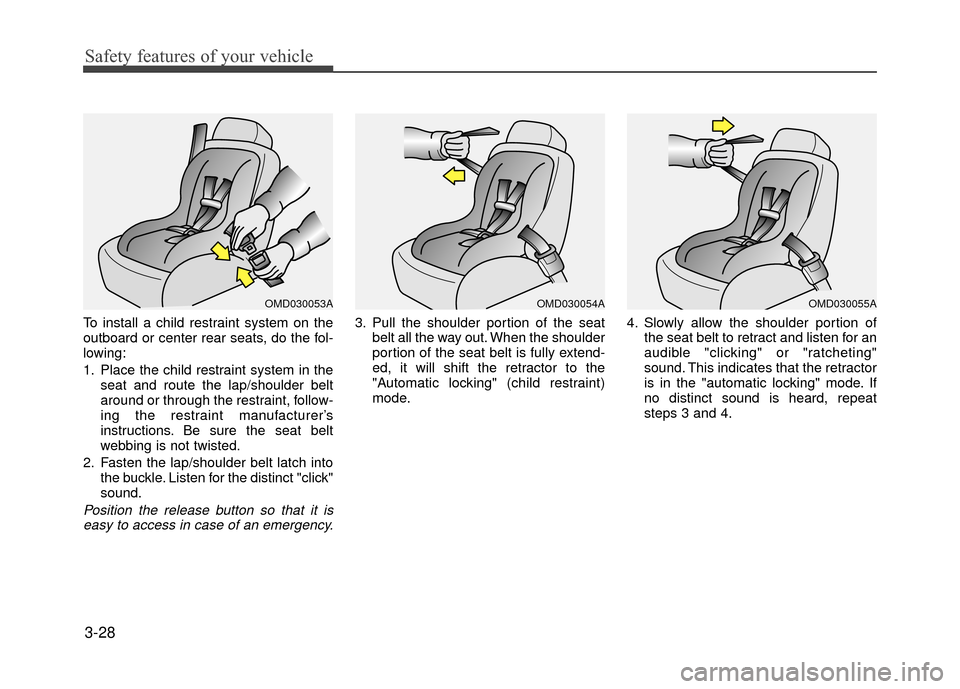
To install a child restraint system on the
outboard or center rear seats, do the fol-
lowing:
1. Place the child restraint system in theseat and route the lap/shoulder belt
around or through the restraint, follow-
ing the restraint manufacturer’s
instructions. Be sure the seat belt
webbing is not twisted.
2. Fasten the lap/shoulder belt latch into the buckle. Listen for the distinct "click"
sound.
Position the release button so that it iseasy to access in case of an emergency.
3. Pull the shoulder portion of the seat belt all the way out. When the shoulder
portion of the seat belt is fully extend-
ed, it will shift the retractor to the
"Automatic locking" (child restraint)
mode. 4. Slowly allow the shoulder portion of
the seat belt to retract and listen for an
audible "clicking" or "ratcheting"
sound. This indicates that the retractor
is in the "automatic locking" mode. If
no distinct sound is heard, repeat
steps 3 and 4.
OMD030054AOMD030053AOMD030055A
Page 45 of 380
3-29
Safety features of your vehicle
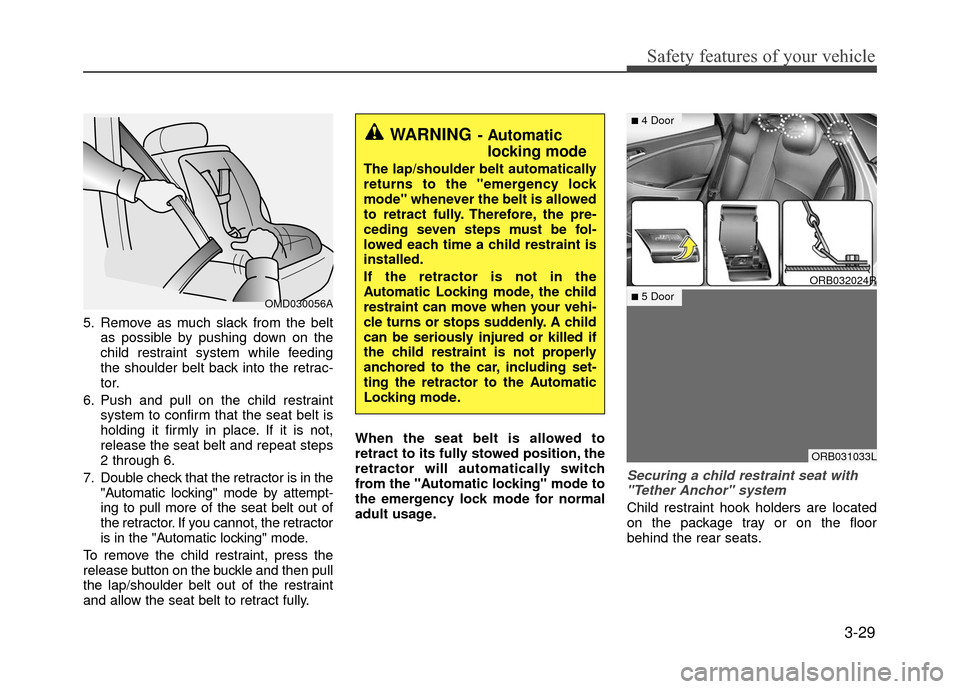
5. Remove as much slack from the beltas possible by pushing down on the
child restraint system while feeding
the shoulder belt back into the retrac-
tor.
6. Push and pull on the child restraint system to confirm that the seat belt is
holding it firmly in place. If it is not,
release the seat belt and repeat steps
2 through 6.
7. Double check that the retractor is in the "Automatic locking" mode by attempt-
ing to pull more of the seat belt out of
the retractor. If you cannot, the retractor
is in the "Automatic locking" mode.
To remove the child restraint, press the
release button on the buckle and then pull
the lap/shoulder belt out of the restraint
and allow the seat belt to retract fully. When the seat belt is allowed to
retract to its fully stowed position, the
retractor will automatically switch
from the "Automatic locking" mode to
the emergency lock mode for normal
adult usage.
Securing a child restraint seat with
"Tether Anchor" system
Child restraint hook holders are located
on the package tray or on the floor
behind the rear seats.
OMD030056A
WARNING- Automatic locking mode
The lap/shoulder belt automatically
returns to the "emergency lock
mode" whenever the belt is allowed
to retract fully. Therefore, the pre-
ceding seven steps must be fol-
lowed each time a child restraint is
installed.
If the retractor is not in the
Automatic Locking mode, the child
restraint can move when your vehi-
cle turns or stops suddenly. A child
can be seriously injured or killed if
the child restraint is not properly
anchored to the car, including set-
ting the retractor to the Automatic
Locking mode.
ORB032024R
ORB031033L
■4 Door
■5 Door
Page 98 of 380
Features of your vehicle
4-24
TILT DOWN →SLIDE OPEN →
SLIDE CLOSE
Then, release the control lever.
When this is complete, the sunroof sys-
tem is reset.
❈ For more detailed information, contact
an authorized HYUNDAI dealer.Electric power steering (EPS)
The power steering uses a motor to
assist you in steering the vehicle. If the
engine is off or if the power steering sys-
tem becomes inoperative, the vehicle
may still be steered, but it will require
increased steering effort.
The motor driven power steering is con-
trolled by a power steering control unit
which senses the steering wheel torque
and vehicle speed to command the
motor.
The steering assist increases as the
vehicle’s speed increases and as the
vehicle’s speed decreases for optimum
steering assist decreases.
Should you notice any change in the
effort required to steer during normal
vehicle operation, have the power steer-
ing checked by an authorized HYUNDAI
dealer.
CAUTION
If the sunroof is not reset when the
vehicle battery is disconnected ordischarged, or related fuse isblown, the sunroof may operateimproperly.
STEERING WHEEL
CAUTION
If the Electric Power Steering System does not operate normal-ly, the warning light will illuminate on the instrument cluster. Thesteering wheel may become diffi-cult to control or operate abnor- mally. Take your vehicle to anauthorized HYUNDAI dealer and have the vehicle checked as soonas possible.
When you operate the steering wheel in low temperature, abnor-mal noise could occur. If tempera- ture rises, the noise will disap-pear. This is a normal condition.
When the vehicle is stationary, if you turn the steering wheel all theway to the left or right continu-ously, the steering wheel becomes heavier from the end.This is normal and not system malfunction. As time passes, thesteering wheel will return to its normal condition.
Page 99 of 380
4-25
Features of your vehicle
✽
✽NOTICE
The following symptoms may occur dur-
ing normal vehicle operation:
• The EPS warning light does not illu-
minate.
• The steering gets heavy immediately after turning the ignition switch on.
This happens as the system performs
the EPS system diagnostics. When the
diagnostics is completed, the steering
wheel will return to its normal condi-
tion.
• A click noise may be heard from the EPS relay after the ignition switch is
turned to the ON or LOCK (OFF)
position.
• A motor noise may be heard when the vehicle is at a stop or at a low driving
speed.
• If the Electric Power Steering System does not operate normally, the warning
light will illuminate on the instrument
cluster. The steering wheel may become
difficult to operate due to increasing
steering effort. Take your vehicle to an
authorized HYUNDAI dealer and have
the vehicle checked as soon as possible.
• When you operate the steering wheel in low temperature, abnormal noise
could occur. If temperature rises, the
noise will disappear. This is a normal
condition. (Continued)(Continued)
• When the charging system warning
light comes on or the voltage is low
(When the alternator (or battery) does
not operate normally or it malfunc-
tions), the steering wheel may get
heavy and become difficult to operate
due to increased steering effort.
Tilt and telescopic steering
(if equipped)
Tilt and telescopic steering allows you to
adjust the steering wheel before you
drive. You can also raise it to give your
legs more room when you exit and enter
the vehicle.
The steering wheel should be positioned
so that it is comfortable for you to drive,
while permitting you to see the instru-
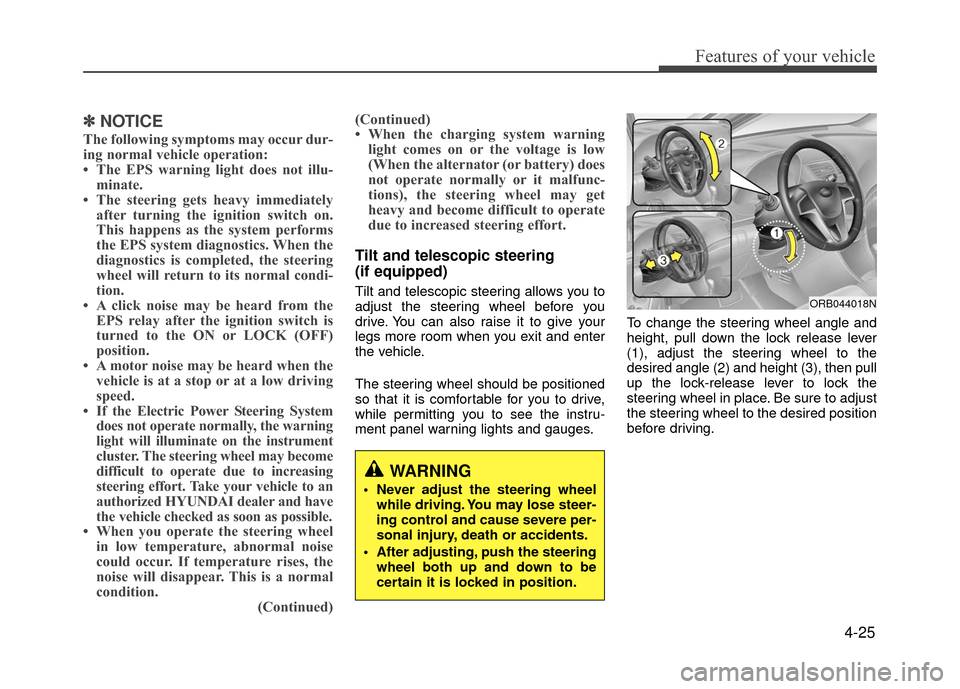
ment panel warning lights and gauges. To change the steering wheel angle and
height, pull down the lock release lever
(1), adjust the steering wheel to the
desired angle (2) and height (3), then pull
up the lock-release lever to lock the
steering wheel in place. Be sure to adjust
the steering wheel to the desired position
before driving.ORB044018N
WARNING
Never adjust the steering wheel
while driving. You may lose steer-
ing control and cause severe per-
sonal injury, death or accidents.
After adjusting, push the steering wheel both up and down to be
certain it is locked in position.
Page 109 of 380
4-35
Features of your vehicle
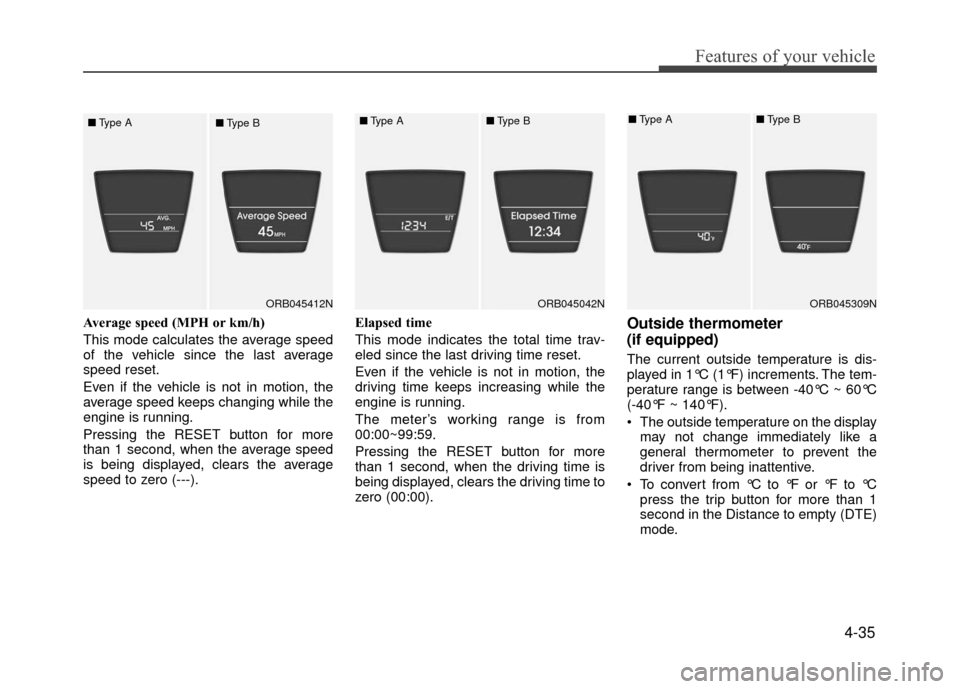
Average speed (MPH or km/h)
This mode calculates the average speed
of the vehicle since the last average
speed reset.
Even if the vehicle is not in motion, the
average speed keeps changing while the
engine is running.
Pressing the RESET button for more
than 1 second, when the average speed
is being displayed, clears the average
speed to zero (---).Elapsed time
This mode indicates the total time trav-
eled since the last driving time reset.
Even if the vehicle is not in motion, the
driving time keeps increasing while the
engine is running.
The meter’s working range is from
00:00~99:59.
Pressing the RESET button for more
than 1 second, when the driving time is
being displayed, clears the driving time to
zero (00:00).Outside thermometer
(if equipped)
The current outside temperature is dis-
played in 1°C (1°F) increments. The tem-
perature range is between -40°C ~ 60°C
(-40°F ~ 140°F).
The outside temperature on the display
may not change immediately like a
general thermometer to prevent the
driver from being inattentive.
To convert from °C to °F or °F to °C press the trip button for more than 1
second in the Distance to empty (DTE)
mode.
ORB045412N
■
Type A
■Type BORB045042N
■Type A■Type B
ORB045309N
■Type A■Type B
Page 117 of 380
4-43
Features of your vehicle
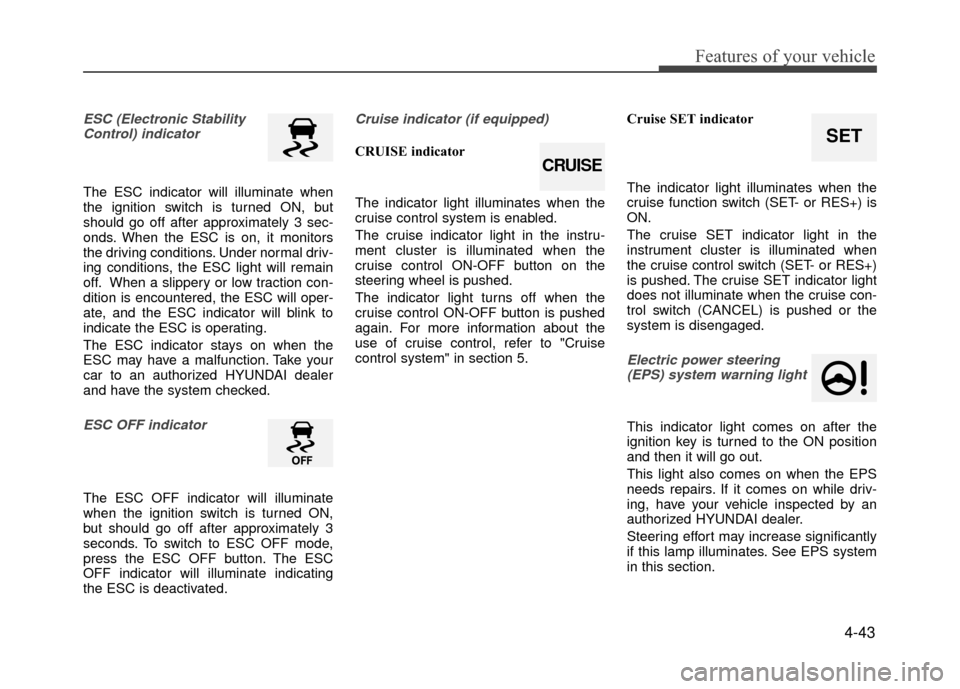
ESC (Electronic StabilityControl) indicator
The ESC indicator will illuminate when
the ignition switch is turned ON, but
should go off after approximately 3 sec-
onds. When the ESC is on, it monitors
the driving conditions. Under normal driv-
ing conditions, the ESC light will remain
off. When a slippery or low traction con-
dition is encountered, the ESC will oper-
ate, and the ESC indicator will blink to
indicate the ESC is operating.
The ESC indicator stays on when the
ESC may have a malfunction. Take your
car to an authorized HYUNDAI dealer
and have the system checked.
ESC OFF indicator
The ESC OFF indicator will illuminate
when the ignition switch is turned ON,
but should go off after approximately 3
seconds. To switch to ESC OFF mode,
press the ESC OFF button. The ESC
OFF indicator will illuminate indicating
the ESC is deactivated.
Cruise indicator (if equipped)
CRUISE indicator
The indicator light illuminates when the
cruise control system is enabled.
The cruise indicator light in the instru-
ment cluster is illuminated when the
cruise control ON-OFF button on the
steering wheel is pushed.
The indicator light turns off when the
cruise control ON-OFF button is pushed
again. For more information about the
use of cruise control, refer to "Cruise
control system" in section 5. Cruise SET indicator
The indicator light illuminates when the
cruise function switch (SET- or RES+) is
ON.
The cruise SET indicator light in the
instrument cluster is illuminated when
the cruise control switch (SET- or RES+)
is pushed. The cruise SET indicator light
does not illuminate when the cruise con-
trol switch (CANCEL) is pushed or the
system is disengaged.
Electric power steering
(EPS) system warning light
This indicator light comes on after the
ignition key is turned to the ON position
and then it will go out.
This light also comes on when the EPS
needs repairs. If it comes on while driv-
ing, have your vehicle inspected by an
authorized HYUNDAI dealer.
Steering effort may increase significantly
if this lamp illuminates. See EPS system
in this section.
CRUISE
SET
Page 155 of 380
4-81
Features of your vehicle
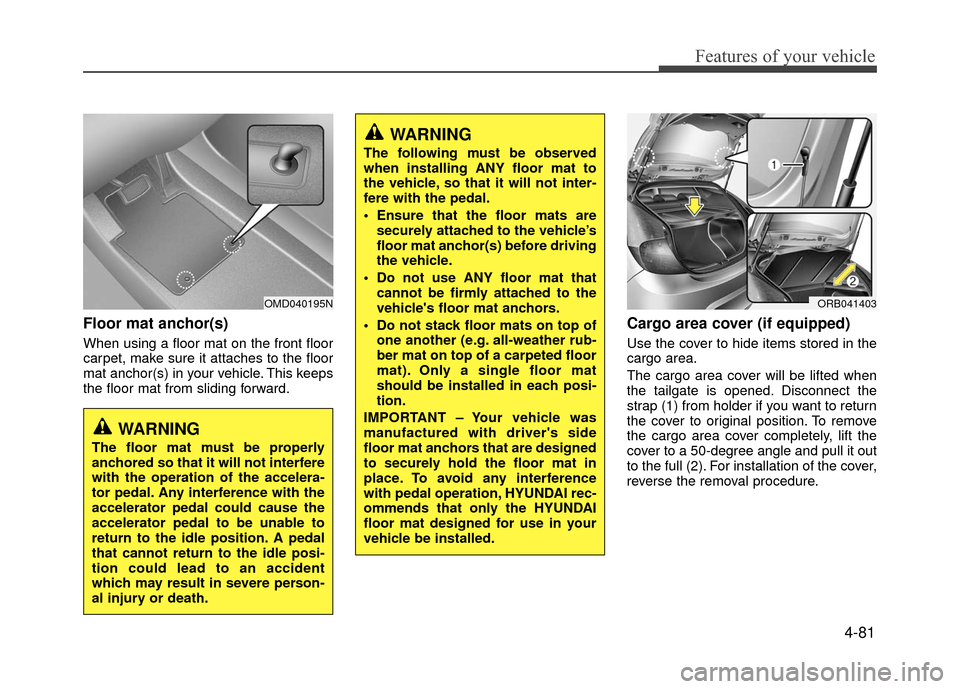
Floor mat anchor(s)
When using a floor mat on the front floor
carpet, make sure it attaches to the floor
mat anchor(s) in your vehicle. This keeps
the floor mat from sliding forward.
Cargo area cover (if equipped)
Use the cover to hide items stored in the
cargo area.
The cargo area cover will be lifted when
the tailgate is opened. Disconnect the
strap (1) from holder if you want to return
the cover to original position. To remove
the cargo area cover completely, lift the
cover to a 50-degree angle and pull it out
to the full (2). For installation of the cover,
reverse the removal procedure.
OMD040195N
WARNING
The floor mat must be properly
anchored so that it will not interfere
with the operation of the accelera-
tor pedal. Any interference with the
accelerator pedal could cause the
accelerator pedal to be unable to
return to the idle position. A pedal
that cannot return to the idle posi-
tion could lead to an accident
which may result in severe person-
al injury or death.
WARNING
The following must be observed
when installing ANY floor mat to
the vehicle, so that it will not inter-
fere with the pedal.
Ensure that the floor mats aresecurely attached to the vehicle’s
floor mat anchor(s) before driving
the vehicle.
Do not use ANY floor mat that cannot be firmly attached to the
vehicle's floor mat anchors.
Do not stack floor mats on top of one another (e.g. all-weather rub-
ber mat on top of a carpeted floor
mat). Only a single floor mat
should be installed in each posi-
tion.
IMPORTANT – Your vehicle was
manufactured with driver's side
floor mat anchors that are designed
to securely hold the floor mat in
place. To avoid any interference
with pedal operation, HYUNDAI rec-
ommends that only the HYUNDAI
floor mat designed for use in your
vehicle be installed.
ORB041403
Page 168 of 380
Features of your vehicle
4-94
✽
✽NOTICE - PRECAUTIONS
FOR SAFE DRIVING
• Connecting the head unit with a
Bluetooth®phone allows the user to
conveniently make and receive calls
and use contacts. Before using
Bluetooth
®, carefully read the con-
tents of this user’s manual.
• Excessive use or operations while driving may lead to negligent driv-
ing practices and result in acci-
dents. Refrain from excessive oper-
ations while driving.
• Viewing the screen for prolonged periods of time is dangerous and
may lead to accidents. When driv-
ing, view the screen only for short
periods of time.
✽ ✽ NOTICE - WHEN CON-
NECTING A
Bluetooth®
PHONE
• Before connecting the head unit
with the mobile phone, check to see
that the mobile phone supports
Bluetooth
®features.
• Even if the phone supports Bluetooth
®, the phone will not be
found during device searches if the
phone has been set to hidden state
or the Bluetooth
®power is turned
off. Disable the hidden state or turn
on the Bluetooth
®power prior to
searching/connecting with the Head
unit.
• Bluetooth phone is automatically connected when the ignition on.
• If you do not want automatic con- nection with your Bluetooth
®
device, turn off the Bluetooth®fea-
ture within your mobile phone.
• The Handsfree call volume and quality may differ depending on the
mobile phone. (Continued)(Continued)
• Park the vehicle when connecting
the head unit with the mobile
phone.
• Bluetooth
®connection may become
intermittently disconnected in some
mobile phones. Follow these steps
to try again.
1. Within the mobile phone, turn the Bluetooth
®function off/on
and try again.
2. Turn the mobile phone power Off/On and try again.
3. Completely remove the mobile phone battery, reboot, and then
again.
4. Reboot the
AudioSystem and try
again.
5. Delete all paired devices, pair and try again.
• Handsfree call quality and volume may differ depending on the model
of your mobile phone.
Page 189 of 380
![Hyundai Accent 2017 Owners Manual 4-115
Features of your vehicle
Pairing through [PHONE] Setup
Press the keySelect [Phone]
Select [Pair Phone] Select TUNE
knob
1. The following steps are the same as those described in the section "W Hyundai Accent 2017 Owners Manual 4-115
Features of your vehicle
Pairing through [PHONE] Setup
Press the keySelect [Phone]
Select [Pair Phone] Select TUNE
knob
1. The following steps are the same as those described in the section "W](/img/35/14348/w960_14348-188.png)
4-115
Features of your vehicle
Pairing through [PHONE] Setup
Press the keySelect [Phone]
Select [Pair Phone] Select TUNE
knob
1. The following steps are the same as those described in the section "When
No Devices have been Paired" on the
previous page.
✽ ✽NOTICE
•Bluetooth®Wireless Technology fea-
tures supported within the vehicle are
as follows. Some features may not be
supported depending on your
Bluetooth
®Wireless Technology
device.
- Outgoing/Incoming Handsfree calls
- Operations during a call (Switch to Private, Switch to call waiting, MIC
on/off)
- Downloading Call History
- Downloading Mobile Contacts
- Bluetooth
®Wireless Technology
device auto connection
- Bluetooth Audio Streaming
• Up to five Bluetooth
®Wireless
Technology devices can be paired to
the Car Handsfree system.
• Only one Bluetooth
®Wireless
Technology device can be connected at
a time.
• Other devices cannot be paired while a Bluetooth
®Wireless Technology
device is connected.
• Only Bluetooth
®Wireless Technology
Handsfree and Bluetooth audio relat-
ed features are supported.
(Continued)(Continued)
Bluetooth related operations are pos-
sible only within devices that support
Handsfree or audio features, such as a
Bluetooth
®Wireless Technology
mobile phone or a Bluetooth audio
device.
• If a connected Bluetooth
®Wireless
Technology device becomes discon-
nected due to being out of communi-
cation range, turning the device OFF,
or a Bluetooth
®Wireless Technology
communication error, corresponding
Bluetooth
®Wireless Technology
devices are automatically searched
and reconnected.
• If the system becomes unstable due to communication errors between the
car Handsfree and the Bluetooth
®
Wireless Technology device, reset the
device by turning off and back on
again. Upon resetting Bluetooth
®
Wireless Technology device, the sys-
tem will be restored.
• After pairing is complete, a contacts download request is sent once to the
mobile phone. Some mobile phones
may require confirmation upon
receiving a download request, ensure
your mobile phone accepts the connec-
tion. Refer to your phones user’s man-
ual for additional information regard-
ing phone pairing and connections.
SETUPCLOCK