open hood HYUNDAI ACCENT 2023 Owners Manual
[x] Cancel search | Manufacturer: HYUNDAI, Model Year: 2023, Model line: ACCENT, Model: HYUNDAI ACCENT 2023Pages: 443, PDF Size: 42.78 MB
Page 15 of 443
1-4
Your vehicle at a glance
I IN
NT
TE
ER
RI
IO
OR
R
O
OV
VE
ER
RV
VI
IE
EW
W
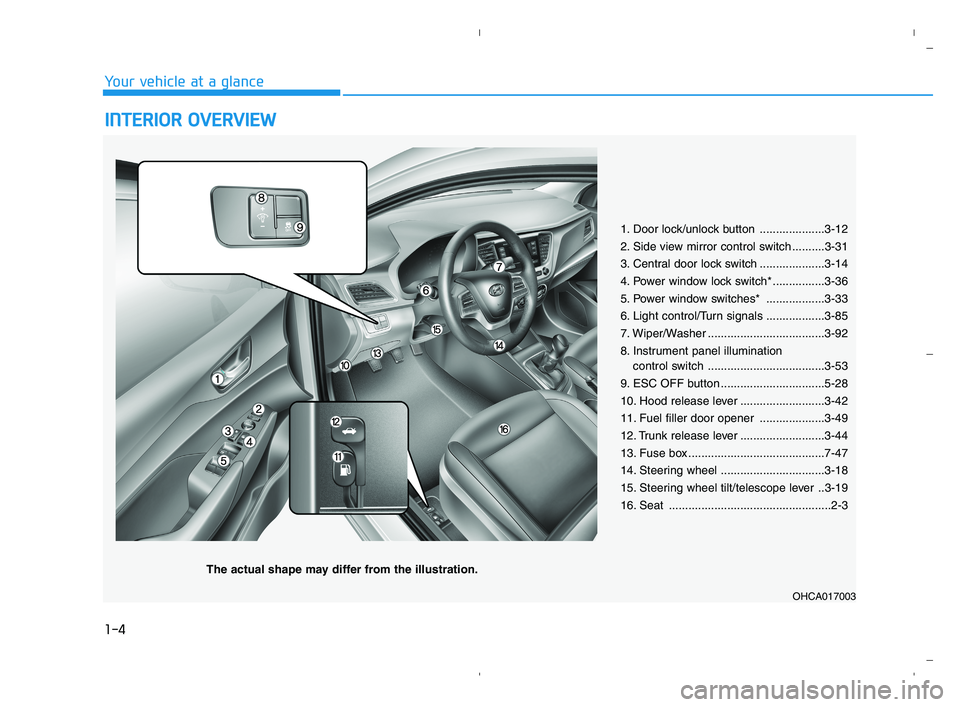
1. Door lock/unlock button ....................3-12
2. Side view mirror control switch ..........3-31
3. Central door lock switch ....................3-14
4. Power window lock switch* ................3-36
5. Power window switches* ..................3-33
6. Light control/Turn signals ..................3-85
7. Wiper/Washer ....................................3-92
8. Instrument panel illumination
control switch ....................................3-53
9. ESC OFF button ................................5-28
10. Hood release lever ..........................3-42
11. Fuel filler door opener ....................3-49
12. Trunk release lever ..........................3-44
13. Fuse box ..........................................7-47
14. Steering wheel ................................3-18
15. Steering wheel tilt/telescope lever ..3-19
16. Seat ..................................................2-3
OHCA017003
The actual shape may differ from the illustration.
HCa HMA 1.qxp 5/25/2020 10:05 AM Page 4
Page 79 of 443

Convenient features of your vehicle
Accessing Your Vehicle .........................................3-3
Remote Key.........................................................................3-3
Smart Key ............................................................................3-6
Immobilizer System .........................................................3-11
Door Locks ............................................................3-12
Operating Door Locks from Outside the Vehicle ....3-12
Operating door locks from inside the vehicle .........3-13
Auto Door Lock/Unlock Features ...............................3-16
Child-Protector Rear Door Locks ...............................3-16
Theft-Alarm System ............................................3-17
Steering Wheel .....................................................3-18
Electric Power Steering (EPS) .....................................3-18
Tilt Steering / Telescope Steering ..............................3-19
Heated steering wheel ...................................................3-20
Horn ....................................................................................3-20
Mirrors ...................................................................3-21
Inside Rearview Mirror ..................................................3-21
Side View Mirrors ...........................................................3-29
Windows ................................................................3-33
Power Windows ...............................................................3-33
Manual windows ..............................................................3-36
Sunroof..................................................................3-37
Sunroof opening and closing .......................................3-38
Sliding the sunroof .........................................................3-38
Tilting the sunroof ..........................................................3-38
Sunshade ...........................................................................3-39
Resetting the sunroof ....................................................3-39
Exterior Features .................................................3-42
Hood ...................................................................................3-42
Trunk ..................................................................................3-43
Smart Trunk ......................................................................3-45
Fuel Filler Door ................................................................3-49
Instrument Cluster ...............................................3-52
Instrument Cluster Control............................................3-53
Gauges and Meters ........................................................3-54
Transmission shift indicator .........................................3-57
Warning and Indicator Lights .......................................3-58
LCD Display Messages ...................................................3-68
LCD Display ...........................................................3-72
LCD Display Control ........................................................3-72
LCD Display Modes .........................................................3-72
Trip Computer .......................................................3-77
Type A ................................................................................3-77
Type B ................................................................................3-81
3
HCa HMA 3a(~84).qxp 5/25/2020 10:35 AM Page 1
Page 85 of 443
3-7
Convenient features of your vehicle
Locking
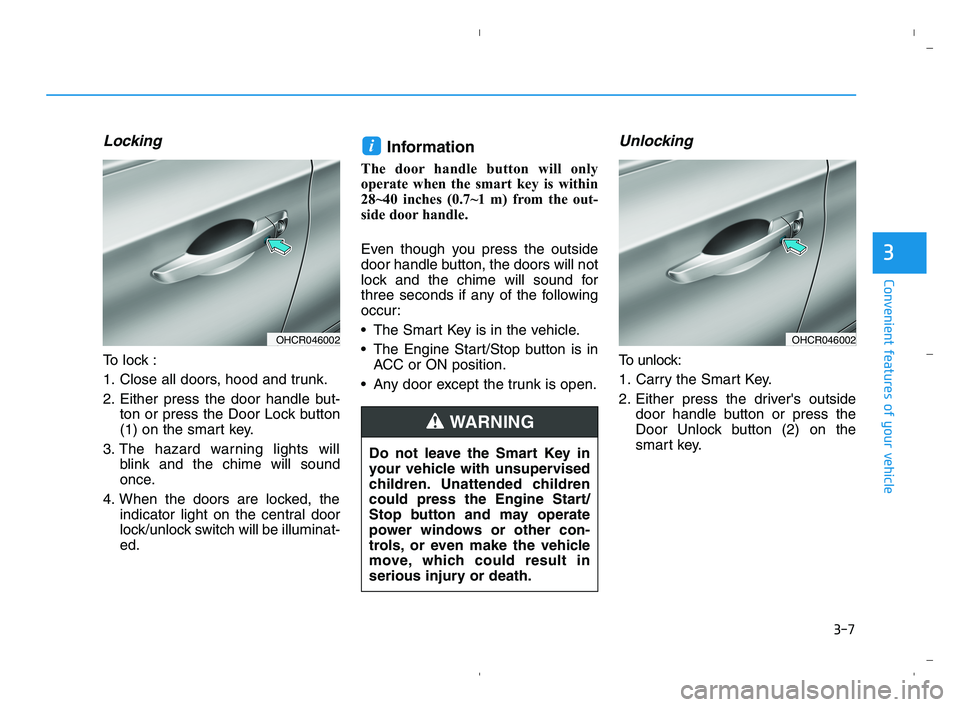
To lock :
1. Close all doors, hood and trunk.
2. Either press the door handle but-
ton or press the Door Lock button
(1) on the smart key.
3. The hazard warning lights will
blink and the chime will sound
once.
4. When the doors are locked, the
indicator light on the central door
lock/unlock switch will be illuminat-
ed.
Information
The door handle button will only
operate when the smart key is within
28~40 inches (0.7~1 m) from the out-
side door handle.
Even though you press the outside
door handle button, the doors will not
lock and the chime will sound for
three seconds if any of the following
occur:
The Smart Key is in the vehicle.
The Engine Start/Stop button is in
ACC or ON position.
Any door except the trunk is open.
Unlocking
To unlock:
1. Carry the Smart Key.
2. Either press the driver's outside
door handle button or press the
Door Unlock button (2) on the
smart key.
i
3
OHCR046002OHCR046002
Do not leave the Smart Key in
your vehicle with unsupervised
children. Unattended children
could press the Engine Start/
Stop button and may operate
power windows or other con-
trols, or even make the vehicle
move, which could result in
serious injury or death.
WARNING
HCa HMA 3a(~84).qxp 5/25/2020 10:35 AM Page 7
Page 95 of 443
3-17
Convenient features of your vehicle
3
This system helps to protect your
vehicle and valuables. The horn will
sound and the hazard warning lights
will blink continuously if any of the
following occur:
- A door is opened without using the
remote key or smart key.
- The trunk is opened without using
the remote key or smart key.
- The engine hood is opened.
The alarm continues for 30 seconds,
then the system resets. To turn off
the alarm, unlock the doors with the
remote key or smart key.
The Theft Alarm System automati-
cally sets 30 seconds after you lock
the doors and the trunk. For the sys-
tem to activate, you must lock the
doors and the trunk from outside the
vehicle with the remote key or smart
key or by pressing the button on the
outside of the door handle with the
smart key in your possession.
The hazard warning lights will blink
and the chime will sound once to
indicate the system is armed.Once the security system is set,
opening any door, the trunk, or the
hood without using the remote key or
smart key will cause the alarm to
activate.
The Theft Alarm System will not set if
the hood, the trunk, or any door is
not fully closed. If the system will not
set, check the hood, the trunk, or the
doors are fully closed.
Do not attempt to alter this system or
add other devices to it.Information
• Do not lock the doors until all pas-
sengers have left the vehicle. If the
remaining passenger leaves the
vehicle when the system is armed,
the alarm will be activated.
• If the vehicle is not disarmed with
the remote key or smart key, open
the doors by using the mechanical
key and place the ignition switch in
the ON position (for remote key) or
start the engine (for smart key) by
directly pressing the ignition switch
with the smart key.
• If the system is disarmed by unlock-
ing the vehicle, but neither a door or
the trunk is opened within 30 sec-
onds, the doors will relock and the
system will rearm automatically.
i
T TH
HE
EF
FT
T-
-A
AL
LA
AR
RM
M
S
SY
YS
ST
TE
EM
M
HCa HMA 3a(~84).qxp 5/25/2020 10:35 AM Page 17
Page 120 of 443
3-42
Convenient features of your vehicle
Hood
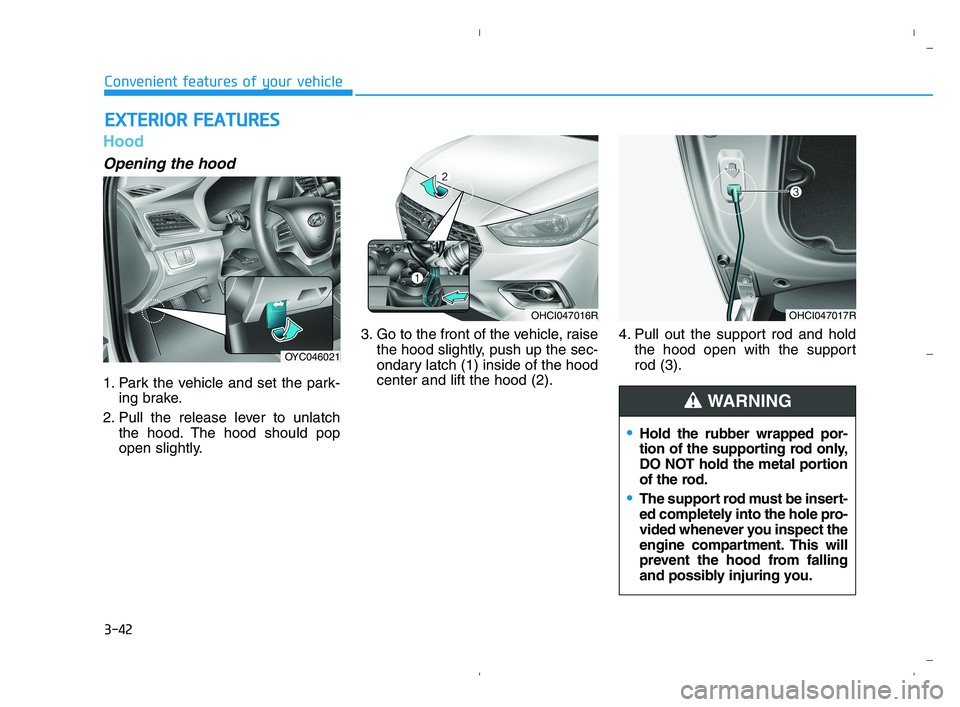
Opening the hood
1. Park the vehicle and set the park-
ing brake.
2. Pull the release lever to unlatch
the hood. The hood should pop
open slightly.3. Go to the front of the vehicle, raise
the hood slightly, push up the sec-
ondary latch (1) inside of the hood
center and lift the hood (2).4. Pull out the support rod and hold
the hood open with the support
rod (3).
E EX
XT
TE
ER
RI
IO
OR
R
F
FE
EA
AT
TU
UR
RE
ES
S
Hold the rubber wrapped por-
tion of the supporting rod only,
DO NOT hold the metal portion
of the rod.
The support rod must be insert-
ed completely into the hole pro-
vided whenever you inspect the
engine compartment. This will
prevent the hood from falling
and possibly injuring you.
WARNING
OYC046021
OHCI047016ROHCI047017R
HCa HMA 3a(~84).qxp 5/25/2020 10:37 AM Page 42
Page 121 of 443
3-43
Convenient features of your vehicle
3
Closing the hood
1. Before closing the hood, check the
following:
ment must be correctly installed.
bustible material must be
removed from the engine com-
partment.
2. Lower the hood halfway (lifted
approximately 12 inches (30 cm)
from the closed position) and push
down to securely lock in place.
Then double check to be sure the
hood is secure. If the hood can be
raised slightly, it is not securely
locked. Open it again and close it
with more force.
Hood open warning
(if equipped)
The warning message will appear on
the LCD display when hood is open.
The warning chime will operate when
the vehicle is being driven at or
above 3 km/h with the hood open.
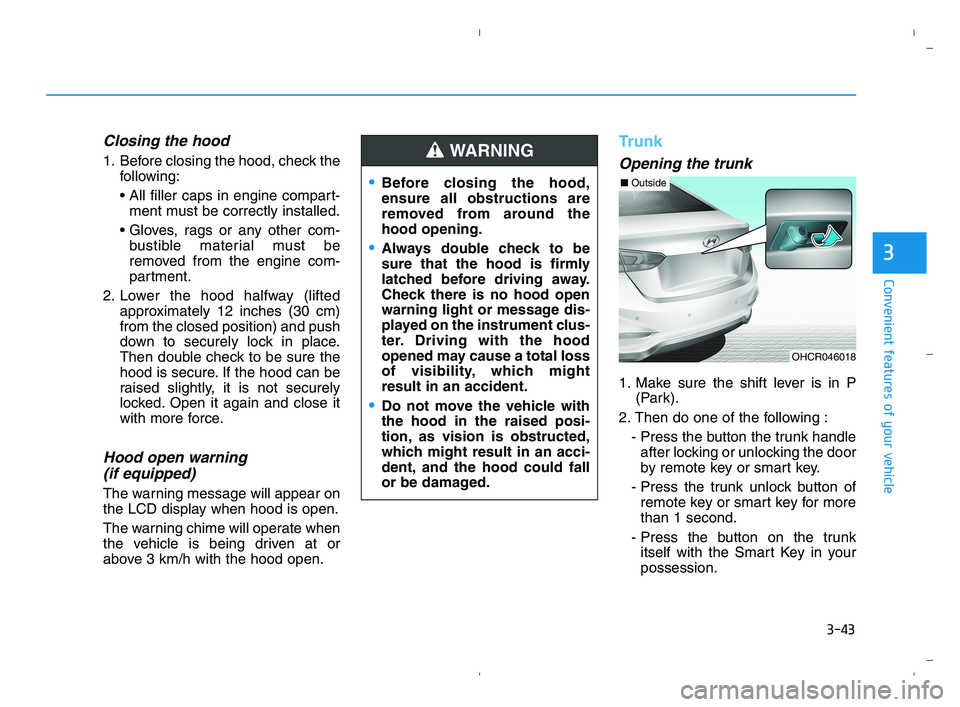
Trunk
Opening the trunk
1. Make sure the shift lever is in P
(Park).
2. Then do one of the following :
- Press the button the trunk handle
after locking or unlocking the door
by remote key or smart key.
- Press the trunk unlock button of
remote key or smart key for more
than 1 second.
- Press the button on the trunk
itself with the Smart Key in your
possession.
Before closing the hood,
ensure all obstructions are
removed from around the
hood opening.
Always double check to be
sure that the hood is firmly
latched before driving away.
Check there is no hood open
warning light or message dis-
played on the instrument clus-
ter. Driving with the hood
opened may cause a total loss
of visibility, which might
result in an accident.
Do not move the vehicle with
the hood in the raised posi-
tion, as vision is obstructed,
which might result in an acci-
dent, and the hood could fall
or be damaged.
WARNING
OHCR046018
■Outside
HCa HMA 3a(~84).qxp 5/25/2020 10:37 AM Page 43
Page 147 of 443
3-69
Convenient features of your vehicle
3
Press clutch pedal to start
engine (for smart key system
and manual transmission)
This warning message is displayed if
the Engine Start/Stop button
changes to the ACC position twice
by pressing the button repeatedly
without depressing the clutch pedal.
You can start the engine by depress-
ing the clutch pedal to.
Key not in vehicle
(for smart key system)
This warning message is displayed if
the smart key is not in the vehicle
when you press the Engine Start/Stop
button.
When attempting to start the vehicle,
always have the smart key with you.
Key not detected
(for smart key system)
This warning message is displayed if
the smart key is not detected when you
press the Engine Start/Stop button.
Press START button again
(for smart key system)
This message is displayed if you were
unable to start the vehicle when the
Engine Start/Stop button was
pressed.
If this occurs, attempt to start the
engine by pressing the Engine Start/
Stop button again.
If the warning message appears each
time you press the Engine Start/Stop
button, have your vehicle inspected by
an authorized HYUNDAI dealer.
Press START button with key
(for smart key system)
This warning message is displayed if
you press the Engine Start/Stop but-
ton while the warning message "Key
not detected" is displayed.
At this time, the immobilizer indicator
light blinks.
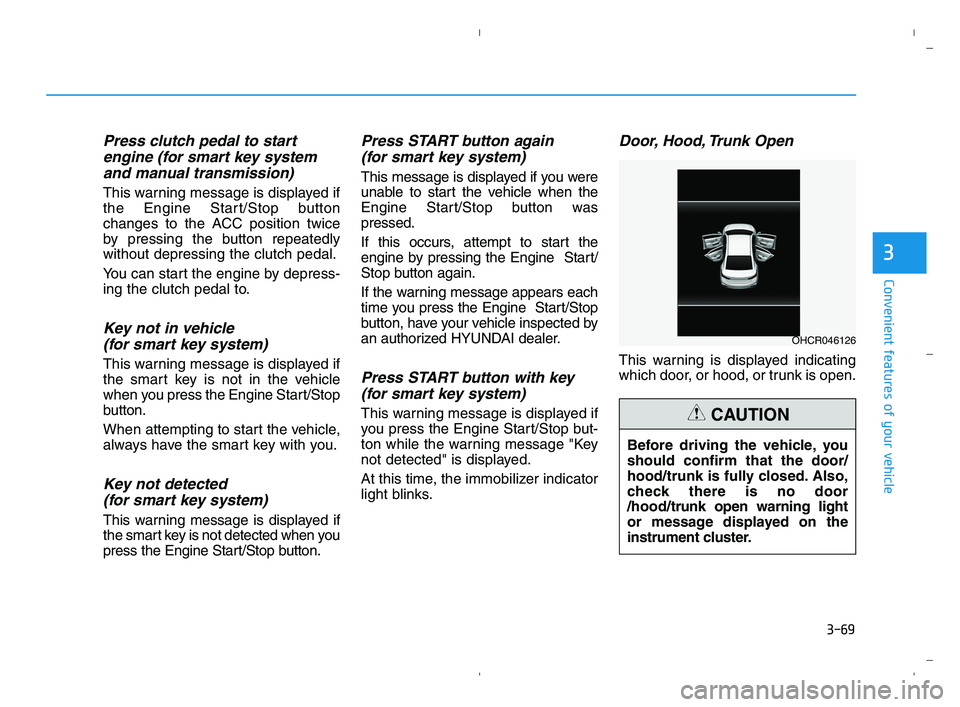
Door, Hood, Trunk Open
This warning is displayed indicating
which door, or hood, or trunk is open.
OHCR046126
Before driving the vehicle, you
should confirm that the door/
hood/trunk is fully closed. Also,
check there is no door
/hood/trunk open warning light
or message displayed on the
instrument cluster.
CAUTION
HCa HMA 3a(~84).qxp 5/25/2020 10:39 AM Page 69
Page 321 of 443
6-6
What to do in an emergency
7. Connect the other end of the sec-
ond jumper cable to the black,
negative (-) chassis ground of
your vehicle (4).
Do not allow the jumper cables to
contact anything except the cor-
rect battery or jumper terminals or
the correct ground. Do not lean
over the battery when making
connections.
8. Start the engine of the assisting
vehicle and let it run at approxi-
mately 2,000 rpm for a few min-
utes. Then start your vehicle.
If your vehicle will not start after a
few attempts, it probably requires
servicing. In this event please seek
qualified assistance. If the cause of
your battery discharging is not
apparent, have your vehicle checked
by an authorized HYUNDAI dealer.Disconnect the jumper cables in the
exact reverse order you connected
them:
1. Disconnect the jumper cable from
the black, negative (-) chassis
ground of your vehicle (4).
2. Disconnect the other end of the
jumper cable from the black, neg-
ative (-) battery/chassis ground of
the assisting vehicle (3).
3. Disconnect the second jumper
cable from the red, positive (+)
battery/jumper terminal of the
assisting vehicle (2).
4. Disconnect the other end of the
jumper cable from the red, positive
(+) jumper terminal of your vehicle
(1).If your temperature gage indicates
overheating, you experience a loss
of power, or hear loud pinging or
knocking, the engine may be over-
heating. If this happens, you should:
1. Pull off the road and stop as soon
as it is safe to do so.
2. Place the shift lever in P (Park)
and set the parking brake. If the air
conditioning is ON, turn it OFF.
3. If engine coolant is running out
under the vehicle or steam is com-
ing out from the hood, stop the
engine. Do not open the hood until
the coolant has stopped running
or the steaming has stopped. If
there is no visible loss of engine
coolant and no steam, leave the
engine running and check to be
sure the engine cooling fan is
operating. If the fan is not running,
turn the engine off.
I IF
F
T
TH
HE
E
E
EN
NG
GI
IN
NE
E
O
OV
VE
ER
RH
HE
EA
AT
TS
S
HCa HMA 6.qxp 5/25/2020 11:03 AM Page 6
Page 401 of 443
Always handle them carefully, and
avoid scratches and abrasions. If
the bulbs are lit, avoid contact with
liquids. Never touch the glass with bare
hands. Residual oil may cause the
bulb to overheat and burst when lit.
A bulb should be operated only
when installed in a headlamp.
If a bulb becomes damaged or
cracked, replace it immediately
and carefully dispose of it.
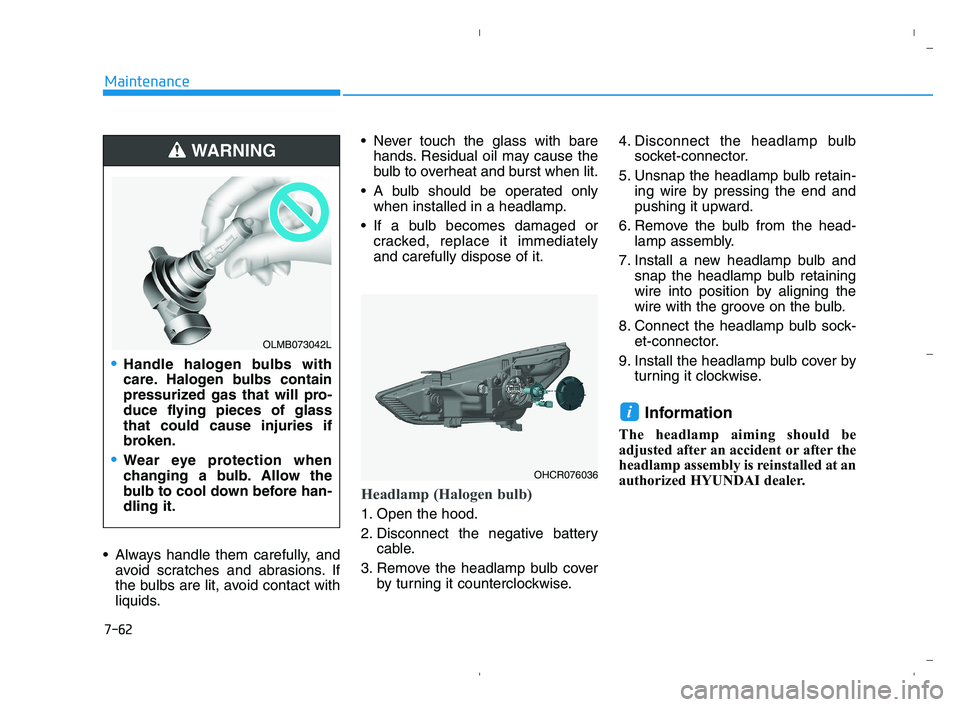
Headlamp (Halogen bulb)
1. Open the hood.
2. Disconnect the negative battery
cable.
3. Remove the headlamp bulb cover
by turning it counterclockwise.4. Disconnect the headlamp bulb
socket-connector.
5. Unsnap the headlamp bulb retain-
ing wire by pressing the end and
pushing it upward.
6. Remove the bulb from the head-
lamp assembly.
7. Install a new headlamp bulb and
snap the headlamp bulb retaining
wire into position by aligning the
wire with the groove on the bulb.
8. Connect the headlamp bulb sock-
et-connector.
9. Install the headlamp bulb cover by
turning it clockwise.
Information
The headlamp aiming should be
adjusted after an accident or after the
headlamp assembly is reinstalled at an
authorized HYUNDAI dealer.
i
7-62
Maintenance
Handle halogen bulbs with
care. Halogen bulbs contain
pressurized gas that will pro-
duce flying pieces of glass
that could cause injuries if
broken.
Wear eye protection when
changing a bulb. Allow the
bulb to cool down before han-
dling it.
WARNING
OHCR076036
OLMB073042L
HCa HMA 7.qxp 5/25/2020 11:10 AM Page 62
Page 402 of 443
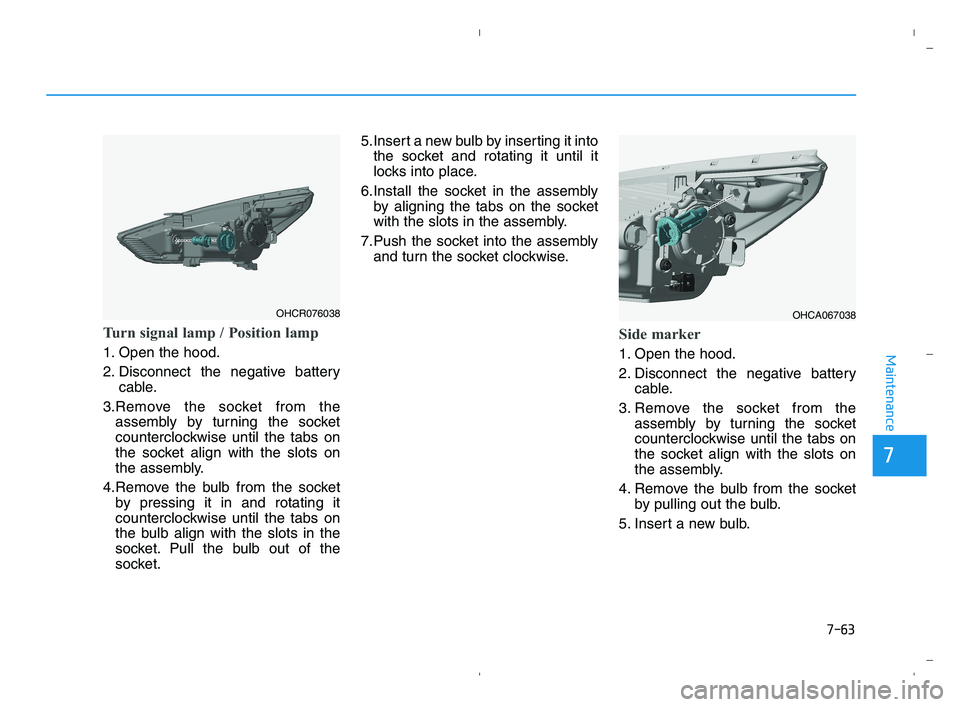
Turn signal lamp / Position lamp
1. Open the hood.
2. Disconnect the negative battery
cable.
3.Remove the socket from the
assembly by turning the socket
counterclockwise until the tabs on
the socket align with the slots on
the assembly.
4.Remove the bulb from the socket
by pressing it in and rotating it
counterclockwise until the tabs on
the bulb align with the slots in the
socket. Pull the bulb out of the
socket.5.Insert a new bulb by inserting it into
the socket and rotating it until it
locks into place.
6.Install the socket in the assembly
by aligning the tabs on the socket
with the slots in the assembly.
7.Push the socket into the assembly
and turn the socket clockwise.
Side marker
1. Open the hood.
2. Disconnect the negative battery
cable.
3. Remove the socket from the
assembly by turning the socket
counterclockwise until the tabs on
the socket align with the slots on
the assembly.
4. Remove the bulb from the socket
by pulling out the bulb.
5. Insert a new bulb.
7-63
7
Maintenance
OHCR076038OHCA067038
HCa HMA 7.qxp 5/25/2020 11:10 AM Page 63