set clock Hyundai Atos 2002 User Guide
[x] Cancel search | Manufacturer: HYUNDAI, Model Year: 2002, Model line: Atos, Model: Hyundai Atos 2002Pages: 249, PDF Size: 3.11 MB
Page 206 of 249

3-5
WHAT TO DO IN AN EMERGENCY
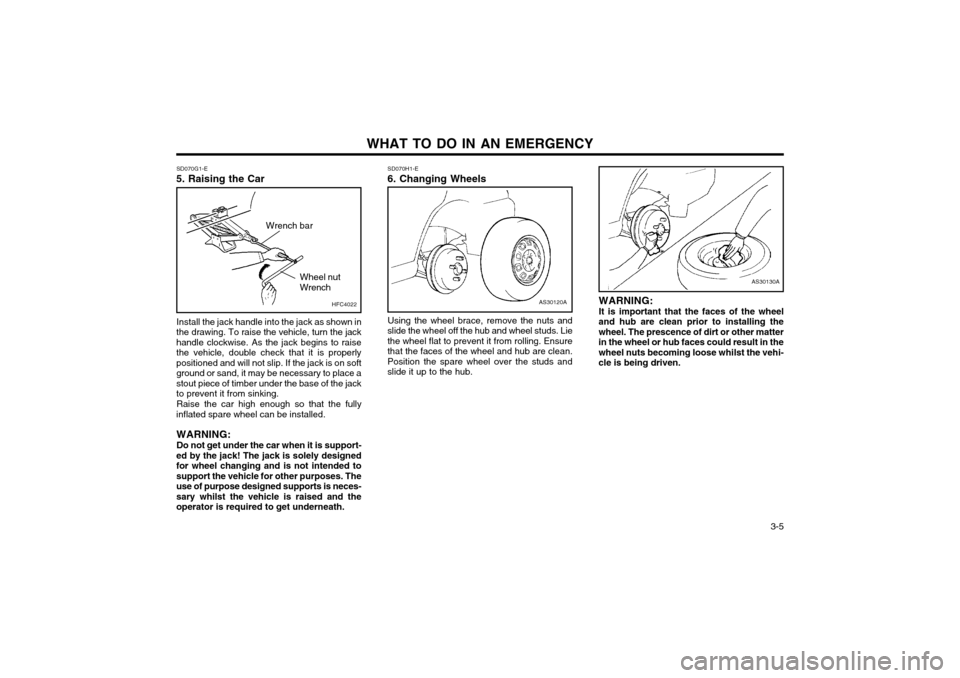
SD070G1-E
5. Raising the Car
AS30120A
SD070H1-E 6. Changing Wheels
Using the wheel brace, remove the nuts and
slide the wheel off the hub and wheel studs. Lie the wheel flat to prevent it from rolling. Ensurethat the faces of the wheel and hub are clean.Position the spare wheel over the studs andslide it up to the hub.
Install the jack handle into the jack as shown in
the drawing. To raise the vehicle, turn the jackhandle clockwise. As the jack begins to raisethe vehicle, double check that it is properlypositioned and will not slip. If the jack is on softground or sand, it may be necessary to place astout piece of timber under the base of the jackto prevent it from sinking.
Raise the car high enough so that the fully
inflated spare wheel can be installed.
WARNING: Do not get under the car when it is support-
ed by the jack! The jack is solely designed for wheel changing and is not intended tosupport the vehicle for other purposes. Theuse of purpose designed supports is neces-sary whilst the vehicle is raised and theoperator is required to get underneath. WARNING: It is important that the faces of the wheel
and hub are clean prior to installing the wheel. The prescence of dirt or other matterin the wheel or hub faces could result in thewheel nuts becoming loose whilst the vehi-cle is being driven.
AS30130A
HFC4022
Wrench bar
Wheel nut Wrench
Page 207 of 249

WHAT TO DO IN AN EMERGENCY
3-6 SD070I1-E
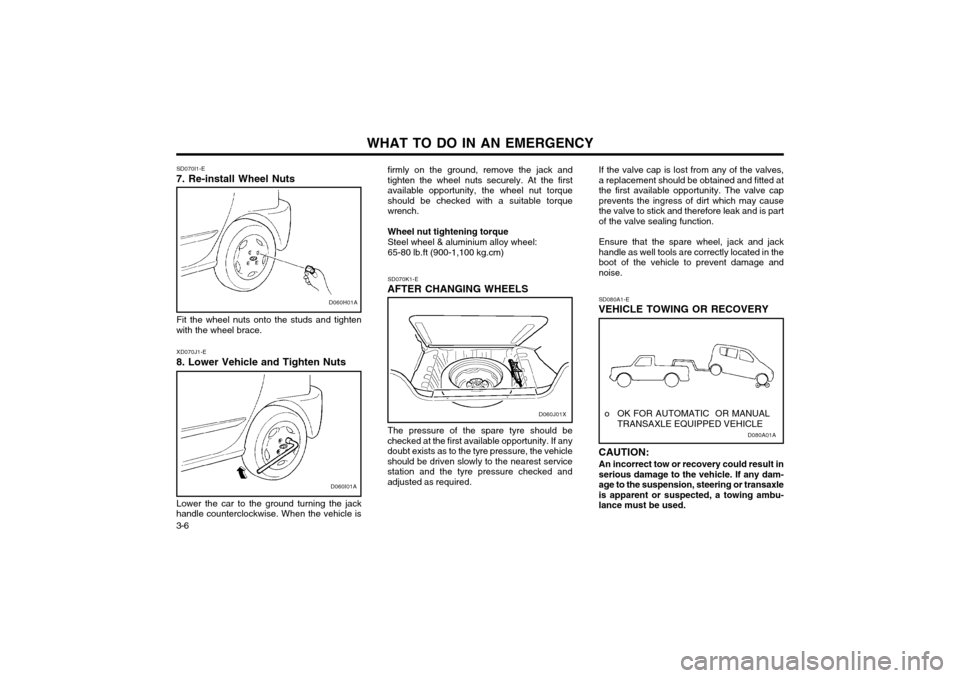
7. Re-install Wheel Nuts
D060H01A
Fit the wheel nuts onto the studs and tighten
with the wheel brace.
D060I01A
XD070J1-E
8. Lower Vehicle and Tighten Nuts
Lower the car to the ground turning the jack
handle counterclockwise. When the vehicle is firmly on the ground, remove the jack and tighten the wheel nuts securely. At the firstavailable opportunity, the wheel nut torqueshould be checked with a suitable torquewrench. Wheel nut tightening torque Steel wheel & aluminium alloy wheel:65-80 lb.ft (900-1,100 kg.cm) SD070K1-E
AFTER CHANGING WHEELS
The pressure of the spare tyre should be
checked at the first available opportunity. If any doubt exists as to the tyre pressure, the vehicleshould be driven slowly to the nearest servicestation and the tyre pressure checked andadjusted as required. If the valve cap is lost from any of the valves,a replacement should be obtained and fitted atthe first available opportunity. The valve capprevents the ingress of dirt which may causethe valve to stick and therefore leak and is partof the valve sealing function. Ensure that the spare wheel, jack and jack handle as well tools are correctly located in theboot of the vehicle to prevent damage andnoise.
D080A01A
o OK FOR AUTOMATIC OR MANUAL
TRANSAXLE EQUIPPED VEHICLE
SD080A1-E
VEHICLE TOWING OR RECOVERY CAUTION:
An incorrect tow or recovery could result in serious damage to the vehicle. If any dam-age to the suspension, steering or transaxleis apparent or suspected, a towing ambu-lance must be used.D060J01X
Page 222 of 249

DO-IT-YOURSELF MAINTENANCE
6-4 G040A01X-GAT
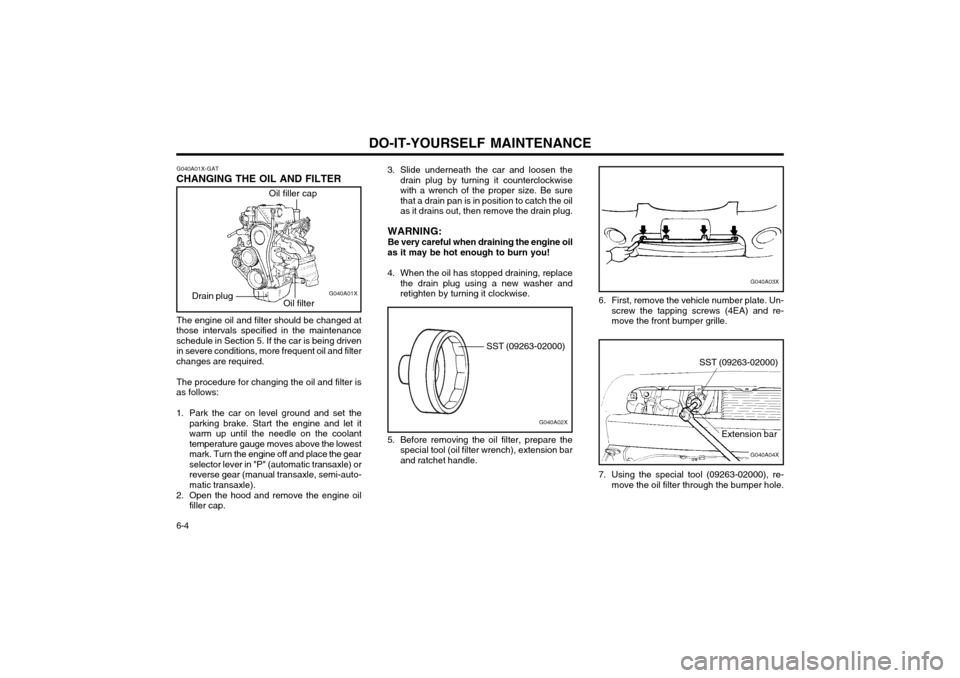
CHANGING THE OIL AND FILTER
Oil filler cap
Oil filter G040A01X
Drain plug
The engine oil and filter should be changed at
those intervals specified in the maintenance schedule in Section 5. If the car is being driven in severe conditions, more frequent oil and filter
changes are required.
The procedure for changing the oil and filter is
as follows:
1. Park the car on level ground and set the parking brake. Start the engine and let it warm up until the needle on the coolanttemperature gauge moves above the lowest
mark. Turn the engine off and place the gearselector lever in "P" (automatic transaxle) orreverse gear (manual transaxle, semi-auto-matic transaxle).
2. Open the hood and remove the engine oil filler cap. 3. Slide underneath the car and loosen the
drain plug by turning it counterclockwisewith a wrench of the proper size. Be sure
that a drain pan is in position to catch the oilas it drains out, then remove the drain plug.
WARNING: Be very careful when draining the engine oil
as it may be hot enough to burn you!
4. When the oil has stopped draining, replace the drain plug using a new washer and retighten by turning it clockwise.
G040A03X
6. First, remove the vehicle number plate. Un- screw the tapping screws (4EA) and re- move the front bumper grille.
G040A04X
SST (09263-02000)
Extension bar
7. Using the special tool (09263-02000), re- move the oil filter through the bumper hole.
G040A02X
SST (09263-02000)
5. Before removing the oil filter, prepare the special tool (oil filter wrench), extension bar and ratchet handle.
Page 247 of 249

INDEX10-1
A ABS SYSTEM
..................................................................................... 2-7
ADJUSTABLE FRONT SEATS .......................................................... 1-5
AIR CLEANER FILTER ...................................................................... 6-8
AIR CONDITIONER CARE .............................................................. 6-12
AIR CONDITIONING SWITCH ......................................................... 1-36
AIR CONDITIONING OPERATION .................................................1-37
ANTENNA ......................................................................................... 1-52
APPEARANCE CARE ....... ........................................................ 4-1 ~ 4-2
ASHTRAY ......................................................................................... 1-25
AUDIO FAULT CODE ...................................................................... 1-49
AUTOMATIC TRANSAXLE ......................... .............................. 2-5 ~ 2-6
BBATTERY MAINTENANCE .............................................................. 6-15
BEFORE STARTING THE ENGINE .................................................. 2-2
BONNET RELEASE ......................................................................... 1-30
BRAKE CIRCUIT FAILURE WARNING LAMP ................................1-18
BRAKE PEDAL CLEARANCE ......................................................... 6-14
BRAKE PEDAL FREEPLAY ............................................................. 6-13
BRAKES ........................................................................................... 6-11
C
CARE OF SEAT BELTS .................................................................... 1-7
CARE OF CASSETTE TAPE ................................................ 1-50 ~ 1-51
CARE OF DISC ................................................................................ 1-50
CATALYTIC CONVERTER (For MFI ) ................................................ 7-1 CENTRAL DOOR LOCKING
SYSTEM ............................................. 1-7
CHANGING THE OIL AND FILTER .................. ....................... 6-4 ~ 6-5
CHARGING WARNING LIGHT ........................................................ 1-19
CHILD PROTECTOR REAR DOOR LOCKS .................................... 1-4
CHILD RESTRAINT SYSTEM ............................................... 1-10 ~ 1-11
CIGAR LIGHTER .............................................................................. 1-24
CLOCK .............................................................................................. 1-24
CLUTCH PEDAL FREEPLAY .......................................................... 6-13
COMPACT DISK PLAYER OPERATION (H922M) .............. 1-47 ~ 1-48
COMPRESSOR DRIVE BELT ......................................................... 6-12
COOLING FANS .............................................................................. 6-15
D
DAY-NIGHT REAR VIEW MIRROR .................................................1-26
DOOR LOCKS .................................................................................... 1-3DRIVE BELTS .................................................................................. 6-14
DRIVING FOR ECONOMY ................................................................ 2-8
EEFFECTIVE BRAKING ....................................................................... 2-7
EMERGENCY T OWING ..................................................................... 3-8
EMISSION CONTROL SYSTEM ......... .............................................. 7-1
ENGINE COMPARTMENT (For MFI Engine) .................................... 6-1
ENGINE COOLANT ........................................................................... 6-5
ENGINE COOLANT TEMPERATURE GAUGE ...............................1-20
ENGINE OIL CONSUMPTION ........................................................... 6-3
F
FILLING THE WASHER RESERVOIR .............................................. 6-9
FOLDING REAR SEAT BACK AND SEAT CUSHION ...................1-27
FOLDING THE OUTSIDE REAR VIEW MIRRORS ........................1-26
ZK000A1-E 10. INDEX
10