radio Hyundai Atos 2002 Owner's Guide
[x] Cancel search | Manufacturer: HYUNDAI, Model Year: 2002, Model line: Atos, Model: Hyundai Atos 2002Pages: 249, PDF Size: 3.11 MB
Page 180 of 249
FEATURES OF YOUR HYUNDAI 1-43
B900B02X-GAT
1. POWER ON-OFF/VOLUME CON-
TROL KNOB
The radio unit may be operated when the igni-
tion key is in the "ACC" or "ON" position. Rotate the knob clockwise to switch the radio unit on
and to increase the volume.
The LCD shows the radio frequency in the radio
mode, or the tape direction indicator in the tape mode. Turn the knob counterclockwise to re-duce the volume and to switch the radio unit off.
BAL (Balance Control) Knob Pull and turn the control knob clockwise to
emphasize right speaker sound. (Left speaker sound will be attenuated) When the controlknob is turned counterclockwise, left speakersound will be emphasized. (Right speaker sound
will be attenuated) 2. BASS Control Knob Press to pop the knob out and turn to the left or
right for the desired bass tone.
TREBLE Control Knob Further pull-lock position of popped-up knob.
Turn to the left or right for the desired treble tone. 3. BAND Selector Pressing the button changes the AM, FM1
and FM2 bands. The mode selected is dis- played on LCD.
4. TUNE (manual) Select Button Press the (+) side or (-) side to increase or to
decrease the frequency. With the button held down for 0.5 sec. or more, the stop signal(broadcasting radio wave) is ignored and chan-nel selection continues.
SEEK Operation (Automatic Channel
Selection) Press the TUNE select button 1 sec. or more.
When the (+) side is pressed, the unit willautomatically tune to the next higher frequencyand when the (-) side is pressed, it will automat-ically tune to the next lower frequency.
5. PRESET STATION SELECT Button Six (6) stations for AM, FM and FM2 respec-
tively can be preset in the electronic memory circuit on this unit.
HOW TO PRESET STATIONS Six AM and twelve FM stations may be pro-
grammed into the memory of the radio. Then, by simply pressing the band select button and/or one of the six station select buttons, you mayrecall any of these stations instantly. To pro-gram the stations, follow these steps:
FM AMo Press band selector to set the band for AM, FM, and FM2.
o Select the desired station to be stored by seek, scan or manual tuning.
o Determine the preset station select button you wish to use to access that station.
o Press the station select button for more than two seconds. A select button indicator will show in the display indicating which selectbutton you have depressed. The frequencydisplay will flash after it has been stored intothe memory. You should then release thebutton, and proceed to program the nextdesired station. A total of 18 stations can beprogrammed by selecting one AM and oneFM station per button.
o When completed, any preset station may be recalled by selecting AM, FM or FM2 bandand the appropriate station button.
6. TAPE EJECT Button To elect the tape, press the button. 7. TAPE PROGRAM When you press the button whose arrow is in
the same direction as the tape play arrow in the display the tape will advance at high speed.When you press the button whose arrow is inthe opposite direction to the tape play arrow inthe display the tape will rewind at high speed. To stop FF or REW action, press the opposite
button. When you press two buttons simulta-neously you play the reverse side of the tape
Page 182 of 249
FEATURES OF YOUR HYUNDAI 1-45
B922A01X
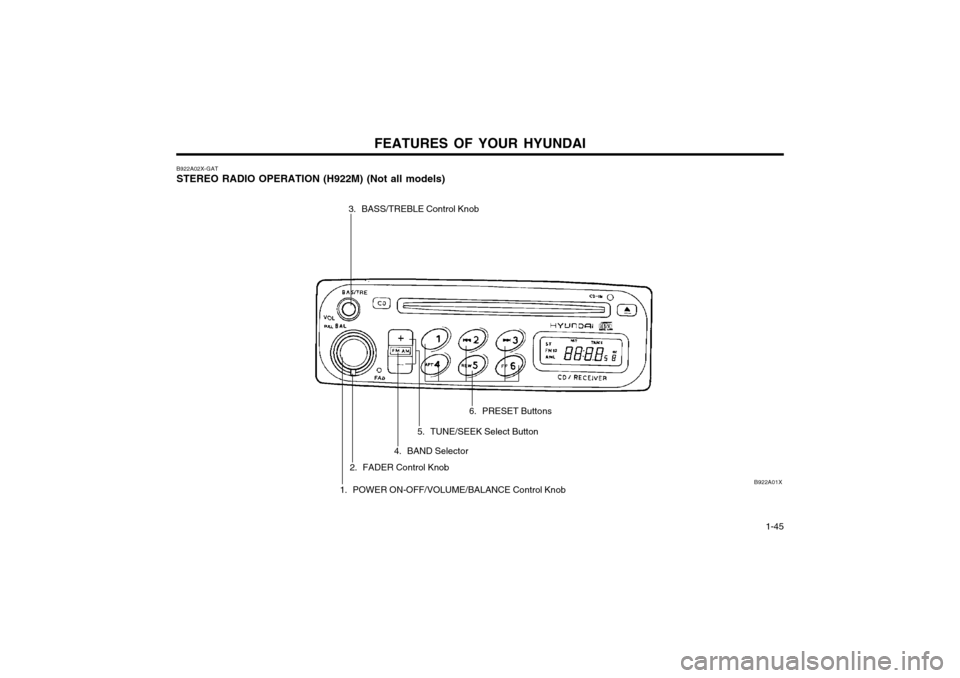
B922A02X-GAT STEREO RADIO OPERATION (H922M) (Not all models)
3. BASS/TREBLE Control Knob
1. POWER ON-OFF/VOLUME/BALANCE Control Knob
2. FADER Control Knob 6. PRESET Buttons
5. TUNE/SEEK Select Button
4. BAND Selector
Page 183 of 249
FEATURES OF YOUR HYUNDAI
1-46 B922B02X-GAT
1. POWER ON-OFF/VOLUME CON-
TROL KNOB
The radio unit may be operated when the igni-
tion key is in the "ACC" or "ON" position. The clock will be displayed automatically, althoughthe radio unit has gone out. Press the button toswitch the power on. The LCD shows the radio frequency in the radio mode or the CD track
indicator in the CD mode. To switch the poweroff, press the button again.
VOLUME Control Rotate the knob clockwise to increase the vol-
ume and turn the knob counterclockwise to reduce the volume.
BALANCE Control Pull and turn the control knob clockwise to
emphasize right speaker sound. (Left speaker sound will be attenuated) When the controlknob is turned counterclockwise, left speakersound will be emphasized. (Right speaker sound
will be attenuated) 2. FAD (Fader Control) Knob Turn the control knob counterclockwise to em-
phasize front speaker sound. (Rear speaker sound will be attenuated) When the controlknob is turned clockwise, rear speaker soundwill be emphasized. (Front speaker sound willbe attenuated)
FM/AM 6. PRESET STATION SELECT Button Six (6) stations for AM, FM and FM2 respec- tively can be preset in the electronic memorycircuit on this unit. HOW TO PRESET STATIONS Six AM and twelve FM stations may be pro- grammed into the memory of the radio. Then,by simply pressing the band select button and/or one of the six station select buttons, you mayrecall any of these stations instantly. To pro-gram the stations, follow these steps:
o Press band selector to set the band for AM, FM, and FM2.
o Select the desired station to be stored by seek, scan or manual tuning.
o Determine the preset station select button you wish to use to access that station.
o Press the station select button for more than two seconds. A select button indicator willshow in the display indicating which selectbutton you have depressed. The frequencydisplay will flash after it has been stored intothe memory. You should then release thebutton, and proceed to program the nextdesired station. A total of 18 stations can beprogrammed by selecting one AM and oneFM station per button.
o When completed, any preset station may be recalled by selecting AM, FM or FM2 bandand the appropriate station button.
3. BASS/TREBLE Control Knob BASS Control Knob Press to pop the knob out and turn to the left or right for the desired bass tone. TREBLE Control Knob Further pull-lock position of popped-up knob. Turn to the left or right for the desired trebletone. 4. BAND Selector Pressing the button changes the AM, FM1 and FM2 bands. The mode selected isdisplayed on LCD. 5. TUNE (Manual) Select Button Press the (+) side or (-) side to increase or to decrease the frequency. With the button helddown for 0.5 sec. or more, the stop signal(broadcasting radio wave) is ignored and chan-nel selection continues. SEEK Operation (Automatic Channel Selection) Press the TUNE select button 1 sec. or more, and releasing will automatically tune the nextavailable station. When the (+) side is pressedlonger than 1 second and releasing will auto-matically tune the next higher frequency andwhen the (-) side is pressed longer than 1second and releasing will automatically tunethe next lower frequency.
Page 185 of 249
FEATURES OF YOUR HYUNDAI
1-48 B922F01X-GAT 1. STOP
o Insert the CD to start CD playback, during the radio operation.
o Press the button to stop CD playback and to change the source to Radio.
2. FF/REWWhile the disc is playing, press and hold FF
button to quickly move forward until you reach the desired section of the track and vice versa.
3. TRACK UP/DOWN
o The desired track on the disc currently being played can be selected using the track num-ber.
o Pressing the button once increases the track number by one and pressing the button decreases it.
4. REPEAT
o To repeat the music you are listening to, press the RPT button and to cancel musicrepeat, press again.
FM/AM
5. EJECT Button When the EJECT button is pressed with the CD loaded, the CD is ejected. NOTE:
o To assure proper operation of the unit, keep the vehicle interior temperature with- in a normal range by using the vehicle’sair conditioning or heating system.
o When replacing the fuse, replace it with a fuse having the correct capacity.
o The preset station frequencies are all erased when the car battery is discon-nected. Therefore, all data will have to beset again if this should occur.
o Do not add any oil to the rotating parts.
o This equipment is designed to be used only in a 12 volt DC battery system with negative ground.
o This unit is made of precision parts. Do not attempt to disassemble or adjust anyparts.
o When driving your vehicle, be sure to keep the volume of the unit set lowenough to allow you to hear sounds com-ing from the outside.
o Do not expose this equipment (including the speakers and tape) to water or exces-sive moisture.
Page 191 of 249
DRIVING YOUR HYUNDAI
2- 2 C020A01A-EAT
BEFORE STARTING THE ENGINE
Before you start the engine, you should always:
o Look around the vehicle to be sure there are no flat tyres, puddles of oil or water or other indications of possible trouble.
o After entering the car, check to be sure the parking brake is engaged.
o Check that all windows, and lights are clean.
o Check that the interior and exterior mirrors are clean and in position.
o Check your seat, seatback and headrestraint to be sure they are in their proper positions.
o Lock all the doors.
o Fasten your seat belt and be sure that all other occupants have fastened theirs.
o Turn off all lights and accessories that are not needed.
o When you turn the ignition switch to "ON", check that all appropriate warning lights are operating and that you have sufficient fuel.
o Check the operation of warning lights and all bulbs when key is in the "ON" position. o To start the engine, insert the ignition key
and turn it to the "START" position. Releaseit as soon as the engine starts. Do not hold
the key in the "START" position for morethan 15 seconds.
NOTE: For safety, the engine will not start if the
shift lever is not in "P" or "N" Position (AutoT/A). ZC050A2-E
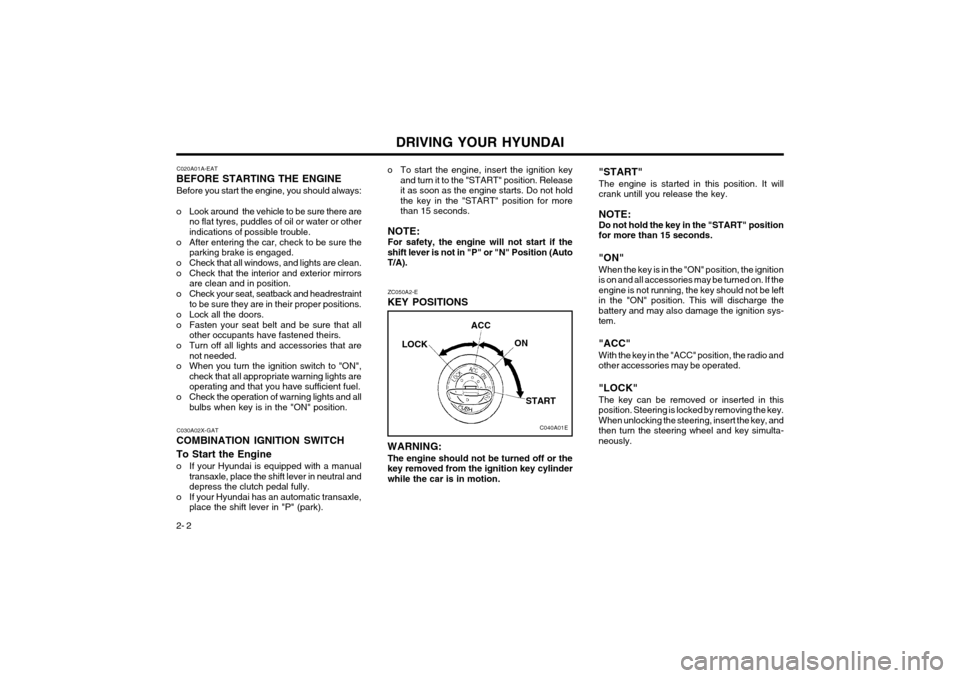
KEY POSITIONS "START"
The engine is started in this position. It will crank untill you release the key. NOTE: Do not hold the key in the "START" position for more than 15 seconds.
"ON" When the key is in the "ON" position, the ignition is on and all accessories may be turned on. If theengine is not running, the key should not be leftin the "ON" position. This will discharge thebattery and may also damage the ignition sys-tem. "ACC" With the key in the "ACC" position, the radio and other accessories may be operated. "LOCK" The key can be removed or inserted in this position. Steering is locked by removing the key.When unlocking the steering, insert the key, andthen turn the steering wheel and key simulta-neously.
C040A01E
LOCK
ACC
ON
STARTC030A02X-GAT
COMBINATION IGNITION SWITCH To Start the Engine
o If your Hyundai is equipped with a manual transaxle, place the shift lever in neutral and depress the clutch pedal fully.
o If your Hyundai has an automatic transaxle, place the shift lever in "P" (park). WARNING:
The engine should not be turned off or thekey removed from the ignition key cylinderwhile the car is in motion.
Page 249 of 249
INDEX10-3
POWER STEER
ING HOSES ........................................................... 6-16
POWER WINDOWS ........................................................................... 1-6
R
REAR FOG LIGHT SWITCH ............................................................ 1-29
REAR WINDOW WIPER AND WASHER ........................................1-23
REMOTE FUEL FILLER LID RELEASE ..........................................1-29
REMOTE TAIL GATE RELEASE ..................................................... 1-29
RUNNING IN ...................................................................................... 1-1
S SCHEDULED MAINTENANCE ................................................. 5-2 ~ 5-3
SEAT BELT PRECAUTIONS ............................................................. 1-7
SEAT BELTS ........................................................................... 1-8 ~ 1-10
SNOW TYRES ................................................................................... 8-1
SPARE TYRE .............................................................................. 3-3, 8-3
SPARK PLUG RE PLACEMENT........................................................ 6-7
SPECIFIATIONS .......................................................................... 9-1, 9-3
SPEEDOMETER .............................................................................. 1-21
SRS AIRBAG SYSTEM ......................................................... 1-12 ~ 1-15
STARTING .......................................................................................... 2-3
STEERING WHEEL FREEPLAY ..................................................... 6-13
STEREO RADIO AND CASSETTE TAPE PLAYER OPERATION (H900) ........................................................ 1-42 ~ 1-44
STEREO RADIO OPERATION (H922M) .............................. 1-45 ~ 1-46
STEREO RADIO OPERATION (HMR90) ............................. 1-40 ~ 1-41
STEREO SOUND SYSTEM .................................................. 1-38 ~ 1-39
SUN-VISOR ...................................................................................... 1-31
T TAIL GATE
....................................................................................... 1-28
TRAILER OR VEHICLE TOWING ........................................ 2-10 ~ 2-12
TRANSAXLE FLUID (AUTOMATIC) ..................................... 6-10 ~ 6-11
TYRE BALANCING ............................................................................ 8-2
TYRE INFORMATION ........................................................................ 8-1
TYRE PRESSURES ........................................................................... 8-1
TYRE REPLACEMEN T ...................................................................... 8-2
TYRE ROTATION .............................................................................. 8-2
V VEHICLE IDENTIFICATION NUMBER (VIN) .................................... 8-1
VEHICLE TOWING OR RECOVERY ................ .........................3-6~3-8
W WHEEL AND TYRE CHANGING ............................................... 3-3 ~3-6
WHEEL REPLACEMENT ................................................................... 8-2
WINDOW GLASS ............................................................................... 1-6
WINDSCREEN WIPER AND WASHER SWITCH ...........................1-22
WINDSHIELD WASHER OPERATION ............................................1-22
WINDSHIELD WIPER BLADES ......................................................... 6-9
WINTER MOTORING ......................................................................... 2-9