radio Hyundai Atos 2002 User Guide
[x] Cancel search | Manufacturer: HYUNDAI, Model Year: 2002, Model line: Atos, Model: Hyundai Atos 2002Pages: 249, PDF Size: 3.11 MB
Page 65 of 249
DRIVING YOUR HYUNDAI
DRIVING YOUR HYUNDAI DRIVING YOUR HYUNDAI
DRIVING YOUR HYUNDAI
DRIVING YOUR HYUNDAI
2- 2 C020A01A-AAT
BEFORE STARTING THE ENGINE
BEFORE STARTING THE ENGINE BEFORE STARTING THE ENGINE
BEFORE STARTING THE ENGINE
BEFORE STARTING THE ENGINE
Before you start the engine, you should always:
1. Look around the vehicle to be sure there are no flat tires, puddles of oil, water or other indications of possible trouble.
2. After entering the car, check to be sure the parking brake is engaged.
3. Check that all windows, and lights are clean.
4. Check that the interior and exterior mirrors are clean and in position.
5. Check your seat, seatback and headrest to be sure they are in their proper positions.
6. Lock all the doors.
7. Fasten your seat belt and be sure that all other occupants have fastened theirs.
8. Turn off all lights and accessories that are not needed.
9. When you turn the ignition switch to "ON", check that all appropriate warning lights are operating and that you have sufficient fuel.
10. Check the operation of warning lights and all bulbs when key is in the "ON" position. o To start the engine, insert the ignition key
and turn it to the "START" position. Releaseit as soon as the engine starts. Do not hold
the key in the "START" position for morethan 15 seconds.
NOTE:
NOTE: NOTE:
NOTE:
NOTE:
For safety, the engine will not start if the
For safety, the engine will not start if the For safety, the engine will not start if the
For safety, the engine will not start if the
For safety, the engine will not start if the
shift lever is not
shift lever is not shift lever is not
shift lever is not
shift lever is not in "P" or "N" Position
in "P" or "N" Position in "P" or "N" Position
in "P" or "N" Position
in "P" or "N" Position
(Automatic Transaxle).
(Automatic Transaxle). (Automatic Transaxle).
(Automatic Transaxle).
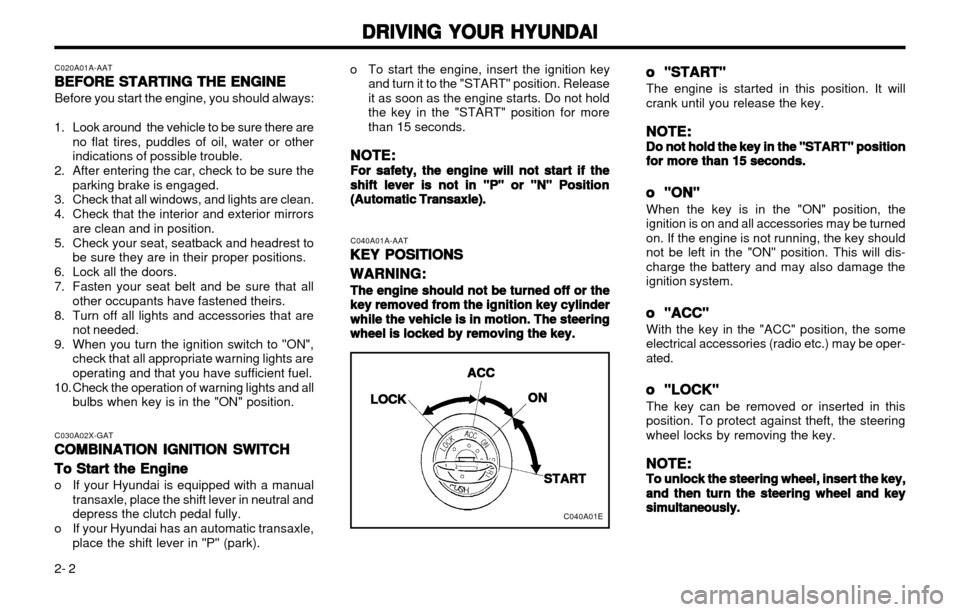
(Automatic Transaxle). C040A01A-AAT
KEY POSITIONS
KEY POSITIONS KEY POSITIONS
KEY POSITIONS
KEY POSITIONS
WARNING:
WARNING: WARNING:
WARNING:
WARNING:
The engine should not be turned off or the
The engine should not be turned off or the The engine should not be turned off or the
The engine should not be turned off or the
The engine should not be turned off or the
key removed from
key removed from key removed from
key removed from
key removed from the ignition key cylinder
the ignition key cylinder the ignition key cylinder
the ignition key cylinder
the ignition key cylinder
while the vehicle is in motion. The steering
while the vehicle is in motion. The steering while the vehicle is in motion. The steering
while the vehicle is in motion. The steering
while the vehicle is in motion. The steering
wheel
wheel wheel
wheel
wheel is locked by removing the key.
is locked by removing the key. is locked by removing the key.
is locked by removing the key.
is locked by removing the key. oo
oo
o "START"
"START" "START"
"START"
"START"
The engine is started in this position. It will crank until you release the key.
NOTE:
NOTE: NOTE:
NOTE:
NOTE:
Do not hold the key in the "START" position
Do not hold the key in the "START" position Do not hold the key in the "START" position
Do not hold the key in the "START" position
Do not hold the key in the "START" position
for more than 15 seconds.
for more than 15 seconds. for more than 15 seconds.
for more than 15 seconds.
for more than 15 seconds.
oo
oo
o
"ON"
"ON" "ON"
"ON"
"ON"
When the key is in the "ON" position, the
ignition is on and all accessories may be turnedon. If the engine is not running, the key shouldnot be left in the "ON" position. This will dis-
charge the battery and may also damage theignition system.
oo
oo
o "ACC"
"ACC" "ACC"
"ACC"
"ACC"
With the key in the "ACC" position, the some
electrical accessories (radio etc.) may be oper-ated.
oo
oo
o "LOCK"
"LOCK" "LOCK"
"LOCK"
"LOCK"
The key can be removed or inserted in thisposition. To protect against theft, the steeringwheel locks by removing the key.
NOTE:
NOTE: NOTE:
NOTE:
NOTE:
To unlock the steering wheel, insert the key,
To unlock the steering wheel, insert the key, To unlock the steering wheel, insert the key,
To unlock the steering wheel, insert the key,
To unlock the steering wheel, insert the key,
and then turn the
and then turn the and then turn the
and then turn the
and then turn the
steering wheel and key
steering wheel and key steering wheel and key
steering wheel and key
steering wheel and key
simultaneously.
simultaneously. simultaneously.
simultaneously.
simultaneously.
C030A02X-GAT
COMBINATION IGNITION SWITCH
COMBINATION IGNITION SWITCH COMBINATION IGNITION SWITCH
COMBINATION IGNITION SWITCH
COMBINATION IGNITION SWITCH
To Start the Engine
To Start the Engine To Start the Engine
To Start the Engine
To Start the Engine
o If your Hyundai is equipped with a manual
transaxle, place the shift lever in neutral and depress the clutch pedal fully.
o If your Hyundai has an automatic transaxle, place the shift lever in "P" (park).
C040A01E
LOCK
LOCK LOCK
LOCK
LOCK ACC
ACC ACC
ACC
ACC
ONON
ONON
ON
START
START START
START
START
Page 103 of 249
DO-IT-YOURSELF MAINTENANCE
DO-IT-YOURSELF MAINTENANCE DO-IT-YOURSELF MAINTENANCE
DO-IT-YOURSELF MAINTENANCE
DO-IT-YOURSELF MAINTENANCE
6-7
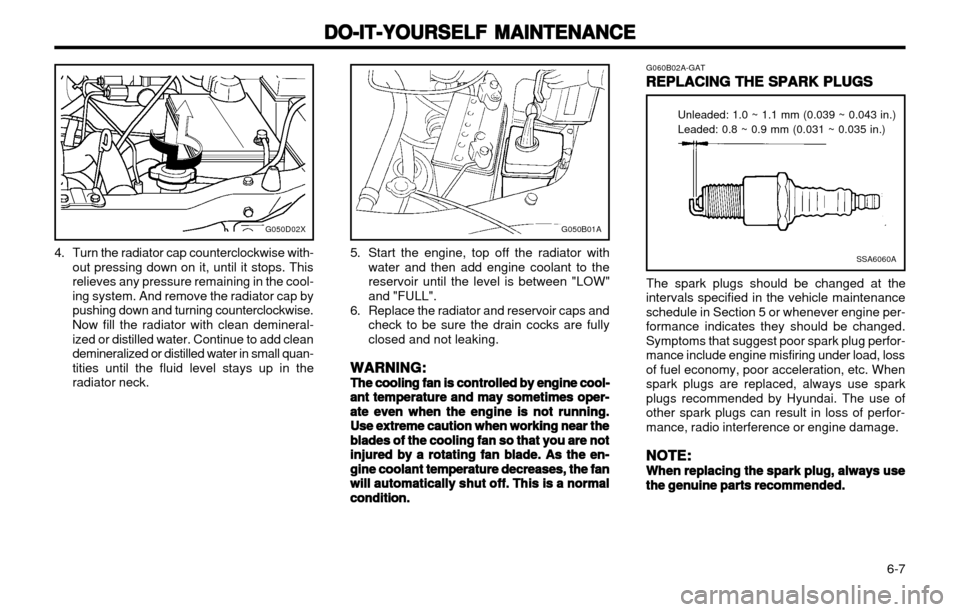
4. Turn the radiator cap counterclockwise with-out pressing down on it, until it stops. This relieves any pressure remaining in the cool-ing system. And remove the radiator cap bypushing down and turning counterclockwise. Now fill the radiator with clean demineral- ized or distilled water. Continue to add cleandemineralized or distilled water in small quan-tities until the fluid level stays up in theradiator neck.SSA6060A
Unleaded: 1.0 ~ 1.1 mm (0.039 ~ 0.043 in.) Leaded: 0.8 ~ 0.9 mm (0.031 ~ 0.035 in.)
G060B02A-GAT
REPLACING THE SPARK PLUGS
REPLACING THE SPARK PLUGS REPLACING THE SPARK PLUGS
REPLACING THE SPARK PLUGS
REPLACING THE SPARK PLUGS
The spark plugs should be changed at the
intervals specified in the vehicle maintenance schedule in Section 5 or whenever engine per-formance indicates they should be changed.Symptoms that suggest poor spark plug perfor-mance include engine misfiring under load, lossof fuel economy, poor acceleration, etc. Whenspark plugs are replaced, always use sparkplugs recommended by Hyundai. The use ofother spark plugs can result in loss of perfor-mance, radio interference or engine damage.
NOTE:
NOTE: NOTE:
NOTE:
NOTE:
When replacing the spark plug, always use
When replacing the spark plug, always use When replacing the spark plug, always use
When replacing the spark plug, always use
When replacing the spark plug, always use the genuine parts recommended.
the genuine parts recommended. the genuine parts recommended.
the genuine parts recommended.
the genuine parts recommended.
G050D02X
5. Start the engine, top off the radiator with
water and then add engine coolant to the reservoir until the level is between "LOW"and "FULL".
6. Replace the radiator and reservoir caps and check to be sure the drain cocks are fullyclosed and not leaking.
WARNING:
WARNING: WARNING:
WARNING:
WARNING:
The cooling fan is controlled by engine cool-
The cooling fan is controlled by engine cool- The cooling fan is controlled by engine cool-
The cooling fan is controlled by engine cool-
The cooling fan is controlled by engine cool- ant temperature and may sometimes oper-
ant temperature and may sometimes oper- ant temperature and may sometimes oper-
ant temperature and may sometimes oper-
ant temperature and may sometimes oper-
ate even when the engine is not running.
ate even when the engine is not running. ate even when the engine is not running.
ate even when the engine is not running.
ate even when the engine is not running.
Use extreme caution when working near the
Use extreme caution when working near the Use extreme caution when working near the
Use extreme caution when working near the
Use extreme caution when working near the
blades of the cooling fan so that you are not
blades of the cooling fan so that you are not blades of the cooling fan so that you are not
blades of the cooling fan so that you are not
blades of the cooling fan so that you are not
injured by a rotating fan blade. As the en-
injured by a rotating fan blade. As the en- injured by a rotating fan blade. As the en-
injured by a rotating fan blade. As the en-
injured by a rotating fan blade. As the en-
gine coolant temperature decreases, the fan
gine coolant temperature decreases, the fan gine coolant temperature decreases, the fan
gine coolant temperature decreases, the fan
gine coolant temperature decreases, the fan
will automatically shut off. This is a normal
will automatically shut off. This is a normal will automatically shut off. This is a normal
will automatically shut off. This is a normal
will automatically shut off. This is a normal
condition.
condition. condition.
condition.
condition.
G050B01A
Page 111 of 249
DO-IT-YOURSELF MAINTENANCE
DO-IT-YOURSELF MAINTENANCE DO-IT-YOURSELF MAINTENANCE
DO-IT-YOURSELF MAINTENANCE
DO-IT-YOURSELF MAINTENANCE
6-15
CAUTION:
CAUTION: CAUTION:
CAUTION:
CAUTION:
A burned-out fuse indicates that there is a
A burned-out fuse indicates that there is a A burned-out fuse indicates that there is a
A burned-out fuse indicates that there is a
A burned-out fuse indicates that there is a problem in the electrical circuit. If you re-
problem in the electrical circuit. If you re- problem in the electrical circuit. If you re-
problem in the electrical circuit. If you re-
problem in the electrical circuit. If you re-
place a fuse and it blows as soon as the
place a fuse and it blows as soon as the place a fuse and it blows as soon as the
place a fuse and it blows as soon as the
place a fuse and it blows as soon as the
accessory is turned on, the problem is seri-
accessory is turned on, the problem is seri- accessory is turned on, the problem is seri-
accessory is turned on, the problem is seri-
accessory is turned on, the problem is seri-
ous and should be referred to a Hyundai
ous and should be referred to a Hyundai ous and should be referred to a Hyundai
ous and should be referred to a Hyundai
ous and should be referred to a Hyundai
dealer for diagnosis and repair. Never re-
dealer for diagnosis and repair. Never re- dealer for diagnosis and repair. Never re-
dealer for diagnosis and repair. Never re-
dealer for diagnosis and repair. Never re-
place a fuse with anything except a fuse
place a fuse with anything except a fuse place a fuse with anything except a fuse
place a fuse with anything except a fuse
place a fuse with anything except a fuse
with the same or a lower amperage rating. A
with the same or a lower amperage rating. A with the same or a lower amperage rating. A
with the same or a lower amperage rating. A
with the same or a lower amperage rating. A
higher capacity fuse could cause damage
higher capacity fuse could cause damage higher capacity fuse could cause damage
higher capacity fuse could cause damage
higher capacity fuse could cause damage
and create a fire hazard.
and create a fire hazard. and create a fire hazard.
and create a fire hazard.
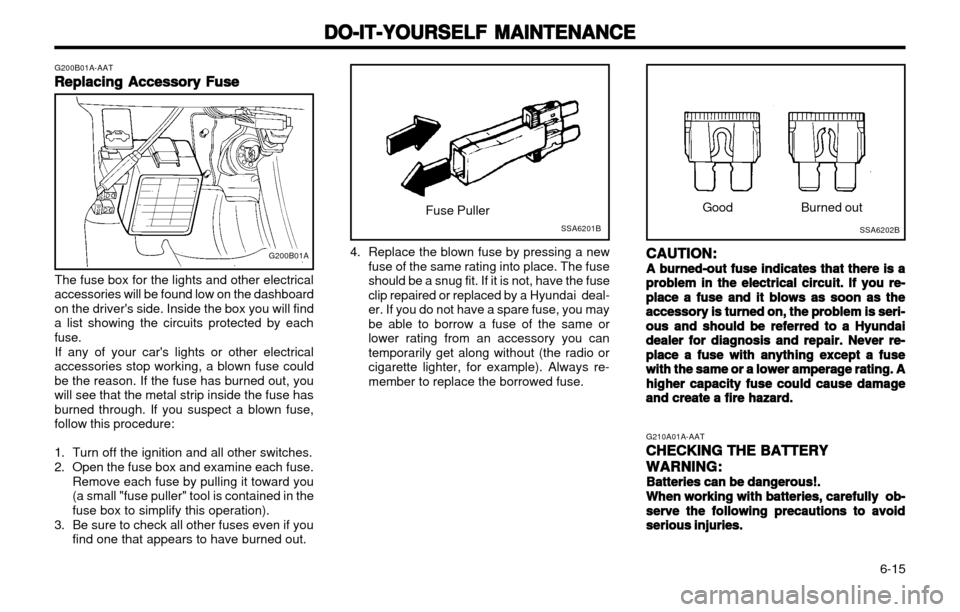
and create a fire hazard. Good
Burned out
4. Replace the blown fuse by pressing a new fuse of the same rating into place. The fuse should be a snug fit. If it is not, have the fuseclip repaired or replaced by a Hyundai deal-er. If you do not have a spare fuse, you maybe able to borrow a fuse of the same orlower rating from an accessory you cantemporarily get along without (the radio orcigarette lighter, for example). Always re-member to replace the borrowed fuse.
G200B01A-AAT
Replacing Accessory Fuse
Replacing Accessory Fuse Replacing Accessory Fuse
Replacing Accessory Fuse
Replacing Accessory Fuse
The fuse box for the lights and other electrical
accessories will be found low on the dashboardon the driver's side. Inside the box you will finda list showing the circuits protected by eachfuse.
If any of your car's lights or other electrical
accessories stop working, a blown fuse couldbe the reason. If the fuse has burned out, youwill see that the metal strip inside the fuse hasburned through. If you suspect a blown fuse,follow this procedure:
1. Turn off the ignition and all other switches.
2. Open the fuse box and examine each fuse. Remove each fuse by pulling it toward you (a small "fuse puller" tool is contained in thefuse box to simplify this operation).
3. Be sure to check all other fuses even if you find one that appears to have burned out.
G200B01A
SSA6201BSSA6202B
Fuse Puller
G210A01A-AATCHECKING THE BATTERY
CHECKING THE BATTERY CHECKING THE BATTERY
CHECKING THE BATTERY
CHECKING THE BATTERY
WARNING:
WARNING: WARNING:
WARNING:
WARNING:
Batteries can be dangerous!.
Batteries can be dangerous!. Batteries can be dangerous!.
Batteries can be dangerous!.
Batteries can be dangerous!.
When working with batteries, carefully ob-
When working with batteries, carefully ob- When working with batteries, carefully ob-
When working with batteries, carefully ob-
When working with batteries, carefully ob-
serve the following precautions to avoid
serve the following precautions to avoid serve the following precautions to avoid
serve the following precautions to avoid
serve the following precautions to avoid
serious injuries.
serious injuries. serious injuries.
serious injuries.
serious injuries.
Page 127 of 249
INDEX
INDEX INDEX
INDEX
INDEX
10-3
Adjustable height ........................................................................... 1-9
Adjusting your seat belt ...............................................................
1-10
Care of seat belts .......................................................................... 1-8
Precautions .................................................................................... 1-7
Spark Plugs ............................................................................... 6-7 ~ 6-8 Speedometer ..................................................................................... 1-22
Starting Procedure .............................................................................. 2-3
Steering Wheel Free play ................................................................. 6-13
Stereo Radio Operation (H922M) .......................................... 1-47 ~ 1-48
Stereo Radio Operation (HMR90) ......................................... 1-42 ~ 1-43
Stereo Sound System ............................................................ 1-40 ~ 1-41
Sun Visor .......................................................................................... 1-32
TT
TT
T Tail Gate
Open ............................................................................................ 1-30
Remote release ............................................................................ 1-30
Tires
Balancing ....................................................................................... 8-3
Chains ............................................................................................ 8-2
Changing a flat tire ........................................................................ 3-4
If you have a flat tire ...................................................................... 3-3Information ..................................................................................... 8-1
Pressure ........................................................................................ 8-1 Replacement .................................................................................. 8-3
Rotation .......................................................................................... 8-2
Snow tires ...................................................................................... 8-2
Spare tire ....................................................................................... 3-3
Traction .......................................................................................... 8-3
MM
MM
MMaintenance Intervals
Explanation of scheduled maintenance items ...................... 5-5 ~ 5-7
Maintenance under severe usage conditions ................................ 5-4
Scheduled maintenance ................................................................. 5-2
Service requirements ..................................................................... 5-1
Mirrors Day-night inside rearview ............................................................ 1-28
Outside rear view ........................................................................ 1-27
OO
OO
OOdometer .......................................................................................... 1-23
PP
PP
P
Parking Brake ................................................................................... 1-28
Power Steering Fluid Level .................................................... 6-16 ~ 6-17
Pretensioner Seat Belt ...................................................................... 1-13
RR
RR
RRear Seat
Fold down .................................................................................... 1-29
Rear Window Defroster Switch ......................................................... 1-26
Rear Window Wiper and Washer ..................................................... 1-25
Roof Rack ......................................................................................... 1-33
SS
SS
SSeat Belts
2-Point static type ............................................................. 1-10 ~ 1-11
3-Point type ......................................................................... 1-9 ~ 1-10
Page 134 of 249
A070A01A-EATCAUTION: MODIFICATIONS TO YOUR HYUNDAI
Modification of components may void the manufacturer’s warranty Your Hyundai should not be modified in any way. Modifications may adversely affect the safety, durability and performance of your Hyundai. Componentswhich are subjected to modification or are added to the vehicle resulting inconsequential damage are not covered by the vehicle manufacturers war-ranty.
A080A01A-EAT TWO WAY RADIO INSTALLATION
This vehicle is fitted with electronically controlled fuel injection or other micro processor controlled equipment. It is possible for incorrectly installed two way radio equipment including mobile telephones to adversely affect these systems.Before radio equipment of this kind is installed, please contact your Hyundaidealer for recommendation regarding the suitability of the particular radioequipment concerned and the recommended method of installation andequipment location. Incorrectly installed or unsuitable equipment which givesrise to incorrect functioning of or damage to electronic vehicle components willnot fall within the scope of the vehicle manufacturers warranty.
Page 175 of 249
FEATURES OF YOUR HYUNDAI
1-38
SSAR012A
Unobstructed area
Mountains BuildingsObstructed area Iron bridges
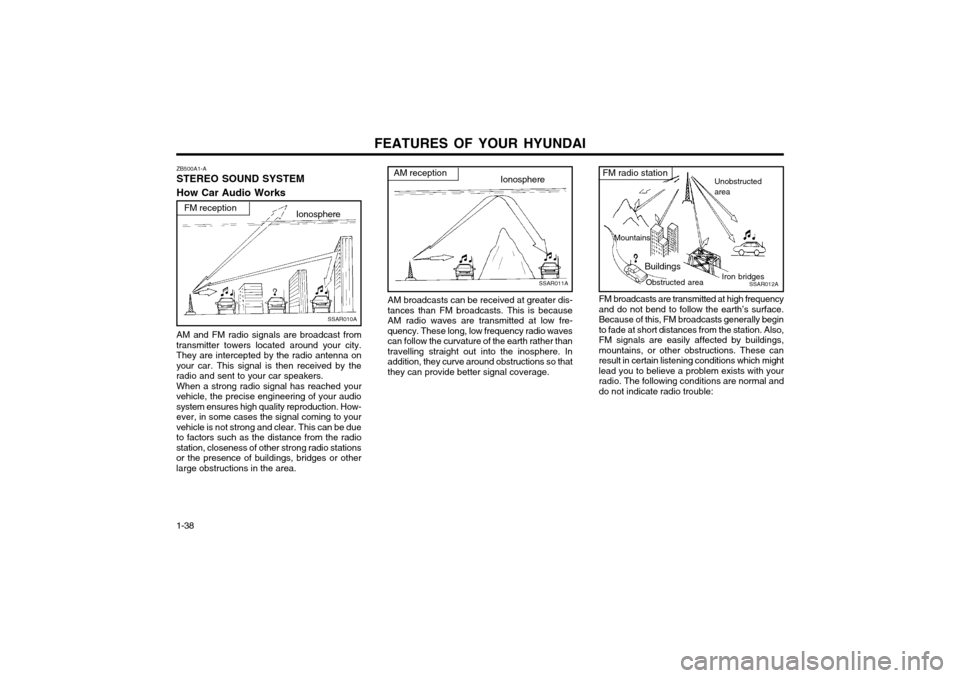
FM broadcasts are transmitted at high frequencyand do not bend to follow the earth’s surface.Because of this, FM broadcasts generally beginto fade at short distances from the station. Also,FM signals are easily affected by buildings,mountains, or other obstructions. These canresult in certain listening conditions which mightlead you to believe a problem exists with yourradio. The following conditions are normal anddo not indicate radio trouble:FM radio stationZB500A1-A STEREO SOUND SYSTEM How Car Audio Works
SSAR010A
Ionosphere
FM reception
AM and FM radio signals are broadcast from
transmitter towers located around your city. They are intercepted by the radio antenna onyour car. This signal is then received by theradio and sent to your car speakers. When a strong radio signal has reached your
vehicle, the precise engineering of your audiosystem ensures high quality reproduction. How-ever, in some cases the signal coming to yourvehicle is not strong and clear. This can be dueto factors such as the distance from the radiostation, closeness of other strong radio stationsor the presence of buildings, bridges or otherlarge obstructions in the area.
Ionosphere
SSAR011A
AM reception
AM broadcasts can be received at greater dis- tances than FM broadcasts. This is becauseAM radio waves are transmitted at low fre-quency. These long, low frequency radio wavescan follow the curvature of the earth rather thantravelling straight out into the inosphere. Inaddition, they curve around obstructions so thatthey can provide better signal coverage.
Page 176 of 249
FEATURES OF YOUR HYUNDAI 1-39
B750B02Y-AAT Using a cellular phone or a two-way radio When a cellular phone is used inside the vehi- cle, noise may be produced from the audioequipment. This does not mean that somethingis wrong with the audio equipment. In such acase, use the cellular phone at a place as far aspossible from the audio equipment. CAUTION: When using a communication system sucha cellular phone or a radio set inside thevehicle, a separate external antenna mustbe fitted. When a cellular phone or a radioset is used by using an internal antennaalone, it may interfere with the vehicle'selectrical system and adversely affect safeoperation of the vehicle. WARNING: Don't use a cellular phone when you are driving, you must stop the car at the safeplace to use a cellular phone.
SSAR013A
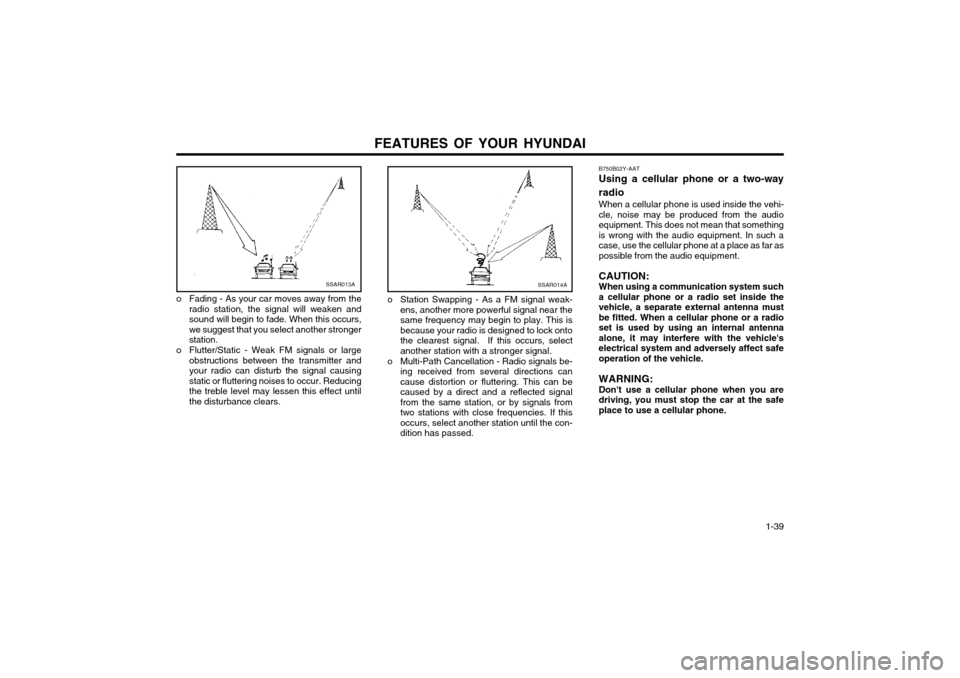
o Fading - As your car moves away from the radio station, the signal will weaken and sound will begin to fade. When this occurs,we suggest that you select another strongerstation.
o Flutter/Static - Weak FM signals or large obstructions between the transmitter andyour radio can disturb the signal causingstatic or fluttering noises to occur. Reducingthe treble level may lessen this effect untilthe disturbance clears.SSAR014A
o Station Swapping - As a FM signal weak-ens, another more powerful signal near the same frequency may begin to play. This isbecause your radio is designed to lock ontothe clearest signal. If this occurs, selectanother station with a stronger signal.
o Multi-Path Cancellation - Radio signals be- ing received from several directions cancause distortion or fluttering. This can becaused by a direct and a reflected signalfrom the same station, or by signals fromtwo stations with close frequencies. If thisoccurs, select another station until the con-dition has passed.
Page 177 of 249
FEATURES OF YOUR HYUNDAI
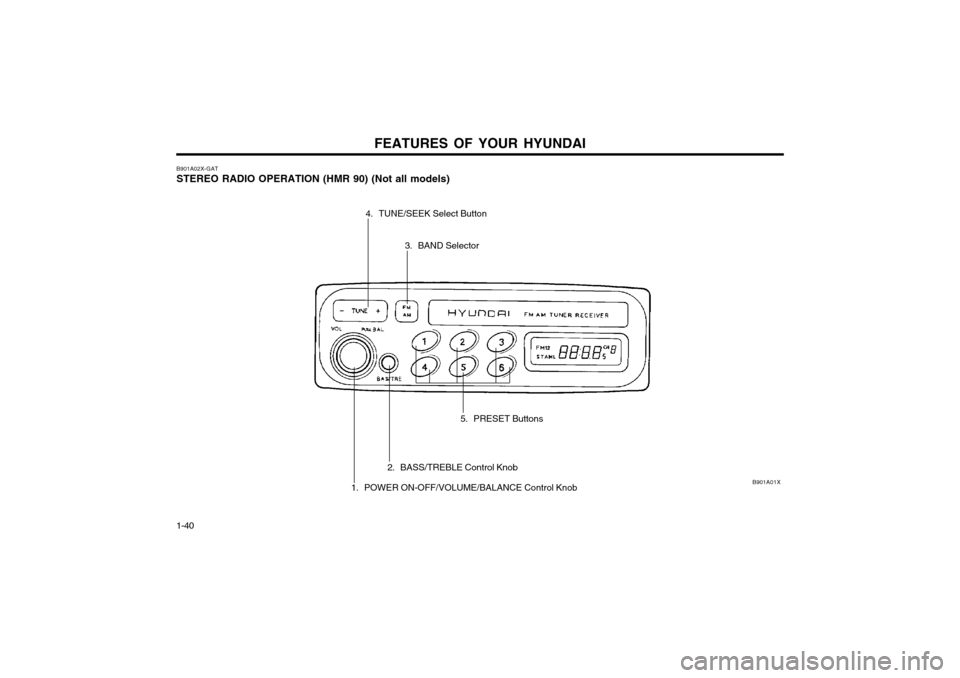
1-40 B901A02X-GAT STEREO RADIO OPERATION (HMR 90) (Not all models)
B901A01X
5. PRESET Buttons
3. BAND Selector
4. TUNE/SEEK Select Button
2. BASS/TREBLE Control Knob
1. POWER ON-OFF/VOLUME/BALANCE Control Knob
Page 178 of 249
FEATURES OF YOUR HYUNDAI 1-41
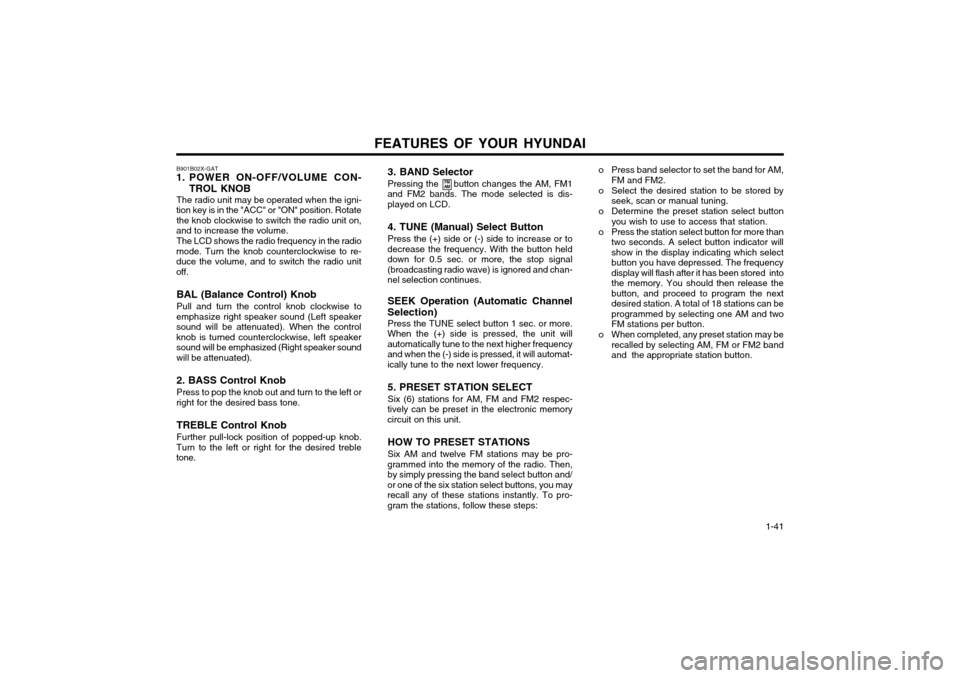
3. BAND Selector Pressing the button changes the AM, FM1
and FM2 bands. The mode selected is dis- played on LCD.
4. TUNE (Manual) Select Button Press the (+) side or (-) side to increase or to
decrease the frequency. With the button held down for 0.5 sec. or more, the stop signal(broadcasting radio wave) is ignored and chan-nel selection continues.
SEEK Operation (Automatic Channel
Selection) Press the TUNE select button 1 sec. or more.
When the (+) side is pressed, the unit willautomatically tune to the next higher frequencyand when the (-) side is pressed, it will automat-ically tune to the next lower frequency.
5. PRESET STATION SELECT Six (6) stations for AM, FM and FM2 respec-
tively can be preset in the electronic memory circuit on this unit.
HOW TO PRESET STATIONS Six AM and twelve FM stations may be pro-
grammed into the memory of the radio. Then, by simply pressing the band select button and/or one of the six station select buttons, you mayrecall any of these stations instantly. To pro-gram the stations, follow these steps:
B901B02X-GAT
1. POWER ON-OFF/VOLUME CON-
TROL KNOB
The radio unit may be operated when the igni-
tion key is in the "ACC" or "ON" position. Rotate the knob clockwise to switch the radio unit on,
and to increase the volume.
The LCD shows the radio frequency in the radio
mode. Turn the knob counterclockwise to re-duce the volume, and to switch the radio unitoff.
BAL (Balance Control) Knob Pull and turn the control knob clockwise to
emphasize right speaker sound (Left speaker sound will be attenuated). When the controlknob is turned counterclockwise, left speakersound will be emphasized (Right speaker sound
will be attenuated). 2. BASS Control Knob Press to pop the knob out and turn to the left or
right for the desired bass tone.
TREBLE Control Knob Further pull-lock position of popped-up knob.
Turn to the left or right for the desired treble tone.
FM
AMo Press band selector to set the band for AM,
FM and FM2.
o Select the desired station to be stored by seek, scan or manual tuning.
o Determine the preset station select button you wish to use to access that station.
o Press the station select button for more than two seconds. A select button indicator will show in the display indicating which selectbutton you have depressed. The frequencydisplay will flash after it has been stored intothe memory. You should then release thebutton, and proceed to program the nextdesired station. A total of 18 stations can beprogrammed by selecting one AM and twoFM stations per button.
o When completed, any preset station may be recalled by selecting AM, FM or FM2 bandand the appropriate station button.
Page 179 of 249
FEATURES OF YOUR HYUNDAI
1-42 B900A01X
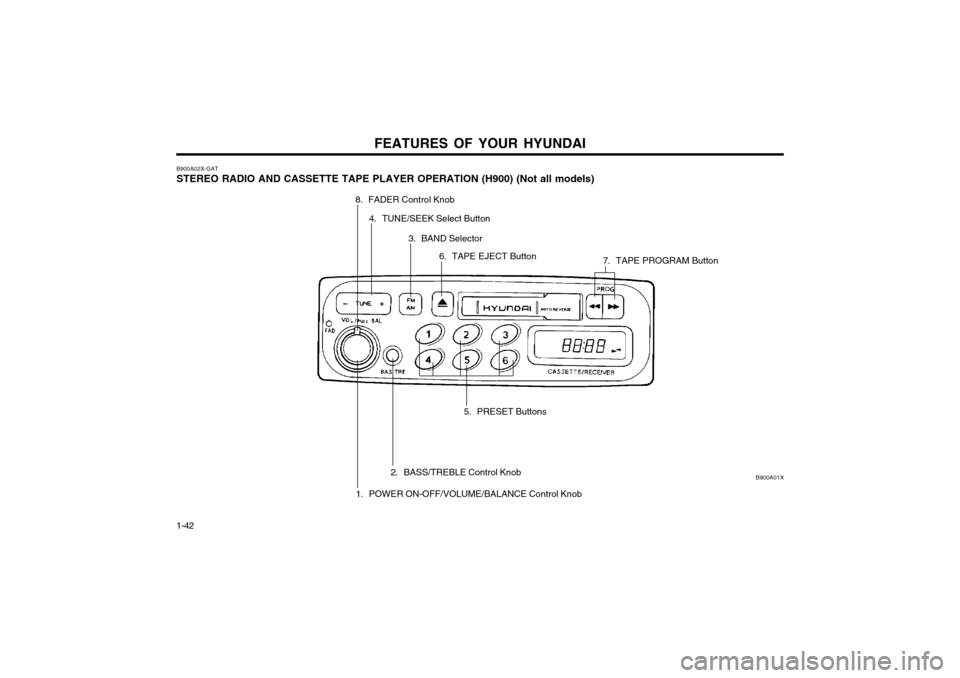
B900A02X-GAT STEREO RADIO AND CASSETTE TAPE PLAYER OPERATION (H900) (Not all models)
1. POWER ON-OFF/VOLUME/BALANCE Control Knob
2. BASS/TREBLE Control Knob 5. PRESET Buttons
8. FADER Control Knob
4. TUNE/SEEK Select Button
3. BAND Selector6. TAPE EJECT Button 7. TAPE PROGRAM Button