steering wheel Hyundai Atos 2002 Owner's Guide
[x] Cancel search | Manufacturer: HYUNDAI, Model Year: 2002, Model line: Atos, Model: Hyundai Atos 2002Pages: 249, PDF Size: 3.11 MB
Page 158 of 249
FEATURES OF YOUR HYUNDAI 1-21
B340B01X-DAG
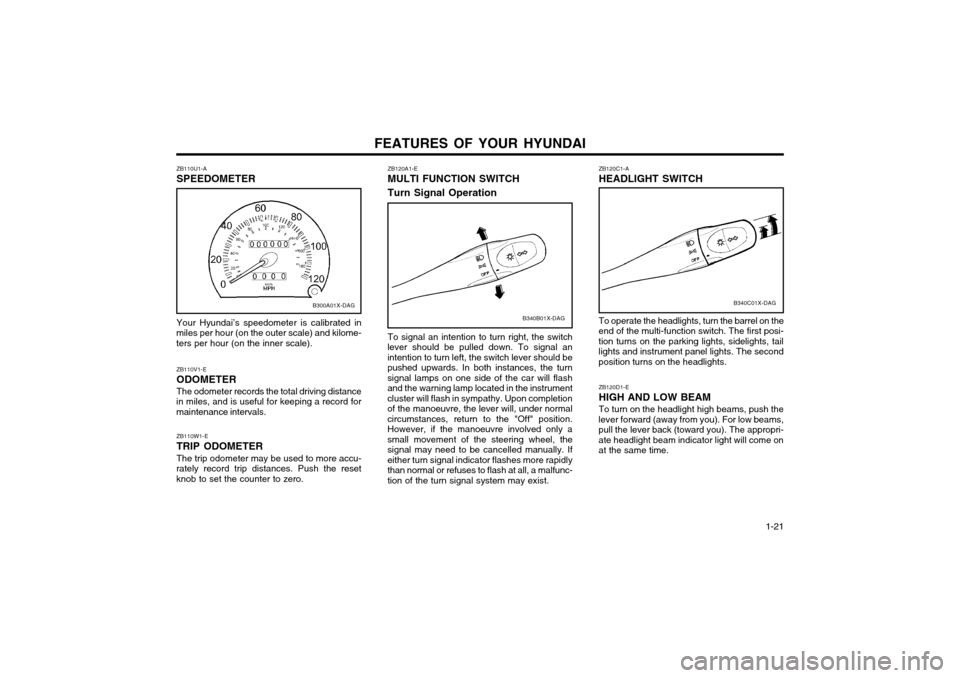
ZB120A1-E MULTI FUNCTION SWITCH Turn Signal Operation
To signal an intention to turn right, the switch
lever should be pulled down. To signal an intention to turn left, the switch lever should bepushed upwards. In both instances, the turnsignal lamps on one side of the car will flashand the warning lamp located in the instrumentcluster will flash in sympathy. Upon completionof the manoeuvre, the lever will, under normalcircumstances, return to the "Off" position.However, if the manoeuvre involved only asmall movement of the steering wheel, thesignal may need to be cancelled manually. Ifeither turn signal indicator flashes more rapidlythan normal or refuses to flash at all, a malfunc-tion of the turn signal system may exist.
ZB110U1-A SPEEDOMETER Your Hyundai’s speedometer is calibrated in
miles per hour (on the outer scale) and kilome- ters per hour (on the inner scale).
B300A01X-DAG
ZB110W1-E TRIP ODOMETER The trip odometer may be used to more accu-
rately record trip distances. Push the reset knob to set the counter to zero. ZB110V1-E ODOMETERThe odometer records the total driving distance
in miles, and is useful for keeping a record for maintenance intervals.
ZB120C1-A HEADLIGHT SWITCH
B340C01X-DAG
ZB120D1-E HIGH AND LOW BEAMTo turn on the headlight high beams, push the
lever forward (away from you). For low beams, pull the lever back (toward you). The appropri-ate headlight beam indicator light will come onat the same time.
To operate the headlights, turn the barrel on the
end of the multi-function switch. The first posi- tion turns on the parking lights, sidelights, taillights and instrument panel lights. The secondposition turns on the headlights.
Page 159 of 249
FEATURES OF YOUR HYUNDAI
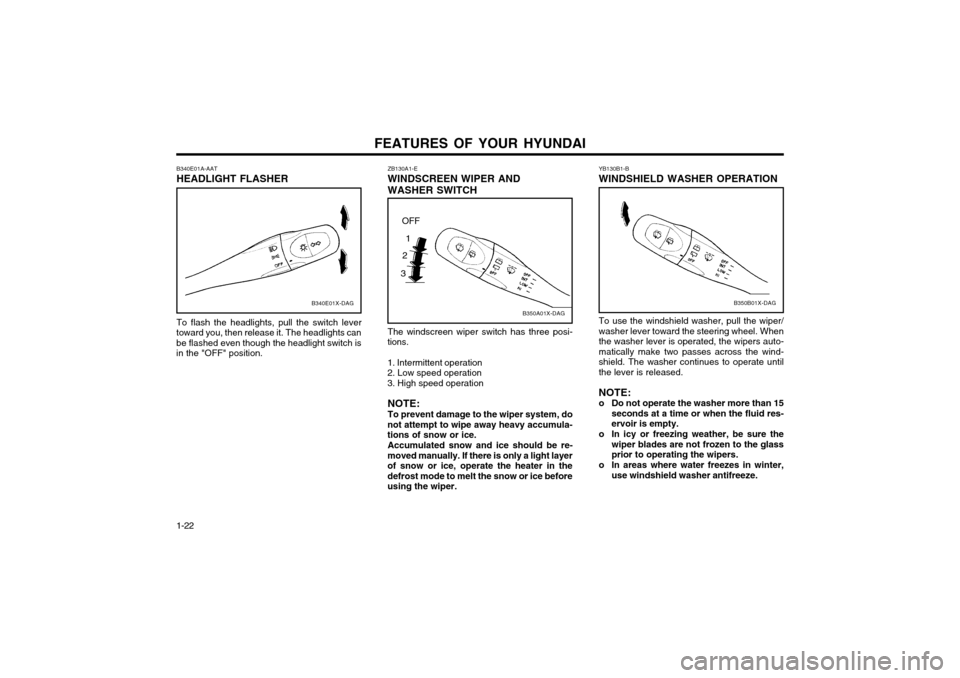
1-22 YB130B1-B WINDSHIELD WASHER OPERATION
B350B01X-DAG
To use the windshield washer, pull the wiper/ washer lever toward the steering wheel. Whenthe washer lever is operated, the wipers auto-matically make two passes across the wind-shield. The washer continues to operate untilthe lever is released. NOTE:
o Do not operate the washer more than 15 seconds at a time or when the fluid res-ervoir is empty.
o In icy or freezing weather, be sure the wiper blades are not frozen to the glassprior to operating the wipers.
o In areas where water freezes in winter, use windshield washer antifreeze.
ZB130A1-E WINDSCREEN WIPER ANDWASHER SWITCH
B350A01X-DAG
The windscreen wiper switch has three posi-
tions. 1. Intermittent operation 2. Low speed operation 3. High speed operation
NOTE:To prevent damage to the wiper system, do
not attempt to wipe away heavy accumula- tions of snow or ice.
Accumulated snow and ice should be re-
moved manually. If there is only a light layerof snow or ice, operate the heater in thedefrost mode to melt the snow or ice beforeusing the wiper.
OFF
1
2
3
B340E01A-AAT HEADLIGHT FLASHER
B340E01X-DAG
To flash the headlights, pull the switch lever
toward you, then release it. The headlights can be flashed even though the headlight switch isin the "OFF" position.
Page 169 of 249
FEATURES OF YOUR HYUNDAI
1-32
B670B02X-DAG
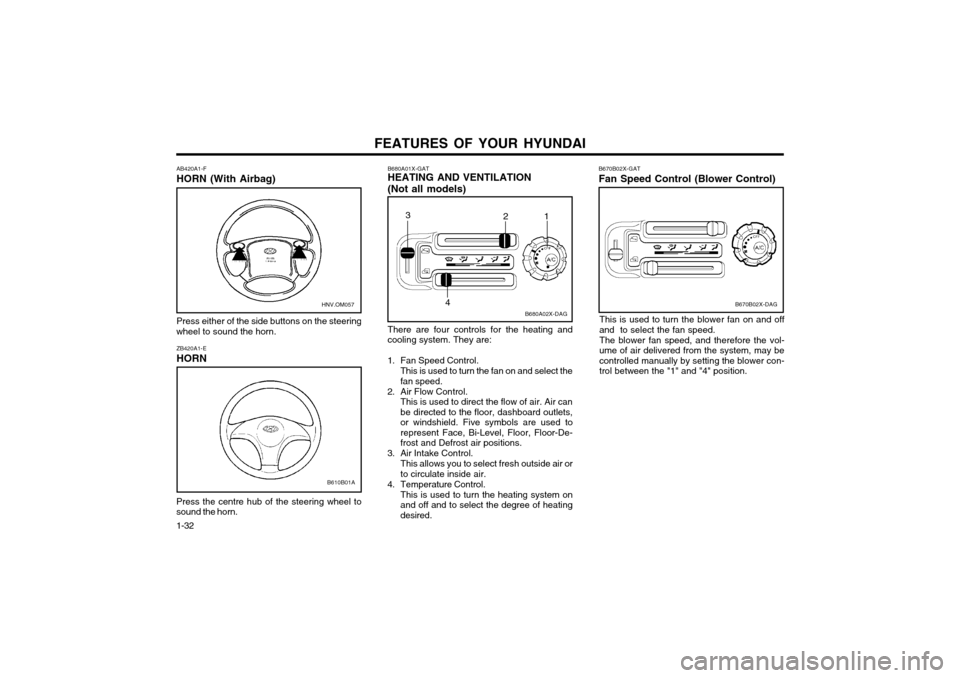
B670B02X-GAT Fan Speed Control (Blower Control)
This is used to turn the blower fan on and off
and to select the fan speed.
The blower fan speed, and therefore the vol-
ume of air delivered from the system, may be controlled manually by setting the blower con-trol between the "1" and "4" position.
B680A01X-GAT HEATING AND VENTILATION (Not all models)
B680A02X-DAG
1
2
3
4
There are four controls for the heating and cooling system. They are:
1. Fan Speed Control. This is used to turn the fan on and select thefan speed.
2. Air Flow Control. This is used to direct the flow of air. Air canbe directed to the floor, dashboard outlets,or windshield. Five symbols are used torepresent Face, Bi-Level, Floor, Floor-De-frost and Defrost air positions.
3. Air Intake Control. This allows you to select fresh outside air orto circulate inside air.
4. Temperature Control. This is used to turn the heating system onand off and to select the degree of heatingdesired.
AB420A1-F HORN (With Airbag)
HNV.OM057
Press either of the side buttons on the steering
wheel to sound the horn.
ZB420A1-E HORN
B610B01A
Press the centre hub of the steering wheel to sound the horn.
Page 191 of 249
DRIVING YOUR HYUNDAI
2- 2 C020A01A-EAT
BEFORE STARTING THE ENGINE
Before you start the engine, you should always:
o Look around the vehicle to be sure there are no flat tyres, puddles of oil or water or other indications of possible trouble.
o After entering the car, check to be sure the parking brake is engaged.
o Check that all windows, and lights are clean.
o Check that the interior and exterior mirrors are clean and in position.
o Check your seat, seatback and headrestraint to be sure they are in their proper positions.
o Lock all the doors.
o Fasten your seat belt and be sure that all other occupants have fastened theirs.
o Turn off all lights and accessories that are not needed.
o When you turn the ignition switch to "ON", check that all appropriate warning lights are operating and that you have sufficient fuel.
o Check the operation of warning lights and all bulbs when key is in the "ON" position. o To start the engine, insert the ignition key
and turn it to the "START" position. Releaseit as soon as the engine starts. Do not hold
the key in the "START" position for morethan 15 seconds.
NOTE: For safety, the engine will not start if the
shift lever is not in "P" or "N" Position (AutoT/A). ZC050A2-E
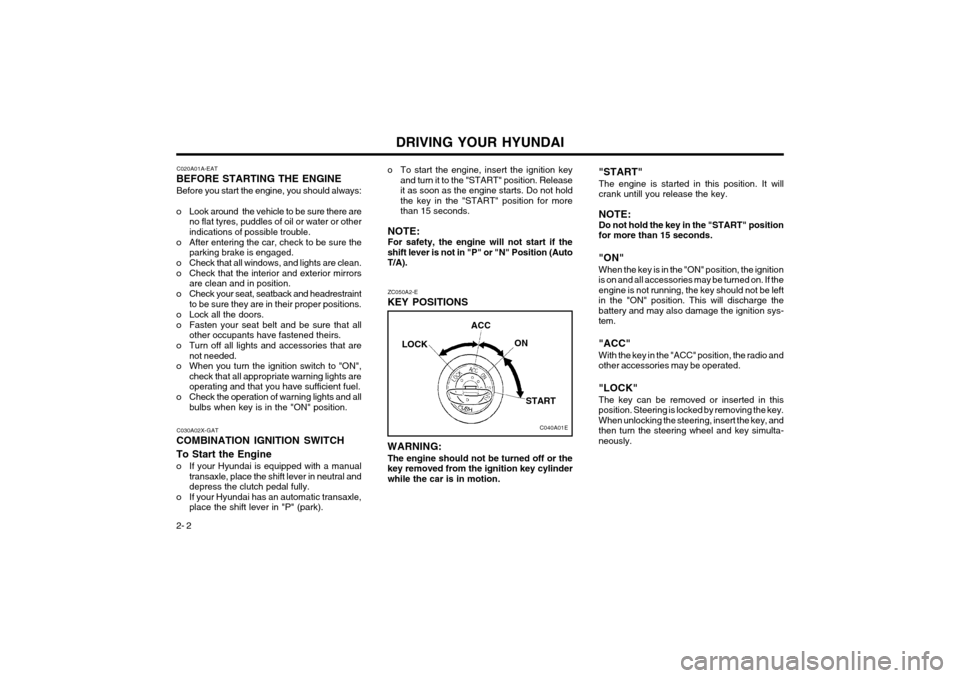
KEY POSITIONS "START"
The engine is started in this position. It will crank untill you release the key. NOTE: Do not hold the key in the "START" position for more than 15 seconds.
"ON" When the key is in the "ON" position, the ignition is on and all accessories may be turned on. If theengine is not running, the key should not be leftin the "ON" position. This will discharge thebattery and may also damage the ignition sys-tem. "ACC" With the key in the "ACC" position, the radio and other accessories may be operated. "LOCK" The key can be removed or inserted in this position. Steering is locked by removing the key.When unlocking the steering, insert the key, andthen turn the steering wheel and key simulta-neously.
C040A01E
LOCK
ACC
ON
STARTC030A02X-GAT
COMBINATION IGNITION SWITCH To Start the Engine
o If your Hyundai is equipped with a manual transaxle, place the shift lever in neutral and depress the clutch pedal fully.
o If your Hyundai has an automatic transaxle, place the shift lever in "P" (park). WARNING:
The engine should not be turned off or thekey removed from the ignition key cylinderwhile the car is in motion.
Page 199 of 249
DRIVING YOUR HYUNDAI
2- 10 CAUTION:
o Never connect a trailer brake system di-
rectly to the vehicle brake system.
o When towing a trailer on steep grades (in excess of 12%) pay close attention to the engine coolant temperature gauge to
ensure the engine does not overheat. Ifthe needle of the coolant temperaturegauge moves across the dial towards"H" (HOT), pull over and stop as soon as
it is safe to do so, and allow the engine toidle until it cools down. You may proceed
once the engine has cooled sufficiently.
C190D01A-GAT
Safety Chains Should the hitch connection between your carand the trailer or vehicle you are towing fail, thetrailer or vehicle could wander dangerouslyacross other lanes of traffic and ultimately col-lide with another vehicle. To eliminate this po-tentially dangerous situation, safety chains, attached between your car and the trailer ortowed vehicle, are required in most provinces.
o When driving in extreme conditions, the
windscreen wiper blades may fail to clearthe screen properly due to the formation ofice upon the blade edge. It will therefore benecessary to periodically remove such iceto restore their efficiency.
o If the power operated door mirrors become frozen, attempts to adjust these may dam-age the mechanism.
o The formation of snow or ice build up inside the wheel arches may interfere with theroadwheels or steering mechanism. In suchinstances, unusual noises or an increase insteering effort may result. Therefore, ensurethat the wheelarches are checked periodi-cally and any accumulated snow or iceremoved.
o It is advisable to carry emergency equip- ment including, torch, shovel, tow rope, blan-kets etc., if a journey is to be undertaken intoareas of severe road conditions. CAUTION: Do not do any towing with your car during
its first 1,200 miles in order to allow the engine to properly break in. Failure to heedthis caution may result in serious engine ortransaxle damage.
C190B01S-AAT
Trailer Hitches Select the proper hitch and ball combination,
making sure that it's location is compatible withthat of the trailer or vehicle being towed. Use aquality non-equalizing hitch which distributesthe tongue load uniformly throughout the chas-sis.
The hitch should be bolted securely to the car
and installed by a qualified technician. DO NOTUSE A HITCH DESIGNED FOR TEMPORARY
INSTALLATION AND NEVER USE ONE THATATTACHES ONLY TO THE BUMPER.
C190A01A-EAT
TRAILER OR VEHICLE TOWING
If you are considering towing with your car, you
should first check with your Province Depart-ment of Motor Vehicles to determine their legalrequirements.
Since laws vary from province to province the
requirements for towing trailers, cars, or othertypes of vehicles or apparatus may differ. Askyour Hyundai dealer for further details beforetowing. C190C01X-GAT
Trailer Brakes If your trailer is equipped with a braking system,
make sure it conforms to federal and/or localregulations and that it is properly installed andoperating correctly. NOTE: If you tow a trailer or vehicle, your car will require more frequent maintenance due tothe additional load. See Maintenance UnderSevere Usage Conditions" on page 5-4.
Page 201 of 249
DRIVING YOUR HYUNDAI
2- 12 15. If you have to stop while going uphill, do not
hold the vehicle in place by pressing on the accelerator. This can cause the automatictransaxle to overheat. Use the parking brakeor footbrake.
NOTE: When towing, check transaxle fluid more frequently. CAUTION: If overheating should occur when towing,
(temperature gauge reads near red zone),taking the following action may reduce oreliminate the problem.
1. Turn off the air conditioner.
2. Reduce highway speed.
3. Select a lower gear when going uphill.
4. While in stop and go traffic, place the gear selection in park or neutral and idle theengine at a higher speed.
being passed by a large vehicle, keep aconstant speed and steer straight ahead. If there is too much wind buffeting, slow
down to get out of the other vehicle's airturbulence.
8. When parking your car and trailer, especial- ly on a hill, be sure to follow all the normalprecautions. Turn your front wheel into thecurb, set the parking brake firmly, and putthe transaxle in 1st or Reverse (manual) orPark (automatic). In addition, place wheelchocks at each of the trailer's tyres.
9. If the trailer has electric brakes, start your vehicle and trailer moving, and then applythe trailer brake controller by hand to be
sure the brakes are working. This lets you
check your electrical connection at the sametime.
10. During your trip, check occasionally to be sure that the load is secure, and that thelights and any trailer brakes are still working.
11. Avoid jerky starts, sudden acceleration or sudden stops.
12. Avoid sharp turns and rapid lane changes.
13. Avoid holding the brake pedal down too long or too frequently. This could cause the brakes to overheat, resulting in reduced brakingefficiency.
14. When going down a hill, shift into a lower gear and use the engine braking effect.When ascending a long grade, downshift thetransaxle to a lower gear and reduce speedto reduce chances of engine overloading
and or overheating.
WARNING:
o The tongue load should never exceed;
Auto Transaxle : 55.1 lb Manual Transaxle 9: 61.7 lb
o Maximun permissible mass of the cou- pling device (ATOS VAN only) : 44 lb
o Improperly loading your car and trailer can serious affect its steering and brak- ing performance causing a crash in which
you may be seriously injured or killed.
YC200E1-A
Trailer or Vehicle Towing Tips
1. Before towing, check hitch and safety chain connections as well as proper operation of the trailer running lights, brake lights, andturn signals.
2. Always drive your vehicle at a moderate speed (Less than 62 MPH).
3. Trailer towing requires more fuel than nor- mal conditions.
4. To maintain engine braking efficiency and electrical charging performance, do not usefifth gear (manual transaxle) or overdrive(automatic transaxle).
5. Always secure items in the trailer to prevent load shift while driving.
6. Check the condition and air pressure of all tires on the trailer and your car. Low tyrepressure can seriously affect the handling.Also check the spare tyre.
7. The vehicle/trailer combination is more af- fected by crosswind and buffeting. When
Page 207 of 249
WHAT TO DO IN AN EMERGENCY
3-6 SD070I1-E
7. Re-install Wheel Nuts
D060H01A
Fit the wheel nuts onto the studs and tighten
with the wheel brace.
D060I01A
XD070J1-E
8. Lower Vehicle and Tighten Nuts
Lower the car to the ground turning the jack
handle counterclockwise. When the vehicle is firmly on the ground, remove the jack and tighten the wheel nuts securely. At the firstavailable opportunity, the wheel nut torqueshould be checked with a suitable torquewrench. Wheel nut tightening torque Steel wheel & aluminium alloy wheel:65-80 lb.ft (900-1,100 kg.cm) SD070K1-E
AFTER CHANGING WHEELS
The pressure of the spare tyre should be
checked at the first available opportunity. If any doubt exists as to the tyre pressure, the vehicleshould be driven slowly to the nearest servicestation and the tyre pressure checked andadjusted as required. If the valve cap is lost from any of the valves,a replacement should be obtained and fitted atthe first available opportunity. The valve capprevents the ingress of dirt which may causethe valve to stick and therefore leak and is partof the valve sealing function. Ensure that the spare wheel, jack and jack handle as well tools are correctly located in theboot of the vehicle to prevent damage andnoise.
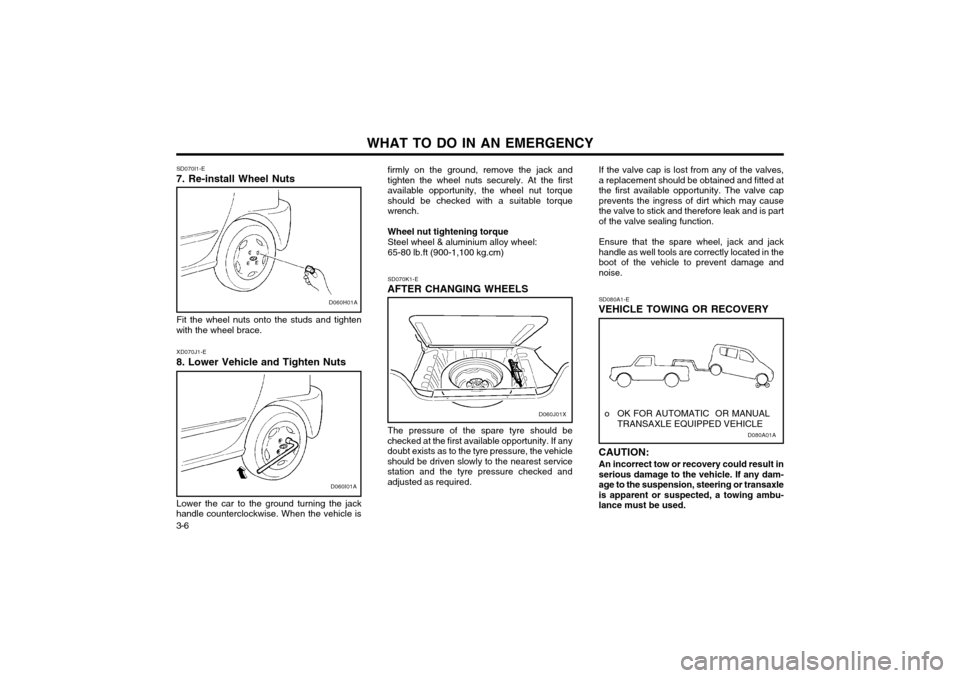
D080A01A
o OK FOR AUTOMATIC OR MANUAL
TRANSAXLE EQUIPPED VEHICLE
SD080A1-E
VEHICLE TOWING OR RECOVERY CAUTION:
An incorrect tow or recovery could result in serious damage to the vehicle. If any dam-age to the suspension, steering or transaxleis apparent or suspected, a towing ambu-lance must be used.D060J01X
Page 208 of 249
3-7
WHAT TO DO IN AN EMERGENCY
SD090A1-E
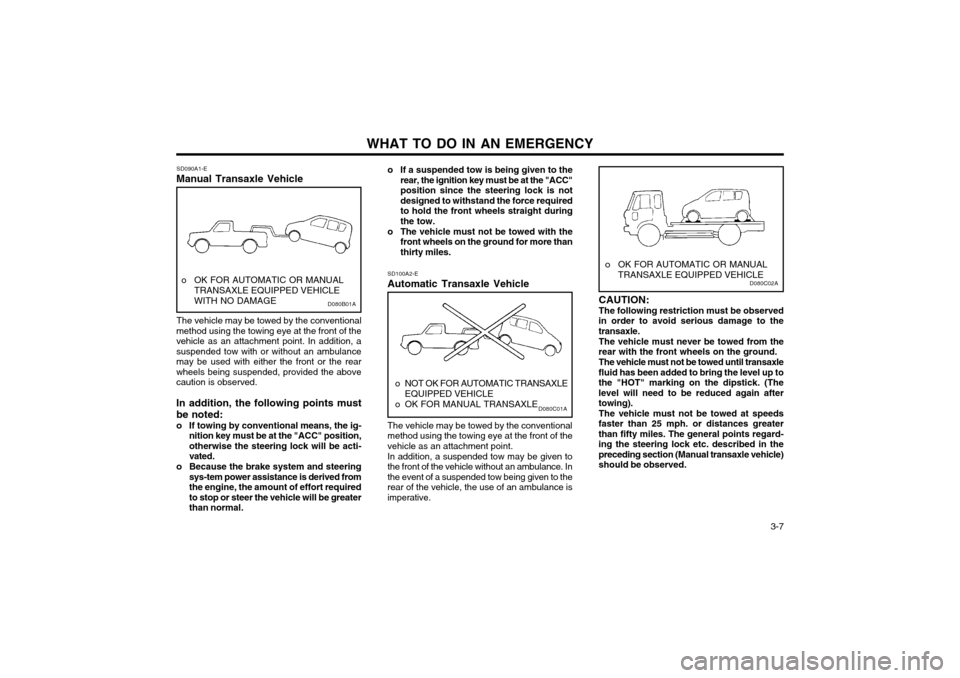
Manual Transaxle Vehicle o If a suspended tow is being given to the
rear, the ignition key must be at the "ACC" position since the steering lock is notdesigned to withstand the force requiredto hold the front wheels straight duringthe tow.
o The vehicle must not be towed with the front wheels on the ground for more thanthirty miles.
D080B01A
o OK FOR AUTOMATIC OR MANUAL
TRANSAXLE EQUIPPED VEHICLE WITH NO DAMAGE
The vehicle may be towed by the conventional
method using the towing eye at the front of the vehicle as an attachment point. In addition, asuspended tow with or without an ambulancemay be used with either the front or the rearwheels being suspended, provided the abovecaution is observed. In addition, the following points must be noted:
o If towing by conventional means, the ig- nition key must be at the "ACC" position, otherwise the steering lock will be acti-vated.
o Because the brake system and steering sys-tem power assistance is derived fromthe engine, the amount of effort requiredto stop or steer the vehicle will be greaterthan normal. SD100A2-E Automatic Transaxle Vehicle
D080C01A
o NOT OK FOR AUTOMATIC TRANSAXLE
EQUIPPED VEHICLE
o OK FOR MANUAL TRANSAXLE
The vehicle may be towed by the conventional method using the towing eye at the front of thevehicle as an attachment point. In addition, a suspended tow may be given to the front of the vehicle without an ambulance. Inthe event of a suspended tow being given to therear of the vehicle, the use of an ambulance isimperative.
D080C02A
o OK FOR AUTOMATIC OR MANUAL TRANSAXLE EQUIPPED VEHICLE
CAUTION: The following restriction must be observed
in order to avoid serious damage to the transaxle.
The vehicle must never be towed from the
rear with the front wheels on the ground.
The vehicle must not be towed until transaxle
fluid has been added to bring the level up tothe "HOT" marking on the dipstick. (Thelevel will need to be reduced again aftertowing). The vehicle must not be towed at speeds
faster than 25 mph. or distances greaterthan fifty miles. The general points regard-ing the steering lock etc. described in thepreceding section (Manual transaxle vehicle)should be observed.
Page 209 of 249
WHAT TO DO IN AN EMERGENCY
3-8 D080D01X-GAT
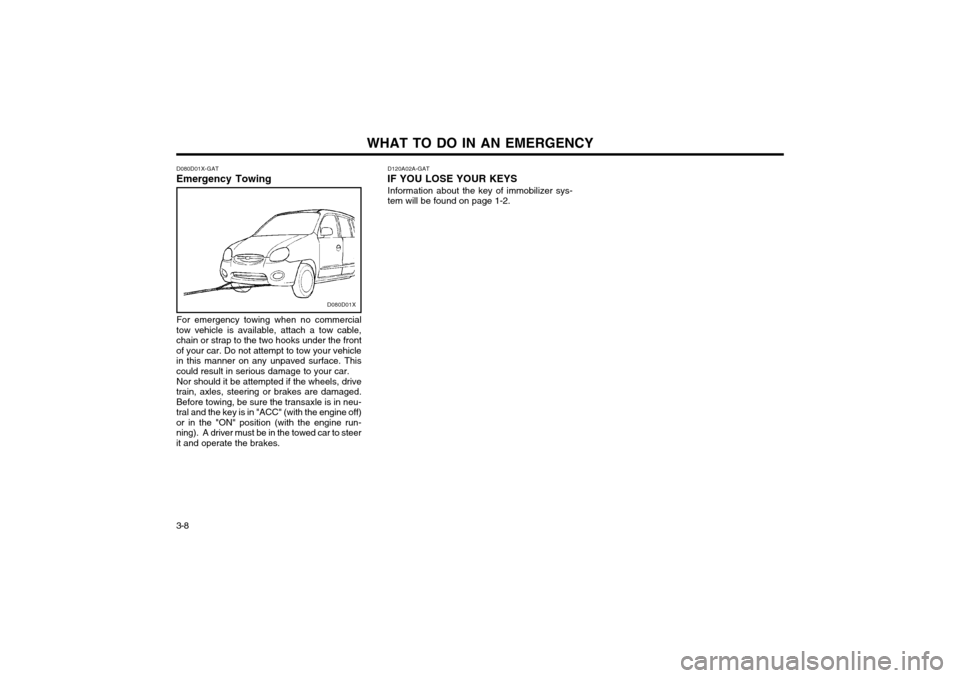
Emergency Towing
D080D01X
For emergency towing when no commercial
tow vehicle is available, attach a tow cable,
chain or strap to the two hooks under the frontof your car. Do not attempt to tow your vehicle
in this manner on any unpaved surface. Thiscould result in serious damage to your car.
Nor should it be attempted if the wheels, drive
train, axles, steering or brakes are damaged.Before towing, be sure the transaxle is in neu-
tral and the key is in "ACC" (with the engine off)or in the "ON" position (with the engine run-ning). A driver must be in the towed car to steer
it and operate the brakes. D120A02A-GAT
IF YOU LOSE YOUR KEYS
Information about the key of immobilizer sys-tem will be found on page 1-2.
Page 214 of 249
VEHICLE MAINTENANCE REQUIREMENTS 5-3
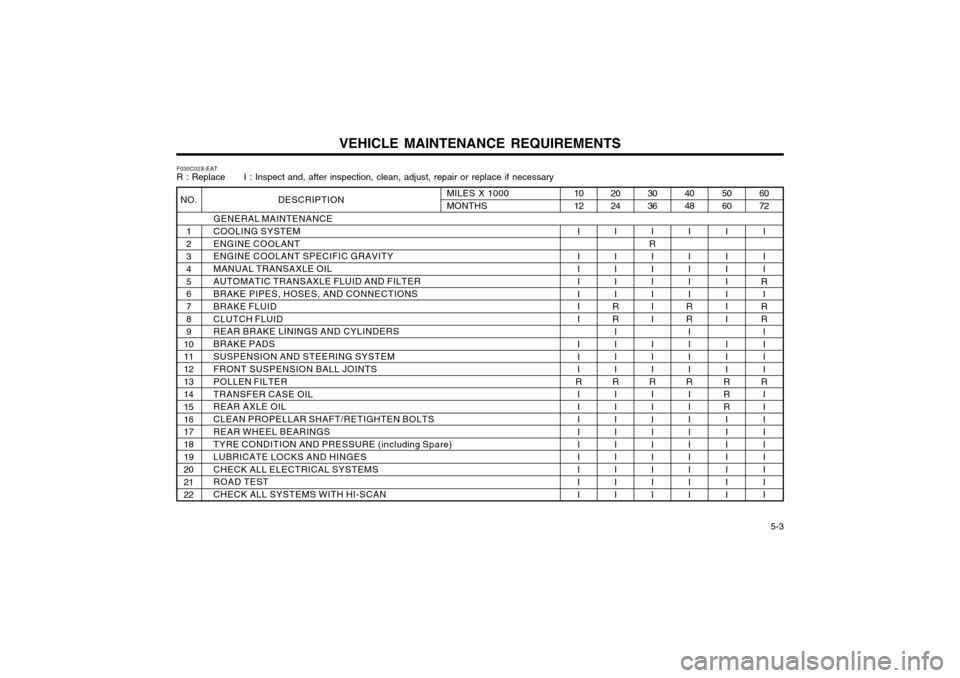
F030C02X-EAT R : Replace I : Inspect and, after inspection, clean, adjust, repair or replace if necessary
DESCRIPTION
GENERAL MAINTENANCE COOLING SYSTEMENGINE COOLANT ENGINE COOLANT SPECIFIC GRAVITY MANUAL TRANSAXLE OILAUTOMATIC TRANSAXLE FLUID AND FILTER BRAKE PIPES, HOSES, AND CONNECTIONS BRAKE FLUIDCLUTCH FLUID REAR BRAKE LININGS AND CYLINDERS BRAKE PADSSUSPENSION AND STEERING SYSTEM FRONT SUSPENSION BALL JOINTS POLLEN FILTERTRANSFER CASE OIL REAR AXLE OIL CLEAN PROPELLAR SHAFT/RETIGHTEN BOLTSREAR WHEEL BEARINGS TYRE CONDITION AND PRESSURE (incl uding Spare)
LUBRICATE LOCKS AND HINGES CHECK ALL ELECTRICAL SYSTEMS ROAD TEST CHECK ALL SYSTEMS WITH HI-SCAN
60 72
I I I
R I
R R
I I II
R
II I II I II I
50 60
I I I II I I I II
RRR III I II I
40 48
I I I II
RR
I I II
R
II I II I II I
30 36
I
R I I II I I I II
R
II I II I II I
20 24
I I I II
RR
I I II
R
II I II I II I
10 12
I I I II I I I II
R
II I II I II I
MILES X 1000 MONTHSNO.
1 2 3 45 6 78 9
1011 1213 14 1516 17 1819 20 2122