steering wheel Hyundai Atos 2002 User Guide
[x] Cancel search | Manufacturer: HYUNDAI, Model Year: 2002, Model line: Atos, Model: Hyundai Atos 2002Pages: 249, PDF Size: 3.11 MB
Page 92 of 249
VEHICLE MAINTENANCE REQUIREMENTS
VEHICLE MAINTENANCE REQUIREMENTS VEHICLE MAINTENANCE REQUIREMENTS
VEHICLE MAINTENANCE REQUIREMENTS
VEHICLE MAINTENANCE REQUIREMENTS
5-3
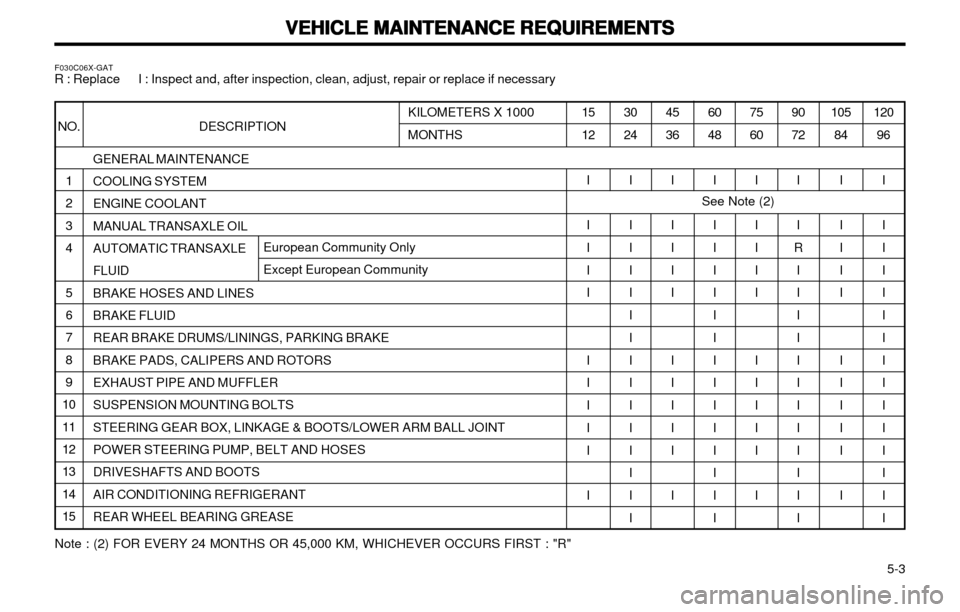
GENERAL MAINTENANCE COOLING SYSTEM ENGINE COOLANTMANUAL TRANSAXLE OIL AUTOMATIC TRANSAXLE FLUIDBRAKE HOSES AND LINES BRAKE FLUID REAR BRAKE DRUMS/LININGS, PARKING BRAKEBRAKE PADS, CALIPERS AND ROTORS EXHAUST PIPE AND MUFFLER SUSPENSION MOUNTING BOLTSSTEERING GEAR BOX, LINKAGE & BOOTS/LOWER ARM BALL JOINT POWER STEERING PUMP, BELT AND HOSES DRIVESHAFTS AND BOOTSAIR CONDITIONING REFRIGERANT REAR WHEEL BEARING GREASE
F030C06X-GAT
R : Replace I : Inspect and, after inspection, clean, adjust, repair or replace if necessary
120
96
I I I I I I I I I I I I I I I
105
84
I I I I I I I I I I I
90 72
I I
R
I I I I I I I I I I I I
75 60
I I I I I I I I I I I
60 48
I I I I I I I I I I I I I I I
45 36
I I I I I I I I I I I
30 24
I I I I I I I I I I I I I I I
15 12
I I I I I I I I I I I
KILOMETERS X 1000 MONTHS
NO. DESCRIPTION
1 2 34 5 6 7 89
101112 13 1415
See Note (2)
Note : (2) FOR EVERY 24 MONTHS OR 45,000 KM, WHICHEVER OCCURS FIRST : "R"
European Community Only Except European Community
Page 95 of 249
VEHICLE MAINTENANCE REQUIREMENTS
VEHICLE MAINTENANCE REQUIREMENTS VEHICLE MAINTENANCE REQUIREMENTS
VEHICLE MAINTENANCE REQUIREMENTS
VEHICLE MAINTENANCE REQUIREMENTS
5- 6 F070B01A-GAT
oo
oo
o Cooling System
Cooling System Cooling System
Cooling System
Cooling System
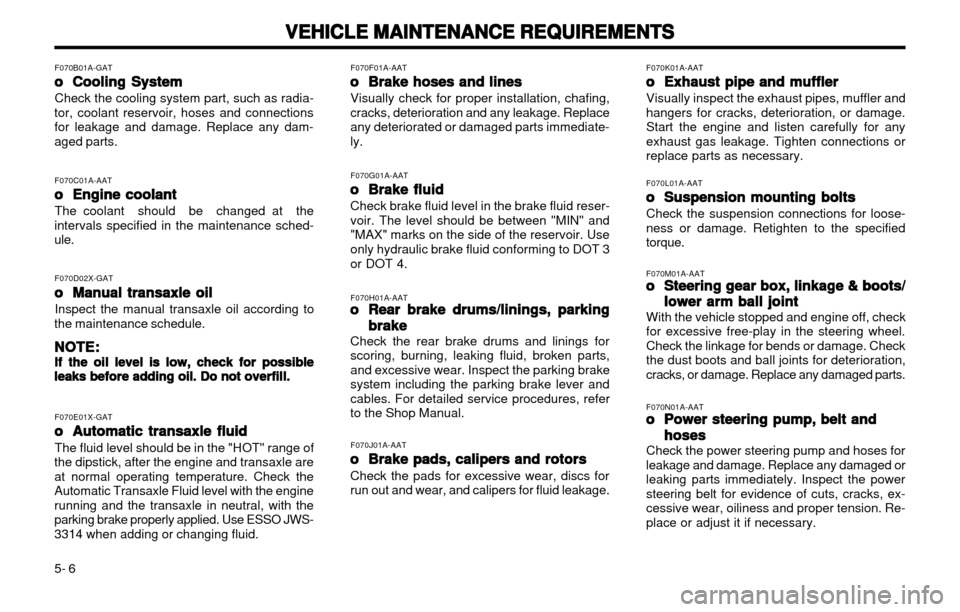
Check the cooling system part, such as radia-
tor, coolant reservoir, hoses and connections for leakage and damage. Replace any dam-aged parts.
F070C01A-AAToo
oo
o
Engine coolant
Engine coolant Engine coolant
Engine coolant
Engine coolant
The coolant should be changed at the
intervals specified in the maintenance sched-ule.
F070D02X-GAToo
oo
o Manual transaxle oil
Manual transaxle oil Manual transaxle oil
Manual transaxle oil
Manual transaxle oil
Inspect the manual transaxle oil according to
the maintenance schedule.
NOTE:
NOTE: NOTE:
NOTE:
NOTE:
If the oil level is low, check for possible
If the oil level is low, check for possible If the oil level is low, check for possible
If the oil level is low, check for possible
If the oil level is low, check for possible leaks before adding oil. Do not overfill.
leaks before adding oil. Do not overfill. leaks before adding oil. Do not overfill.
leaks before adding oil. Do not overfill.
leaks before adding oil. Do not overfill.
F070E01X-GAToo
oo
o
Automatic transaxle fluid
Automatic transaxle fluid Automatic transaxle fluid
Automatic transaxle fluid
Automatic transaxle fluid
The fluid level should be in the "HOT" range of
the dipstick, after the engine and transaxle are at normal operating temperature. Check theAutomatic Transaxle Fluid level with the engine
running and the transaxle in neutral, with theparking brake properly applied. Use ESSO JWS-3314 when adding or changing fluid. F070F01A-AAT
oo
oo
o Brake hoses and lines
Brake hoses and lines Brake hoses and lines
Brake hoses and lines
Brake hoses and lines
Visually check for proper installation, chafing,
cracks, deterioration and any leakage. Replaceany deteriorated or damaged parts immediate-ly. F070G01A-AAT
oo
oo
o Brake fluid
Brake fluid Brake fluid
Brake fluid
Brake fluid
Check brake fluid level in the brake fluid reser- voir. The level should be between "MIN" and"MAX" marks on the side of the reservoir. Use only hydraulic brake fluid conforming to DOT 3 or DOT 4. F070H01A-AAT oo
oo
o
Rear brake drums/linings, parking
Rear brake drums/linings, parking Rear brake drums/linings, parking
Rear brake drums/linings, parking
Rear brake drums/linings, parking
brake
brake brake
brake
brake
Check the rear brake drums and linings for
scoring, burning, leaking fluid, broken parts,and excessive wear. Inspect the parking brake
system including the parking brake lever andcables. For detailed service procedures, referto the Shop Manual. F070J01A-AAT
oo
oo
o
Brake pads, calipers and rotors
Brake pads, calipers and rotors Brake pads, calipers and rotors
Brake pads, calipers and rotors
Brake pads, calipers and rotors
Check the pads for excessive wear, discs for
run out and wear, and calipers for fluid leakage. F070L01A-AAT
oo
oo
o Suspension mounting bolts
Suspension mounting bolts Suspension mounting bolts
Suspension mounting bolts
Suspension mounting bolts
Check the suspension connections for loose-ness or damage. Retighten to the specifiedtorque.
F070K01A-AAT
oo
oo
o Exhaust pipe and muffler
Exhaust pipe and muffler Exhaust pipe and muffler
Exhaust pipe and muffler
Exhaust pipe and muffler
Visually inspect the exhaust pipes, muffler andhangers for cracks, deterioration, or damage.Start the engine and listen carefully for any
exhaust gas leakage. Tighten connections orreplace parts as necessary. F070M01A-AAT oo
oo
o
Steering gear box, linkage & boots/
Steering gear box, linkage & boots/ Steering gear box, linkage & boots/
Steering gear box, linkage & boots/
Steering gear box, linkage & boots/
lower
lower lower
lower
lower arm ball joint
arm ball joint arm ball joint
arm ball joint
arm ball joint
With the vehicle stopped and engine off, check for excessive free-play in the steering wheel.Check the linkage for bends or damage. Check
the dust boots and ball joints for deterioration,
cracks, or damage. Replace any damaged parts. F070N01A-AAT oo
oo
o Power steering pump, belt and
Power steering pump, belt and Power steering pump, belt and
Power steering pump, belt and
Power steering pump, belt and
hoses
hoses hoses
hoses
hoses
Check the power steering pump and hoses for leakage and damage. Replace any damaged orleaking parts immediately. Inspect the powersteering belt for evidence of cuts, cracks, ex-
cessive wear, oiliness and proper tension. Re-place or adjust it if necessary.
Page 98 of 249
DO-IT-YOURSELF MAINTENANCE
DO-IT-YOURSELF MAINTENANCE DO-IT-YOURSELF MAINTENANCE
DO-IT-YOURSELF MAINTENANCE
DO-IT-YOURSELF MAINTENANCE
6-2 G020A01A-AAT
GENERAL CHECKS
GENERAL CHECKS GENERAL CHECKS
GENERAL CHECKS
GENERAL CHECKS
Engine Compartment
Engine Compartment Engine Compartment
Engine Compartment
Engine Compartment The following should be checked regularly:
o Engine oil level and condition
o Transaxle fluid level and condition
o Brake fluid level
o Clutch fluid level
o Engine coolant level
o Windshield washer fluid level
o Accessory drive belt condition
o Engine coolant hose condition
o Fluid leaks (on or below components)
o Power steering fluid level
o Battery Condition G020C01X-GAT
Vehicle Interior
Vehicle Interior Vehicle Interior
Vehicle Interior
Vehicle Interior
The following should be checked each time
when the vehicle is driven:
o Lights operation
o Windshield wipers operation
o Horn operation
o Defroster, heating system operation (and air conditioning, if installed)
o Steering operation and condition
o Mirror condition and operation
o Turn signal operation
o Accelerator pedal operation
o Brake operation, including parking brake
o Manual transaxle operation, including clutch operation
o Automatic transaxle operation, including "Park" mechanism operation
o Seat control condition and operation
o Seat belt condition and operation
o Sunvisor operation
If you notice anything that does not operate
correctly or appears to be functioning in cor-rectly, inspect it carefully and seek assistancefrom your Hyundai dealer if service is needed. G030A01A-AAT
CHECKING THE ENGINE OIL
CHECKING THE ENGINE OIL CHECKING THE ENGINE OIL
CHECKING THE ENGINE OIL
CHECKING THE ENGINE OIL
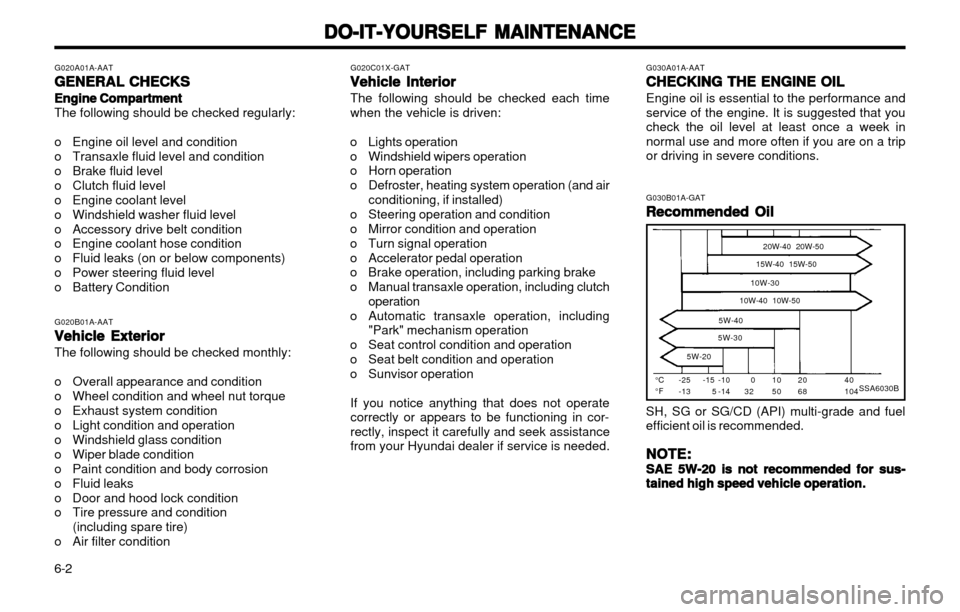
Engine oil is essential to the performance andservice of the engine. It is suggested that youcheck the oil level at least once a week innormal use and more often if you are on a tripor driving in severe conditions. G030B01A-GAT
Recommended Oil
Recommended Oil Recommended Oil
Recommended Oil
Recommended Oil
SSA6030B°C °F -25-13 20W-40 20W-50
15W-40 15W-50
10W-30
10W-40 10W-50
5W-40
5W-30
5W-2040 104
2068
1050
032
-15 5 -10-14
SH, SG or SG/CD (API) multi-grade and fuel efficient oil is recommended.
NOTE:
NOTE: NOTE:
NOTE:
NOTE:
SAE 5W-20 is not recommended for sus-
SAE 5W-20 is not recommended for sus- SAE 5W-20 is not recommended for sus-
SAE 5W-20 is not recommended for sus-
SAE 5W-20 is not recommended for sus-
tained high speed vehicle operation.
tained high speed vehicle operation. tained high speed vehicle operation.
tained high speed vehicle operation.
tained high speed vehicle operation.
G020B01A-AAT
Vehicle Exterior
Vehicle Exterior Vehicle Exterior
Vehicle Exterior
Vehicle Exterior The following should be checked monthly:
o Overall appearance and condition
o Wheel condition and wheel nut torque
o Exhaust system condition
o Light condition and operation
o Windshield glass condition
o Wiper blade condition
o Paint condition and body corrosion
o Fluid leaks
o Door and hood lock condition
o Tire pressure and condition
(including spare tire)
o Air filter condition
Page 109 of 249
DO-IT-YOURSELF MAINTENANCE
DO-IT-YOURSELF MAINTENANCE DO-IT-YOURSELF MAINTENANCE
DO-IT-YOURSELF MAINTENANCE
DO-IT-YOURSELF MAINTENANCE
6-13
G170A01A-GAT
CHECKING BRAKE PEDAL
CHECKING BRAKE PEDAL CHECKING BRAKE PEDAL
CHECKING BRAKE PEDAL
CHECKING BRAKE PEDAL
FREEPLAY
FREEPLAY FREEPLAY
FREEPLAY
FREEPLAY
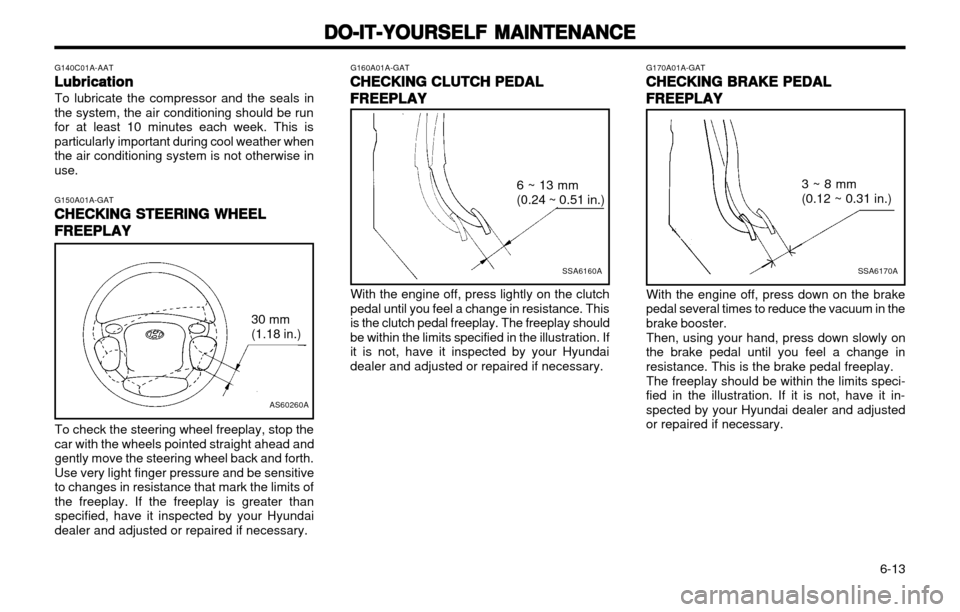
To check the steering wheel freeplay, stop the car with the wheels pointed straight ahead andgently move the steering wheel back and forth.Use very light finger pressure and be sensitiveto changes in resistance that mark the limits ofthe freeplay. If the freeplay is greater thanspecified, have it inspected by your Hyundaidealer and adjusted or repaired if necessary. G160A01A-GAT
CHECKING CLUTCH PEDAL
CHECKING CLUTCH PEDAL CHECKING CLUTCH PEDAL
CHECKING CLUTCH PEDAL
CHECKING CLUTCH PEDAL
FREEPLAY
FREEPLAY FREEPLAY
FREEPLAY
FREEPLAY
SSA6160A
6 ~ 13 mm (0.24 ~ 0.51 in.)
With the engine off, press lightly on the clutch
pedal until you feel a change in resistance. This is the clutch pedal freeplay. The freeplay shouldbe within the limits specified in the illustration. Ifit is not, have it inspected by your Hyundaidealer and adjusted or repaired if necessary.
SSA6170A
3 ~ 8 mm (0.12 ~ 0.31 in.)
With the engine off, press down on the brake
pedal several times to reduce the vacuum in the brake booster.
Then, using your hand, press down slowly on
the brake pedal until you feel a change inresistance. This is the brake pedal freeplay.
The freeplay should be within the limits speci-
fied in the illustration. If it is not, have it in-spected by your Hyundai dealer and adjustedor repaired if necessary.
G140C01A-AAT
Lubrication
Lubrication Lubrication
Lubrication
Lubrication
To lubricate the compressor and the seals in
the system, the air conditioning should be run for at least 10 minutes each week. This isparticularly important during cool weather whenthe air conditioning system is not otherwise inuse.
G150A01A-GATCHECKING STEERING WHEEL
CHECKING STEERING WHEEL CHECKING STEERING WHEEL
CHECKING STEERING WHEEL
CHECKING STEERING WHEEL
FREEPLAY
FREEPLAY FREEPLAY
FREEPLAY
FREEPLAY
AS60260A
30 mm (1.18 in.)
Page 121 of 249
CONSUMER INFORMATION
CONSUMER INFORMATION CONSUMER INFORMATION
CONSUMER INFORMATION
CONSUMER INFORMATION
8-3
tread. Always replace your tires with those of the recommended size. If you change wheels,the new wheel's rim width and offset must meetHyundai specification.
I070A01A-AAT
TIRE BALANCING
TIRE BALANCING TIRE BALANCING
TIRE BALANCING
TIRE BALANCING A tire that is out of balance may affect handling and tire wear. The tires on your Hyundai werebalanced before the car was delivered but mayneed balancing again during the years you ownthe car. Whenever a tire is dismounted for repair, it should be rebalanced before being reinstalledon the car. I080A01A-AAT
TIRE TRACTION
TIRE TRACTION TIRE TRACTION
TIRE TRACTION
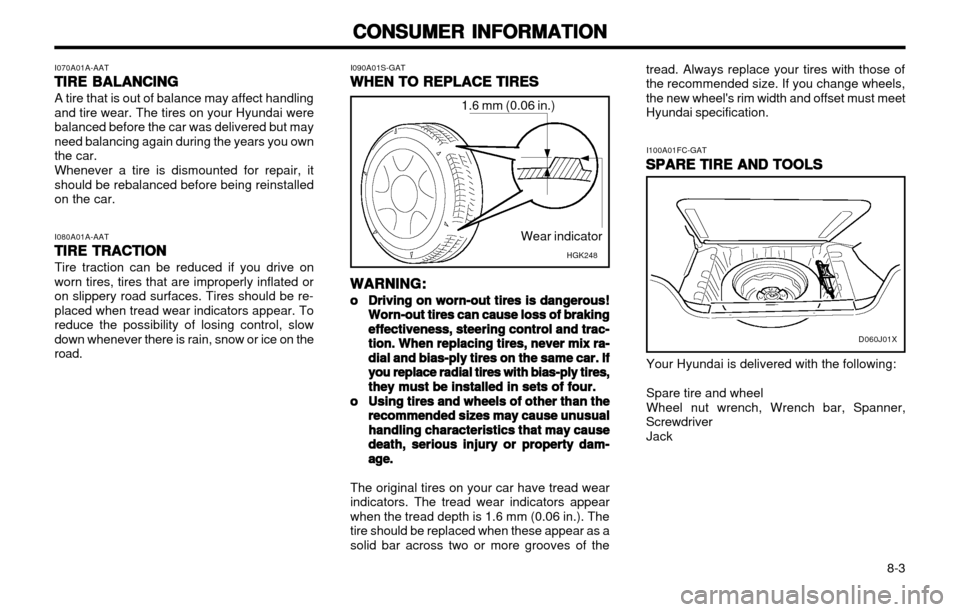
TIRE TRACTION Tire traction can be reduced if you drive on worn tires, tires that are improperly inflated oron slippery road surfaces. Tires should be re-placed when tread wear indicators appear. Toreduce the possibility of losing control, slowdown whenever there is rain, snow or ice on theroad. Wear indicator
I090A01S-GAT
WHEN TO REPLACE TIRES
WHEN TO REPLACE TIRES WHEN TO REPLACE TIRES
WHEN TO REPLACE TIRES
WHEN TO REPLACE TIRES
I100A01FC-GATSPARE TIRE AND TOOLS
SPARE TIRE AND TOOLS SPARE TIRE AND TOOLS
SPARE TIRE AND TOOLS
SPARE TIRE AND TOOLS
Your Hyundai is delivered with the following: Spare tire and wheel Wheel nut wrench, Wrench bar, Spanner,
Screwdriver
Jack
WARNING
WARNING WARNING
WARNING
WARNING
::
::
:
oo
oo
o Driving on worn-out tires is dangerous!
Driving on worn-out tires is dangerous! Driving on worn-out tires is dangerous!
Driving on worn-out tires is dangerous!
Driving on worn-out tires is dangerous!
Worn-out tires can cause loss of braking
Worn-out tires can cause loss of braking Worn-out tires can cause loss of braking
Worn-out tires can cause loss of braking
Worn-out tires can cause loss of braking
effectiveness, steering control and trac-
effectiveness, steering control and trac- effectiveness, steering control and trac-
effectiveness, steering control and trac-
effectiveness, steering control and trac-
tion. When replacing tires, never mix ra-
tion. When replacing tires, never mix ra- tion. When replacing tires, never mix ra-
tion. When replacing tires, never mix ra-
tion. When replacing tires, never mix ra-
dial and bias-ply tires on the same car. If
dial and bias-ply tires on the same car. If dial and bias-ply tires on the same car. If
dial and bias-ply tires on the same car. If
dial and bias-ply tires on the same car. If
you replace radial tires with bias-ply tires,
you replace radial tires with bias-ply tires, you replace radial tires with bias-ply tires,
you replace radial tires with bias-ply tires,
you replace radial tires with bias-ply tires,
they must be installed in sets of four.
they must be installed in sets of four. they must be installed in sets of four.
they must be installed in sets of four.
they must be installed in sets of four.
oo
oo
o Using tires and wheels of other than the
Using tires and wheels of other than the Using tires and wheels of other than the
Using tires and wheels of other than the
Using tires and wheels of other than the
recommended sizes may cause unusual
recommended sizes may cause unusual recommended sizes may cause unusual
recommended sizes may cause unusual
recommended sizes may cause unusual
handling characteristics that may cause
handling characteristics that may cause handling characteristics that may cause
handling characteristics that may cause
handling characteristics that may cause
death, serious injury or property
death, serious injury or property death, serious injury or property
death, serious injury or property
death, serious injury or property dam-
dam- dam-
dam-
dam-
age.age.
age.age.
age.
The original tires on your car have tread wearindicators. The tread wear indicators appearwhen the tread depth is 1.6 mm (0.06 in.). Thetire should be replaced when these appear as asolid bar across two or more grooves of the
D060J01X
1.6 mm (0.06 in.)
HGK248
Page 122 of 249
VEHICLE SPECIFICATIONS
VEHICLE SPECIFICATIONS VEHICLE SPECIFICATIONS
VEHICLE SPECIFICATIONS
VEHICLE SPECIFICATIONS
9-1
9.9.
9.9.
9.
VEHICLE SPECIFICA
VEHICLE SPECIFICA VEHICLE SPECIFICA
VEHICLE SPECIFICA
VEHICLE SPECIFICA
TIONS
TIONS TIONS
TIONS
TIONS
J010A02X-GAT MEASUREMENT
MEASUREMENT MEASUREMENT
MEASUREMENT
MEASUREMENT
mm (in.)
J020A01X-GAT POWER STEERING
POWER STEERING POWER STEERING
POWER STEERING
POWER STEERING
Imp.gal
7.7Liter35 US.gal
9.3
J060A01X-GAT
FUEL SYSTEM
FUEL SYSTEM FUEL SYSTEM
FUEL SYSTEM
FUEL SYSTEM J040A02X-GAT
ELECTRICAL
ELECTRICAL ELECTRICAL
ELECTRICAL
ELECTRICAL J050A02X-GAT
BRAKE
BRAKE BRAKE
BRAKE
BRAKE
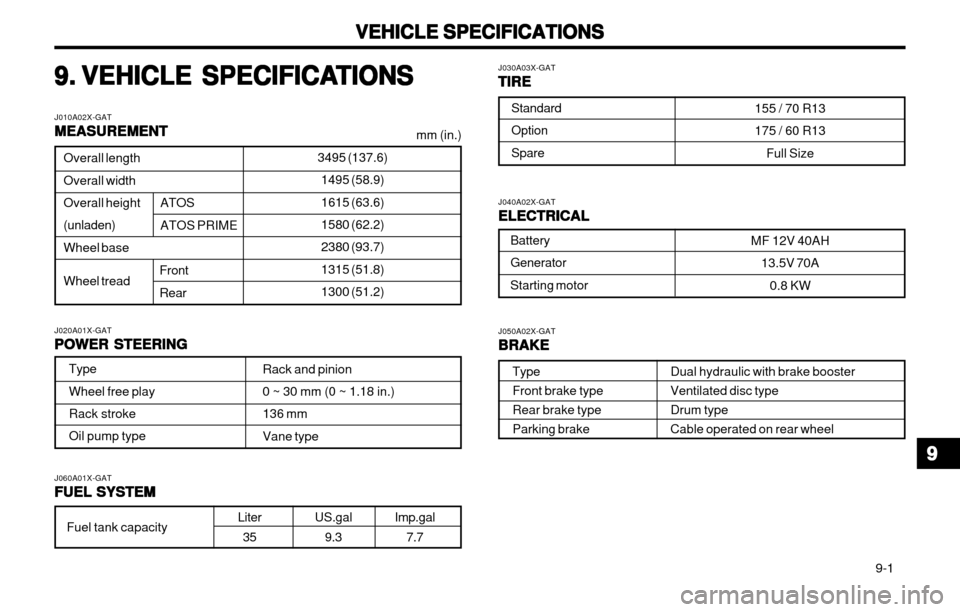
Dual hydraulic with brake booster Ventilated disc typeDrum typeCable operated on rear wheel
J030A03X-GAT
TIRE
TIRE TIRE
TIRE
TIRE
3495 (137.6)
1495 (58.9) 1615 (63.6) 1580 (62.2) 2380 (93.7)1315 (51.8) 1300 (51.2)Overall length Overall widthOverall height (unladen) Wheel base Wheel tread
Front Rear
ATOS ATOS PRIME
Type Wheel free play Rack stroke Oil pump type Rack and pinion 0 ~ 30 mm (0 ~ 1.18 in.) 136 mmVane type
Standard Option Spare
155 / 70 R13175 / 60 R13
Full Size
Battery Generator Starting motor MF 12V 40AH
13.5V 70A
0.8 KW
Fuel tank capacity Type Front brake typeRear brake typeParking brake
99
99
9
Page 127 of 249
INDEX
INDEX INDEX
INDEX
INDEX
10-3
Adjustable height ........................................................................... 1-9
Adjusting your seat belt ...............................................................
1-10
Care of seat belts .......................................................................... 1-8
Precautions .................................................................................... 1-7
Spark Plugs ............................................................................... 6-7 ~ 6-8 Speedometer ..................................................................................... 1-22
Starting Procedure .............................................................................. 2-3
Steering Wheel Free play ................................................................. 6-13
Stereo Radio Operation (H922M) .......................................... 1-47 ~ 1-48
Stereo Radio Operation (HMR90) ......................................... 1-42 ~ 1-43
Stereo Sound System ............................................................ 1-40 ~ 1-41
Sun Visor .......................................................................................... 1-32
TT
TT
T Tail Gate
Open ............................................................................................ 1-30
Remote release ............................................................................ 1-30
Tires
Balancing ....................................................................................... 8-3
Chains ............................................................................................ 8-2
Changing a flat tire ........................................................................ 3-4
If you have a flat tire ...................................................................... 3-3Information ..................................................................................... 8-1
Pressure ........................................................................................ 8-1 Replacement .................................................................................. 8-3
Rotation .......................................................................................... 8-2
Snow tires ...................................................................................... 8-2
Spare tire ....................................................................................... 3-3
Traction .......................................................................................... 8-3
MM
MM
MMaintenance Intervals
Explanation of scheduled maintenance items ...................... 5-5 ~ 5-7
Maintenance under severe usage conditions ................................ 5-4
Scheduled maintenance ................................................................. 5-2
Service requirements ..................................................................... 5-1
Mirrors Day-night inside rearview ............................................................ 1-28
Outside rear view ........................................................................ 1-27
OO
OO
OOdometer .......................................................................................... 1-23
PP
PP
P
Parking Brake ................................................................................... 1-28
Power Steering Fluid Level .................................................... 6-16 ~ 6-17
Pretensioner Seat Belt ...................................................................... 1-13
RR
RR
RRear Seat
Fold down .................................................................................... 1-29
Rear Window Defroster Switch ......................................................... 1-26
Rear Window Wiper and Washer ..................................................... 1-25
Roof Rack ......................................................................................... 1-33
SS
SS
SSeat Belts
2-Point static type ............................................................. 1-10 ~ 1-11
3-Point type ......................................................................... 1-9 ~ 1-10
Page 149 of 249
FEATURES OF YOUR HYUNDAI
1-12 NOTE: Be sure to read information about the SRS on the labels provided on the backside ofthe sun visor and in the glove box. WARNING:
o As its name implies, the SRS is designed
to work with, and be supplemental to, the driver's and the passenger's three pointseat belt systems and is not a substitutefor them. Therefore your seat belts mustbe worn at all times while the vehicle is inmotion. In addition, the airbags deployonly in certain frontal impact conditionssevere enough to likely cause significantinjury to the vehicle occupants.
o The SRS is designed to deploy the airbags only when an impact is sufficiently se-vere and when the impact angle is lessthan 30° from the forward longitudinalaxis of the vehicle and will not deploy inside, rear or rollover impacts. Additional-ly, the airbags will only deploy once. Thus, seat belts must be worn at all times.
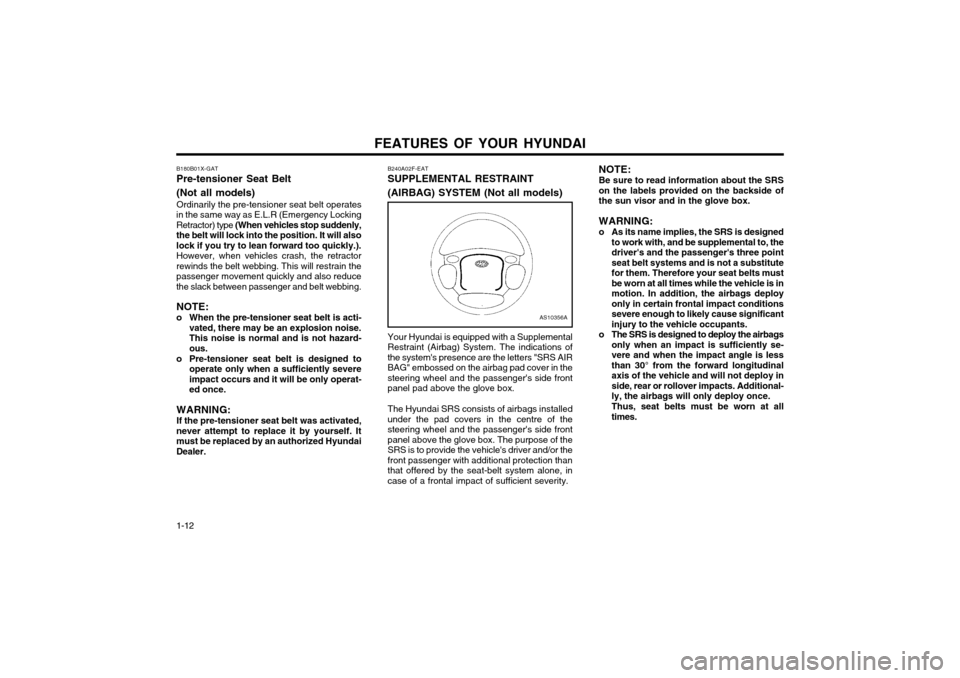
B240A02F-EAT SUPPLEMENTAL RESTRAINT (AIRBAG) SYSTEM (Not all models) Your Hyundai is equipped with a Supplemental Restraint (Airbag) System. The indications ofthe system's presence are the letters "SRS AIRBAG" embossed on the airbag pad cover in thesteering wheel and the passenger's side frontpanel pad above the glove box. The Hyundai SRS consists of airbags installed under the pad covers in the centre of thesteering wheel and the passenger's side frontpanel above the glove box. The purpose of theSRS is to provide the vehicle's driver and/or thefront passenger with additional protection thanthat offered by the seat-belt system alone, incase of a frontal impact of sufficient severity.
AS10356A
B180B01X-GAT Pre-tensioner Seat Belt (Not all models) Ordinarily the pre-tensioner seat belt operates
in the same way as E.L.R (Emergency Locking Retractor) type (When vehicles stop suddenly,
the belt will lock into the position. It will alsolock if you try to lean forward too quickly.).
However, when vehicles crash, the retractorrewinds the belt webbing. This will restrain thepassenger movement quickly and also reducethe slack between passenger and belt webbing.
NOTE:
o When the pre-tensioner seat belt is acti- vated, there may be an explosion noise.This noise is normal and is not hazard-ous.
o Pre-tensioner seat belt is designed to operate only when a sufficiently severeimpact occurs and it will be only operat-ed once.
WARNING: If the pre-tensioner seat belt was activated,
never attempt to replace it by yourself. It must be replaced by an authorized HyundaiDealer.
Page 150 of 249
FEATURES OF YOUR HYUNDAI 1-13
B240C01X
Rear impact
Side impact Rollover
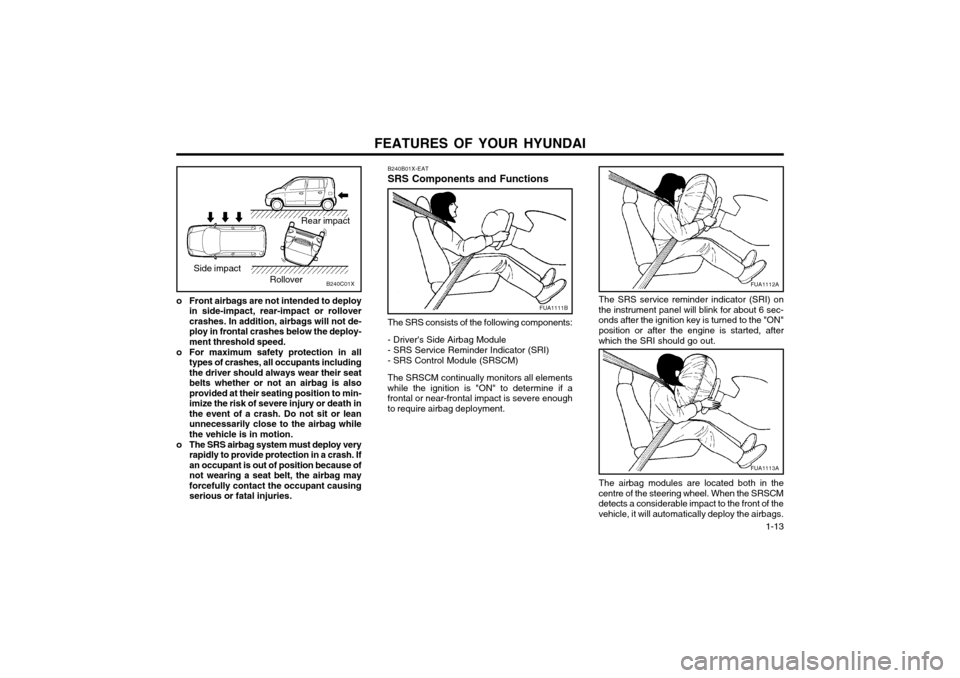
o Front airbags are not intended to deploy in side-impact, rear-impact or rollover crashes. In addition, airbags will not de-ploy in frontal crashes below the deploy-ment threshold speed.
o For maximum safety protection in all types of crashes, all occupants includingthe driver should always wear their seatbelts whether or not an airbag is alsoprovided at their seating position to min-imize the risk of severe injury or death inthe event of a crash. Do not sit or leanunnecessarily close to the airbag whilethe vehicle is in motion.
o The SRS airbag system must deploy very rapidly to provide protection in a crash. Ifan occupant is out of position because ofnot wearing a seat belt, the airbag mayforcefully contact the occupant causingserious or fatal injuries. B240B01X-EAT SRS Components and Functions The SRS consists of the following components: - Driver's Side Airbag Module - SRS Service Reminder Indicator (SRI)- SRS Control Module (SRSCM) The SRSCM continually monitors all elements
while the ignition is "ON" to determine if a frontal or near-frontal impact is severe enough
to require airbag deployment.
FUA1111B The SRS service reminder indicator (SRI) on
the instrument panel will blink for about 6 sec- onds after the ignition key is turned to the "ON"
position or after the engine is started, after
which the SRI should go out.
The airbag modules are located both in the
centre of the steering wheel. When the SRSCMdetects a considerable impact to the front of thevehicle, it will automatically deploy the airbags.
FUA1113A
FUA1112A
Page 151 of 249
FEATURES OF YOUR HYUNDAI
1-14 B240C01X-EAT SRS CareThe SRS is virtually maintenance-free and so there are no parts you can safely service byyourself. The entire SRS system must be in-spected by an authorized Hyundai dealer in 10years after the date that the car was manufac-ture. Any work on the airbag system, such as remov- ing, installing, repairing, or any work on thesteering wheel must be performed by a quali-fied Hyundai technician. Improper handling of the airbag system may result in serious personal injury. WARNING:
o Modification to SRS components or wir- ing, including the addition of any kind of badges to the pad cover or modifica-tions to the body structure, can adverse-ly affect SRS performance and lead topossible injury.
o For cleaning the horn pad, use only a soft, dry cloth or one which has beenmoistened with plain water. Solvents orcleaners could adversely affect the airbagcover and proper deployment of the sys-tem.
o No objects should be placed over or near the label identifying the airbag on thesteering wheel and instrument panel,because any such object could causeharm if the vehicle is in a crash severeenough to cause the airbag to inflate.
WARNING:
o When the SRS is activated, there may be
a loud noise and fine dust will be re- leased through out the vehicle. Theseconditions are normal and are not haz-ardous. However, the fine dust generat-ed during airbag deployment may causeskin irritation. Be sure to wash your handsand face thoroughly with lukewarm wa-ter and a mild soap after an accident inwhich the airbags were deployed.
o The SRS can function only when the ignition key is in the "ON" position. If theSRS SRI does not come on, or continu-ously remains on, after flashing for about6 seconds when the ignition key is turnedto the "ON" position, or after the engineis started, or comes on while driving, theSRS is not working properly. If this oc-curs, have your vehicle immediately in-spected by your Hyundai dealer.
o Before you replace a fuse or disconnect a battery terminal, turn the ignition key tothe "LOCK" position or remove the igni-tion key. Never remove or replace the airbag related fuse(s) when the ignition keyis in the "ON" position. Failure to heedthis warning will cause the SRS SRI toilluminate.
Upon deployment, tear seams molded directly
into the pad covers will separate under pres-sure from the expansion of the airbags. Furtheropening of the covers then allows full inflation ofthe airbags.
A fully inflated airbag in combination with a
properly worn seat belt slows the driver's for-ward motion, thus reducing the
risk of head and chest injury. After complete inflation, the airbag immediately
starts deflating, enabling the driver to maintain forward visibility.
CAUTION: When installing a container of liquid air
fresherer inside a vehicle, do not place it near the instrument cluster nor on the in-strument panel pad surface. If there is anyleakage from the air fresherer onto theseareas (instrument cluster, instrument panelpad or air ventilator), it may damage theseparts. If the liquid from the air freshererdoes leak onto these areas, wash them withwater immediately.