windshield Hyundai Azera 2012 Owner's Manual
[x] Cancel search | Manufacturer: HYUNDAI, Model Year: 2012, Model line: Azera, Model: Hyundai Azera 2012Pages: 403, PDF Size: 9.28 MB
Page 11 of 403
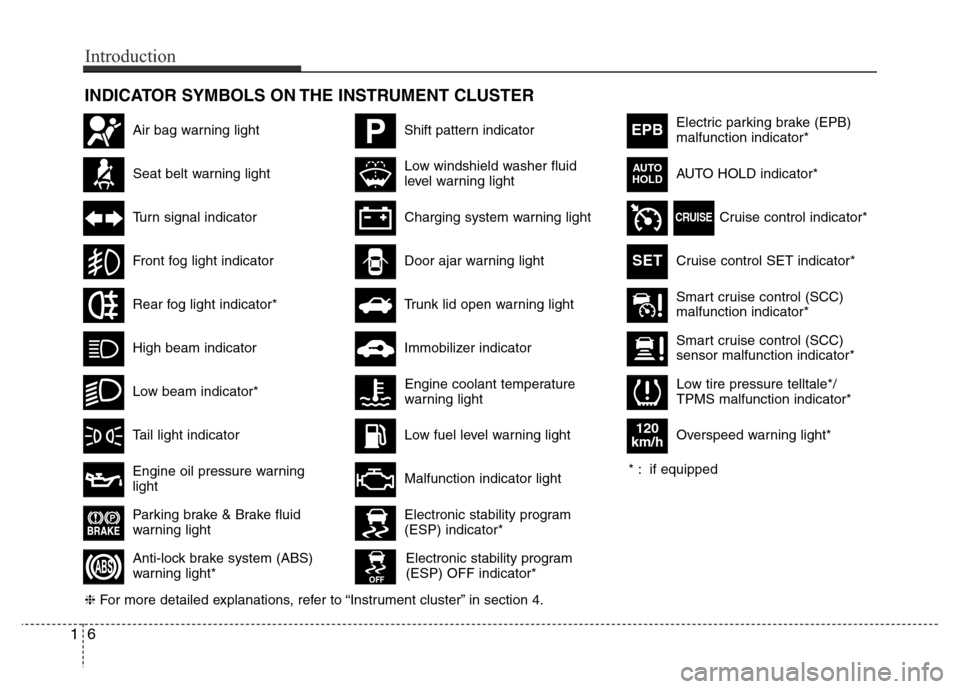
INDICATOR SYMBOLS ON THE INSTRUMENT CLUSTER
Seat belt warning light
High beam indicator
Turn signal indicator
Anti-lock brake system (ABS)
warning light*
Parking brake & Brake fluid
warning light
Engine oil pressure warning
light
Electronic stability program
(ESP) indicator*
Electronic stability program
(ESP) OFF indicator*
Malfunction indicator light
Smart cruise control (SCC)
malfunction indicator*
Smart cruise control (SCC)
sensor malfunction indicator*
Cruise control indicator*
Cruise control SET indicator*
Immobilizer indicator
Low fuel level warning light
❈For more detailed explanations, refer to “Instrument cluster” in section 4.
Charging system warning light
Tail light indicator
Front fog light indicator
Low windshield washer fluid
level warning lightElectric parking brake (EPB)
malfunction indicator*
AUTO HOLD indicator*
EPB
CRUISE
AUTO
HOLD
Engine coolant temperature
warning light
Door ajar warning light
Low tire pressure telltale*/
TPMS malfunction indicator*
PShift pattern indicatorAir bag warning light
Rear fog light indicator*
Overspeed warning light*
120
km/h
SET
* : if equipped
16
Introduction
Low beam indicator*
Trunk lid open warning light
Page 15 of 403
Your vehicle at a glance
4 2
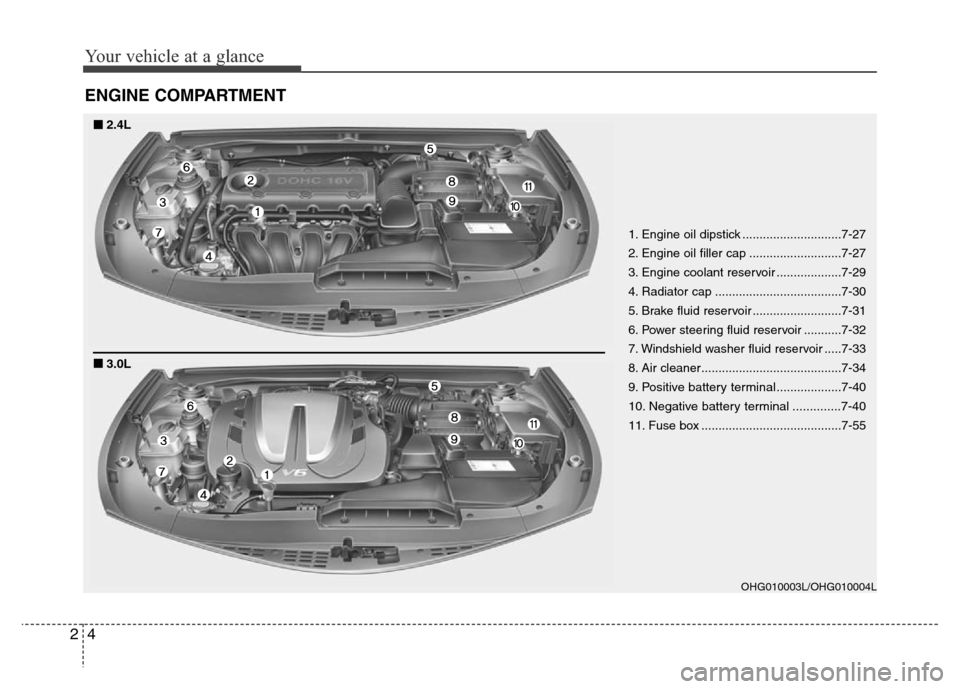
ENGINE COMPARTMENT
1. Engine oil dipstick .............................7-27
2. Engine oil filler cap ...........................7-27
3. Engine coolant reservoir ...................7-29
4. Radiator cap .....................................7-30
5. Brake fluid reservoir ..........................7-31
6. Power steering fluid reservoir ...........7-32
7. Windshield washer fluid reservoir .....7-33
8. Air cleaner.........................................7-34
9.
Positive battery terminal...................7-40
10. Negative battery terminal ..............7-40
11. Fuse box .........................................7-55
OHG010003L/OHG010004L
■■2.4L
■3.0L
Page 78 of 403
Manual climate control system / 4-91
Automatic climate control system / 4-101
Windshield defrosting and defogging / 4-113
Storage compartment / 4-117
Interior features / 4-118
Audio system / 4-125
Features of your vehicle4
Page 155 of 403
479
Features of your vehicle
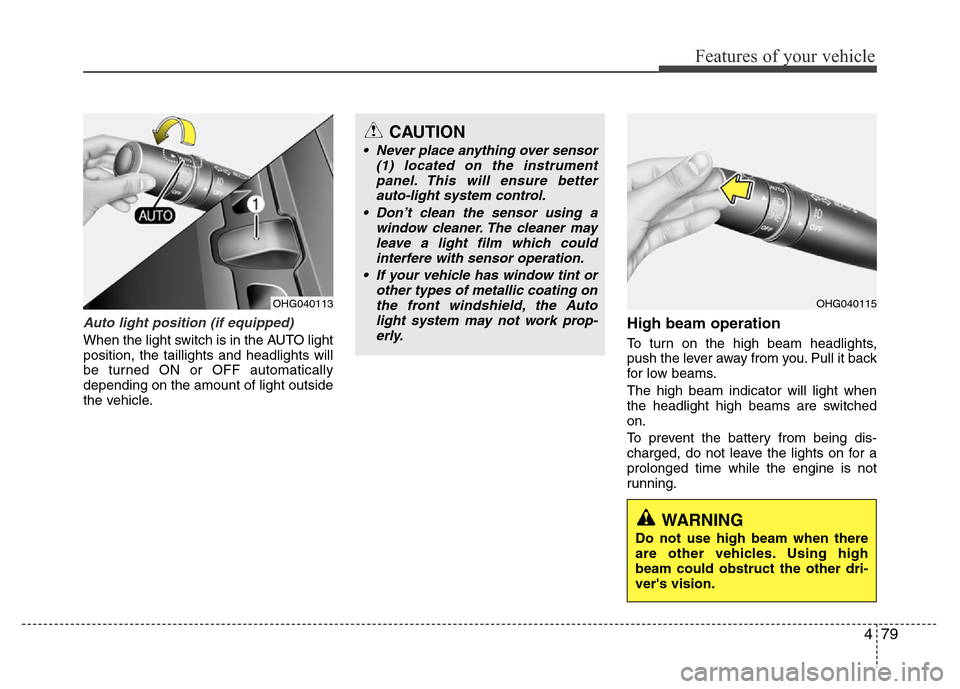
Auto light position (if equipped)
When the light switch is in the AUTO light
position, the taillights and headlights will
be turned ON or OFF automatically
depending on the amount of light outside
the vehicle.
High beam operation
To turn on the high beam headlights,
push the lever away from you. Pull it back
for low beams.
The high beam indicator will light when
the headlight high beams are switched
on.
To prevent the battery from being dis-
charged, do not leave the lights on for a
prolonged time while the engine is not
running.
OHG040113OHG040115
CAUTION
• Never place anything over sensor
(1) located on the instrument
panel. This will ensure better
auto-light system control.
• Don’t clean the sensor using a
window cleaner. The cleaner may
leave a light film which could
interfere with sensor operation.
• If your vehicle has window tint or
other types of metallic coating on
the front windshield, the Auto
light system may not work prop-
erly.
WARNING
Do not use high beam when there
are other vehicles. Using high
beam could obstruct the other dri-
ver's vision.
Page 159 of 403
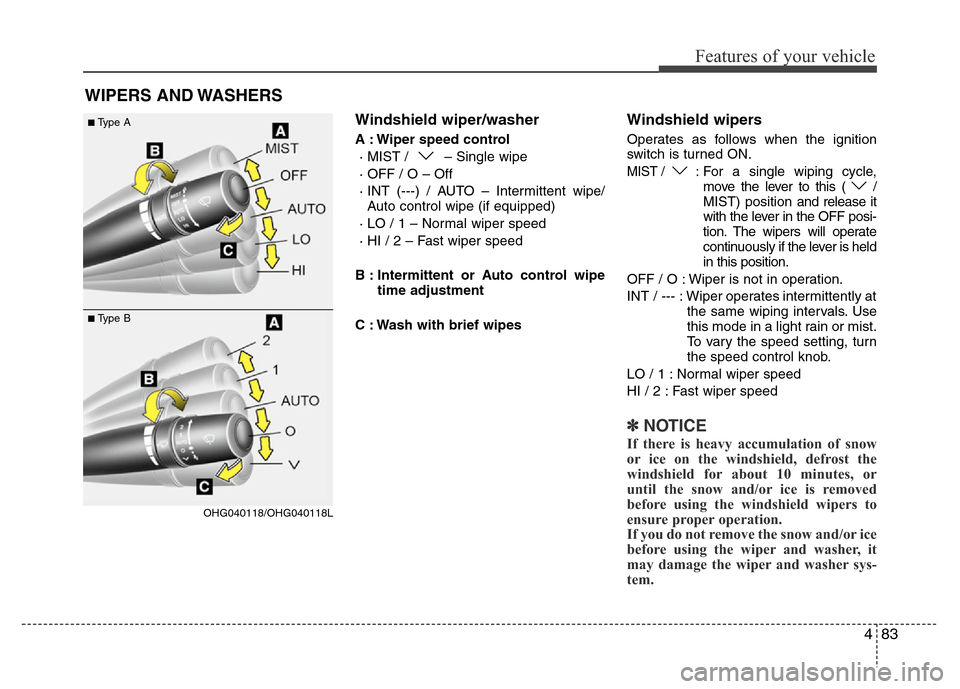
483
Features of your vehicle
Windshield wiper/washer
A : Wiper speed control
· MIST / – Single wipe
· OFF / O – Off
· INT (---) / AUTO – Intermittent wipe/
Auto control wipe (if equipped)
· LO / 1 – Normal wiper speed
· HI / 2 – Fast wiper speed
B : Intermittent or Auto control wipe
time adjustment
C : Wash with brief wipes
Windshield wipers
Operates as follows when the ignition
switch is turned ON.
MIST / : For a single wiping cycle,
move the lever to this ( /
MIST) position and release it
with the lever in the OFF posi-
tion. The wipers will operate
continuously if the lever is held
in this position.
OFF / O : Wiper is not in operation.
INT / --- : Wiper operates intermittently at
the same wiping intervals. Use
this mode in a light rain or mist.
To vary the speed setting, turn
the speed control knob.
LO / 1 : Normal wiper speed
HI / 2 : Fast wiper speed
✽NOTICE
If there is heavy accumulation of snow
or ice on the windshield, defrost the
windshield for about 10 minutes, or
until the snow and/or ice is removed
before using the windshield wipers to
ensure proper operation.
If you do not remove the snow and/or ice
before using the wiper and washer, it
may damage the wiper and washer sys-
tem.
WIPERS AND WASHERS
OHG040118/OHG040118L
■Type A
■Type B
Page 160 of 403
Features of your vehicle
84 4
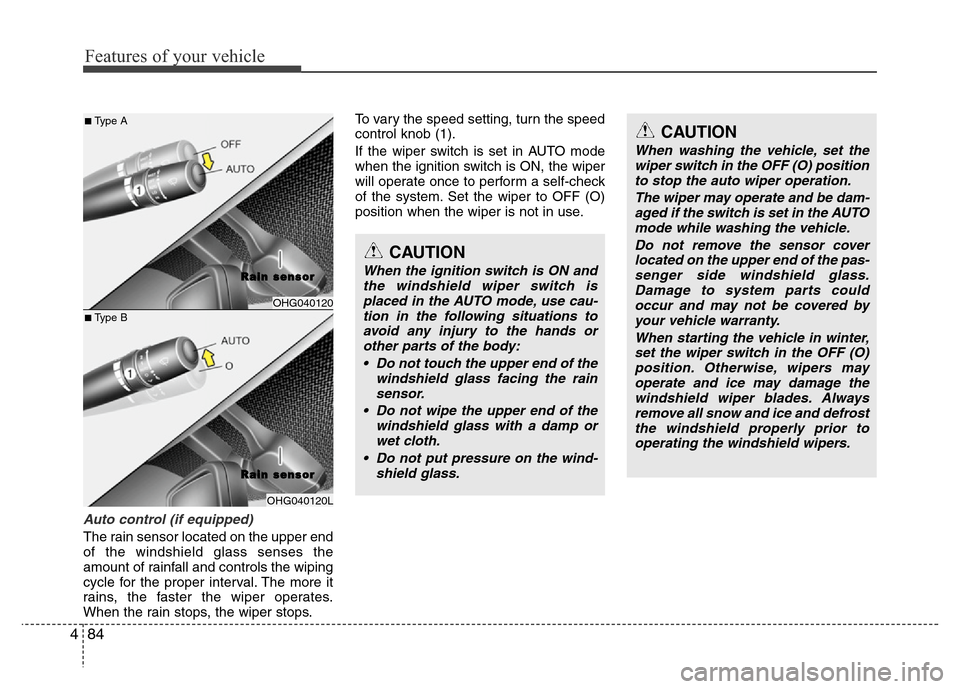
Auto control (if equipped)
The rain sensor located on the upper end
of the windshield glass senses the
amount of rainfall and controls the wiping
cycle for the proper interval. The more it
rains, the faster the wiper operates.
When the rain stops, the wiper stops.To vary the speed setting, turn the speed
control knob (1).
If the wiper switch is set in AUTO mode
when the ignition switch is ON, the wiper
will operate once to perform a self-check
of the system. Set the wiper to OFF (O)
position when the wiper is not in use.
OHG040120
R R
a a
i i
n n
s s
e e
n n
s s
o o
r r
OHG040120L
CAUTION
When the ignition switch is ON and
the windshield wiper switch is
placed in the AUTO mode, use cau-
tion in the following situations to
avoid any injury to the hands or
other parts of the body:
• Do not touch the upper end of the
windshield glass facing the rain
sensor.
• Do not wipe the upper end of the
windshield glass with a damp or
wet cloth.
• Do not put pressure on the wind-
shield glass.
CAUTION
When washing the vehicle, set the
wiper switch in the OFF (O) position
to stop the auto wiper operation.
The wiper may operate and be dam-
aged if the switch is set in the AUTO
mode while washing the vehicle.
Do not remove the sensor cover
located on the upper end of the pas-
senger side windshield glass.
Damage to system parts could
occur and may not be covered by
your vehicle warranty.
When starting the vehicle in winter,
set the wiper switch in the OFF (O)
position. Otherwise, wipers may
operate and ice may damage the
windshield wiper blades. Always
remove all snow and ice and defrost
the windshield properly prior to
operating the windshield wipers.
■Type A
■Type B
R R
a a
i i
n n
s s
e e
n n
s s
o o
r r
Page 161 of 403
485
Features of your vehicle
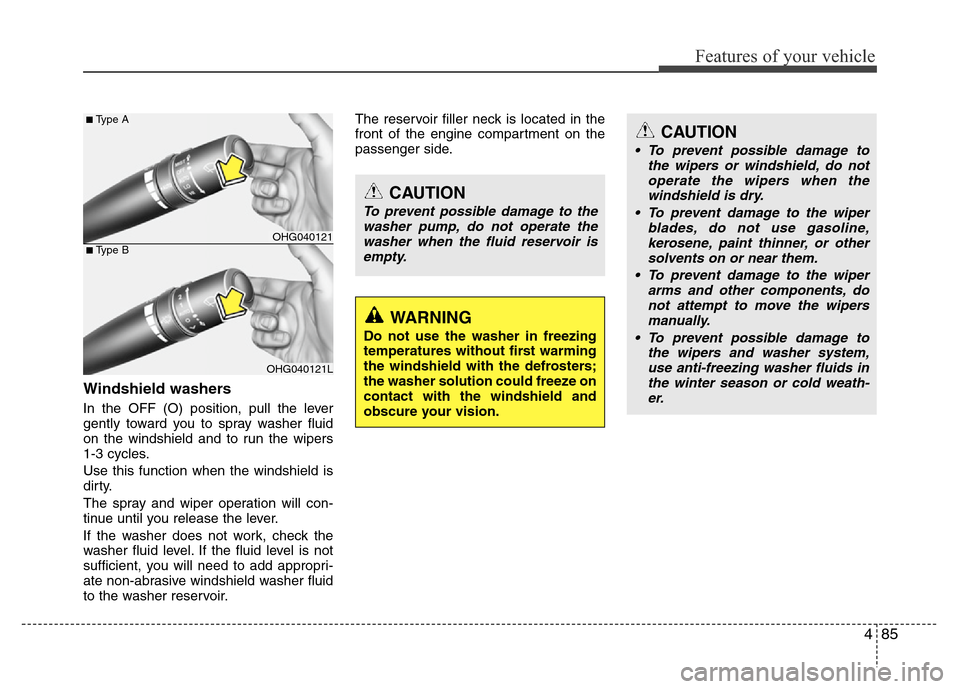
Windshield washers
In the OFF (O) position, pull the lever
gently toward you to spray washer fluid
on the windshield and to run the wipers
1-3 cycles.
Use this function when the windshield is
dirty.
The spray and wiper operation will con-
tinue until you release the lever.
If the washer does not work, check the
washer fluid level. If the fluid level is not
sufficient, you will need to add appropri-
ate non-abrasive windshield washer fluid
to the washer reservoir.The reservoir filler neck is located in the
front of the engine compartment on the
passenger side.
CAUTION
To prevent possible damage to the
washer pump, do not operate the
washer when the fluid reservoir is
empty.
WARNING
Do not use the washer in freezing
temperatures without first warming
the windshield with the defrosters;
the washer solution could freeze on
contact with the windshield and
obscure your vision.
CAUTION
• To prevent possible damage to
the wipers or windshield, do not
operate the wipers when the
windshield is dry.
• To prevent damage to the wiper
blades, do not use gasoline,
kerosene, paint thinner, or other
solvents on or near them.
• To prevent damage to the wiper
arms and other components, do
not attempt to move the wipers
manually.
• To prevent possible damage to
the wipers and washer system,
use anti-freezing washer fluids in
the winter season or cold weath-
er.
OHG040121
OHG040121L
■Type B
■Type A
Page 166 of 403
Features of your vehicle
90 4
DEFROSTER
✽NOTICE
If you want to defrost and defog the
front windshield, refer to “Windshield
defrosting and defogging” in this sec-
tion.
Rear window defroster
The defroster heats the window to
remove frost, fog and thin ice from the
rear window, while the engine is running.
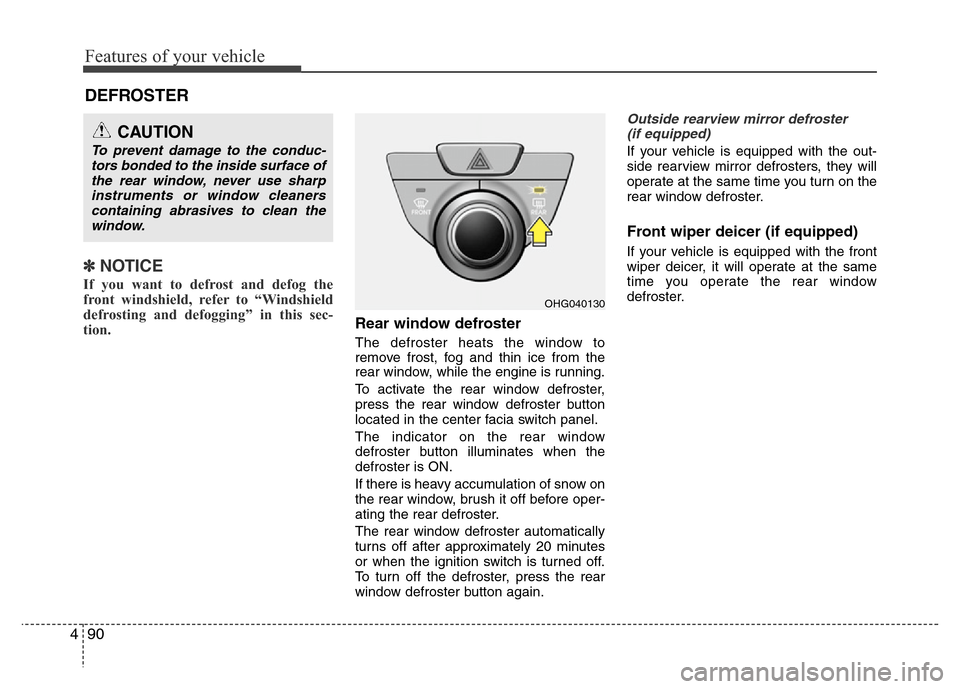
To activate the rear window defroster,
press the rear window defroster button
located in the center facia switch panel.
The indicator on the rear window
defroster button illuminates when the
defroster is ON.
If there is heavy accumulation of snow on
the rear window, brush it off before oper-
ating the rear defroster.
The rear window defroster automatically
turns off after approximately 20 minutes
or when the ignition switch is turned off.
To turn off the defroster, press the rear
window defroster button again.
Outside rearview mirror defroster
(if equipped)
If your vehicle is equipped with the out-
side rearview mirror defrosters, they will
operate at the same time you turn on the
rear window defroster.
Front wiper deicer (if equipped)
If your vehicle is equipped with the front
wiper deicer, it will operate at the same
time you operate the rear window
defroster.
CAUTION
To prevent damage to the conduc-
tors bonded to the inside surface of
the rear window, never use sharp
instruments or window cleaners
containing abrasives to clean the
window.
OHG040130
Page 167 of 403
491
Features of your vehicle
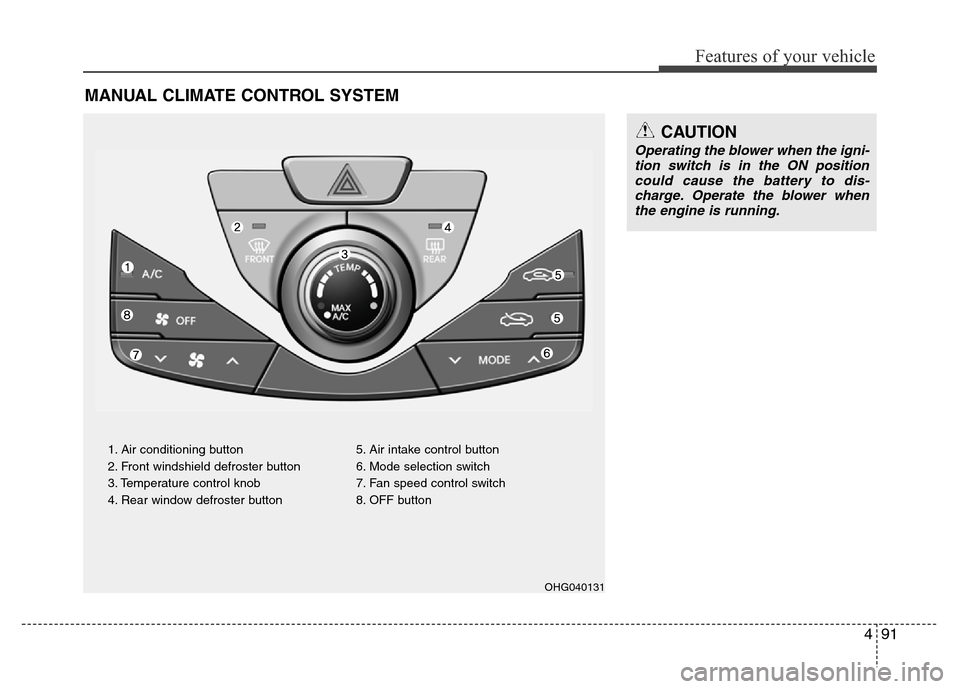
MANUAL CLIMATE CONTROL SYSTEM
1. Air conditioning button
2. Front windshield defroster button
3. Temperature control knob
4. Rear window defroster button5. Air intake control button
6. Mode selection switch
7. Fan speed control switch
8. OFF button
OHG040131
CAUTION
Operating the blower when the igni-
tion switch is in the ON position
could cause the battery to dis-
charge. Operate the blower when
the engine is running.
Page 169 of 403
493
Features of your vehicle
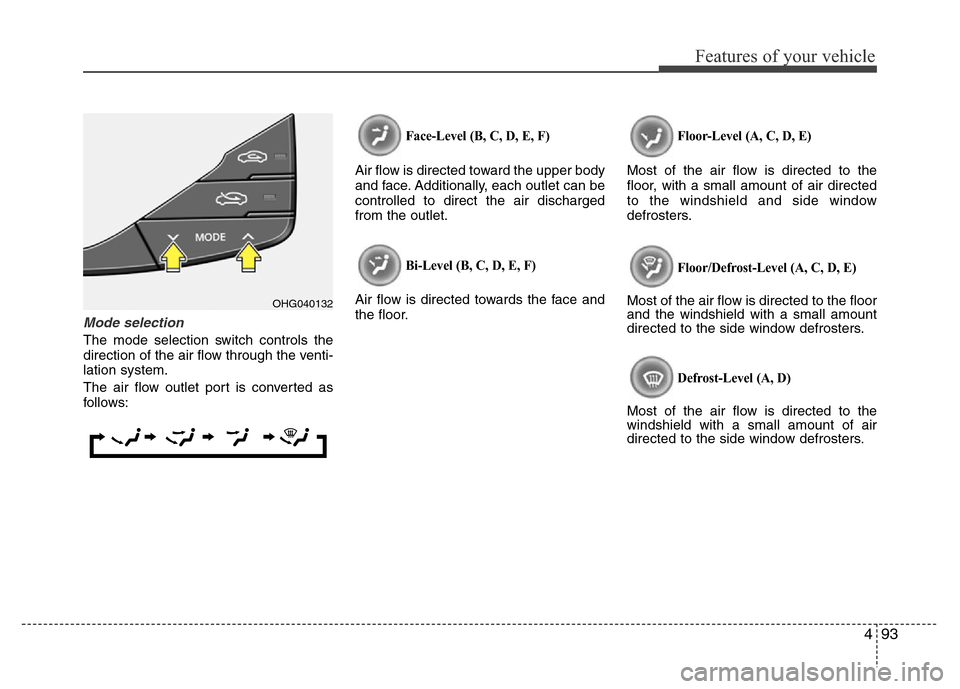
Mode selection
The mode selection switch controls the
direction of the air flow through the venti-
lation system.
The air flow outlet port is converted as
follows:
Face-Level (B, C, D, E, F)
Air flow is directed toward the upper body
and face. Additionally, each outlet can be
controlled to direct the air discharged
from the outlet.
Bi-Level (B, C, D, E, F)
Air flow is directed towards the face and
the floor.
Floor-Level (A, C, D, E)
Most of the air flow is directed to the
floor, with a small amount of air directed
to the windshield and side window
defrosters.
Floor/Defrost-Level (A, C, D, E)
Most of the air flow is directed to the floor
and the windshield with a small amount
directed to the side window defrosters.
Defrost-Level (A, D)
Most of the air flow is directed to the
windshield with a small amount of air
directed to the side window defrosters.
OHG040132