lights Hyundai Azera 2014 Owner's Guide
[x] Cancel search | Manufacturer: HYUNDAI, Model Year: 2014, Model line: Azera, Model: Hyundai Azera 2014Pages: 403, PDF Size: 9.28 MB
Page 279 of 403
Driving your vehicle
56 5
✽NOTICE
Vehicle equipped with the ESP system
should turn off the system prior to rock-
ing the vehicle.
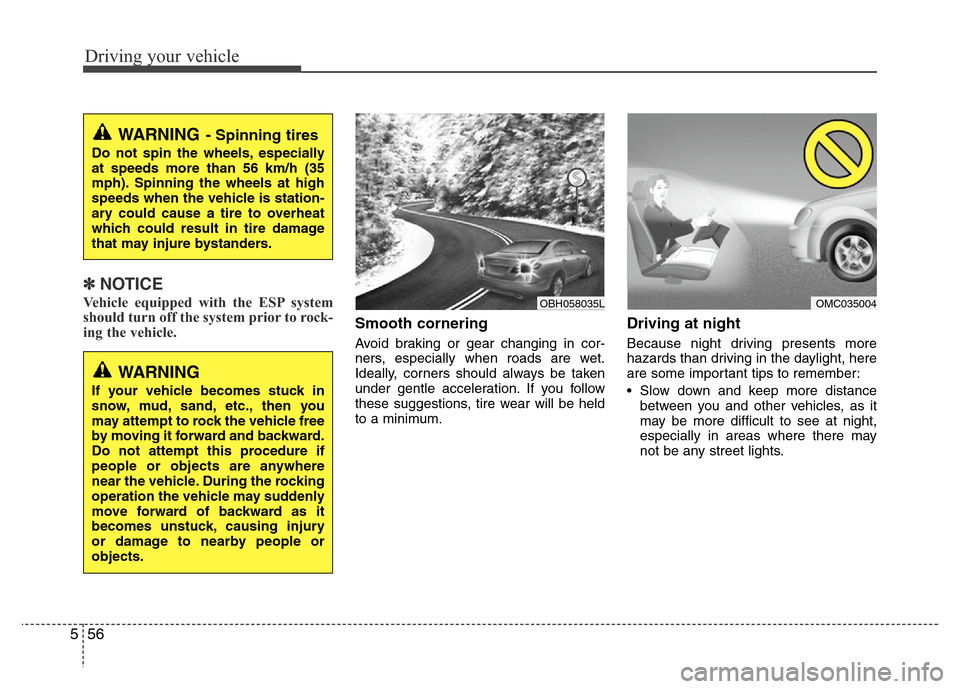
Smooth cornering
Avoid braking or gear changing in cor-
ners, especially when roads are wet.
Ideally, corners should always be taken
under gentle acceleration. If you follow
these suggestions, tire wear will be held
to a minimum.
Driving at night
Because night driving presents more
hazards than driving in the daylight, here
are some important tips to remember:
• Slow down and keep more distance
between you and other vehicles, as it
may be more difficult to see at night,
especially in areas where there may
not be any street lights.
WARNING- Spinning tires
Do not spin the wheels, especially
at speeds more than 56 km/h (35
mph). Spinning the wheels at high
speeds when the vehicle is station-
ary could cause a tire to overheat
which could result in tire damage
that may injure bystanders.
OMC035004
WARNING
If your vehicle becomes stuck in
snow, mud, sand, etc., then you
may attempt to rock the vehicle free
by moving it forward and backward.
Do not attempt this procedure if
people or objects are anywhere
near the vehicle. During the rocking
operation the vehicle may suddenly
move forward of backward as it
becomes unstuck, causing injury
or damage to nearby people or
objects.
OBH058035L
Page 280 of 403
557
Driving your vehicle
• Adjust your mirrors to reduce the glare
from other driver's headlights.
• Keep your headlights clean and prop-
erly aimed on vehicles not equipped
with the automatic headlight aiming
feature. Dirty or improperly aimed
headlights will make it much more diffi-
cult to see at night.
• Avoid staring directly at the headlights
of oncoming vehicles. You could be
temporarily blinded, and it will take
several seconds for your eyes to read-
just to the darkness.Driving in the rain
Rain and wet roads can make driving
dangerous, especially if you’re not pre-
pared for the slick pavement. Here are a
few things to consider when driving in the
rain:
• A heavy rainfall will make it harder to
see and will increase the distance
needed to stop your vehicle, so slow
down.
• Keep your windshield wiping equip-
ment in good shape. Replace your
windshield wiper blades when they
show signs of streaking or missing
areas on the windshield.
• If your tires are not in good condition,
making a quick stop on wet pavement
can cause a skid and possibly lead to
an accident. Be sure your tires are in
good shape.
• Turn on your headlights to make it eas-
ier for others to see you.
• Driving too fast through large puddles
can affect your brakes. If you must go
through puddles, try to drive through
them slowly.
• If you believe you may have gotten
your brakes wet, apply them lightly
while driving until normal braking oper-
ation returns.
Driving in flooded areas
Avoid driving through flooded areas
unless you are sure the water is no high-
er than the bottom of the wheel hub.
Drive through any water slowly. Allow
adequate stopping distance because
brake performance may be affected.
After driving through water, dry the
brakes by gently applying them several
times while the vehicle is moving slowly.
Driving off-road
Drive carefully off-road because your
vehicle may be damaged by rocks or
roots of trees. Become familiar with the
off-road conditions where you are going
to drive before you begin driving.
Page 289 of 403
What to do in an emergency
2 6
ROAD WARNING
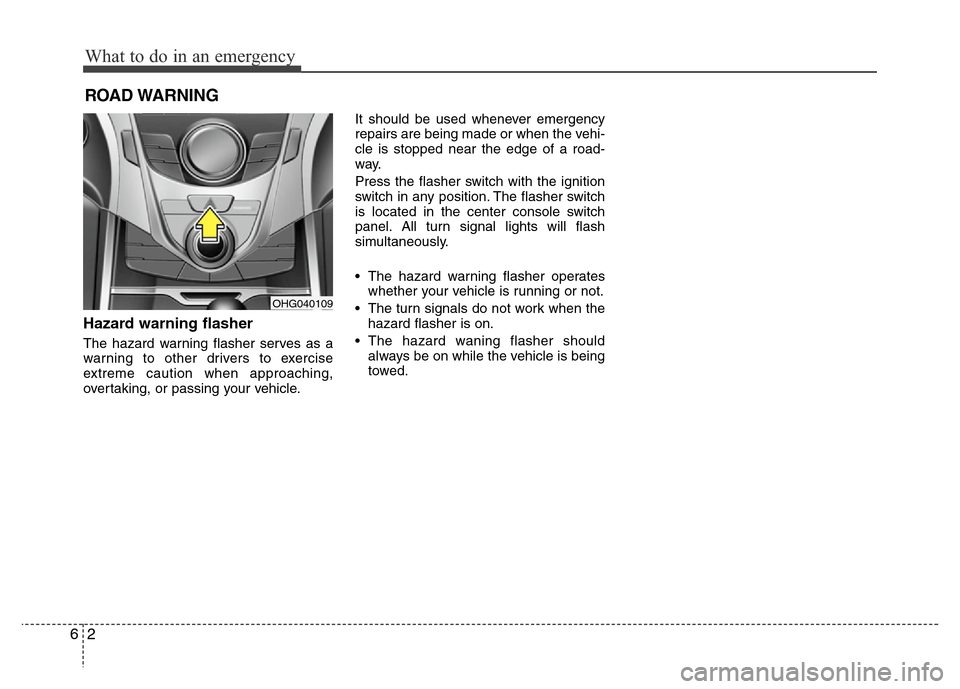
Hazard warning flasher
The hazard warning flasher serves as a
warning to other drivers to exercise
extreme caution when approaching,
overtaking, or passing your vehicle.It should be used whenever emergency
repairs are being made or when the vehi-
cle is stopped near the edge of a road-
way.
Press the flasher switch with the ignition
switch in any position. The flasher switch
is located in the center console switch
panel. All turn signal lights will flash
simultaneously.
• The hazard warning flasher operates
whether your vehicle is running or not.
• The turn signals do not work when the
hazard flasher is on.
• The hazard waning flasher should
always be on while the vehicle is being
towed.
OHG040109
Page 317 of 403
75
Maintenance
Owner maintenance schedule
When you stop for fuel:
• Check the engine oil level.
• Check coolant level in coolant reser-
voir.
• Check the windshield washer fluid
level.
• Look for low or under-inflated tires.
• Check the radiator and condenser.
Check if the front of the radiator and
condenser are clean and not blocked
with leaves, dirt or insects etc.
If any of the above parts are extremely
dirty or you are not sure of their condi-
tion, take your vehicle to an authorized
HYUNDAI dealer.
While operating your vehicle:
• Note any changes in the sound of the
exhaust or any smell of exhaust fumes
in the vehicle.
• Check for vibrations in the steering
wheel. Notice any increased steering
effort or looseness in the steering
wheel, or change in its straight-ahead
position.
• Notice if your vehicle constantly turns
slightly or “pulls” to one side when trav-
eling on smooth, level road.
• When stopping, listen and check for
unusual sounds, pulling to one side,
increased brake pedal travel or “hard-
to-push” brake pedal.
• If any slipping or changes in the oper-
ation of your transaxle occurs, check
the transaxle fluid level.
• Check automatic transaxle P (Park)
function.
• Check parking brake.
• Check for fluid leaks under your vehicle
(water dripping from the air condition-
ing system during or after use is nor-
mal).
At least monthly:
• Check coolant level in the engine
coolant reservoir.
• Check the operation of all exterior
lights, including the stoplights, turn sig-
nals and hazard warning flashers.
• Check the inflation pressures of all
tires including the spare.
At least twice a year
(i.e., every Spring and Fall):
• Check radiator, heater and air condi-
tioning hoses for leaks or damage.
• Check windshield washer spray and
wiper operation. Clean wiper blades
with clean cloth dampened with wash-
er fluid.
• Check headlight alignment.
• Check muffler, exhaust pipes, shields
and clamps.
• Check the lap/shoulder belts for wear
and function.
• Check for worn tires and loose wheel
lug nuts.
WARNING
Be careful when checking your
engine coolant level when the
engine is hot. Scalding hot coolant
and steam may blow out under
pressure. This could cause burns
or other serious injury.
Page 354 of 403
Maintenance
42 7
Battery recharging
Your vehicle has a maintenance-free,
calcium-based battery.
• If the battery becomes discharged in a
short time (because, for example, the
headlights or interior lights were left on
while the vehicle was not in use),
recharge it by slow charging (trickle)
for 10 hours.
• If the battery gradually discharges
because of high electric load while the
vehicle is being used, recharge it at 20-
30A for two hours.
Reset items
Items should be reset after the battery
has been discharged or the battery has
been disconnected.
• Auto up/down window (See section 4)
• Sunroof (See section 4)
• Driver position memory system
(See section 4)
• Trip computer (See section 4)
• Climate control system
(See section 4)
• Clock (See section 4)
• Audio (See section 4)
WARNING
• Before performing maintenance
or recharging the battery, turn off
all accessories and stop the
engine.
• The negative battery cable must
be removed first and installed
last when the battery is discon-
nected.
• Operation related to the battery
should be done in an authorized
HYUNDAI dealer.
CAUTION
• Keep the battery away from water
or any liquid.
• For your safety, use the authentic-
ity by approved authorized
HYUNDAI dealer, when you
replace the battery.
WARNING- Recharging
battery
When recharging the battery,
observe the following precautions:
• The battery must be removed
from the vehicle and placed in an
area with good ventilation.
• Do not allow cigarettes, sparks,
or flame near the battery.
• Watch the battery during charg-
ing, and stop or reduce the charg-
ing rate if the battery cells begin
gassing (boiling) violently or if
the temperature of the electrolyte
of any cell exceeds 49°C (120°F).
(Continued)
(Continued)
• Wear eye protection when check-
ing the battery during charging.
• Disconnect the battery charger in
the following order.
1. Turn off the battery charger main
switch.
2. Unhook the negative clamp from
the negative battery terminal.
3. Unhook the positive clamp from
the positive battery terminal.
Page 365 of 403
753
Maintenance
FUSES
A vehicle’s electrical system is protected
from electrical overload damage by
fuses.
This vehicle has 2 fuse panels, one locat-
ed in the driver’s side panel bolster,
another is in the engine compartment.
If any of your vehicle’s lights, acces-
sories, or controls do not work, check the
appropriate circuit fuse. If a fuse has
blown, the element inside the fuse will be
melted.
If the electrical system does not work,
first check the driver’s side fuse panel.
Before replacing a blown fuse, discon-
nect the negative battery cable.
Always replace a blown fuse with one of
the same rating.
If the replacement fuse blows, this indi-
cates an electrical problem. Avoid using
the system involved and immediately
consult an authorized HYUNDAI dealer.
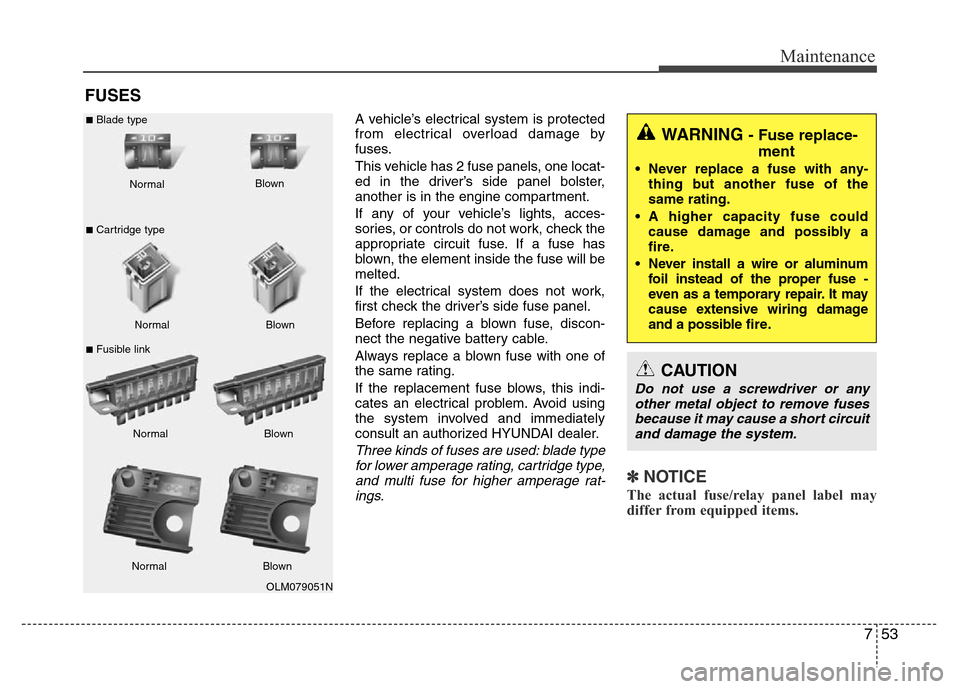
Three kinds of fuses are used: blade type
for lower amperage rating, cartridge type,
and multi fuse for higher amperage rat-
ings.
✽NOTICE
The actual fuse/relay panel label may
differ from equipped items.
WARNING - Fuse replace-
ment
• Never replace a fuse with any-
thing but another fuse of the
same rating.
• A higher capacity fuse could
cause damage and possibly a
fire.
• Never install a wire or aluminum
foil instead of the proper fuse -
even as a temporary repair. It may
cause extensive wiring damage
and a possible fire.
CAUTION
Do not use a screwdriver or any
other metal object to remove fuses
because it may cause a short circuit
and damage the system.
OLM079051N Normal Normal
■Blade type
■Cartridge type
■Fusible linkBlown
Blown
Normal Blown
Normal Blown
Page 367 of 403
755
Maintenance
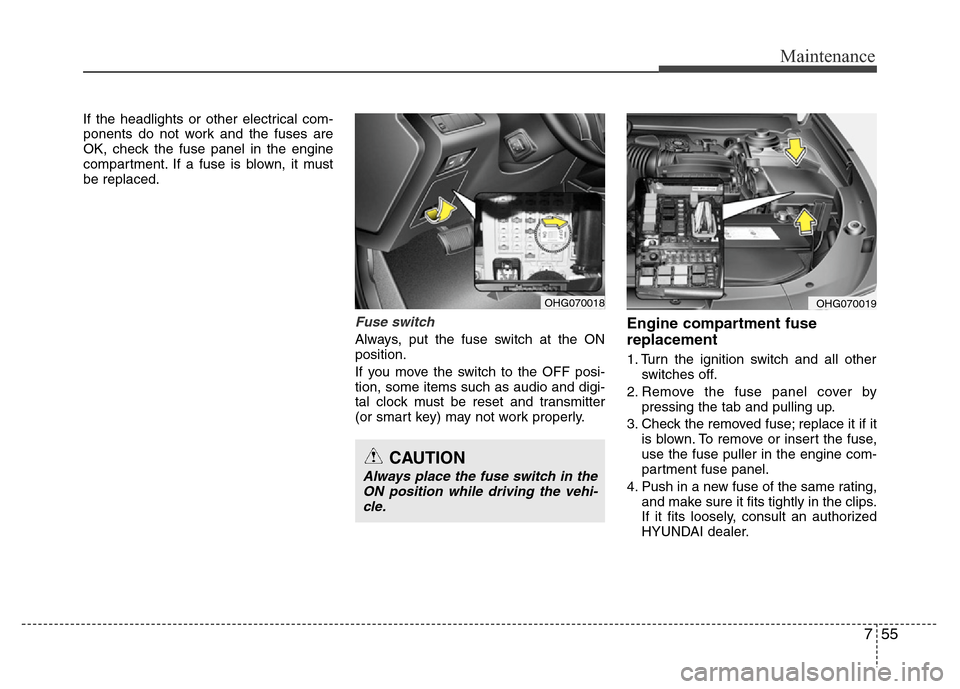
If the headlights or other electrical com-
ponents do not work and the fuses are
OK, check the fuse panel in the engine
compartment. If a fuse is blown, it must
be replaced.
Fuse switch
Always, put the fuse switch at the ON
position.
If you move the switch to the OFF posi-
tion, some items such as audio and digi-
tal clock must be reset and transmitter
(or smart key) may not work properly.
Engine compartment fuse
replacement
1. Turn the ignition switch and all other
switches off.
2. Remove the fuse panel cover by
pressing the tab and pulling up.
3. Check the removed fuse; replace it if it
is blown. To remove or insert the fuse,
use the fuse puller in the engine com-
partment fuse panel.
4. Push in a new fuse of the same rating,
and make sure it fits tightly in the clips.
If it fits loosely, consult an authorized
HYUNDAI dealer.
OHG070018OHG070019
CAUTION
Always place the fuse switch in the
ON position while driving the vehi-
cle.
Page 377 of 403
765
Maintenance
LIGHT BULBS
Use only the bulbs of the specified
wattage.
✽NOTICE
After driving in heavy rain or washing
the vehicle, headlight and taillight lenses
could appear frosty. This condition is
caused by the temperature difference
between the lamp inside and outside.
This is similar to the condensation on
your windows inside your vehicle during
the rain and doesn’t indicate a problem
with your vehicle. If the water leaks into
the lamp bulb circuitry, have the vehicle
checked by an authorized HYUNDAI
dealer.
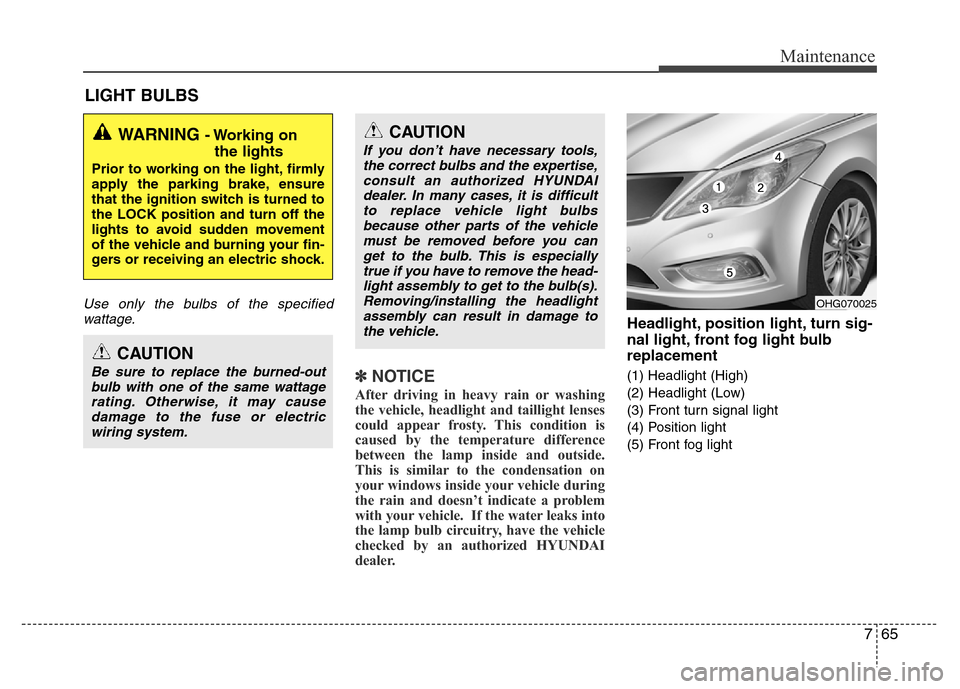
Headlight, position light, turn sig-
nal light, front fog light bulb
replacement
(1) Headlight (High)
(2) Headlight (Low)
(3) Front turn signal light
(4) Position light
(5) Front fog light
WARNING - Working on
the lights
Prior to working on the light, firmly
apply the parking brake, ensure
that the ignition switch is turned to
the LOCK position and turn off the
lights to avoid sudden movement
of the vehicle and burning your fin-
gers or receiving an electric shock.
CAUTION
Be sure to replace the burned-out
bulb with one of the same wattage
rating. Otherwise, it may cause
damage to the fuse or electric
wiring system.
CAUTION
If you don’t have necessary tools,
the correct bulbs and the expertise,
consult an authorized HYUNDAI
dealer. In many cases, it is difficult
to replace vehicle light bulbs
because other parts of the vehicle
must be removed before you can
get to the bulb. This is especially
true if you have to remove the head-
light assembly to get to the bulb(s).
Removing/installing the headlight
assembly can result in damage to
the vehicle.
OHG070025
Page 384 of 403
Maintenance
72 7
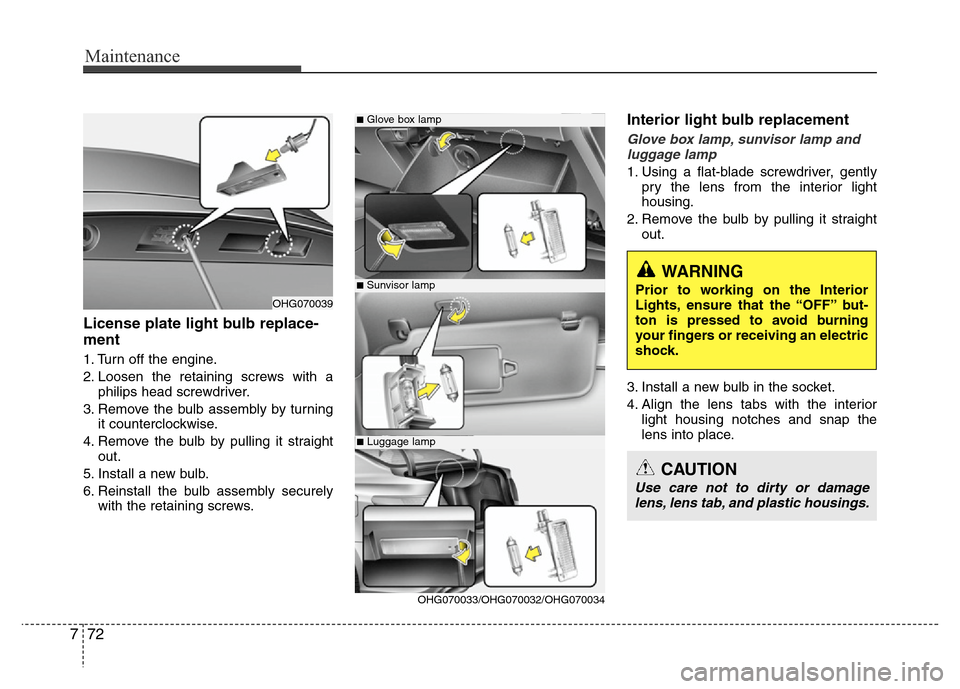
License plate light bulb replace-
ment
1. Turn off the engine.
2. Loosen the retaining screws with a
philips head screwdriver.
3. Remove the bulb assembly by turning
it counterclockwise.
4. Remove the bulb by pulling it straight
out.
5. Install a new bulb.
6. Reinstall the bulb assembly securely
with the retaining screws.
Interior light bulb replacement
Glove box lamp, sunvisor lamp and
luggage lamp
1. Using a flat-blade screwdriver, gently
pry the lens from the interior light
housing.
2. Remove the bulb by pulling it straight
out.
3. Install a new bulb in the socket.
4. Align the lens tabs with the interior
light housing notches and snap the
lens into place.
■Glove box lamp
■Sunvisor lamp
■Luggage lamp
OHG070039
OHG070033/OHG070032/OHG070034
WARNING
Prior to working on the Interior
Lights, ensure that the “OFF” but-
ton is pressed to avoid burning
your fingers or receiving an electric
shock.
CAUTION
Use care not to dirty or damage
lens, lens tab, and plastic housings.
Page 396 of 403
Specifications & Consumer information
2 8
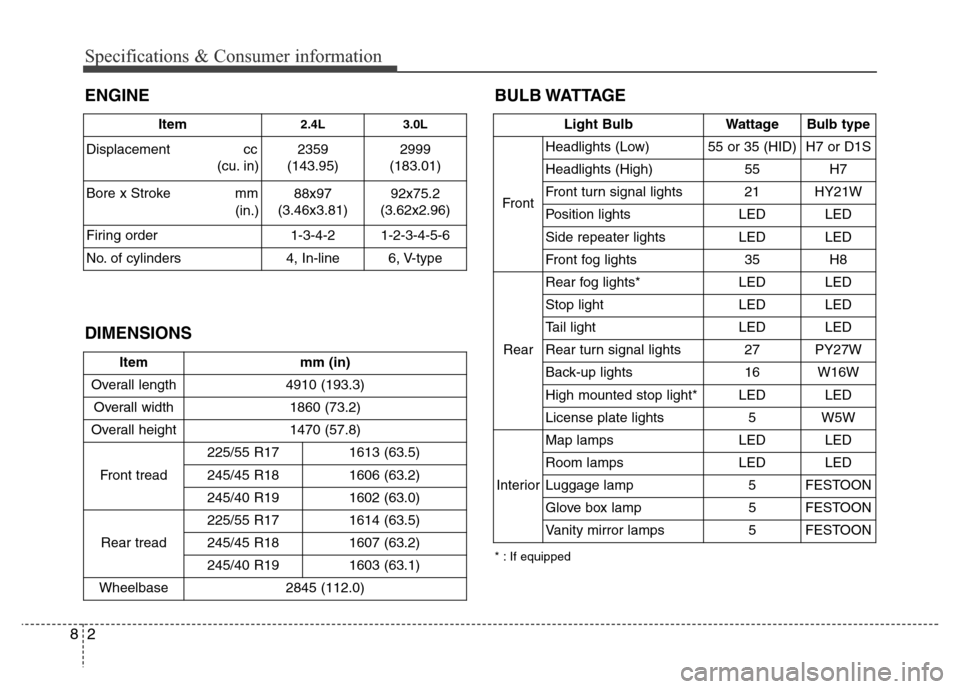
BULB WATTAGE
Item mm (in)
Overall length 4910 (193.3)
Overall width 1860 (73.2)
Overall height 1470 (57.8)
Front tread225/55 R17 1613 (63.5)
245/45 R18 1606 (63.2)
245/40 R191602 (63.0)
Rear tread225/55 R17 1614 (63.5)
245/45 R18 1607 (63.2)
245/40 R191603 (63.1)
Wheelbase 2845 (112.0)
Light Bulb Wattage Bulb type
FrontHeadlights (Low) 55 or 35 (HID) H7 or D1S
Headlights (High) 55 H7
Front turn signal lights 21 HY21W
Position lights LED LED
Side repeater lights LED LED
Front fog lights35H8
RearRear fog lights* LED LED
Stop lightLEDLED
Tail light LED LED
Rear turn signal lights 27 PY27W
Back-up lights 16 W16W
High mounted stop light* LED LED
License plate lights 5 W5W
InteriorMap lamps LED LED
Room lamps LED LED
Luggage lamp 5 FESTOON
Glove box lamp 5 FESTOON
Vanity mirror lamps 5 FESTOON
DIMENSIONS ENGINE
Item2.4L 3.0L
Displacement cc
(cu. in) 2359
(143.95)2999
(183.01)
Bore x Stroke mm
(in.)88x97
(3.46x3.81)92x75.2
(3.62x2.96)
Firing order 1-3-4-2 1-2-3-4-5-6
No. of cylinders 4, In-line 6, V-type
* : If equipped