seat adjustment Hyundai Azera 2015 Owner's Manual
[x] Cancel search | Manufacturer: HYUNDAI, Model Year: 2015, Model line: Azera, Model: Hyundai Azera 2015Pages: 473, PDF Size: 11.92 MB
Page 14 of 473
Your vehicle at a glance
4 2
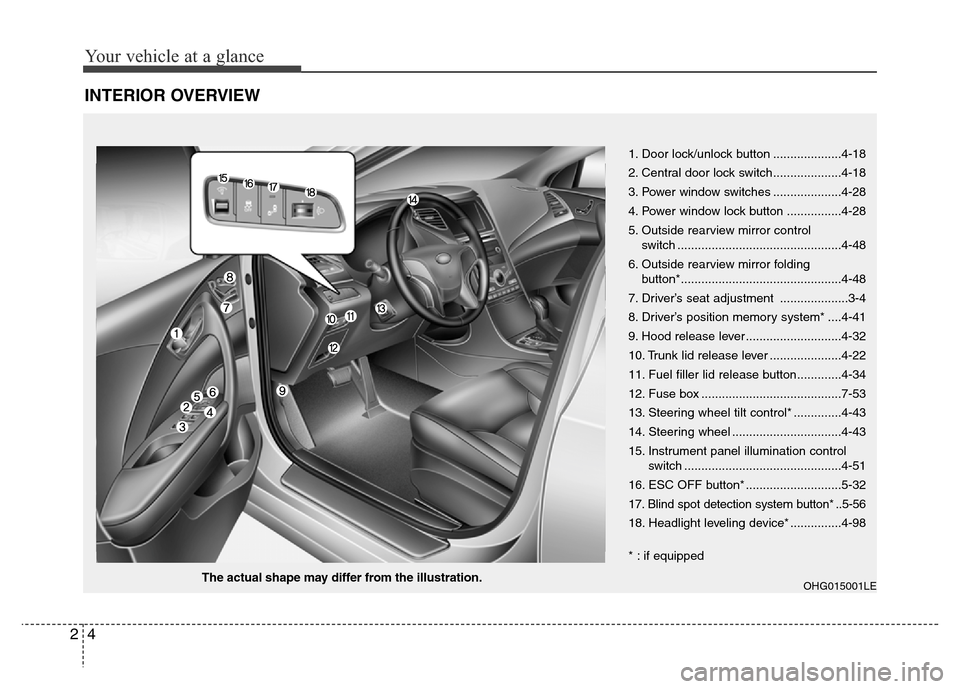
INTERIOR OVERVIEW
OHG015001LEThe actual shape may differ from the illustration.1. Door lock/unlock button ....................4-18
2. Central door lock switch....................4-18
3. Power window switches ....................4-28
4. Power window lock button ................4-28
5. Outside rearview mirror control
switch ................................................4-48
6. Outside rearview mirror folding
button*...............................................4-48
7. Driver’s seat adjustment ....................3-4
8. Driver’s position memory system* ....4-41
9. Hood release lever ............................4-32
10. Trunk lid release lever .....................4-22
11. Fuel filler lid release button.............4-34
12. Fuse box .........................................7-53
13. Steering wheel tilt control* ..............4-43
14. Steering wheel ................................4-43
15. Instrument panel illumination control
switch ..............................................4-51
16. ESC OFF button* ............................5-32
17. Blind spot detection system button* ..5-56
18. Headlight leveling device* ...............4-98
* : if equipped
Page 20 of 473
Safety features of your vehicle
4 3
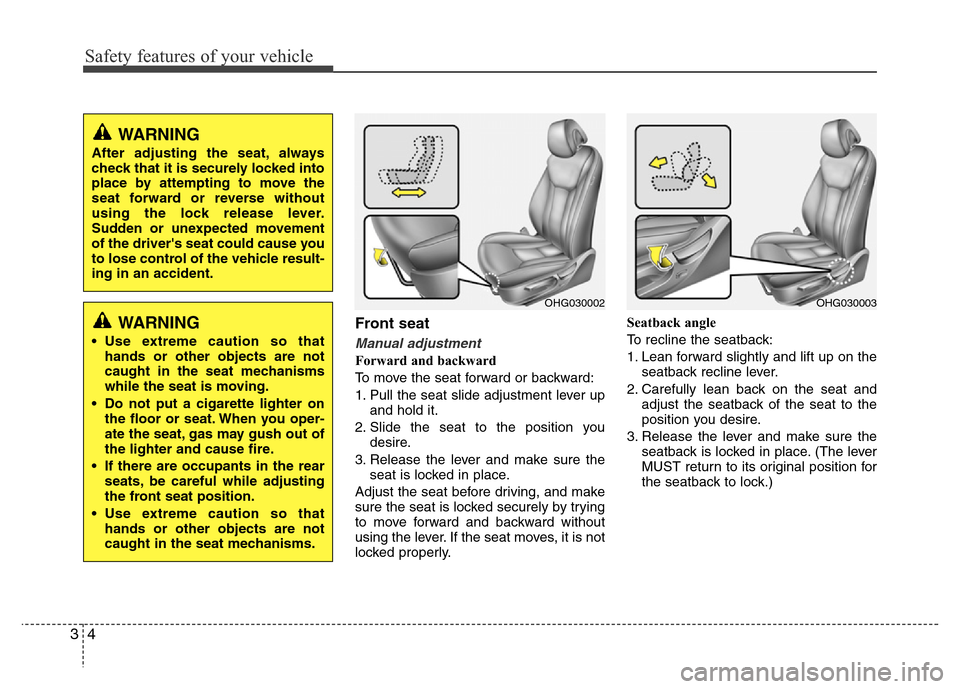
Front seat
Manual adjustment
Forward and backward
To move the seat forward or backward:
1. Pull the seat slide adjustment lever up
and hold it.
2. Slide the seat to the position you
desire.
3. Release the lever and make sure the
seat is locked in place.
Adjust the seat before driving, and make
sure the seat is locked securely by trying
to move forward and backward without
using the lever. If the seat moves, it is not
locked properly.Seatback angle
To recline the seatback:
1. Lean forward slightly and lift up on the
seatback recline lever.
2. Carefully lean back on the seat and
adjust the seatback of the seat to the
position you desire.
3. Release the lever and make sure the
seatback is locked in place. (The lever
MUST return to its original position for
the seatback to lock.)
OHG030003OHG030002
WARNING
After adjusting the seat, always
check that it is securely locked into
place by attempting to move the
seat forward or reverse without
using the lock release lever.
Sudden or unexpected movement
of the driver's seat could cause you
to lose control of the vehicle result-
ing in an accident.
WARNING
• Use extreme caution so that
hands or other objects are not
caught in the seat mechanisms
while the seat is moving.
• Do not put a cigarette lighter on
the floor or seat. When you oper-
ate the seat, gas may gush out of
the lighter and cause fire.
• If there are occupants in the rear
seats, be careful while adjusting
the front seat position.
• Use extreme caution so that
hands or other objects are not
caught in the seat mechanisms.
Page 21 of 473
35
Safety features of your vehicle
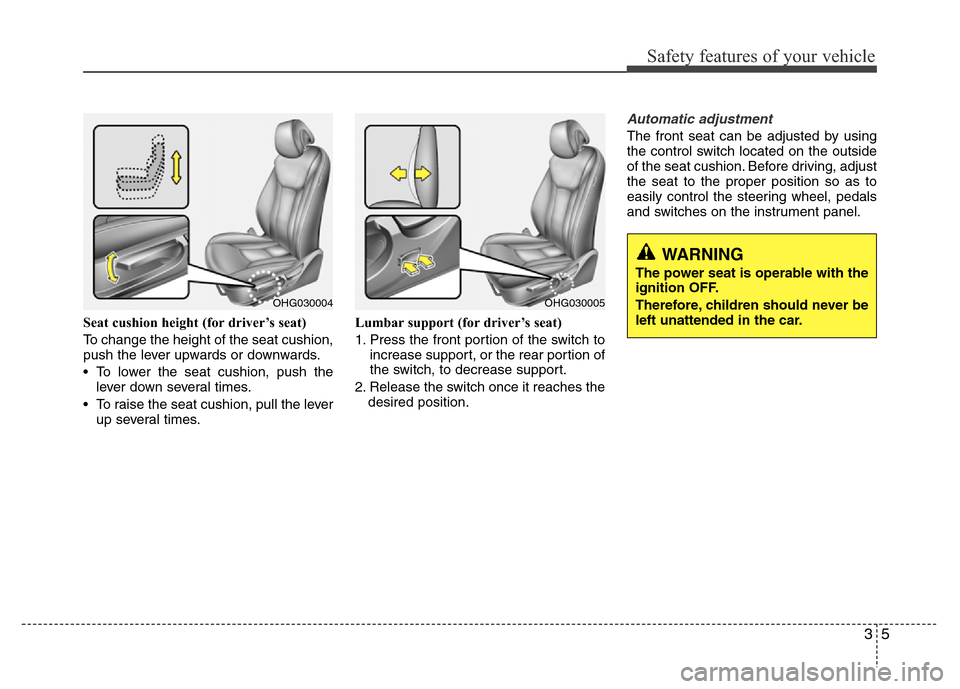
Seat cushion height (for driver’s seat)
To change the height of the seat cushion,
push the lever upwards or downwards.
• To lower the seat cushion, push the
lever down several times.
• To raise the seat cushion, pull the lever
up several times.Lumbar support (for driver’s seat)
1. Press the front portion of the switch to
increase support, or the rear portion of
the switch, to decrease support.
2. Release the switch once it reaches the
desired position.
Automatic adjustment
The front seat can be adjusted by using
the control switch located on the outside
of the seat cushion. Before driving, adjust
the seat to the proper position so as to
easily control the steering wheel, pedals
and switches on the instrument panel.
WARNING
The power seat is operable with the
ignition OFF.
Therefore, children should never be
left unattended in the car.
OHG030004OHG030005
Page 22 of 473
Safety features of your vehicle
6 3
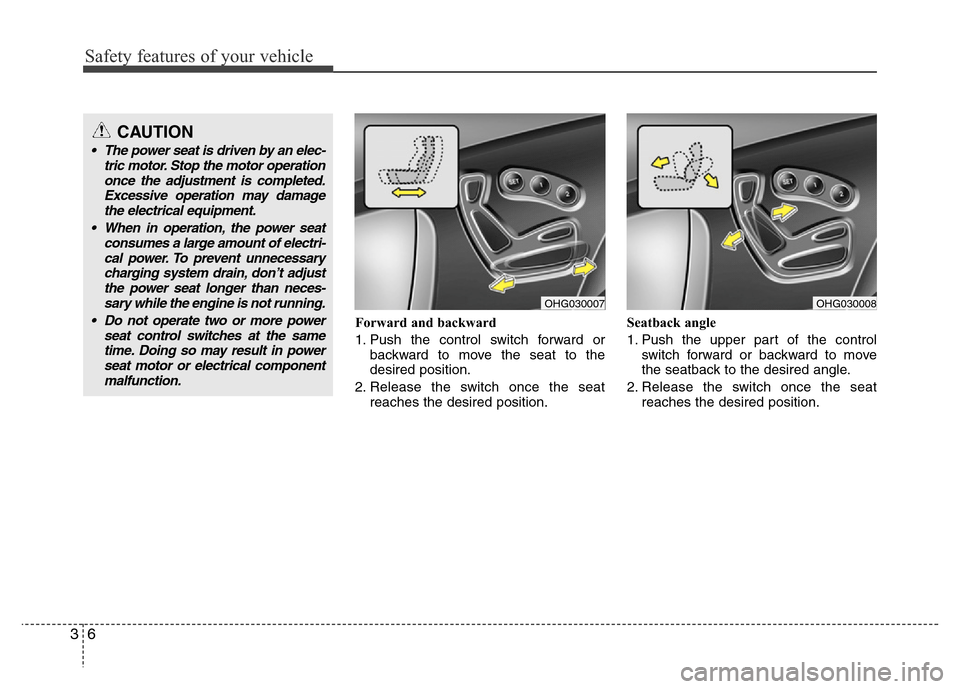
Forward and backward
1. Push the control switch forward or
backward to move the seat to the
desired position.
2. Release the switch once the seat
reaches the desired position.Seatback angle
1. Push the upper part of the control
switch forward or backward to move
the seatback to the desired angle.
2. Release the switch once the seat
reaches the desired position.
OHG030007OHG030008
CAUTION
• The power seat is driven by an elec-
tric motor. Stop the motor operation
once the adjustment is completed.
Excessive operation may damage
the electrical equipment.
• When in operation, the power seat
consumes a large amount of electri-
cal power. To prevent unnecessary
charging system drain, don’t adjust
the power seat longer than neces-
sary while the engine is not running.
• Do not operate two or more power
seat control switches at the same
time. Doing so may result in power
seat motor or electrical component
malfunction.
Page 26 of 473
Safety features of your vehicle
10 3
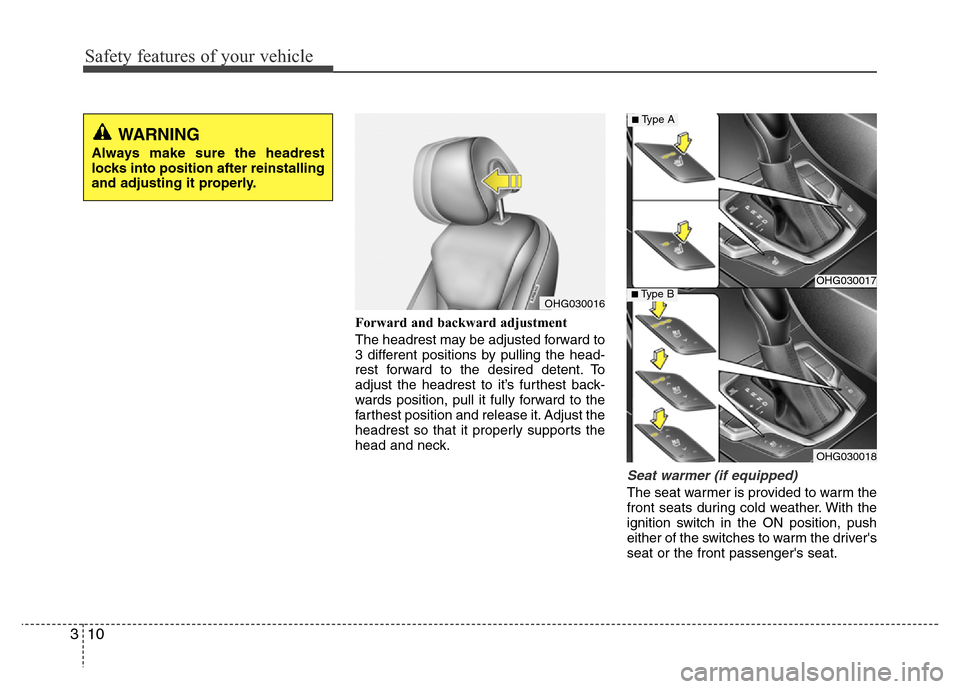
Forward and backward adjustment
The headrest may be adjusted forward to
3 different positions by pulling the head-
rest forward to the desired detent. To
adjust the headrest to it’s furthest back-
wards position, pull it fully forward to the
farthest position and release it. Adjust the
headrest so that it properly supports the
head and neck.
Seat warmer (if equipped)
The seat warmer is provided to warm the
front seats during cold weather. With the
ignition switch in the ON position, push
either of the switches to warm the driver's
seat or the front passenger's seat.
OHG030017
OHG030018
■Type A
■Type BOHG030016
WARNING
Always make sure the headrest
locks into position after reinstalling
and adjusting it properly.
Page 37 of 473
321
Safety features of your vehicle
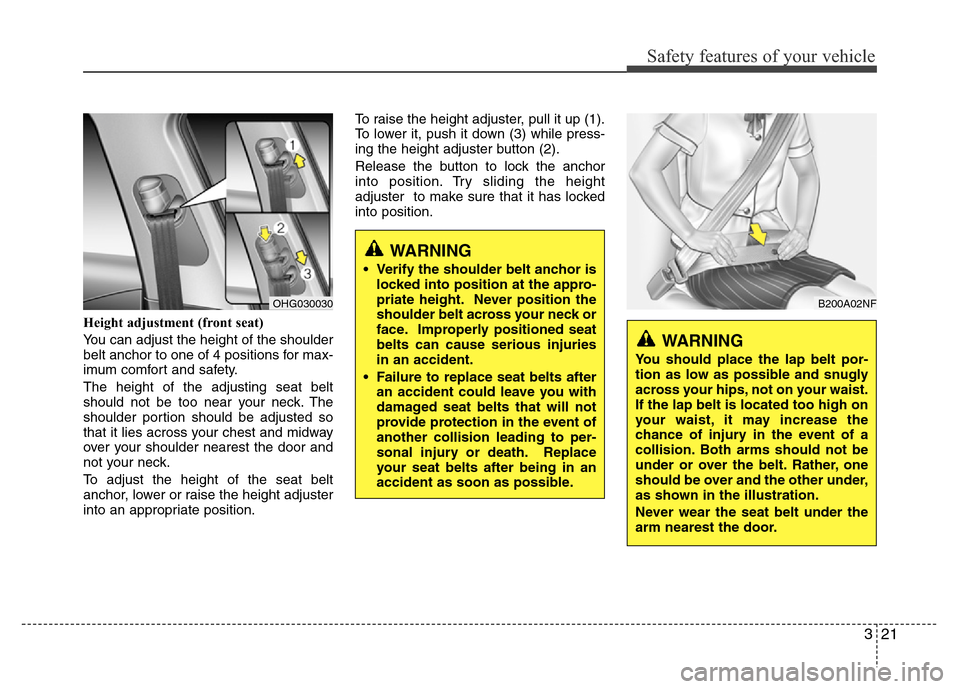
Height adjustment (front seat)
You can adjust the height of the shoulder
belt anchor to one of 4 positions for max-
imum comfort and safety.
The height of the adjusting seat belt
should not be too near your neck. The
shoulder portion should be adjusted so
that it lies across your chest and midway
over your shoulder nearest the door and
not your neck.
To adjust the height of the seat belt
anchor, lower or raise the height adjuster
into an appropriate position.To raise the height adjuster, pull it up (1).
To lower it, push it down (3) while press-
ing the height adjuster button (2).
Release the button to lock the anchor
into position. Try sliding the height
adjuster to make sure that it has locked
into position.
B200A02NF
WARNING
You should place the lap belt por-
tion as low as possible and snugly
across your hips, not on your waist.
If the lap belt is located too high on
your waist, it may increase the
chance of injury in the event of a
collision. Both arms should not be
under or over the belt. Rather, one
should be over and the other under,
as shown in the illustration.
Never wear the seat belt under the
arm nearest the door.
OHG030030
WARNING
• Verify the shoulder belt anchor is
locked into position at the appro-
priate height. Never position the
shoulder belt across your neck or
face. Improperly positioned seat
belts can cause serious injuries
in an accident.
• Failure to replace seat belts after
an accident could leave you with
damaged seat belts that will not
provide protection in the event of
another collision leading to per-
sonal injury or death. Replace
your seat belts after being in an
accident as soon as possible.
Page 119 of 473
Features of your vehicle
42 4
Recalling memory position
1. Move the shift lever into P (for
Automatic transaxle) or Neutral (for
manual transaxle) while the ignition
switch or the Engine Start/Stop button
is in the ON position.
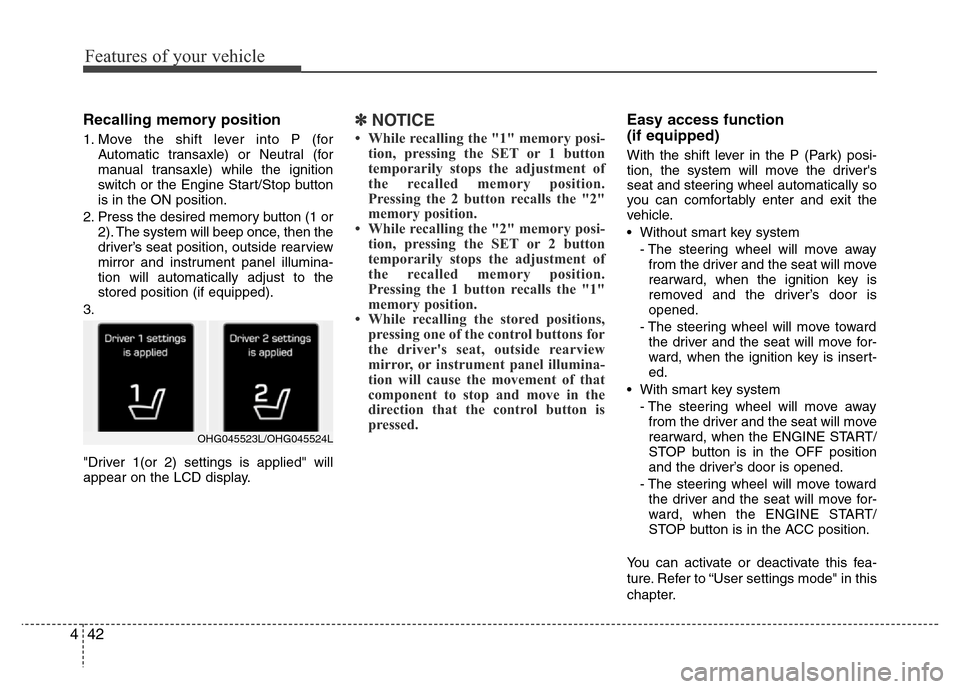
2. Press the desired memory button (1 or
2). The system will beep once, then the
driver’s seat position, outside rearview
mirror and instrument panel illumina-
tion will automatically adjust to the
stored position (if equipped).
3.
"Driver 1(or 2) settings is applied" will
appear on the LCD display.
✽NOTICE
• While recalling the "1" memory posi-
tion, pressing the SET or 1 button
temporarily stops the adjustment of
the recalled memory position.
Pressing the 2 button recalls the "2"
memory position.
• While recalling the "2" memory posi-
tion, pressing the SET or 2 button
temporarily stops the adjustment of
the recalled memory position.
Pressing the 1 button recalls the "1"
memory position.
• While recalling the stored positions,
pressing one of the control buttons for
the driver's seat, outside rearview
mirror, or instrument panel illumina-
tion will cause the movement of that
component to stop and move in the
direction that the control button is
pressed.
Easy access function
(if equipped)
With the shift lever in the P (Park) posi-
tion, the system will move the driver's
seat and steering wheel automatically so
you can comfortably enter and exit the
vehicle.
• Without smart key system
- The steering wheel will move away
from the driver and the seat will move
rearward, when the ignition key is
removed and the driver’s door is
opened.
- The steering wheel will move toward
the driver and the seat will move for-
ward, when the ignition key is insert-
ed.
• With smart key system
- The steering wheel will move away
from the driver and the seat will move
rearward, when the ENGINE START/
STOP button is in the OFF position
and the driver’s door is opened.
- The steering wheel will move toward
the driver and the seat will move for-
ward, when the ENGINE START/
STOP button is in the ACC position.
You can activate or deactivate this fea-
ture. Refer to “User settings mode" in this
chapter.
OHG045523L/OHG045524L
Page 123 of 473
Features of your vehicle
46 4
Inside rearview mirror
Adjust the rearview mirror to center on
the view through the rear window. Make
this adjustment before you start driving.
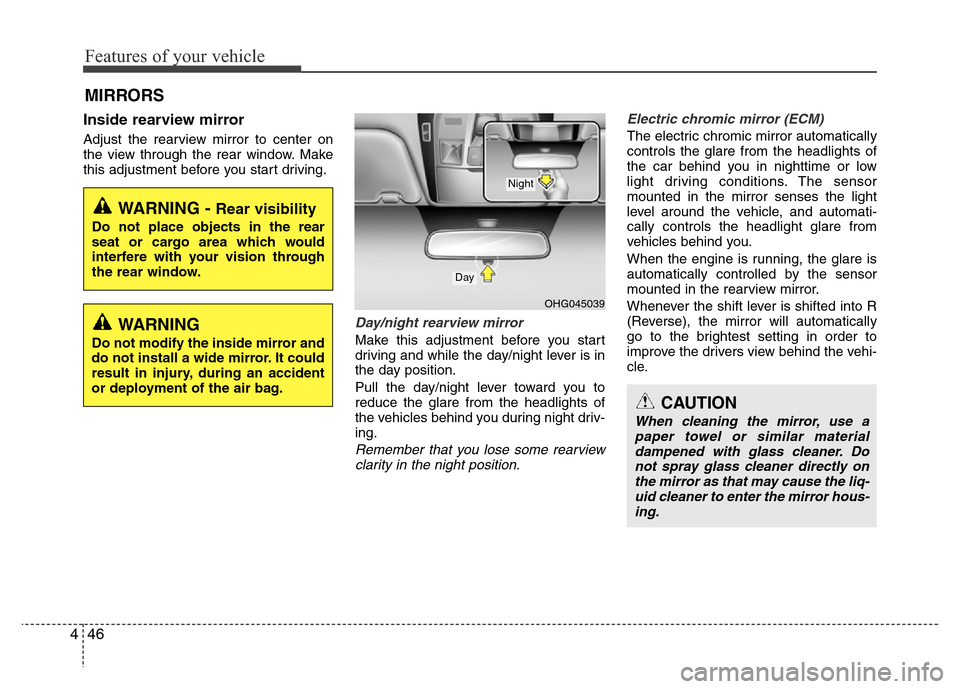
Day/night rearview mirror
Make this adjustment before you start
driving and while the day/night lever is in
the day position.
Pull the day/night lever toward you to
reduce the glare from the headlights of
the vehicles behind you during night driv-
ing.
Remember that you lose some rearview
clarity in the night position.Electric chromic mirror (ECM)
The electric chromic mirror automatically
controls the glare from the headlights of
the car behind you in nighttime or low
light driving conditions. The sensor
mounted in the mirror senses the light
level around the vehicle, and automati-
cally controls the headlight glare from
vehicles behind you.
When the engine is running, the glare is
automatically controlled by the sensor
mounted in the rearview mirror.
Whenever the shift lever is shifted into R
(Reverse), the mirror will automatically
go to the brightest setting in order to
improve the drivers view behind the vehi-
cle.
MIRRORS
CAUTION
When cleaning the mirror, use a
paper towel or similar material
dampened with glass cleaner. Do
not spray glass cleaner directly on
the mirror as that may cause the liq-
uid cleaner to enter the mirror hous-
ing.
WARNING - Rear visibility
Do not place objects in the rear
seat or cargo area which would
interfere with your vision through
the rear window.
OHG045039
Day
Night
WARNING
Do not modify the inside mirror and
do not install a wide mirror. It could
result in injury, during an accident
or deployment of the air bag.