turn signal Hyundai Azera 2016 Owner's Manual
[x] Cancel search | Manufacturer: HYUNDAI, Model Year: 2016, Model line: Azera, Model: Hyundai Azera 2016Pages: 521, PDF Size: 16.54 MB
Page 19 of 521
25
Your vehicle at a glance
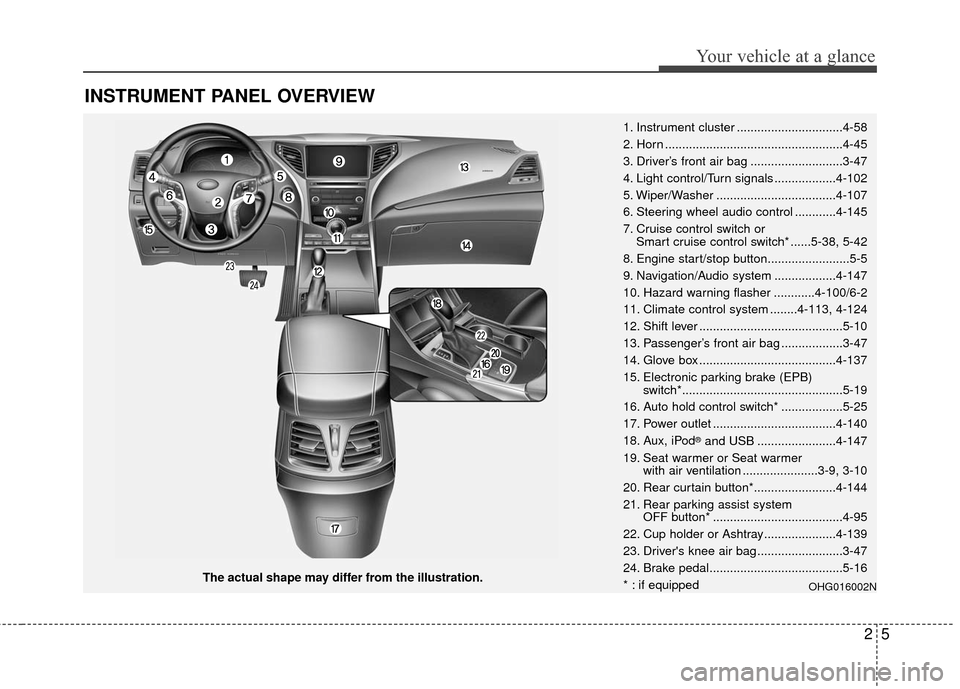
INSTRUMENT PANEL OVERVIEW
The actual shape may differ from the illustration.1. Instrument cluster ...............................4-58
2. Horn ....................................................4-45
3. Driver’s front air bag ...........................3-47
4. Light control/Turn signals ..................4-102
5. Wiper/Washer ...................................4-107
6. Steering wheel audio control ............4-145
7. Cruise control switch or
Smart cruise control switch* ......5-38, 5-42
8. Engine start/stop button........................5-5
9. Navigation/Audio system ..................4-147
10. Hazard warning flasher ............4-100/6-2
11. Climate control system ........4-113, 4-124
12. Shift lever ..........................................5-10
13. Passenger’s front air bag ..................3-47
14. Glove box ........................................4-137
15. Electronic parking brake (EPB) switch*...............................................5-19
16. Auto hold control switch* ..................5-25
17. Power outlet ....................................4-140
18. Aux, iPod
®and USB .......................4-147
19. Seat warmer or Seat warmer with air ventilation ......................3-9, 3-10
20. Rear curtain button*........................4-144
21. Rear parking assist system OFF button* ......................................4-95
22. Cup holder or Ashtray.....................4-139
23. Driver's knee air bag .........................3-47
24. Brake pedal.......................................5-16
* : if equipped
OHG016002N
Page 130 of 521
Features of your vehicle
50
4
Retain the original transmitter of the
RF device you are programming for
use in other vehicles as well as for
future HomeLink
®programming. It is
also suggested that upon the sale of
the vehicle, the programmed
HomeLink
®buttons be erased for
security purposes.
✽ ✽ NOTICE- Programming
HomeLink®
• When programming a garage door opener, it is advised to park
the vehicle outside of the garage.
• It is recommended that a new bat- tery be placed in the hand-held
transmitter of the device being pro-
grammed to HomeLink
®for quick-
er training and accurate transmis-
sion of the radio-frequency signal.
• Some vehicles may require the ignition switch to be turned to the
second (or "accessories") position
for programming and/or opera-
tion of HomeLink
®.
• In the event that there are still pro- gramming difficulties or questions
after following the programming
steps listed below, contact
HomeLink
®at: www.homelink.com
or 1-800-355-3515.
WARNING
Before programming HomeLink®
to a garage door opener or gate
operator, make sure that people
and objects are out of the way of
the device to prevent potential
harm or damage. Do not use
HomeLink
®with any garage
door opener that lacks the safe-
ty stop and reverse features
required by U.S. federal safety
standards (this includes any
garage door opener model man-
ufactured before April 1, 1982). A
garage door that cannot detect
an object - signaling the door to
stop and reverse - does not meet
current U.S. federal safety stan-
dards. Using a garage door
opener without these features
increases the risk of serious
injury or death.
Page 132 of 521
Features of your vehicle
52
4
4. Firmly press, hold for 5 seconds
and release the programmed
HomeLink
®button up to two sepa-
rate times to activate the door. If
the door does not activate, press
and hold the just-trained
HomeLink
®button and observe
the indicator light.
stantly, programming is complete
and your device should activate
when the HomeLink
®button is
pressed and released.
for 2 seconds and then turns to
a constant light, continue with
"Programming" steps 5-7 to
complete the programming of a
rolling code equipped device
(most commonly a garage door
opener).
5. At the garage door opener receiv- er (motor-head unit) in the garage,
locate the "learn" or "smart" but-
ton. This can usually be found
where the hanging antenna wire is
attached to the motor-head unit. 6. Firmly press and release the
"learn" or "smart" button. (The
name and color of the button vary
by manufacturer). There are 30
seconds to initiate step 7.
7. Return to the vehicle and firmly press, hold for 2 seconds
and release the programmed
HomeLink
®button. Repeat the
"press/hold/release" sequence a
second time, and, depending on
the brand of the garage door
opener (or other rolling code
equipped device), repeat this
sequence a third time to complete
the programming process.
HomeLink
®should now activate your
rolling code equipped device. Gate operator & Canadian
programming
During programming, your handheld
transmitter may automatically stop
transmitting. Continue to press
the Integrated HomeLink
®Wireless
Control System button (note steps
2 through 4 in the Standard
Programming portion of this docu-
ment) while you press and re-press
("cycle") your handheld transmitter
every two seconds until the frequen-
cy signal has been learned. The indi-
cator light will flash slowly and then
rapidly after several seconds upon
successful training.
Operating HomeLink
®
To operate, simply press and release
the programmed HomeLink®button.
Activation will now occur for the
trained device (i.e. garage door
opener, gate operator, security sys-
tem, entry door lock, home/office
lighting, etc.). For convenience, the
hand-held transmitter of the device
may also be used at any time.
Page 138 of 521
Features of your vehicle
58
4
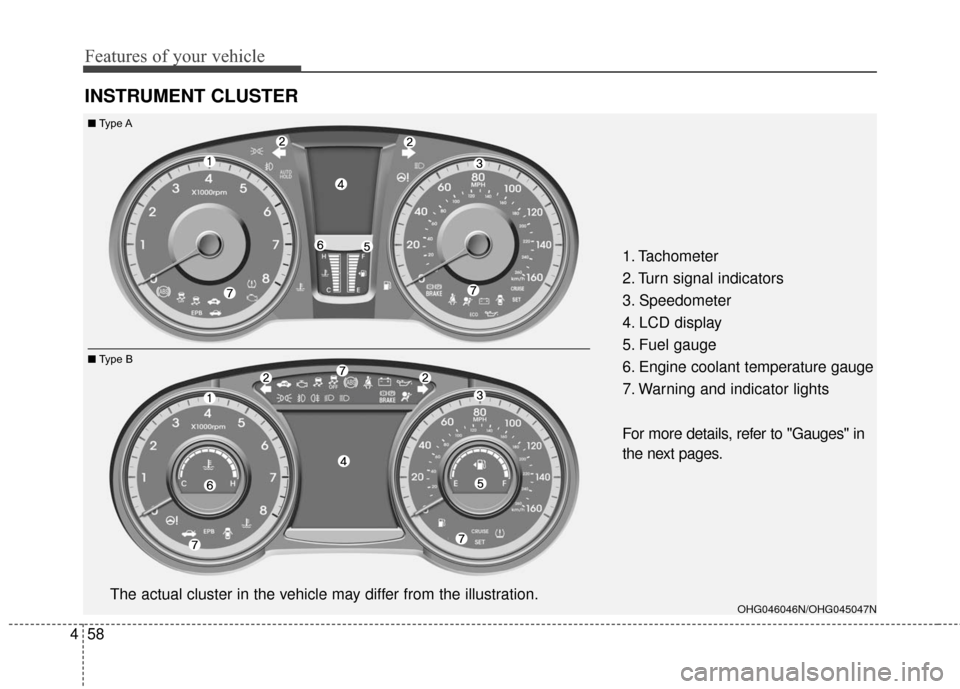
INSTRUMENT CLUSTER
1. Tachometer
2. Turn signal indicators
3. Speedometer
4. LCD display
5. Fuel gauge
6. Engine coolant temperature gauge
7. Warning and indicator lights
For more details, refer to "Gauges" in
the next pages.
OHG046046N/OHG045047NThe actual cluster in the vehicle may differ from the illustration.
■ Type A
■ Type B
Page 150 of 521
Features of your vehicle
70
4
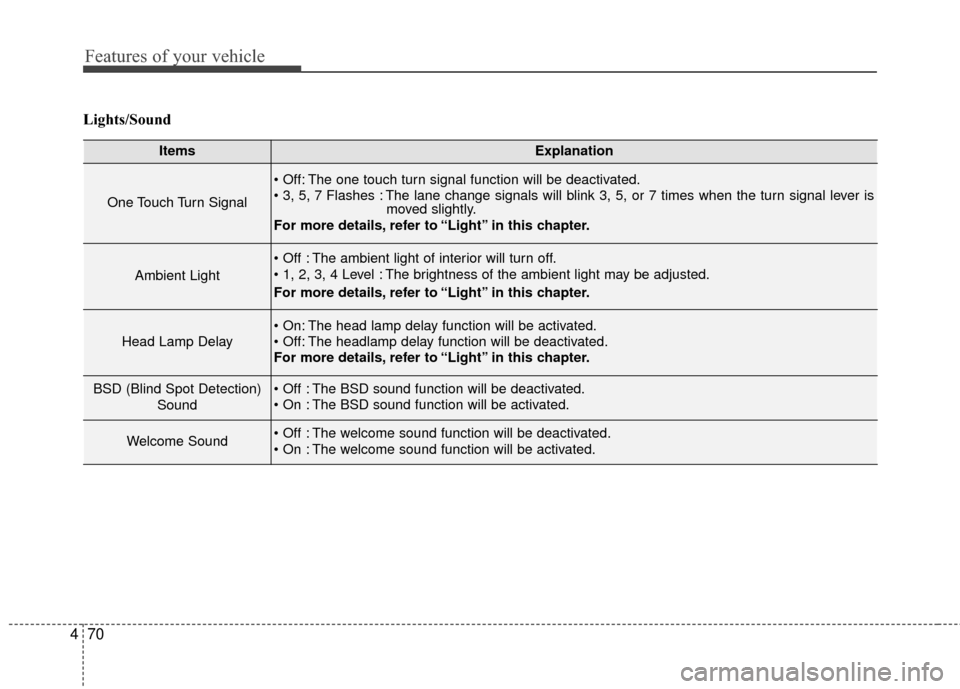
Lights/Sound
ItemsExplanation
One Touch Turn Signal
The one touch turn signal function will be deactivated.
The lane change signals will blink 3, 5, or 7 times when the turn signal lever is
moved slightly.
For more details, refer to “Light” in this chapter.
Ambient Light
The ambient light of interior will turn off.
The brightness of the ambient light may be adjusted.
For more details, refer to “Light” in this chapter.
Head Lamp Delay
The head lamp delay function will be activated.
The headlamp delay function will be deactivated.
For more details, refer to “Light” in this chapter.
BSD (Blind Spot Detection)
Sound The BSD sound function will be deactivated.
The BSD sound function will be activated.
Welcome Sound The welcome sound function will be deactivated.
The welcome sound function will be activated.
Page 158 of 521
Features of your vehicle
78
4
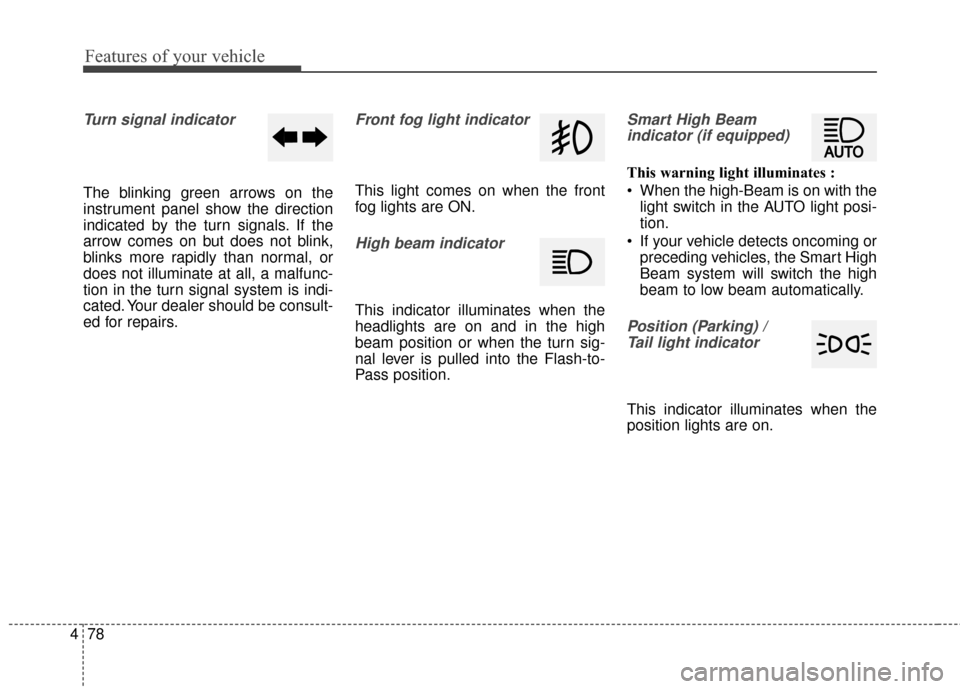
Turn signal indicator
The blinking green arrows on the
instrument panel show the direction
indicated by the turn signals. If the
arrow comes on but does not blink,
blinks more rapidly than normal, or
does not illuminate at all, a malfunc-
tion in the turn signal system is indi-
cated. Your dealer should be consult-
ed for repairs.
Front fog light indicator
This light comes on when the front
fog lights are ON.
High beam indicator
This indicator illuminates when the
headlights are on and in the high
beam position or when the turn sig-
nal lever is pulled into the Flash-to-
Pass position.
Smart High Beam
indicator (if equipped)
This warning light illuminates :
When the high-Beam is on with the light switch in the AUTO light posi-
tion.
If your vehicle detects oncoming or preceding vehicles, the Smart High
Beam system will switch the high
beam to low beam automatically.
Position (Parking) / Tail light indicator
This indicator illuminates when the
position lights are on.
Page 180 of 521
Features of your vehicle
100
4
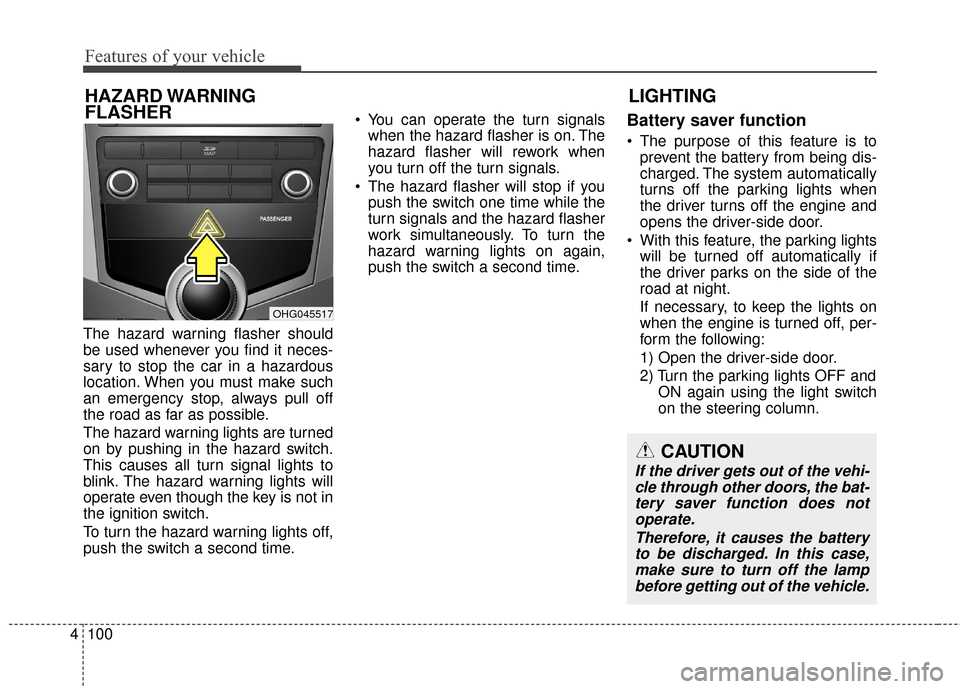
The hazard warning flasher should
be used whenever you find it neces-
sary to stop the car in a hazardous
location. When you must make such
an emergency stop, always pull off
the road as far as possible.
The hazard warning lights are turned
on by pushing in the hazard switch.
This causes all turn signal lights to
blink. The hazard warning lights will
operate even though the key is not in
the ignition switch.
To turn the hazard warning lights off,
push the switch a second time. You can operate the turn signals
when the hazard flasher is on. The
hazard flasher will rework when
you turn off the turn signals.
The hazard flasher will stop if you push the switch one time while the
turn signals and the hazard flasher
work simultaneously. To turn the
hazard warning lights on again,
push the switch a second time.
Battery saver function
The purpose of this feature is toprevent the battery from being dis-
charged. The system automatically
turns off the parking lights when
the driver turns off the engine and
opens the driver-side door.
With this feature, the parking lights will be turned off automatically if
the driver parks on the side of the
road at night.
If necessary, to keep the lights on
when the engine is turned off, per-
form the following:
1) Open the driver-side door.
2) Turn the parking lights OFF and ON again using the light switch
on the steering column.
LIGHTING
HAZARD WARNING
FLASHER
CAUTION
If the driver gets out of the vehi-
cle through other doors, the bat-tery saver function does notoperate.
Therefore, it causes the batteryto be discharged. In this case,make sure to turn off the lampbefore getting out of the vehicle.
OHG045517
Page 181 of 521
4101
Features of your vehicle
Headlight (Headlamp) escort
function
If you turn the ignition switch to the
ACC or OFF position with the head-
lights ON, the headlights (and/or
parking light) remain on for about 5
minutes. However, if the driver’s door
is opened and closed, the headlights
(and/or parking light) turn off after 15
seconds.
The headlights (and/or parking light)
can be turned off by pressing the
lock button on the smart key twice or
turning the light switch to the OFF or
Parking light position.
You can activate or deactivate this
feature. Refer to “User Settings
Mode” in this section.
Headlight (Headlamp) welcome
function
When the headlight is in the ON or
AUTO position and all doors (and
trunk) are closed and locked, if you
press the door unlock button on the
smart key, the headlights (and/or
parking light) will come on for about
15 seconds. At this time, if you press
the door lock or unlock button, the
headlights (and/or parking light) will
turn off immediately.
You can activate or deactivate this
feature. Refer to “User Settings
Mode” in this section.
Daytime running light
Daytime Running Lights (DRL) can
make it easier for others to see the
front of your vehicle during the day.
DRL can be helpful in many different
driving conditions, and it is especially
helpful after dawn and before sunset.
The DRL system turns ON when:1. The light switch is in the AUTO light position.
2. The light switch is in the Parking light position.
The DRL system turns OFF when: 1. The multifunction switch is in the DRL OFF position.
2. The headlights are ON.
3. The turn signal is ON. (the blink- ing side of the DRL will turn off)
4. The hazard warning light is ON.
5. The parking brake is applied.
6. Engine stops.
Page 185 of 521
4105
Features of your vehicle
The high beam switches to low beam
in the below conditions.
- When the Smart High Beam is off.
- When the light switch is not in theAUTO position.
- When the headlamp is detected from the on-coming vehicle.
- When the tail lamp is detected from the front vehicle.
- When the surrounding is bright enough high beams are not need-
ed.
- When streetlights or other lights are detected.
- When vehicle speed is below 22 mph (35 km/h).
Turn signals and lane change
signals
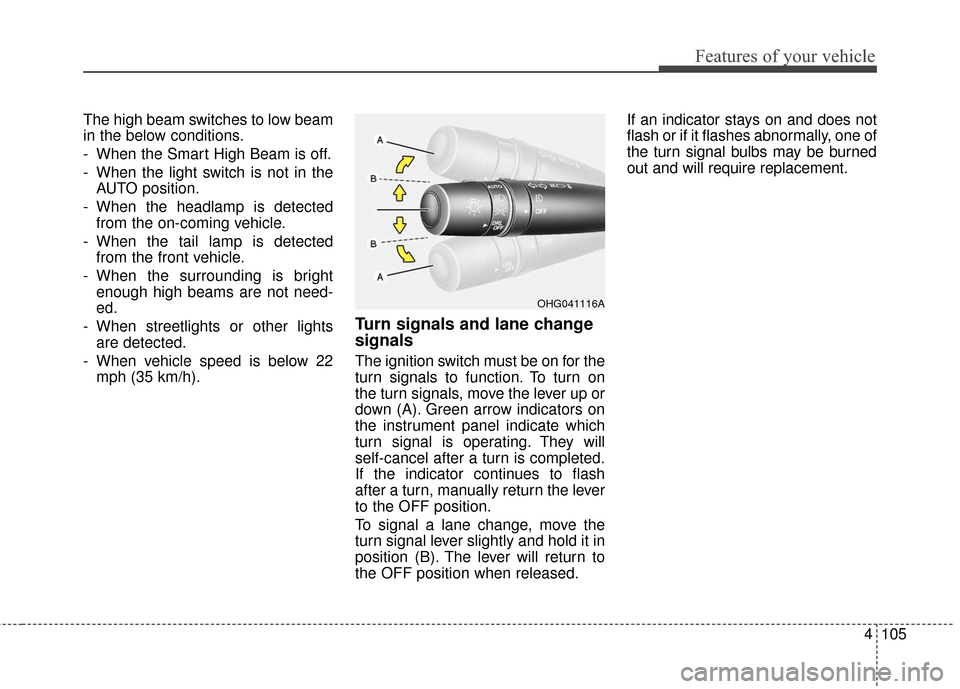
The ignition switch must be on for the
turn signals to function. To turn on
the turn signals, move the lever up or
down (A). Green arrow indicators on
the instrument panel indicate which
turn signal is operating. They will
self-cancel after a turn is completed.
If the indicator continues to flash
after a turn, manually return the lever
to the OFF position.
To signal a lane change, move the
turn signal lever slightly and hold it in
position (B). The lever will return to
the OFF position when released. If an indicator stays on and does not
flash or if it flashes abnormally, one of
the turn signal bulbs may be burned
out and will require replacement.
OHG041116A
Page 186 of 521
Features of your vehicle
106
4
One-touch turn signal
To activate the one-touch turn signal
move the turn signal lever slightly
and then release it. The lane change
signals will blink 3, 5 or 7 times.
You can activate or deactivate the
One-touch turn signal function or
choose the number of blinking (3, 5,
or 7) from the User Settings Mode on
the LCD display.
✽ ✽
NOTICE
If an indicator flash is abnormally
quick or slow, a bulb may be burned
out or have a poor electrical connec-
tion in the circuit.
Front fog light
Fog lights are used to provide
improved visibility and avoid acci-
dents when visibility is poor due to
fog, rain or snow etc.
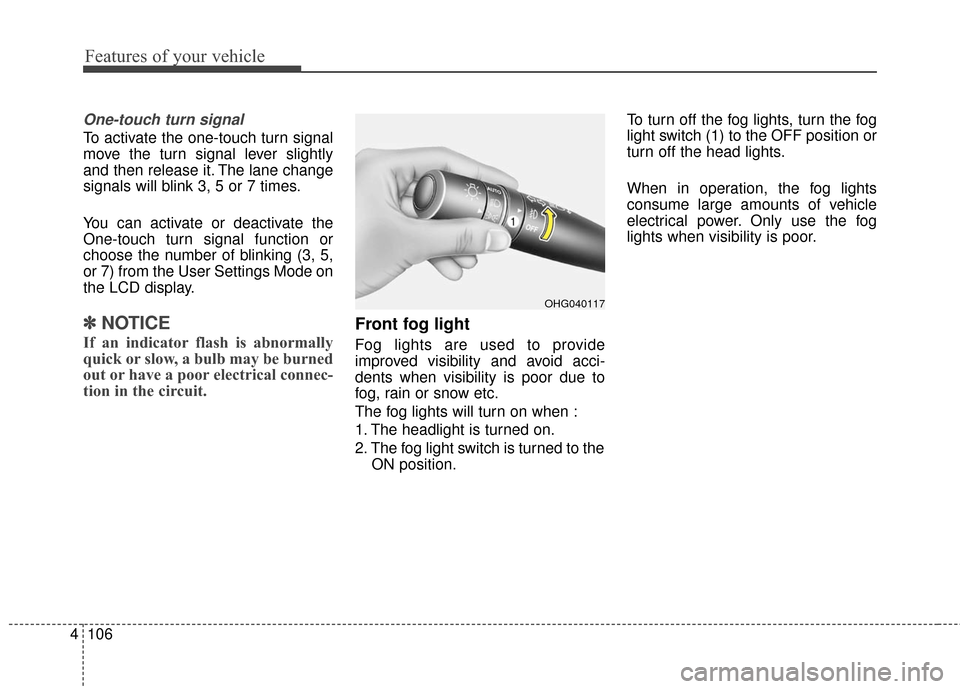
The fog lights will turn on when :
1. The headlight is turned on.
2. The fog light switch is turned to the
ON position. To turn off the fog lights, turn the fog
light switch (1) to the OFF position or
turn off the head lights.
When in operation, the fog lights
consume large amounts of vehicle
electrical power. Only use the fog
lights when visibility is poor.
OHG040117