Engine Hyundai Coupe 2004 Owner's Manual
[x] Cancel search | Manufacturer: HYUNDAI, Model Year: 2004, Model line: Coupe, Model: Hyundai Coupe 2004Pages: 389, PDF Size: 10.22 MB
Page 358 of 389
6OWNER MAINTENANCE
32
G290B01GK-EAT
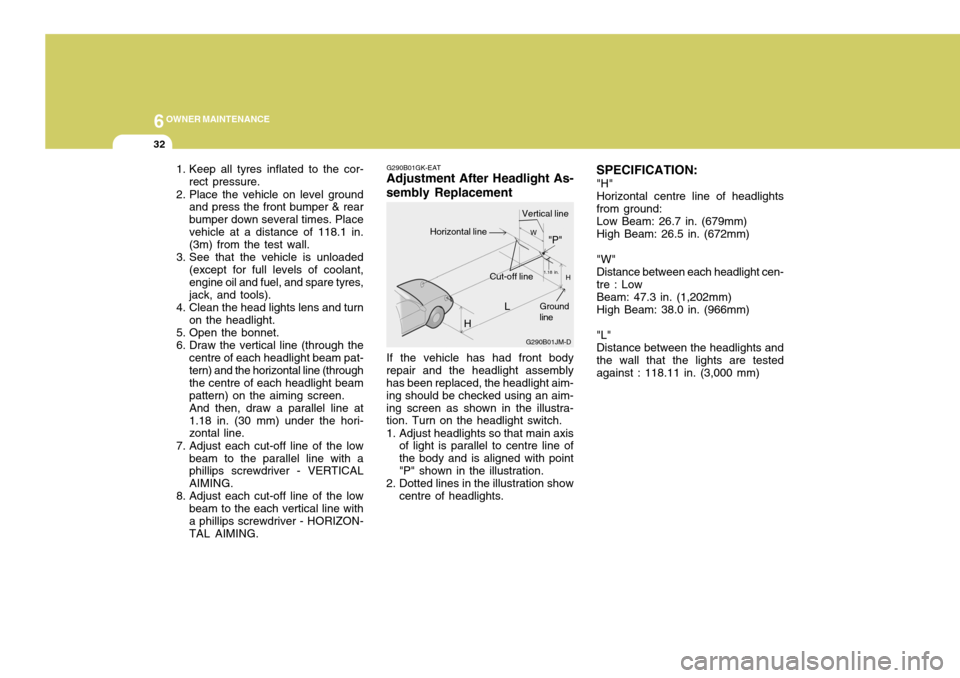
Adjustment After Headlight As- sembly Replacement
If the vehicle has had front body
repair and the headlight assembly has been replaced, the headlight aim- ing should be checked using an aim-ing screen as shown in the illustra- tion. Turn on the headlight switch.
1. Adjust headlights so that main axis of light is parallel to centre line of the body and is aligned with point"P" shown in the illustration.
2. Dotted lines in the illustration show centre of headlights. SPECIFICATION:
"H" Horizontal centre line of headlights from ground: Low Beam: 26.7 in. (679mm) High Beam: 26.5 in. (672mm) "W" Distance between each headlight cen- tre : Low Beam: 47.3 in. (1,202mm) High Beam: 38.0 in. (966mm) "L" Distance between the headlights and the wall that the lights are tested against : 118.11 in. (3,000 mm)
1. Keep all tyres inflated to the cor-
rect pressure.
2. Place the vehicle on level ground and press the front bumper & rearbumper down several times. Placevehicle at a distance of 118.1 in. (3m) from the test wall.
3. See that the vehicle is unloaded (except for full levels of coolant, engine oil and fuel, and spare tyres,jack, and tools).
4. Clean the head lights lens and turn on the headlight.
5. Open the bonnet.
6. Draw the vertical line (through the centre of each headlight beam pat- tern) and the horizontal line (through the centre of each headlight beampattern) on the aiming screen.And then, draw a parallel line at1.18 in. (30 mm) under the hori- zontal line.
7. Adjust each cut-off line of the low beam to the parallel line with aphillips screwdriver - VERTICAL AIMING.
8. Adjust each cut-off line of the low beam to the each vertical line witha phillips screwdriver - HORIZON- TAL AIMING. L
G290B01JM-D
W
H
H Cut-off line"P"
Vertical lineHorizontal line
Ground line
1.18 in.
Page 359 of 389
6
OWNER MAINTENANCE
33REPLACING LIGHT BULBS
G260A03A-EAT In the event of bulb failure being experienced, ensure that the relative lighting circuit is turned off prior toattempting to replace the bulb. The illustrations on the following page will assist in locating and removing thevarious bulbs. Ensure that the re- placement bulb has the same cap configuration and wattage as the origi-nal.See page 6-40 for the wattage de-scriptions.
CAUTION:
Keep the lamps out of contact withpetroleum product, such as oil, gasoline, etc.
!
HGK5025
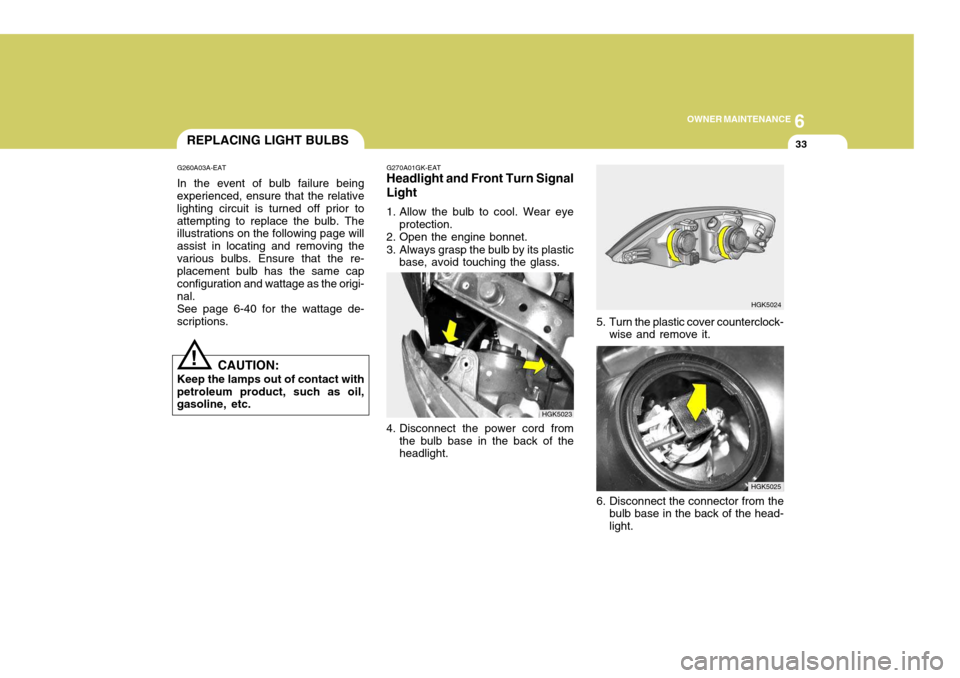
G270A01GK-EAT Headlight and Front Turn Signal Light
1. Allow the bulb to cool. Wear eye protection.
2. Open the engine bonnet.
3. Always grasp the bulb by its plastic base, avoid touching the glass.
HGK5024
5. Turn the plastic cover counterclock- wise and remove it.
4. Disconnect the power cord from the bulb base in the back of the headlight. HGK5023
6. Disconnect the connector from thebulb base in the back of the head- light.
Page 367 of 389
6
OWNER MAINTENANCE
41FUSE PANEL DESCRIPTION
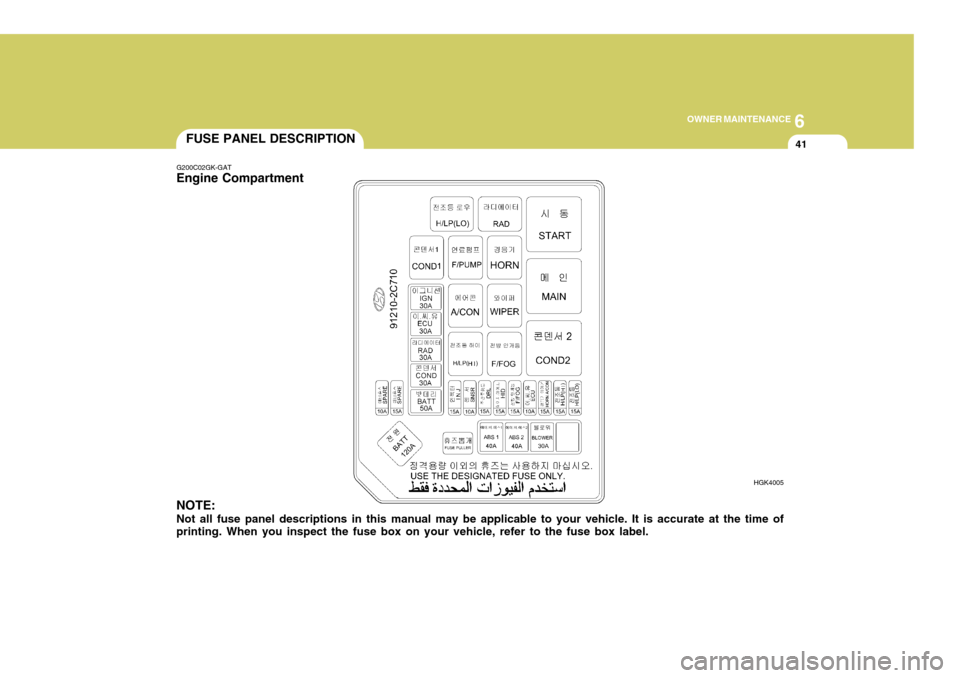
G200C02GK-GAT
Engine Compartment NOTE: Not all fuse panel descriptions in this manual may be applicable to your vehicle. It is accurate at the time of printing. When you inspect the fuse box on your vehicle, refer to the fuse box label. HGK4005
Page 368 of 389

6OWNER MAINTENANCE
42
PROTECTED COMPONENTS
Generator(1.6L/2.0L) BCM BOX(Tail lamp relay,Power connector,Fuse(2,7,12,13,19,20,24))Condenser fan relayRadiator fan relayEngine control relay, Fuel pump relay, A/T control relay, Generator,ECM(1.6L/2.7L),PCM(2.0L) Ignition switch,Start relayABS/ESP control module,ESP Air bleeding connectorABS/ESP control module,ESP Air bleeding connectorBlower relayInjector Oxygen sensor,Camshaft position sensor, Idle speed control actuator DRL control moduleFront fog lamp relayTCM(2.7L),ECM(2.7L/1.6L)Horn relay,A/C relay Head lamp relay(High) Head lamp relay(Low)
FUSERATING 120A50A 30A30A 30A 30A 40A40A30A 15A 10A15A15A10A15A 15A 15A
DESCRIPTION
BATTBATT
COND RAD ECU
IGN
ABS 1 ABS 2
BLOWER INJ
SNSR DRL
F/FOG ECU
HORN,A/CON H/LP (HI)
H/LP (LO)
Page 372 of 389
7EMISSION CONTROL SYSTEMS
2
SH010A1-E (Not all models) Depending upon the market for which the vehicle is destined, the emission control system will comprise one or more of the following emission controldevices.
(1) Crankcase emission control sys-
tem
(2) Evaporative emission control sys- tem
(3) Exhaust emission control systemIn order that the proper functioning of the emission control systems may be ensured, it is recommended that the vehicle is inspected and maintainedby an authorized Hyundai dealer in accordance with the maintenance schedule in this manual. EMISSION CONTROL SYS- TEMS
SH010B1-E
1. CRANKCASE EMISSION CON- TROL SYSTEM The positive crankcase ventilation system is employed to prevent air pollution caused by blow-by gases being emitted from the crankcase byintroducing fresh air to the crankcase through the air cleaner where this mixes with blow-by gases and thenpasses through the PCV valve into the intake manifold from where it sub- sequently enters the combustionchamber and is burned.
SH010C1-E
2. EVAPORATIVE EMISSION
CONTROL SYSTEM
The Evaporative Emission Control
System is designed to prevent fuelvapours from escaping into the atmo-sphere through the fuel tank ventila- tion system. SH010D1-E
3. EXHAUST EMISSION
CONTROL SYSTEM
The exhaust emission control system
is a highly effective system which controls exhaust emission while main- taining good vehicle performance. Whilst the engine is not running, fuel vapours generated inside the fuel tankare absorbed and stored in a char- coal canister. When the engine is started, the vapours stored in thecanister are drawn into the induction system through the purge control so- lenoid valve and are subsequentlyburned.The purge control solenoid valve iscontrolled by the ECU; when the en-gine coolant temperature is low or the engine is idling, the purge control valve is closed and fuel vapours re-main stored in the canister. Under normal running conditions when the engine is warm, the valve opens andthe vapours are drawn into the inlet tract and subsequently burned in the combustion chamber.
Page 373 of 389
7
EMISSION CONTROL SYSTEMS
3CATALYTIC CONVERTOR
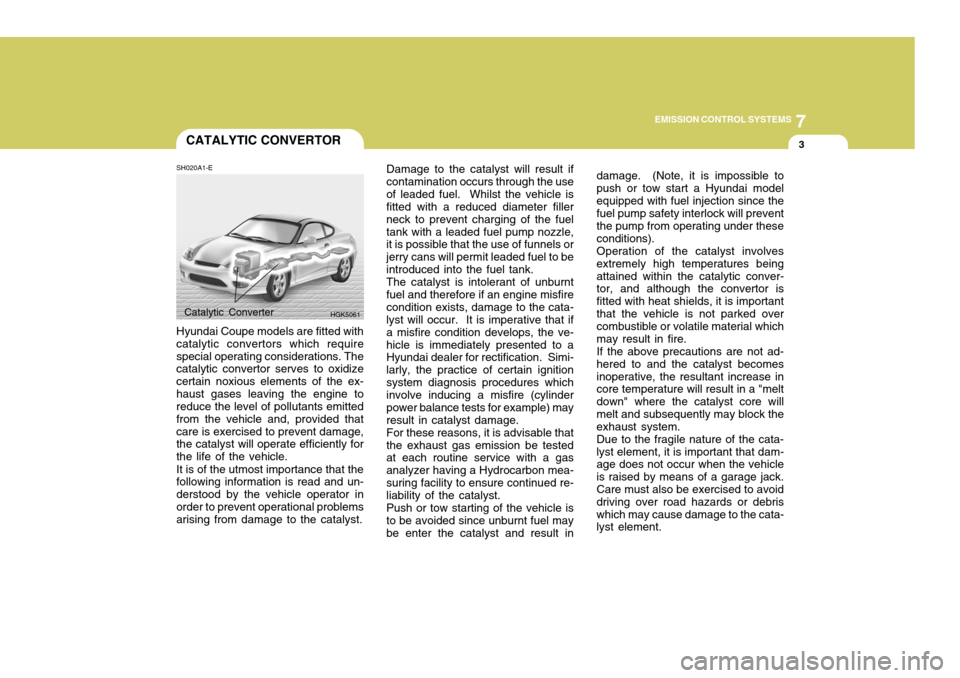
SH020A1-E Hyundai Coupe models are fitted with catalytic convertors which requirespecial operating considerations. The catalytic convertor serves to oxidize certain noxious elements of the ex-haust gases leaving the engine to reduce the level of pollutants emitted from the vehicle and, provided thatcare is exercised to prevent damage, the catalyst will operate efficiently for the life of the vehicle. It is of the utmost importance that the following information is read and un- derstood by the vehicle operator inorder to prevent operational problems arising from damage to the catalyst. Damage to the catalyst will result if contamination occurs through the useof leaded fuel. Whilst the vehicle is fitted with a reduced diameter filler neck to prevent charging of the fueltank with a leaded fuel pump nozzle, it is possible that the use of funnels or jerry cans will permit leaded fuel to beintroduced into the fuel tank.The catalyst is intolerant of unburntfuel and therefore if an engine misfirecondition exists, damage to the cata- lyst will occur. It is imperative that if a misfire condition develops, the ve-hicle is immediately presented to a Hyundai dealer for rectification. Simi- larly, the practice of certain ignitionsystem diagnosis procedures which involve inducing a misfire (cylinder power balance tests for example) mayresult in catalyst damage.For these reasons, it is advisable thatthe exhaust gas emission be tested at each routine service with a gas analyzer having a Hydrocarbon mea-suring facility to ensure continued re- liability of the catalyst. Push or tow starting of the vehicle is to be avoided since unburnt fuel may be enter the catalyst and result in
Catalytic Converter
HGK5061 damage. (Note, it is impossible to push or tow start a Hyundai modelequipped with fuel injection since the fuel pump safety interlock will prevent the pump from operating under theseconditions).Operation of the catalyst involvesextremely high temperatures beingattained within the catalytic conver- tor, and although the convertor is fitted with heat shields, it is importantthat the vehicle is not parked over combustible or volatile material which may result in fire.If the above precautions are not ad-hered to and the catalyst becomesinoperative, the resultant increase in core temperature will result in a "melt down" where the catalyst core willmelt and subsequently may block the exhaust system. Due to the fragile nature of the cata- lyst element, it is important that dam- age does not occur when the vehicleis raised by means of a garage jack. Care must also be exercised to avoid driving over road hazards or debriswhich may cause damage to the cata- lyst element.
Page 374 of 389
Vehicle Identification Number (VIN) ............................ 8-2
Engine Number ............................................................ 8-2
Tyre Information ........................................................... 8-3
Tyre Pressures ............................................................. 8-3
Snow Tyres .................................................................. 8-4
Tyre Chains .................................................................. 8-4
Tyre Rotation ............................................................... 8-5
Tyre Balancing ............................................................. 8-6
Tyre Replacement ........................................................ 8-6
Wheel Replacement ..................................................... 8-6
Spare Tyre and Tools .................................................. 8-7
8
CONSUMER INFORMATION
8
Page 375 of 389
8CONSUMER INFORMATION
2
F040A02TB-1
1.6LHGK220
SI010A1-E
VEHICLE IDENTIFICATION NUMBER (VIN)
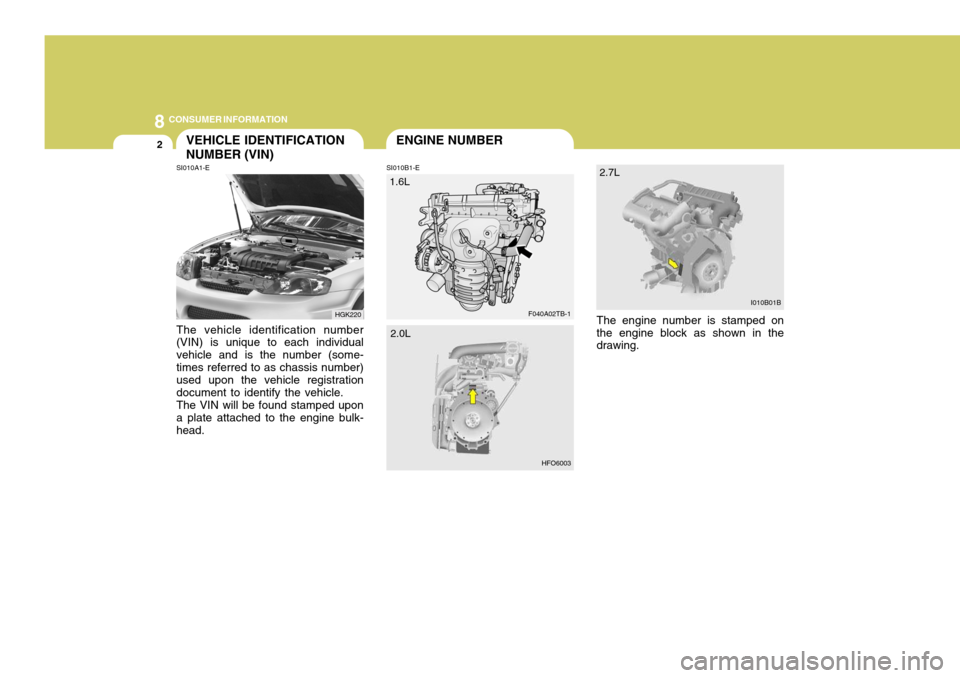
The vehicle identification number (VIN) is unique to each individual vehicle and is the number (some-times referred to as chassis number) used upon the vehicle registration document to identify the vehicle.The VIN will be found stamped upona plate attached to the engine bulk-head. SI010B1-E
ENGINE NUMBER
The engine number is stamped onthe engine block as shown in the drawing.I010B01B
2.7L
HFO6003
2.0L
Page 381 of 389
Measurement................................................................ 9-2
Engine ........................................................................... 9-3
Lubrication Chart .......................................................... 9-4
9
VEHICLE SPECIFICATIONS
9
Page 383 of 389

9
VEHICLE SPECIFICATIONS
3
2.0 L
82 x 93.5 1,975
1 - 3 - 4 - 2
0.0067 ~ 0.0091 in. (0.17 ~ 0.23 mm) 0.0098 ~ 0.0122 in. (0.25 ~ 0.31 mm)
0.0047 ~ 0.011 in. (0.12 ~ 0.28 mm) 0.0079 ~ 0.015 in. (0.2 ~ 0.38 mm)
� �
700 ± 100
BTDC 8° ± 5° 2.7 L
6-Cyl., V-type DOHC 86.7 x 75
2,656
1 - 2 - 3 - 4 - 5 - 6
AUTO LASH
PFR5N-11, IFR5G-11 RC10PYPB4
750 ± 100
BTDC 12° ± 10°
4-Cyl., In-line DOHC
1.6 L
76.5 x 87 1,599
1 - 3 - 4 - 2
AUTO LASH
BKR5ES-11 RC10YC4
700 ± 100
BTDC 5° ± 5°
ITEMS
Engine Type Bore x Stroke (mm) Displacement (cc) Firing order Valve clearance (Cold Engine 20 ± 5°C) Spark plug Spark plug gap Idle speed (rpm) Ignition timing (Base)
For adjustingFor checking NGKCHAMPION IntakeExhaustIntake Exhaust
ENGINE
J070A04GK-EAT SPECIFICATION
0.039 ~ 0.043 in. (1.0 ~ 1.1 mm)