set clock Hyundai Coupe 2006 User Guide
[x] Cancel search | Manufacturer: HYUNDAI, Model Year: 2006, Model line: Coupe, Model: Hyundai Coupe 2006Pages: 483, PDF Size: 12.73 MB
Page 254 of 483

10INDEX
2
A Air bag ........................................................................ 1-34
Air clean er filter .......................................................... 6-11
Air Conditioning
Care ......................................................................... 6-18
Operation ................................................................. 6-19
Switch ...................................................................... 1-84
Air Cond itioner filter .................................................... 1-93
Antenna .................................................................... 1-102
Ashtray ....................................................................... 1-63
Audio Remote Control ................................................. 1-82
Automatic Transaxle .................................................... 2-8
BBattery .............................................................. 2-18, 6-23
Brake
Anti-lock system ...................................................... 2-12
Checking the brakes ................................................ 6-17
Fluid ......................................................................... 6-17
Practices ................................................................. 2-15
Breaking-In your new Hyundai ..................................... 1-3
CCare of Cassette tapes ............................................ 1-128
Care of D iscs ........................................................... 1-127
Cassette Tape Player Operation (H280, H265, H465) .........................1-105, 1-114, 1-120
Catalytic Converter ...................................................... 7-3
Child Restraint system ............................................... 1-25Child Seat Restraint Suitability For Seat Position
Using the Seat Belt .................................................. 1-27
Cigarette Lighter ......................................................... 1-62
Clock .......................................................................... 1-62
Clutch Checking fluid .......................................................... 6-18
Combination Light
Daytime running lights ............................................. 1-57
Headlight flasher ...................................................... 1-58
Headlight swi tch ...................................................... 1-56
High-beam switch .................................................... 1-57
Lane change si gnal .................................................. 1-56
Turn signal operation ............................................... 1-56
Compact Disc Player Operation
(H280, H265, H465) .........................1-111, 1-117, 1-123
Cooling Fans ............................................................... 6-24
Corrosion Protection
Cleaning the interior .................................................. 4-6
Protecting your Hyundai from corrosion ................... 4-2
Washing and waxing ................................................. 4-4
Cruise Control ............................................................. 1-79
DDefrosting/Defogging ................................................... 1-89
Door
Central door lock ...................................................... 1-8
Door locks ................................................................ 1-7 Locking and unlocking front door with a key ............ 1-7
Drink Holder ................................................................ 1-63
Page 326 of 483
1
CONTROLS AND EQUIPMENT
59
!
CAUTION:
The inside of the rear windscreen should never be cleaned with a hard or sharp implement since damage to the heating element may occur.The glass should only be cleaned with a soft cloth or chamois leather with the use only of a mild deter-gent or proprietary glass cleaner where necessary. Only horizontal movement of the cloth should bemade when cleaning the glass and care should be exercised to ensure that the heating elements are not damaged by rings or jewellery whilst the glass is being cleaned. NOTE: The engine must be running for the rear window defroster to operate.
INSTRUMENT PANEL ILLUMINATION CONTROL
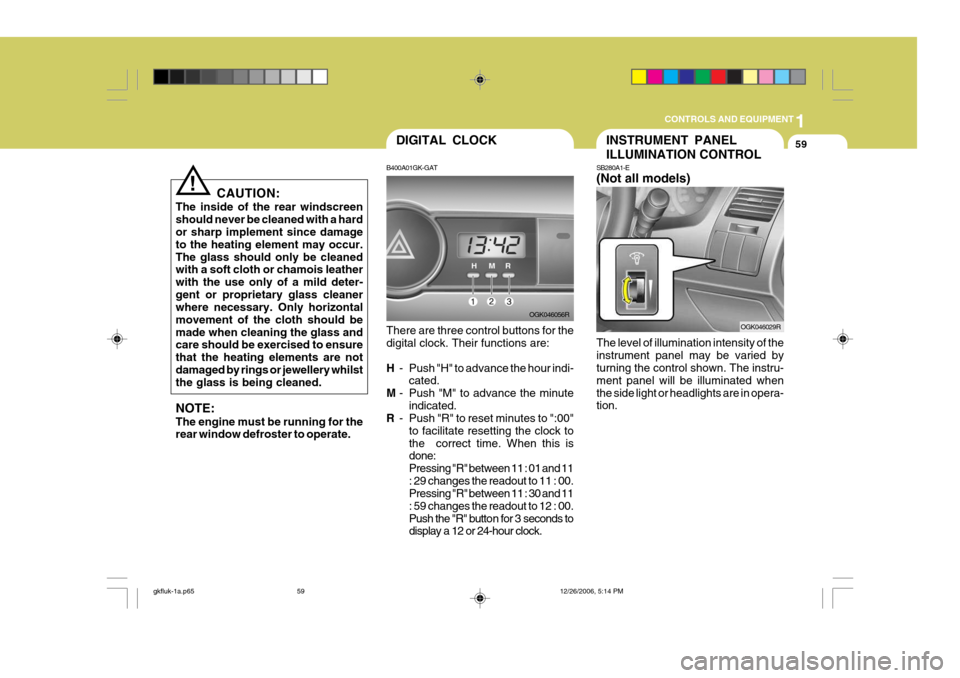
SB280A1-E (Not all models) The level of illumination intensity of the instrument panel may be varied by turning the control shown. The instru- ment panel will be illuminated whenthe side light or headlights are in opera- tion. OGK046029RDIGITAL CLOCK
B400A01GK-GAT There are three control buttons for the digital clock. Their functions are: H - Push "H" to advance the hour indi-
cated.
M - Push "M" to advance the minute
indicated.
R - Push "R" to reset minutes to ":00"
to facilitate resetting the clock to the correct time. When this is done: Pressing "R" between 11 : 01 and 11: 29 changes the readout to 11 : 00. Pressing "R" between 11 : 30 and 11 : 59 changes the readout to 12 : 00.
Push the "R" button for 3 seconds to display a 12 or 24-hour clock. OGK046056R
gkfluk-1a.p65
12/26/2006, 5:14 PM
59
Page 331 of 483
1CONTROLS AND EQUIPMENT
64
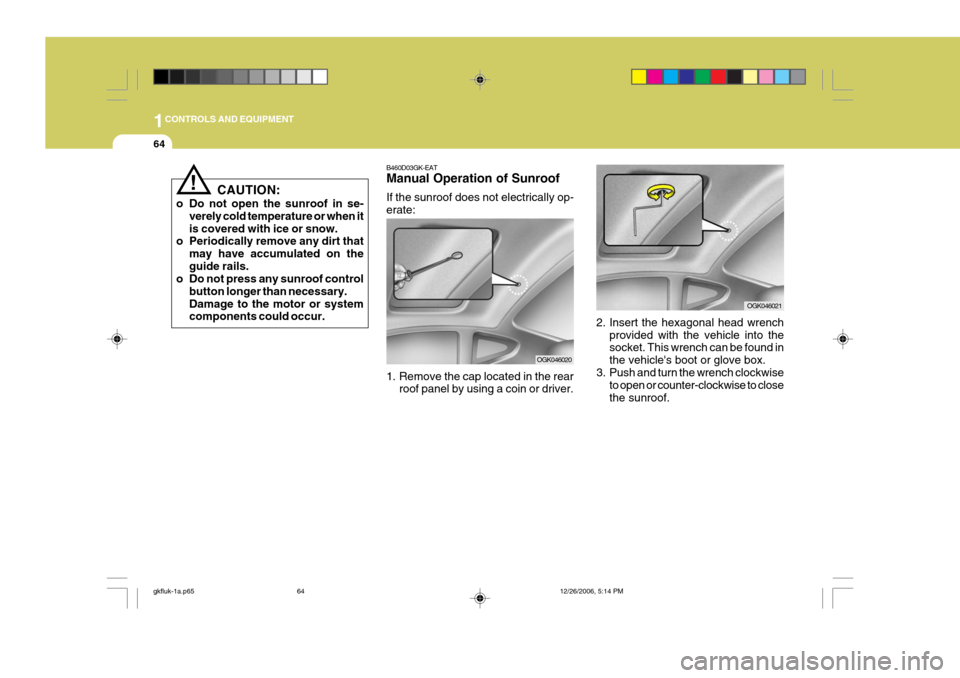
2. Insert the hexagonal head wrenchprovided with the vehicle into the socket. This wrench can be found in the vehicle's boot or glove box.
3. Push and turn the wrench clockwise
to open or counter-clockwise to closethe sunroof.
OGK046021
B460D03GK-EAT Manual Operation of Sunroof If the sunroof does not electrically op- erate:
1. Remove the cap located in the rear
roof panel by using a coin or driver.
OGK046020
! CAUTION:
o Do not open the sunroof in se- verely cold temperature or when it is covered with ice or snow.
o Periodically remove any dirt that
may have accumulated on theguide rails.
o Do not press any sunroof control
button longer than necessary.Damage to the motor or system components could occur.
gkfluk-1a.p65 12/26/2006, 5:14 PM
64
Page 340 of 483
1
CONTROLS AND EQUIPMENT
73HATCHBACK DOOR
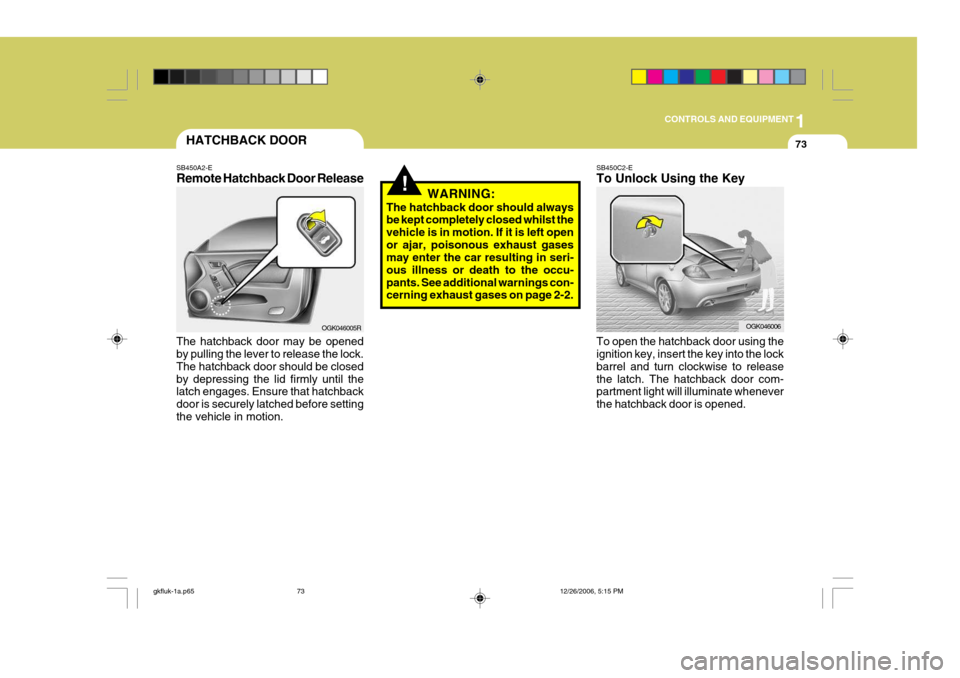
SB450A2-E Remote Hatchback Door Release The hatchback door may be opened by pulling the lever to release the lock. The hatchback door should be closedby depressing the lid firmly until the latch engages. Ensure that hatchback door is securely latched before settingthe vehicle in motion. OGK046005R
!WARNING:
The hatchback door should always be kept completely closed whilst the vehicle is in motion. If it is left openor ajar, poisonous exhaust gases may enter the car resulting in seri- ous illness or death to the occu-pants. See additional warnings con- cerning exhaust gases on page 2-2.
SB450C2-E To Unlock Using the Key To open the hatchback door using the ignition key, insert the key into the lock barrel and turn clockwise to releasethe latch. The hatchback door com- partment light will illuminate whenever the hatchback door is opened. OGK046006
gkfluk-1a.p65
12/26/2006, 5:15 PM
73
Page 359 of 483
1FEATURES OF YOUR HYUNDAI
92
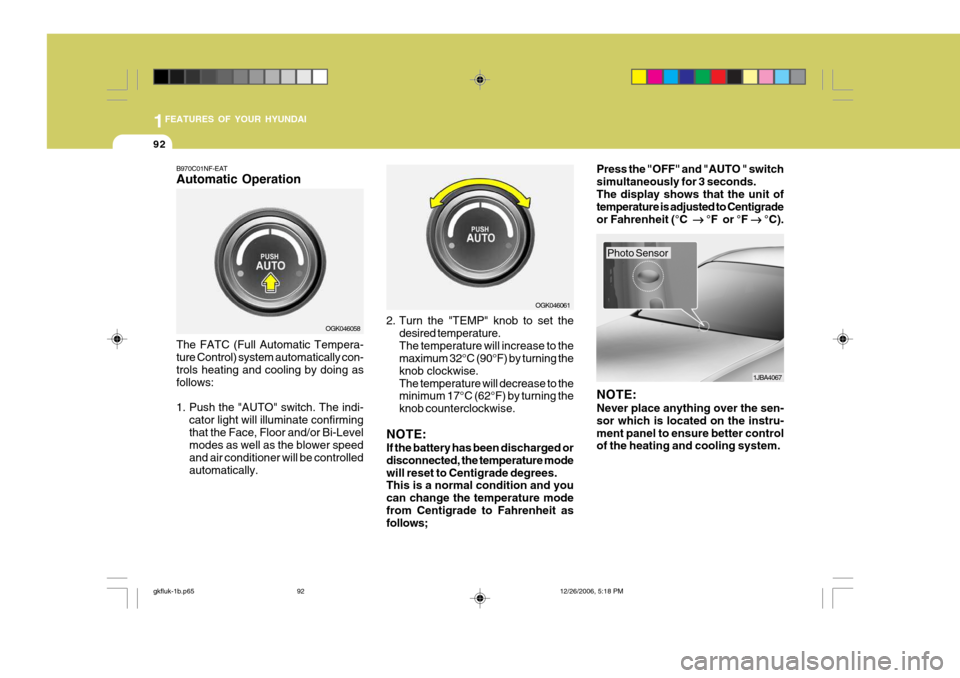
B970C01NF-EAT Automatic Operation The FATC (Full Automatic Tempera- ture Control) system automatically con- trols heating and cooling by doing as follows:
1. Push the "AUTO" switch. The indi-
cator light will illuminate confirming that the Face, Floor and/or Bi-Level modes as well as the blower speed and air conditioner will be controlledautomatically. 2. Turn the "TEMP" knob to set the
desired temperature.The temperature will increase to the maximum 32°C (90°F) by turning the knob clockwise.The temperature will decrease to the minimum 17°C (62°F) by turning the knob counterclockwise.
NOTE: If the battery has been discharged or disconnected, the temperature modewill reset to Centigrade degrees. This is a normal condition and you can change the temperature modefrom Centigrade to Fahrenheit as follows; Press the "OFF" and "AUTO " switch simultaneously for 3 seconds.The display shows that the unit of temperature is adjusted to Centigrade or Fahrenheit (°C
��
��
� °F or °F
��
��
� °C).
OGK046058 OGK046061
1JBA4067
NOTE: Never place anything over the sen- sor which is located on the instru-ment panel to ensure better control of the heating and cooling system.
Photo Sensor
gkfluk-1b.p65 12/26/2006, 5:18 PM
92
Page 404 of 483
3
IN CASE OF EMERGENCY
7
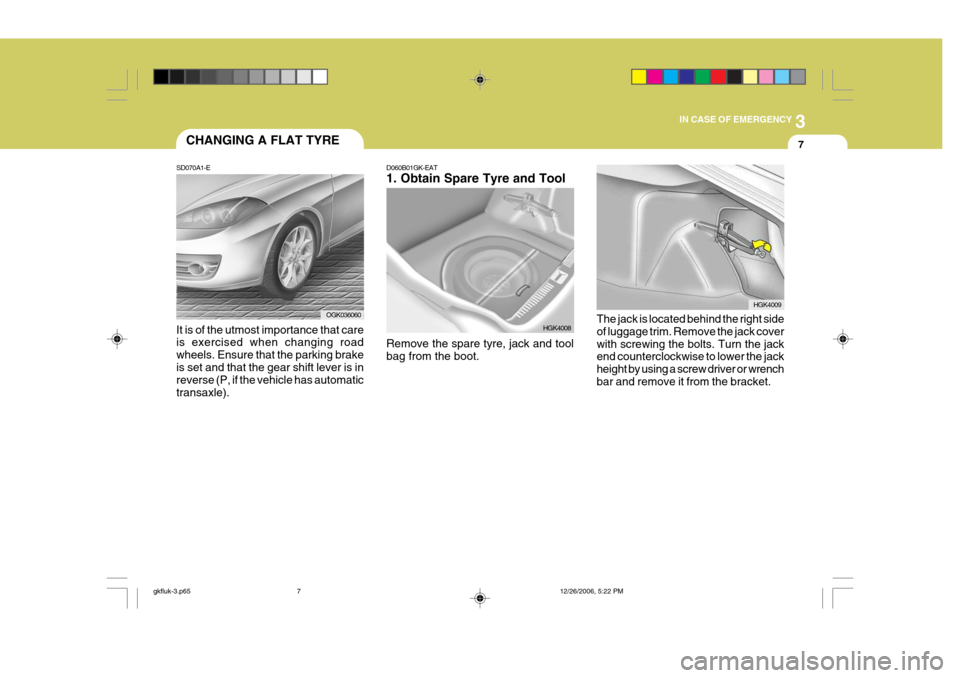
SD070A1-E CHANGING A FLAT TYRE
It is of the utmost importance that care is exercised when changing road wheels. Ensure that the parking brakeis set and that the gear shift lever is in reverse (P, if the vehicle has automatic transaxle).
OGK036060
D060B01GK-EAT 1. Obtain Spare Tyre and Tool Remove the spare tyre, jack and tool bag from the boot. HGK4008
HGK4009
The jack is located behind the right side of luggage trim. Remove the jack coverwith screwing the bolts. Turn the jack end counterclockwise to lower the jack height by using a screw driver or wrenchbar and remove it from the bracket.
gkfluk-3.p65 12/26/2006, 5:22 PM
7
Page 434 of 483
6
OWNER MAINTENANCE
7
JMG030C2-E
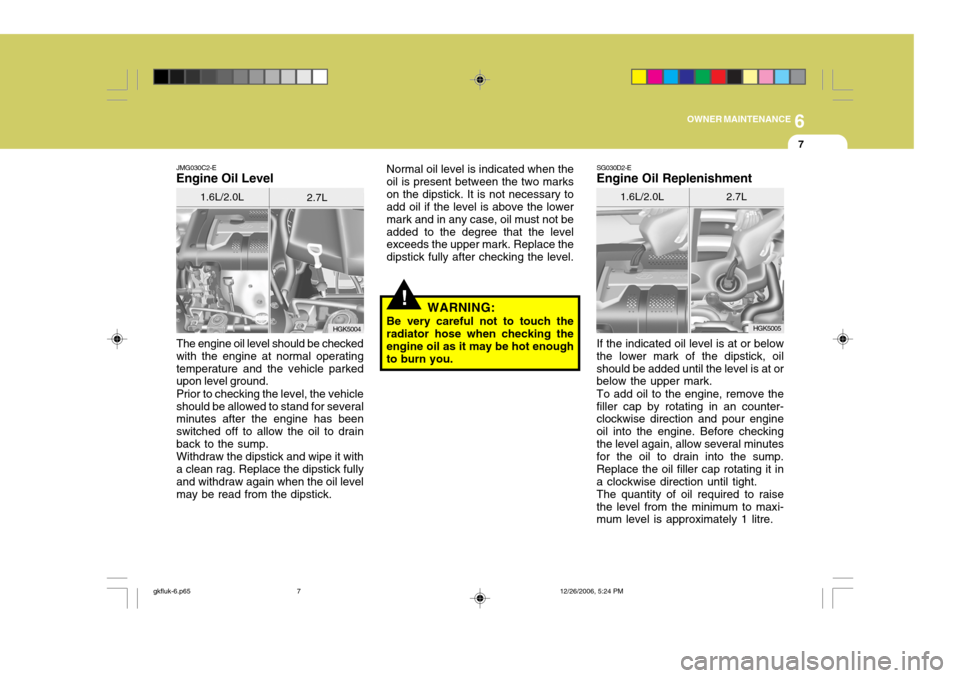
Engine Oil Level
The engine oil level should be checked with the engine at normal operatingtemperature and the vehicle parked upon level ground. Prior to checking the level, the vehicle should be allowed to stand for several minutes after the engine has been switched off to allow the oil to drainback to the sump.Withdraw the dipstick and wipe it witha clean rag. Replace the dipstick fully and withdraw again when the oil level may be read from the dipstick.
!
HGK5004
1.6L/2.0L
2.7LNormal oil level is indicated when the oil is present between the two markson the dipstick. It is not necessary to add oil if the level is above the lower mark and in any case, oil must not beadded to the degree that the level exceeds the upper mark. Replace the dipstick fully after checking the level.
WARNING:
Be very careful not to touch theradiator hose when checking the engine oil as it may be hot enough to burn you.HGK5005
SG030D2-E Engine Oil Replenishment If the indicated oil level is at or below the lower mark of the dipstick, oilshould be added until the level is at or below the upper mark. To add oil to the engine, remove the filler cap by rotating in an counter- clockwise direction and pour engine oil into the engine. Before checkingthe level again, allow several minutes for the oil to drain into the sump. Replace the oil filler cap rotating it ina clockwise direction until tight.The quantity of oil required to raisethe level from the minimum to maxi- mum level is approximately 1 litre. 1.6L/2.0L
2.7L
gkfluk-6.p65 12/26/2006, 5:24 PM
7
Page 480 of 483
10INDEX
2
A Airbag ......................................................................... 1-32
Air Cleaner Filter ......................................................... 6-11
Air Conditioning
Care ......................................................................... 6-18
Operation ....................................................... 1-89, 6-18
Switch ...................................................................... 1-88
Antenna ...................................................................... 1-99
Ashtray ....................................................................... 1-60
Audio Remote Control Switch ..................................... 1-79
B Battery ........................................................................ 6-21
Bonnet Release .......................................................... 1-70
Brake Anti-lock system ...................................................... 2-14
Checking the brakes ................................................ 6-16
Effective braking ...................................................... 2-16
Fluid ......................................................................... 6-16
C
Care of Cassette Tapes ........................................... 1-104
Care of D iscs ........................................................... 1-103
Catalytic Converter ...................................................... 7-3
Child Restraint System ............................................... 1-23
Cigar Lighter ............................................................... 1-60
Climate Control Air Filter .................................. 1-99, 6-18
Clock .......................................................................... 1-59
Clutch Checking fluid .......................................................... 6-17Combination Light
Auto light ................................................................. 1-54
High-beam switch .................................................... 1-54
Headlight flasher ...................................................... 1-55
Lighting switch ......................................................... 1-53
Lane change si gnal .................................................. 1-53
Turn signal operation ............................................... 1-53
Cooling Fans ............................................................... 6-23
Corrosion Protection Cleaning the interior .................................................. 4-5
Protecting your Hyundai from corrosion ................... 4-2
Valeting ..................................................................... 4-3
Cruise Control ............................................................. 1-76
DDaily Operating Checks ............................................... 6-5
Defrosting/Defogging ................................................... 1-87
Door Central door lock ...................................................... 1-7
Door locks ................................................................ 1-6
Locking and unlocking front doors with a key .......... 1-6
Drink Holder ................................................................ 1-61
Driving
Economical driving .................................................. 2-17
Smooth corneri ng ..................................................... 2-18
Winter motoring ....................................................... 2-19
EElectronic Stability Program (ESP) ............................2-15
Emission Control Systems .......................................... 7-2
gkfluk-10.p65 12/26/2006, 5:10 PM
2