reset Hyundai Coupe 2007 User Guide
[x] Cancel search | Manufacturer: HYUNDAI, Model Year: 2007, Model line: Coupe, Model: Hyundai Coupe 2007Pages: 487, PDF Size: 12.96 MB
Page 117 of 487
1
FEATURES OF YOUR HYUNDAI
105
H280B01GK-GAT
1. Power Button (POWER ON) Press this button when the ignition switch of the automobile is set to ACC(1st notch) or ON (2nd notch) to turn on the power and the audio system. Press once again when the audio system is onto turn off the power. 2. Volume Control (VOLUME) Turn the volume control clockwise to increase volume and counterclockwise to reduce. The volume level will bedisplayed on the screen when you ad- just the volume. 3. Radio Band Selection Button (FM/AM)
o Press this button to listen to either FM or AM.
o The radio will be set to each of the
following modes each time you press the button. FM1 ➟ FM2 ➟ AM NOTE: Push this button when the power is off to turn on the power automati- cally. 4. Automatic Channel Selection
Memorization Button (BSM: Best Station Memory)
Press this button once to automatically select channels starting from the cur-rent channel and memorize into the preset buttons (1~6) in the selected order and turn to the channel memo-rized in preset button 1. 5. Automatic Channel Selection Button (SEEK)
Press the upper side of the button to automatically increase frequency and select and play the receivable channel. Press the lower side of the button toautomatically decrease frequency and select and play the next available chan- nel. 6. Preset Button (1~6) Press this button to listen to the chan- nels memorized to each button. If youwant to memorize the current channel to the preset button, press the button for more than 1.5 seconds then thechannel will be memorized to the button with a beep.
7. Information Display Screen
(LCD)
A variety of information will be dis- played on the screen including the radio bands (FM1/FM2/AM) while listening tothe radio, frequency of each channel, the number of preset channel and "ST" for FM stereo broadcasting.
Page 125 of 487
1
FEATURES OF YOUR HYUNDAI
113
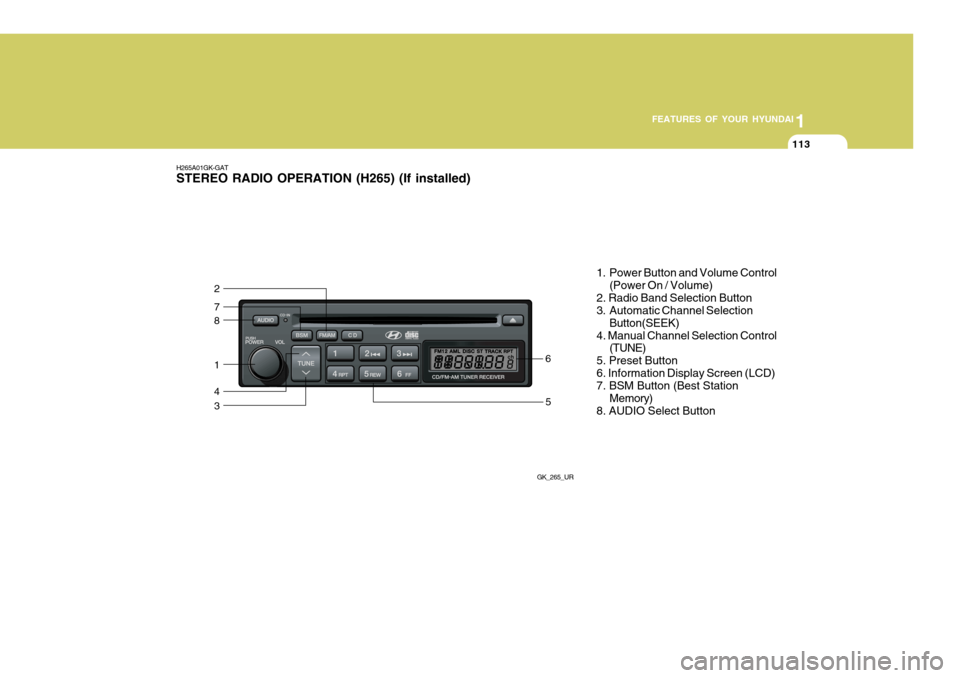
H265A01GK-GAT STEREO RADIO OPERATION (H265) (If installed)
GK_265_UR
8
7
2
1
4
35
6 1. Power Button and Volume Control
(Power On / Volume)
2. Radio Band Selection Button
3. Automatic Channel Selection Button(SEEK)
4. Manual Channel Selection Control (TUNE)
5. Preset Button 6. Information Display Screen (LCD) 7. BSM Button (Best Station Memory)
8. AUDIO Select Button
Page 126 of 487
1FEATURES OF YOUR HYUNDAI
114
H265B01GK-GAT
1. Power Button and VolumeControl (POWER ON/ VOL- UME)
Press this button when the ignition switch of the automobile is set to ACC (1st notch) or ON (2nd notch) to turn onthe power of the audio system. When the power is turned on, turn the volume control clockwise to increase volumeand counterclockwise to reduce. Press once again when the audio system is on to turn off the power.
2. Radio Band Selection Button (FM/AM)
North American Standard
o Press this button to listen to either FM or AM.
o The radio will be set to each mode
each time you press the button in aloop; FM1 ➟FM2 ➟AM ➟FM1 and
soon.
European Standard
o Press this button to listen to either FM or AM.
o The radio will be set to each mode each time you press the button in a loop; FM1 ➟FM2 ➟MW ➟LW ➟FM1
and soon. 5. Preset Button (1~6) Press this button but do not hold for no more than 2 seconds to listen to thechannels memorized to each button. If you want to memorize the current chan- nel to the preset button when you arelistening to channel not memorized to any of the preset buttons, press the button and hold for more than 2 sec-onds then the channel will be memo- rized to the button with the beep.
6. Information Display Screen
(LCD)
A variety of information will be dis- played on the screen including the radio bands (FM1/FM2/AM) while listening tothe radio, frequency of each channel, the number of preset channel and "ST" for FM stereo broadcasting.
3. Automatic Channel Selection
Button (SEEK)
Press and hold the [
] button for more
than 0.5 seconds until you hear the beep to automatically increase frequency and press and hold the [
] button for more
than 0.5 seconds until you hear the beep to automatically decrease frequency to select and play the next available chan- nel. If the received channel is memo-rized in the preset buttons then the screen will display the memorized chan- nel.
4. Manual Channel Selection
Control (TUNE)
Press and hold [
] button for less than
0.5 seconds to increase frequency by 1 step and [
] to decrease.
Press and hold [
] or [ ] button for
more than 0.5 seconds even after you hear the beep then the frequency will increase or decrease quickly. When you release the button, the system willturn to the automatic selection mode.
Page 127 of 487
1
FEATURES OF YOUR HYUNDAI
115
7. BSM Button(Best Station Memory)
Press this button once to automatically select well-received channels andmemorize them into the preset buttons (1~6) in the selected order and turn to the channel memorized in preset button1. If no channel is received after acti- vating BSM and no channel is memo- rized, the system will turn to the previ-ously received channel. 8. AUDIO Select Button
o Press this button to change AUDIO function control mode.
Current State ➟BASS ➟MID ➟TRE ➟
FAD ➟BAL
o Select the audio control mode you want and increase or decrease the setting by ±10 from currently audiocontrol mode. If no actions are taken, the screen will return to the previous display after 3 seconds.
! CAUTION:
o Do not place beverages close to the audio system. The audio sys- tem mechanism may be damagedif you spill them.
o Do not strike or allow anything to
impact the audio system, damageto the system mechanisms could occur.
BASS MIDDLETREBLE BALANCE FADER Turn the TUNE Controller clockwise to increase bass tone and counterclockwiseto decrease. Turn the TUNE Controller clockwise to increase middle tone and counter- clockwise to decrease. Turn the TUNE Controller clockwise to increasetreble tone and counter- clockwise to decrease. Turn the TUNE Controller clockwise to increase right speaker volume and coun-terclockwise to increase left speaker volume. Turn the TUNE Controller clockwise to increase rear speaker volume and coun-terclockwise to increase front speaker volume.
Page 131 of 487
1
FEATURES OF YOUR HYUNDAI
119
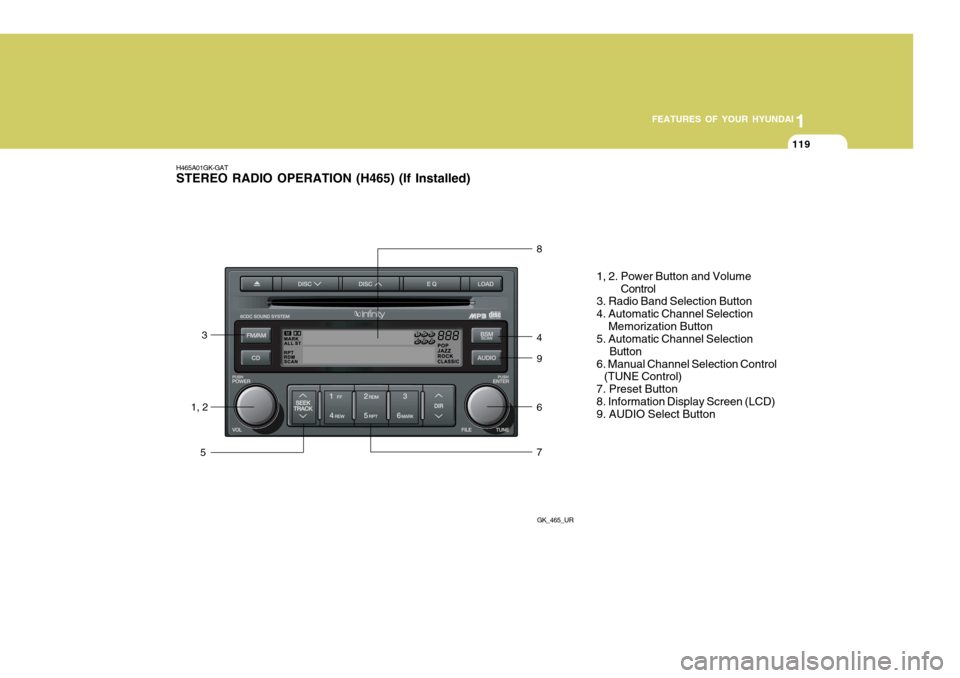
H465A01GK-GAT STEREO RADIO OPERATION (H465) (If Installed)
GK_465_UR
1, 23
5 8 4 9 6 7
1, 2. Power Button and Volume
Control
3. Radio Band Selection Button 4. Automatic Channel Selection Memorization Button 5. Automatic Channel Selection
Button
6. Manual Channel Selection Control (TUNE Control) 7. Preset Button8. Information Display Screen (LCD) 9. AUDIO Select Button
Page 132 of 487
1FEATURES OF YOUR HYUNDAI
120
H465B01GK-GAT
1. Power Button (POWER ON) Press this button when the ignition switch of the automobile is set to ACC(1st notch) or ON (2nd notch) to turn on the power and the audio system. Press once again when the audio system is onto turn off the power. 2. Volume Control (VOLUME) Turn the volume control clockwise to increase volume and counterclockwise to reduce. The volume level will bedisplayed on the screen when you ad- just the volume. 3. Radio Band Selection Button(FM/AM)
o Press this button to listen to either FM or AM.
o The radio will be set to each of the
following modes each time you press the button. FM1 ➟ FM2 ➟ AM NOTE: Push this button when the power is off to turn on the power automati- cally. 4. Automatic Channel Selection
Memorization Button (BSM: Best Station Memory)
Press this button once to automatically select channels starting from the cur-rent channel and memorize into the preset buttons (1~6) in the selected order and turn to the channel memo-rized in preset button 1. 5. Automatic Channel Selection Button (SEEK)
Press the [SEEK
] button to auto-
matically increase frequency and press the [TRACK
] button to automati-
cally decrease frequency to select and play the next available channel. If the received channel is memorized in thepreset buttons then the screen will dis- play the memorized channel. 6. Manual Channel Selection
Control (TUNE)
Turn the TUNE control clockwise to increase frequency and counterclock-wise to reduce frequency by 1 step for each click.
7. Preset Button (1~6) Press this button to listen to the chan- nels memorized to each button. If you want to memorize the current channelto the preset button, press the button for more than 1.5 seconds then the channel will be memorized to the buttonwith a beep.
8. Information Display Screen (LCD)
A variety of information will be dis- played on the screen including the radiobands (FM1/FM2/AM) while listening to the radio, frequency of each channel, the number of preset channel and "ST"for FM stereo broadcasting.
Page 309 of 487

1
CONTROLS AND EQUIPMENT
41
1. Speedometer
2. Turn Signal Indicator Light
3. Odometer/Trip Odometer
4. Automatic Transaxle Position Indicator Light (Not all models)
5. Coolant Temperature Gauge
6. Trip Computer (Not all models)
7. Fuel Gauge
8. Tachometer
9. Electronic Stability Program (ESP) Indicator Light (Not all models)
10. Immobiliser Warning Light
11. Trip Odometer Reset Knob 12. Charging System Warning Light
13. SRS (Airbag) Warning Light
14. Seat Belt Warning Light
15. High Beam Indicator Light
16. Oil Pressure Warning Light
17. Malfuction Indicator Light (MIL) (Not all models)
18. Low Fuel Warning Light
19. Parking Brake/Brake Fluide Level Warning Light
20. Trip Computer Reset Knob21.CRUISE Indicator Light (Not all models)
22. CRUISE SET Indicator Light (Not all models)
23. Hatchback Door Open Warning Light
24. Door Open (Ajar) Warning Light
25. ABS Service Reminder Indicator Light (Not all models)
Page 316 of 487
1CONTROLS AND EQUIPMENT
48
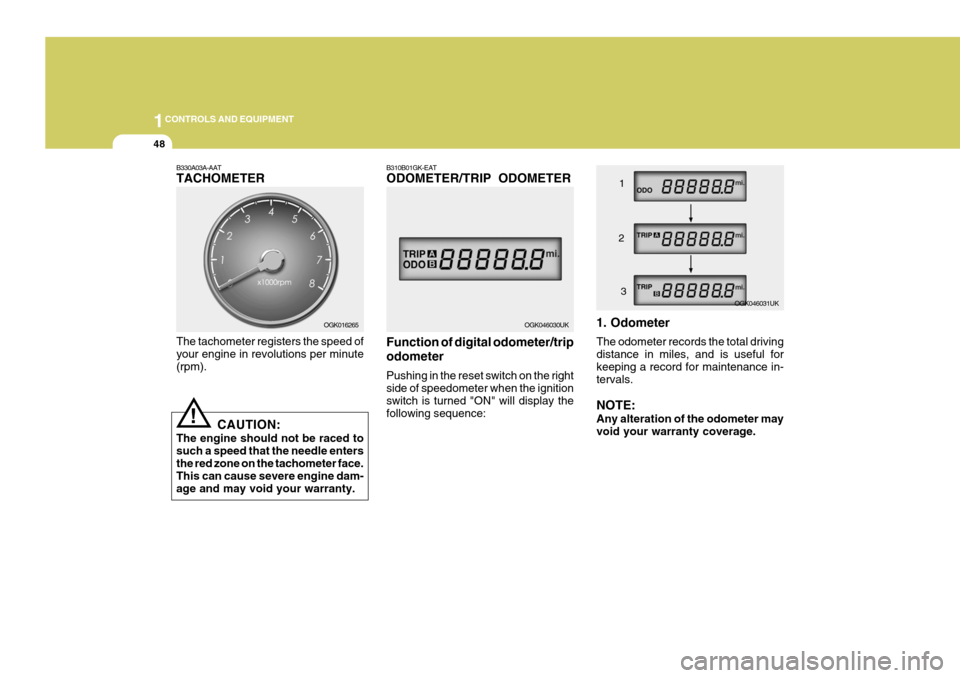
B310B01GK-EAT ODOMETER/TRIP ODOMETER Function of digital odometer/trip odometer Pushing in the reset switch on the right side of speedometer when the ignition switch is turned "ON" will display thefollowing sequence: 1. Odometer The odometer records the total driving distance in miles, and is useful forkeeping a record for maintenance in- tervals. NOTE: Any alteration of the odometer may void your warranty coverage.
OGK046030UK
OGK046031UK
1
2 3
!
B330A03A-AAT TACHOMETER The tachometer registers the speed of your engine in revolutions per minute (rpm).
CAUTION:
The engine should not be raced tosuch a speed that the needle entersthe red zone on the tachometer face. This can cause severe engine dam- age and may void your warranty. OGK016265
Page 317 of 487
1
CONTROLS AND EQUIPMENT
49
2,3 Trip odometer Records the distance of 2 trips in miles. TRIP A : First distance you have trav-
eled from your origination point to a first destination. TRIP B : Second distance from the first
destination to the final destination. To shift from TRIP A to TRIP B, press the reset switch. When pressed for 1 second, it will reset to 0.TRIP COMPUTER
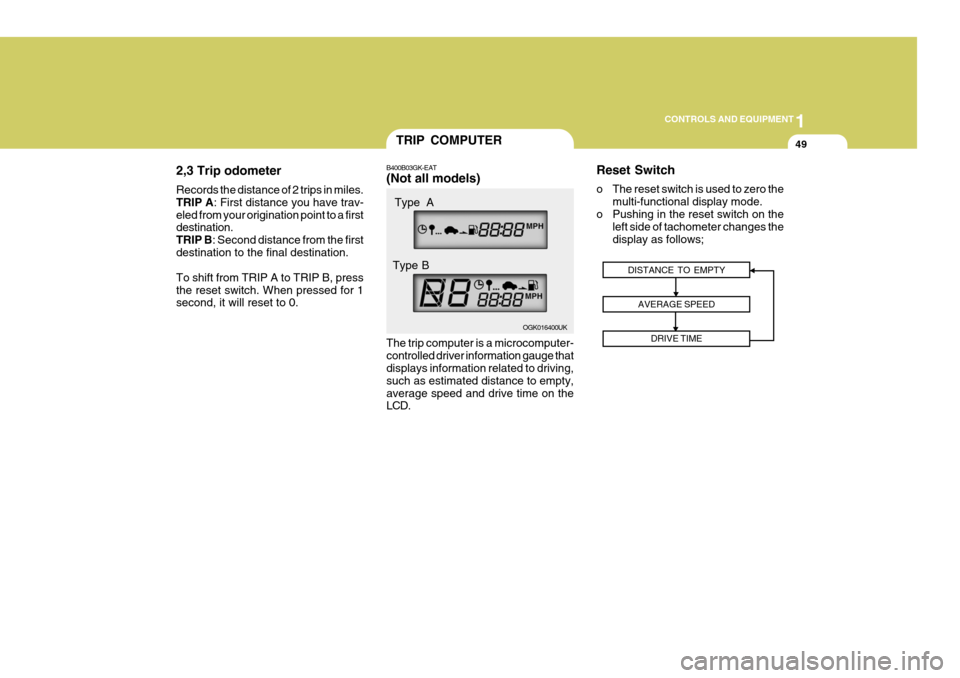
B400B03GK-EAT (Not all models) The trip computer is a microcomputer- controlled driver information gauge that displays information related to driving, such as estimated distance to empty,average speed and drive time on the LCD. Reset Switch
o The reset switch is used to zero the
multi-functional display mode.
o Pushing in the reset switch on the left side of tachometer changes the display as follows;
DISTANCE TO EMPTY
AVERAGE SPEED DRIVE TIME
OGK016400UK
Type A
Type B
Page 318 of 487
1CONTROLS AND EQUIPMENT
50
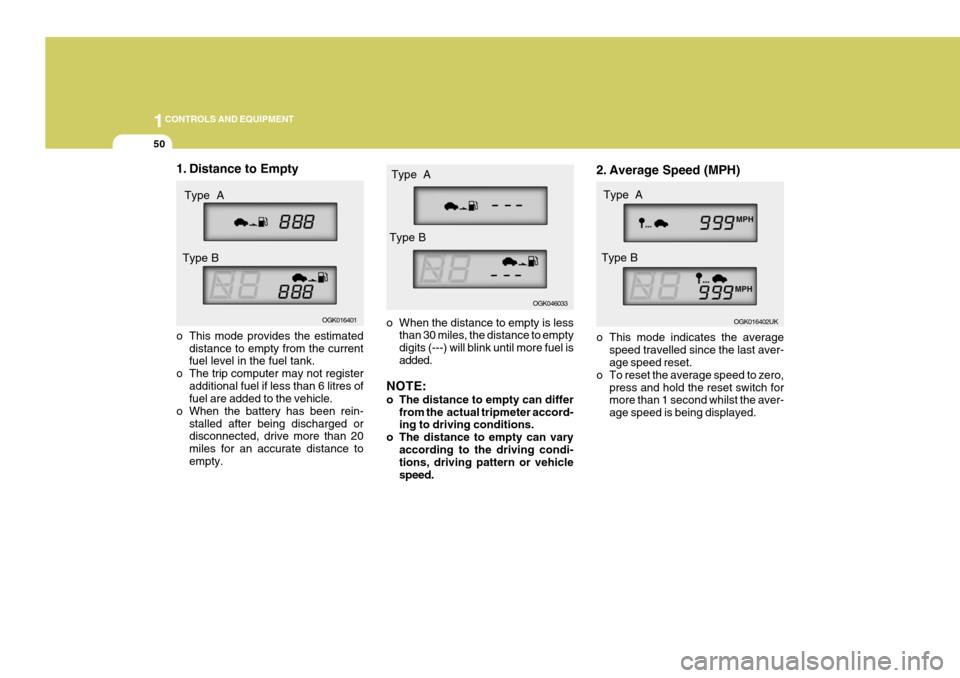
o When the distance to empty is less
than 30 miles, the distance to empty digits (---) will blink until more fuel is added.
NOTE:
o The distance to empty can differ from the actual tripmeter accord- ing to driving conditions.
o The distance to empty can vary according to the driving condi-tions, driving pattern or vehicle speed. 2. Average Speed (MPH)
o This mode indicates the average
speed travelled since the last aver- age speed reset.
o To reset the average speed to zero, press and hold the reset switch formore than 1 second whilst the aver- age speed is being displayed. OGK016402UK
Type A
Type B
1. Distance to Empty
o This mode provides the estimated distance to empty from the current fuel level in the fuel tank.
o The trip computer may not register additional fuel if less than 6 litres offuel are added to the vehicle.
o When the battery has been rein- stalled after being discharged ordisconnected, drive more than 20 miles for an accurate distance toempty. OGK016401
Type A
Type B
OGK046033
Type A
Type B