chapter 7 Hyundai Creta 2019 Owner's Manual
[x] Cancel search | Manufacturer: HYUNDAI, Model Year: 2019, Model line: Creta, Model: Hyundai Creta 2019Pages: 472, PDF Size: 13.39 MB
Page 5 of 472
We want to help you get the greatest
possible driving pleasure from your
vehicle. Your Owner’s Manual can
assist you in many ways. We strongly
recommend that you read the entire
manual. In order to minimize the
chance of death or injury, you must
read the DANGER, WARNING and
CAUTION sections in the manual.
Illustrations complement the words
in this manual to best explain how to
enjoy your vehicle. By reading your
manual, you will learn about fea-
tures, important safety information,
and driving tips under various road
conditions.
The general layout of the manual is
provided in the Table of Contents.
Use the index when looking for a
specific area or subject; it has an
alphabetical listing of all information
in your manual.
Sections: This manual has eight
chapters plus an index. Each section
begins with a brief list of contents so
you can tell at a glance if that section
has the information you want.Your safety, and the safety of others,
is very important. This Owner's
Manual provides you with many safe-
ty precautions and operating proce-
dures. This information alerts you to
potential hazards that may hurt you
or others, as well as damage to your
vehicle.
Safety messages found on vehicle
labels and in this manual describe
these hazards and what to do to
avoid or reduce the risks.
Warnings and instructions contained
in this manual are for your safety.
Failure to follow safety warnings and
instructions can lead to serious injury
or death.Throughout this manual DANGER,
WARNING, CAUTION, NOTICE and
the SAFETY ALERT SYMBOL will
be used.
This is the safety alert symbol.
It is used to alert you to poten-
tial physical injury hazards.
Obey all safety messages that
follow this symbol to avoid
possible injury or death. The
safety alert symbol precedes
the signal words DANGER,
WARNING and CAUTION.
H HO
OW
W
T
TO
O
U
US
SE
E
T
TH
HI
IS
S
M
MA
AN
NU
UA
AL
L
F5
Introduction
DANGER indicates a hazardous
situation which, if not avoided,
will result in death or serious
injury.
DANGER
WARNING indicates a hazardous
situation which, if not avoided,
could result in death or serious
injury.
WARNING
Page 48 of 472
2-28
Safety system of your vehicle
Seat belt use and children
Infant and small children
Most countries have Child Restraint
System laws which require children to
travel in approved Child Restraint
System devices, including booster
seats. The age at which seat belts can
be used instead of Child Restraint
System differs among countries, so
you should be aware of the specific
requirements in your country, and
where you are travelling. Infant and
Child Restraint System must be prop-
erly placed and installed in a rear seat.
For more information refer to the “Child
Restraint Systems” in this chapter.
Small children are best protected from
injury in an accident when properly
restrained in the rear seat by a Child
Restraint System that meets the
requirements of the Safety Standards
of your country. Before buying any Child
Restraint System, make sure that it has
a label certifying that it meets Safety
Standard of your country. The restraint
must be appropriate for your child's
height and weight. Check the label on
the Child Restraint System for this
information. Refer to “Child Restraint
Systems” in this chapter.
Larger children
Children under age 13 and who are
too large for a booster seat must
always occupy the rear seat and use
the available lap/shoulder belts. A
seat belt should lie across the upper
thighs and be snug across the shoul-
der and chest to restrain the child
safely. Check belt fit periodically. A
child's squirming could put the belt
out of position. Children are afforded
the most safety in the event of an
accident when they are restrained by
a proper restraint system and/or seat
belts in the rear seat.
If a larger child over age 13 must be
seated in the front seat, the child
must be securely restrained by the
available lap/shoulder belt and the
seat should be placed in the rear-
most position.
If the shoulder belt portion slightly
touches the child’s neck or face, try
placing the child closer to the center
of the vehicle. If the shoulder belt still
touches their face or neck, they need
to be returned to an appropriate
booster seat in the rear seat. ALWAYS properly restrain infants
and small children in a Child
Restraint System appropriate for
the child’s height and weight.
To reduce the risk of serious
injury or death to a child and other
passengers, NEVER hold a child
in your lap or arms when the vehi-
cle is moving. The violent forces
created during an accident will
tear the child from your arms and
throw the child against the interior
of the vehicle.WARNING
Page 59 of 472
Securing a Child Restraint
System with a lap/shoulder belt
When not using the ISOFIX system,
all Child Restraint Systems must be
secured to a rear seat with the lap
part of a lap/shoulder belt.
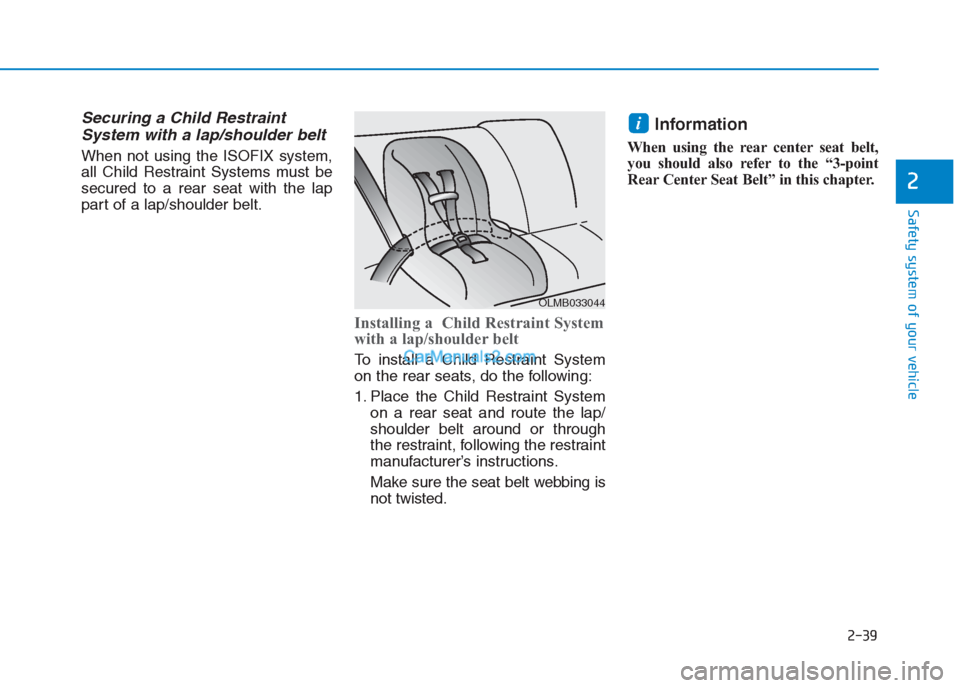
Installing a Child Restraint System
with a lap/shoulder belt
To install a Child Restraint System
on the rear seats, do the following:
1. Place the Child Restraint System
on a rear seat and route the lap/
shoulder belt around or through
the restraint, following the restraint
manufacturer’s instructions.
Make sure the seat belt webbing is
not twisted.
Information
When using the rear center seat belt,
you should also refer to the “3-point
Rear Center Seat Belt” in this chapter.
i
2-39
Safety system of your vehicle
2
OLMB033044
Page 89 of 472
3-4
Convenient features of your vehicle
Tailgate unlocking
To unlock:
1. Press the Tailgate Unlock button
(3) on the remote key for more
than one second.
2. The hazard warning lights will
blink two times. Once the tailgate
is opened and then closed, the
tailgate will lock automatically.
Information
• After unlocking the tailgate, the tail-
gate will lock automatically.
• The word "HOLD" is written on the
button to inform you that you must
press and hold the button for more
than one second.
Start-up
For detailed information refer to “Key
Ignition Switch” in chapter 5.
To prevent damaging the remote
key:
• Keep the remote key away from
water or any liquid. If the remote
key is inoperative due to expo-
sure to water or other liquids, it
will not be covered by your man-
ufacturer’s vehicle warranty.
Avoid dropping or throwing the
remote key.
Protect the remote key from
extreme temperatures.
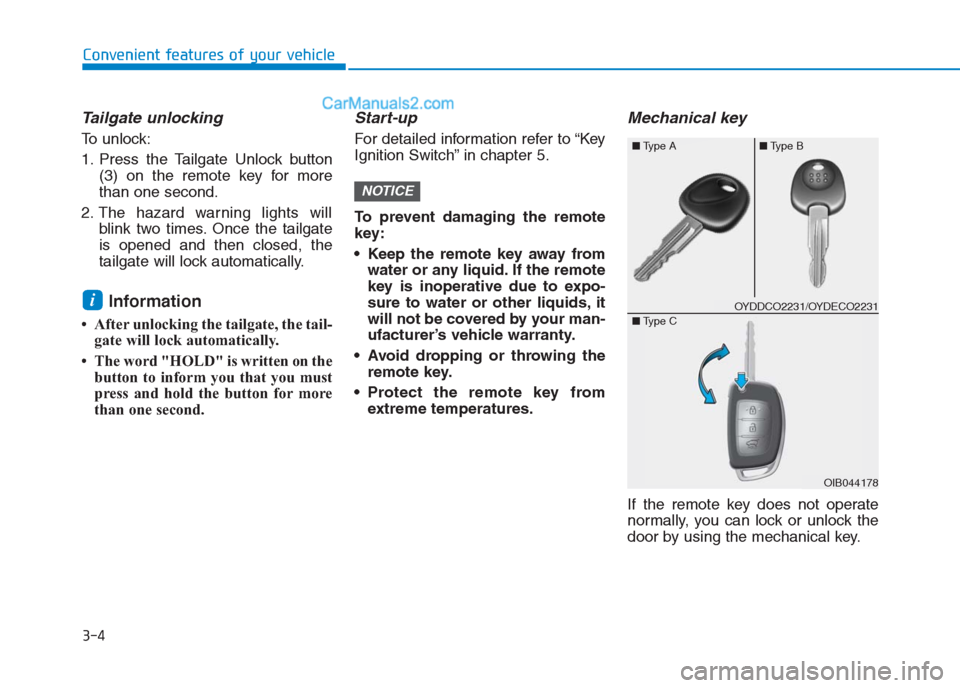
Mechanical key
If the remote key does not operate
normally, you can lock or unlock the
door by using the mechanical key.
NOTICE
i
■Type A■Type B
OIB044178 ■Type C
OYDDCO2231/OYDECO2231
Page 94 of 472
3-9
Convenient features of your vehicle
3
Tailgate unlocking
To unlock:
1. Carry the smart key.
2. Either press the tailgate handle
button or press the Tailgate Unlock
button (3) on the smart key for
more than one second.
3. The hazard warning lights will
blink two times.
Once the tailgate is opened and then
closed, the tailgate will lock automat-
ically.
Information
After unlocking the tailgate, the tail-
gate will lock automatically after 30
seconds unless the tailgate is opened.
Start-up
You can start the engine without
inserting the key. For detailed infor-
mation refer to the Engine Start/Stop
button in chapter 5.
To prevent damaging the smart
key:
Keep the smart key away from
water or any liquid. If the smart
key is inoperative due to expo-
sure to water or other liquids, it
will not be covered by your man-
ufacturer’s vehicle warranty.
Avoid dropping or throwing the
smart key.
Protect the smart key from
extreme temperatures.
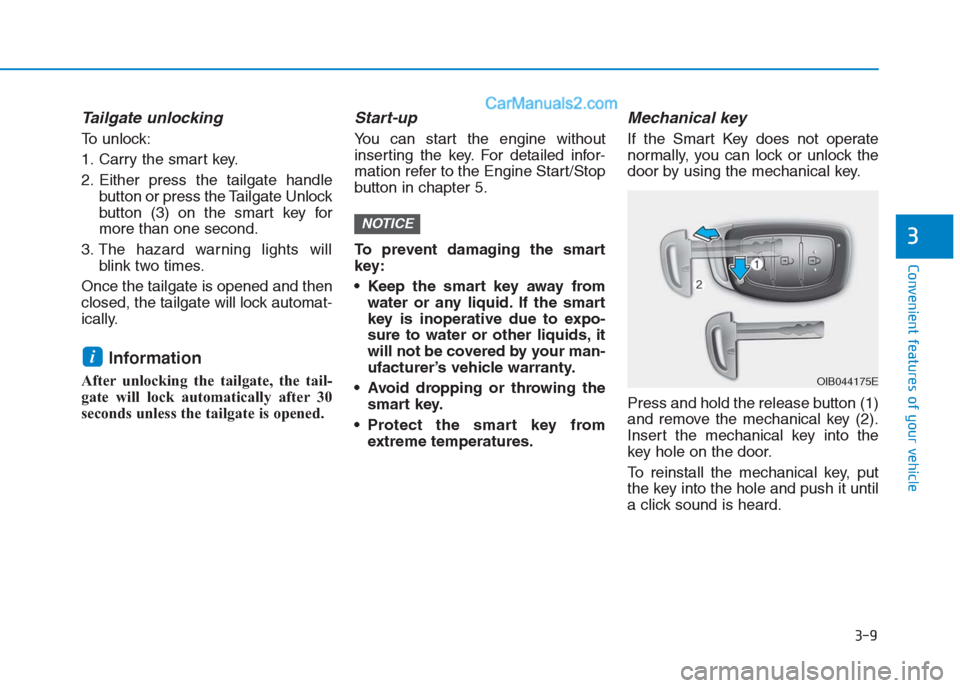
Mechanical key
If the Smart Key does not operate
normally, you can lock or unlock the
door by using the mechanical key.
Press and hold the release button (1)
and remove the mechanical key (2).
Insert the mechanical key into the
key hole on the door.
To reinstall the mechanical key, put
the key into the hole and push it until
a click sound is heard.
NOTICE
i
OIB044175E
Page 117 of 472
3-32
Convenient features of your vehicle
Information
• Make sure to refuel your vehicle
according to the "Fuel Requirements"
suggested in the introduction chapter.
• Do not spill fuel on the exterior sur-
faces of the vehicle. Any type of fuel
spilled on painted surfaces may
damage the paint.
If the fuel filler cap requires
replacement, use only a genuine
HYUNDAI cap or the equivalent
specified for your vehicle. An
incorrect fuel filler cap can result
in a serious malfunction of the
fuel system or emission control
system.
NOTICE
i(Continued)
When refueling, always move
the shift lever to the P (Park)
position (for automatic
transaxle) or first gear or R
(Reverse, for manual
transaxle), set the parking
brake, and place the ignition
switch to the LOCK/OFF posi-
tion. Sparks produced by
electrical components related
to the engine can ignite fuel
vapors causing a fire.
Do not use matches or a
lighter and do not smoke or
leave a lit cigarette in your
vehicle while at a gas station,
especially during refueling.
Do not over-fill or top-off your
vehicle tank, which can cause
gasoline spillage.
(Continued)
(Continued)
If a fire breaks out during refu-
eling, leave the vicinity of the
vehicle, and immediately con-
tact the manager of the gas
station and then contact the
local fire department. Follow
any safety instructions they
provide.
If pressurized fuel sprays out,
it can cover your clothes or
skin and thus subject you to
the risk of fire and burns.
Always remove the fuel cap
carefully and slowly. If the cap
is venting fuel or if you hear a
hissing sound, wait until the
condition stops before com-
pletely removing the cap.
Always check that the fuel cap
is installed securely to pre-
vent fuel spillage in the event
of an accident.
Page 128 of 472
3-43
Convenient features of your vehicle
3
I IN
NS
ST
TR
RU
UM
ME
EN
NT
T
C
CL
LU
US
ST
TE
ER
R
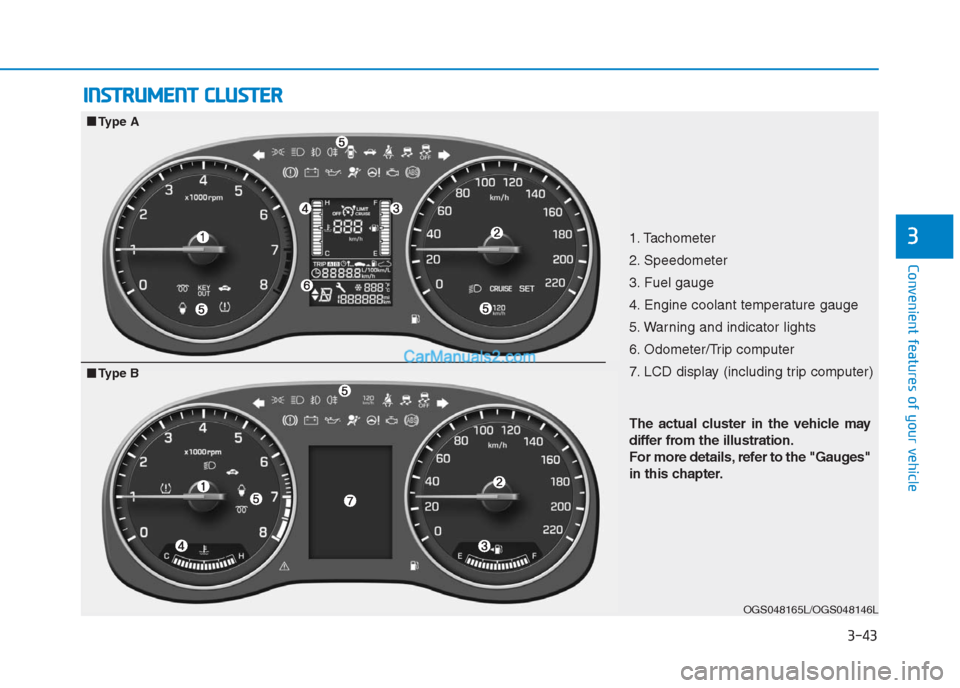
1. Tachometer
2. Speedometer
3. Fuel gauge
4. Engine coolant temperature gauge
5. Warning and indicator lights
6. Odometer/Trip computer
7. LCD display (including trip computer)
OGS048165L/OGS048146L
■ ■
Type A
The actual cluster in the vehicle may
differ from the illustration.
For more details, refer to the "Gauges"
in this chapter.
■ ■
Type B
Page 131 of 472
3-46
Convenient features of your vehicle
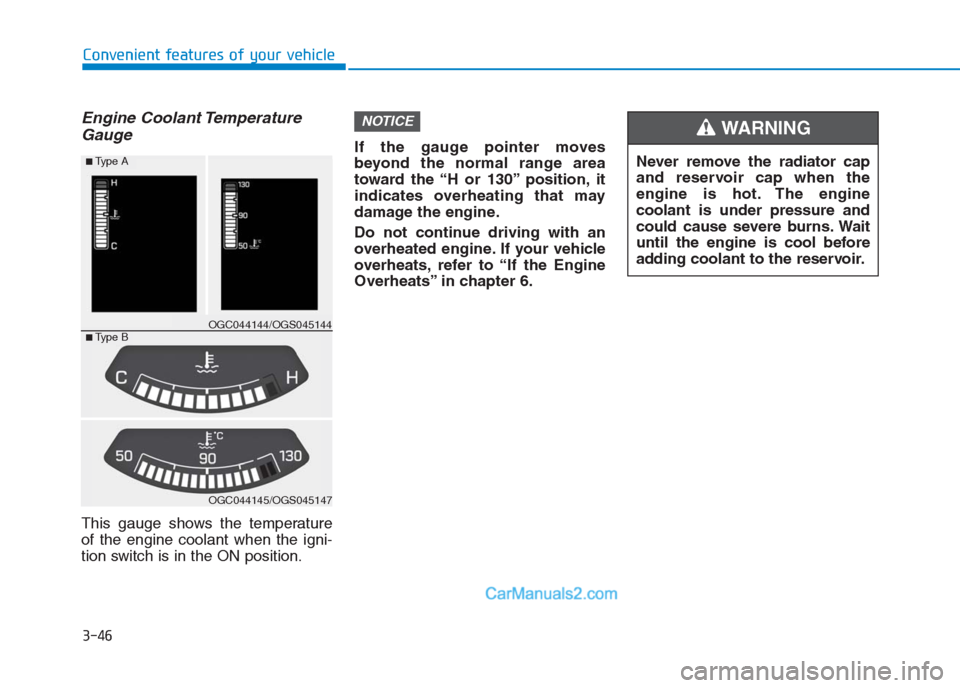
Engine Coolant Temperature
Gauge
This gauge shows the temperature
of the engine coolant when the igni-
tion switch is in the ON position.If the gauge pointer moves
beyond the normal range area
toward the “H or 130” position, it
indicates overheating that may
damage the engine.
Do not continue driving with an
overheated engine. If your vehicle
overheats, refer to “If the Engine
Overheats” in chapter 6.
NOTICE
Never remove the radiator cap
and reservoir cap when the
engine is hot. The engine
coolant is under pressure and
could cause severe burns. Wait
until the engine is cool before
adding coolant to the reservoir.
WARNING
OGC044145/OGS045147
■Type A
■Type BOGC044144/OGS045144
Page 132 of 472
3-47
Convenient features of your vehicle
3
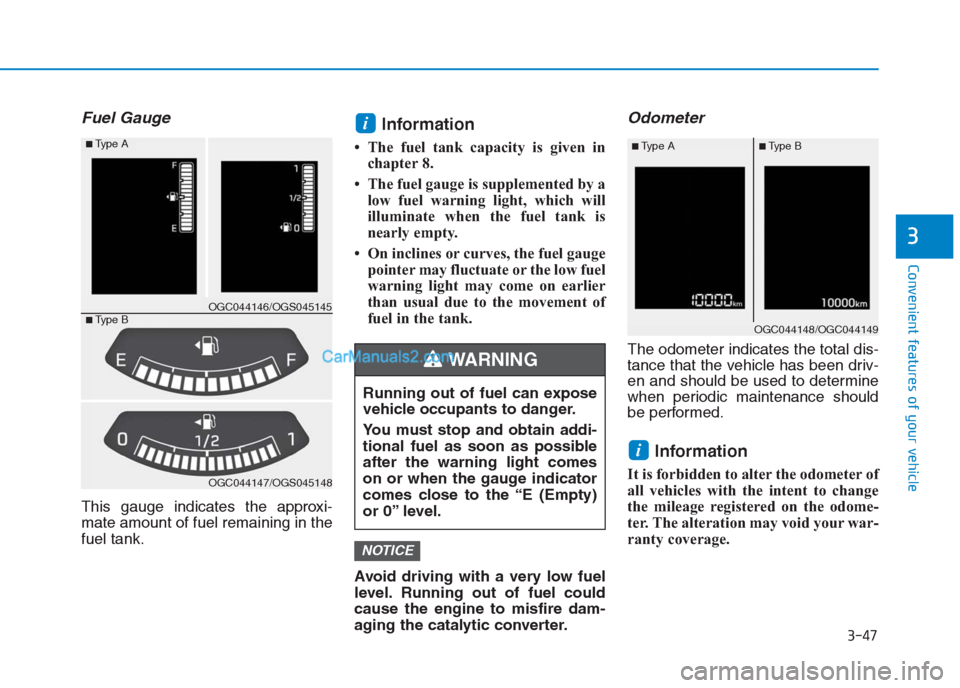
Fuel Gauge
This gauge indicates the approxi-
mate amount of fuel remaining in the
fuel tank.
Information
• The fuel tank capacity is given in
chapter 8.
• The fuel gauge is supplemented by a
low fuel warning light, which will
illuminate when the fuel tank is
nearly empty.
• On inclines or curves, the fuel gauge
pointer may fluctuate or the low fuel
warning light may come on earlier
than usual due to the movement of
fuel in the tank.
Avoid driving with a very low fuel
level. Running out of fuel could
cause the engine to misfire dam-
aging the catalytic converter.
Odometer
The odometer indicates the total dis-
tance that the vehicle has been driv-
en and should be used to determine
when periodic maintenance should
be performed.
Information
It is forbidden to alter the odometer of
all vehicles with the intent to change
the mileage registered on the odome-
ter. The alteration may void your war-
ranty coverage.
i
NOTICE
i
Running out of fuel can expose
vehicle occupants to danger.
You must stop and obtain addi-
tional fuel as soon as possible
after the warning light comes
on or when the gauge indicator
comes close to the “E (Empty)
or 0” level.
WARNING
OGC044147/OGS045148
■Type A
■Type BOGC044146/OGS045145
OGC044148/OGC044149
■Type B■Type A
Page 135 of 472
3-50
Convenient features of your vehicle
Warning and indicator lights
Information -
Warning lights
Make sure that all warning lights are
OFF after starting the engine. If any
light is still ON, this indicates a situa-
tion that needs attention.
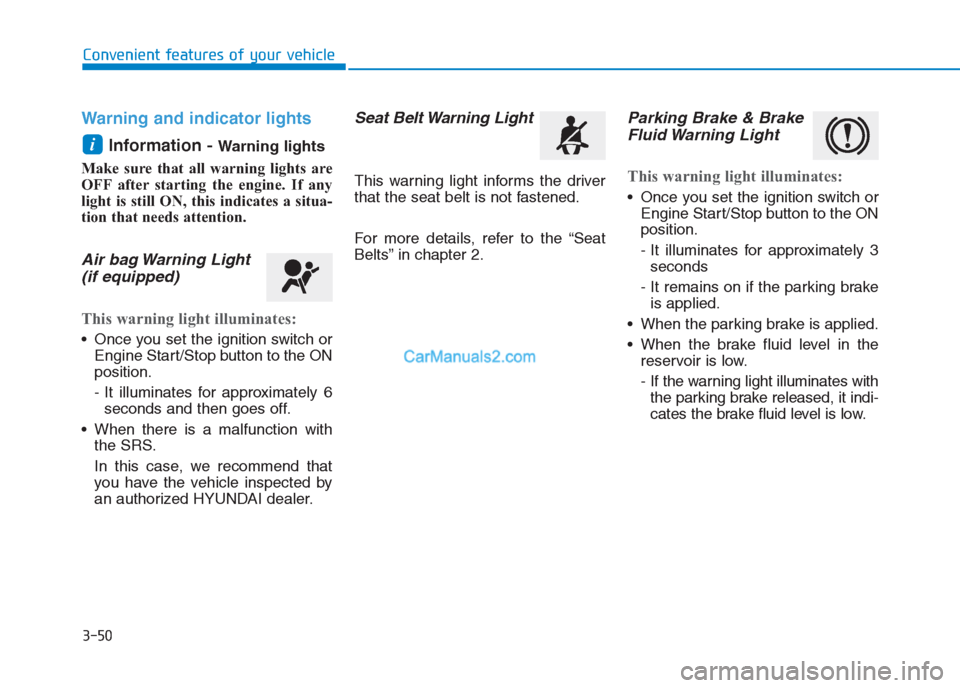
Air bag Warning Light
(if equipped)
This warning light illuminates:
Once you set the ignition switch or
Engine Start/Stop button to the ON
position.
- It illuminates for approximately 6
seconds and then goes off.
When there is a malfunction with
the SRS.
In this case, we recommend that
you have the vehicle inspected by
an authorized HYUNDAI dealer.
Seat Belt Warning Light
This warning light informs the driver
that the seat belt is not fastened.
For more details, refer to the “Seat
Belts” in chapter 2.
Parking Brake & Brake
Fluid Warning Light
This warning light illuminates:
Once you set the ignition switch or
Engine Start/Stop button to the ON
position.
- It illuminates for approximately 3
seconds
- It remains on if the parking brake
is applied.
When the parking brake is applied.
When the brake fluid level in the
reservoir is low.
- If the warning light illuminates with
the parking brake released, it indi-
cates the brake fluid level is low.
i