oil pressure Hyundai Elantra 2003 Owner's Manual
[x] Cancel search | Manufacturer: HYUNDAI, Model Year: 2003, Model line: Elantra, Model: Hyundai Elantra 2003Pages: 172, PDF Size: 2.82 MB
Page 37 of 172
FEATURES OF YOUR HYUNDAI FEATURES OF YOUR HYUNDAIFEATURES OF YOUR HYUNDAI FEATURES OF YOUR HYUNDAI
FEATURES OF YOUR HYUNDAI
1- 28
B260A01E
24 6578 13
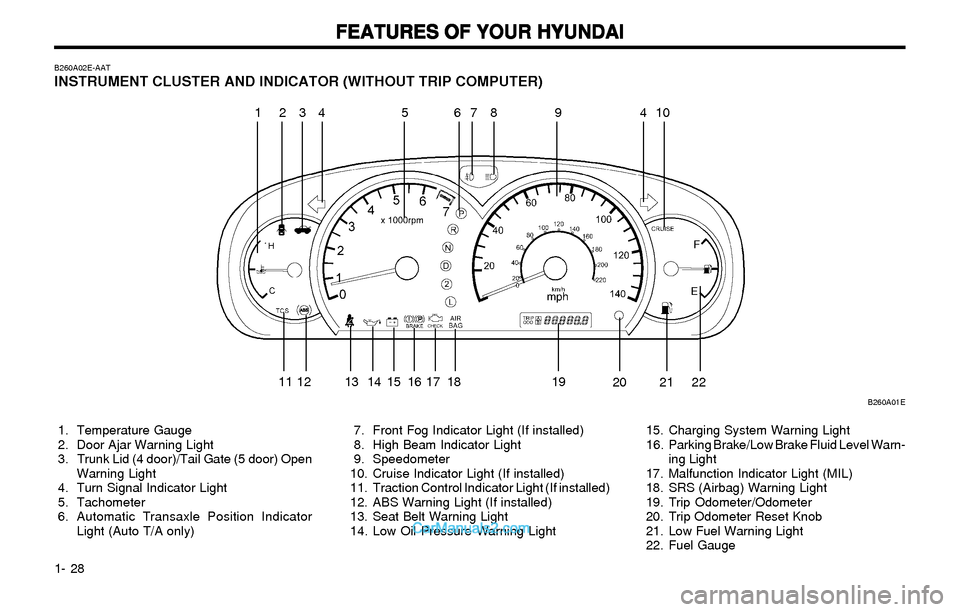
B260A02E-AATINSTRUMENT CLUSTER AND INDICATOR (WITHOUT TRIP COMPUTER)
10
12 13 14 15 16 17 18 19
21 20 22
1. Temperature Gauge
2. Door Ajar Warning Light
3. Trunk Lid (4 door)/Tail Gate (5 door) Open
Warning Light
4. Turn Signal Indicator Light
5. Tachometer
6. Automatic Transaxle Position Indicator
Light (Auto T/A only) 7. Front Fog Indicator Light (If installed)
8. High Beam Indicator Light
9. Speedometer
10. Cruise Indicator Light (If installed)
11. Traction Control Indicator Light (If installed)
12. ABS Warning Light (If installed)
13. Seat Belt Warning Light
14. Low Oil Pressure Warning Light9
114
15. Charging System Warning Light
16. Parking Brake/Low Brake Fluid Level Warn-
ing Light
17. Malfunction Indicator Light (MIL)
18. SRS (Airbag) Warning Light
19. Trip Odometer/Odometer
20. Trip Odometer Reset Knob
21. Low Fuel Warning Light
22. Fuel Gauge
Page 38 of 172
FEATURES OF YOUR HYUNDAI FEATURES OF YOUR HYUNDAIFEATURES OF YOUR HYUNDAI FEATURES OF YOUR HYUNDAI
FEATURES OF YOUR HYUNDAI
1- 29
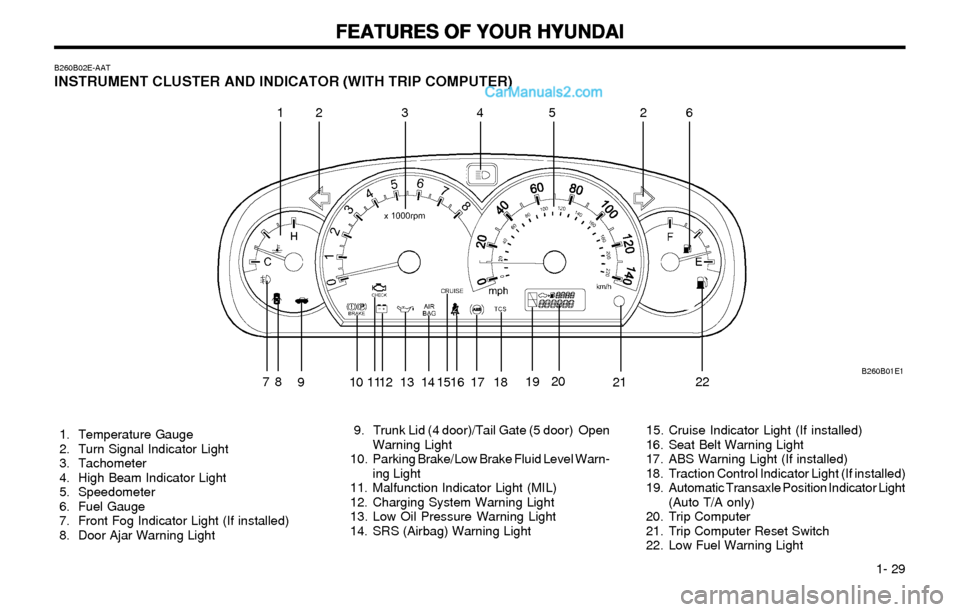
B260B02E-AATINSTRUMENT CLUSTER AND INDICATOR (WITH TRIP COMPUTER)
24 65
7813
10 12 13 14 1516
171819 2220
9112
1. Temperature Gauge
2. Turn Signal Indicator Light
3. Tachometer
4. High Beam Indicator Light
5. Speedometer
6. Fuel Gauge
7. Front Fog Indicator Light (If installed)
8. Door Ajar Warning Light 9. Trunk Lid (4 door)/Tail Gate (5 door) Open
Warning Light
10. Parking Brake/Low Brake Fluid Level Warn-
ing Light
11. Malfunction Indicator Light (MIL)
12. Charging System Warning Light
13. Low Oil Pressure Warning Light
14. SRS (Airbag) Warning Light15. Cruise Indicator Light (If installed)
16. Seat Belt Warning Light
17. ABS Warning Light (If installed)
18. Traction Control Indicator Light (If installed)
19. Automatic Transaxle Position Indicator Light
(Auto T/A only)
20. Trip Computer
21. Trip Computer Reset Switch
22. Low Fuel Warning Light
B260B01E121
Page 39 of 172
FEATURES OF YOUR HYUNDAI FEATURES OF YOUR HYUNDAIFEATURES OF YOUR HYUNDAI FEATURES OF YOUR HYUNDAI
FEATURES OF YOUR HYUNDAI
1- 30
B260D01A-AAT
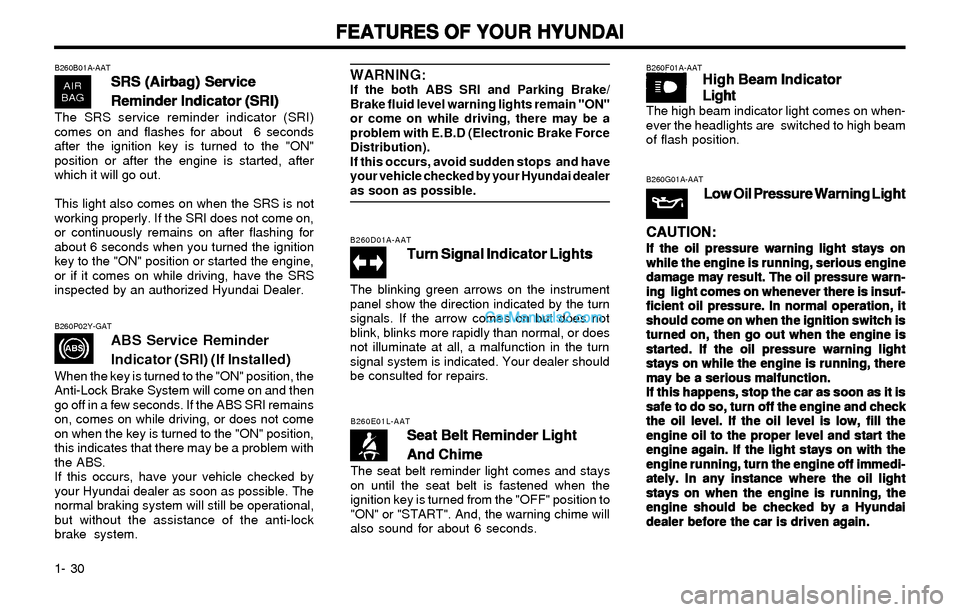
Turn Signal Indicator Lights Turn Signal Indicator LightsTurn Signal Indicator Lights Turn Signal Indicator Lights
Turn Signal Indicator Lights
The blinking green arrows on the instrument
panel show the direction indicated by the turn
signals. If the arrow comes on but does not
blink, blinks more rapidly than normal, or does
not illuminate at all, a malfunction in the turn
signal system is indicated. Your dealer should
be consulted for repairs.
B260E01L-AAT
Seat Belt Reminder Light Seat Belt Reminder LightSeat Belt Reminder Light Seat Belt Reminder Light
Seat Belt Reminder Light
And Chime And ChimeAnd Chime And Chime
And Chime
The seat belt reminder light comes and stays
on until the seat belt is fastened when the
ignition key is turned from the "OFF" position to
"ON" or "START". And, the warning chime will
also sound for about 6 seconds.
B260F01A-AATHigh Beam Indicator High Beam IndicatorHigh Beam Indicator High Beam Indicator
High Beam Indicator
Light LightLight Light
Light
The high beam indicator light comes on when-
ever the headlights are switched to high beam
of flash position.
B260G01A-AAT
Low Oil Pressure Warning Light Low Oil Pressure Warning LightLow Oil Pressure Warning Light Low Oil Pressure Warning Light
Low Oil Pressure Warning Light
CAUTION: CAUTION:CAUTION: CAUTION:
CAUTION:
If the oil pressure warning light stays on If the oil pressure warning light stays onIf the oil pressure warning light stays on If the oil pressure warning light stays on
If the oil pressure warning light stays on
while the engine is running, serious engine while the engine is running, serious enginewhile the engine is running, serious engine while the engine is running, serious engine
while the engine is running, serious engine
damage may result. The oil pressure warn- damage may result. The oil pressure warn-damage may result. The oil pressure warn- damage may result. The oil pressure warn-
damage may result. The oil pressure warn-
ing light comes on whenever there is insuf- ing light comes on whenever there is insuf-ing light comes on whenever there is insuf- ing light comes on whenever there is insuf-
ing light comes on whenever there is insuf-
ficient oil pressure. In normal operation, it ficient oil pressure. In normal operation, itficient oil pressure. In normal operation, it ficient oil pressure. In normal operation, it
ficient oil pressure. In normal operation, it
should come on when the ignition switch is should come on when the ignition switch isshould come on when the ignition switch is should come on when the ignition switch is
should come on when the ignition switch is
turned on, then go out when the engine is turned on, then go out when the engine isturned on, then go out when the engine is turned on, then go out when the engine is
turned on, then go out when the engine is
started. If the oil pressure warning light started. If the oil pressure warning lightstarted. If the oil pressure warning light started. If the oil pressure warning light
started. If the oil pressure warning light
stays on while the engine is running, there stays on while the engine is running, therestays on while the engine is running, there stays on while the engine is running, there
stays on while the engine is running, there
may be a serious malfunction. may be a serious malfunction.may be a serious malfunction. may be a serious malfunction.
may be a serious malfunction.
If this happens, stop the car as soon as it is If this happens, stop the car as soon as it isIf this happens, stop the car as soon as it is If this happens, stop the car as soon as it is
If this happens, stop the car as soon as it is
safe to do so, turn off the engine and check safe to do so, turn off the engine and checksafe to do so, turn off the engine and check safe to do so, turn off the engine and check
safe to do so, turn off the engine and check
the oil level. If the oil level is low, fill the the oil level. If the oil level is low, fill thethe oil level. If the oil level is low, fill the the oil level. If the oil level is low, fill the
the oil level. If the oil level is low, fill the
engine oil to the proper level and start the engine oil to the proper level and start theengine oil to the proper level and start the engine oil to the proper level and start the
engine oil to the proper level and start the
engine again. If the light stays on with the engine again. If the light stays on with theengine again. If the light stays on with the engine again. If the light stays on with the
engine again. If the light stays on with the
engine running, turn the engine off immedi- engine running, turn the engine off immedi-engine running, turn the engine off immedi- engine running, turn the engine off immedi-
engine running, turn the engine off immedi-
ately. In any instance where the oil light ately. In any instance where the oil lightately. In any instance where the oil light ately. In any instance where the oil light
ately. In any instance where the oil light
stays on when the engine is running, the stays on when the engine is running, thestays on when the engine is running, the stays on when the engine is running, the
stays on when the engine is running, the
engine should be checked by a Hyundai engine should be checked by a Hyundaiengine should be checked by a Hyundai engine should be checked by a Hyundai
engine should be checked by a Hyundai
dealer before the car is driven again. dealer before the car is driven again.dealer before the car is driven again. dealer before the car is driven again.
dealer before the car is driven again.
B260B01A-AAT
SRS (Airbag) Service SRS (Airbag) ServiceSRS (Airbag) Service SRS (Airbag) Service
SRS (Airbag) Service
Reminder Indicator (SRI) Reminder Indicator (SRI)Reminder Indicator (SRI) Reminder Indicator (SRI)
Reminder Indicator (SRI)
The SRS service reminder indicator (SRI)
comes on and flashes for about 6 seconds
after the ignition key is turned to the "ON"
position or after the engine is started, after
which it will go out.
This light also comes on when the SRS is not
working properly. If the SRI does not come on,
or continuously remains on after flashing for
about 6 seconds when you turned the ignition
key to the "ON" position or started the engine,
or if it comes on while driving, have the SRS
inspected by an authorized Hyundai Dealer.
B260P02Y-GATABS Service Reminder
Indicator (SRI) (If Installed)
When the key is turned to the "ON" position, the
Anti-Lock Brake System will come on and then
go off in a few seconds. If the ABS SRI remains
on, comes on while driving, or does not come
on when the key is turned to the "ON" position,
this indicates that there may be a problem with
the ABS.
If this occurs, have your vehicle checked by
your Hyundai dealer as soon as possible. The
normal braking system will still be operational,
but without the assistance of the anti-lock
brake system.
WARNING:If the both ABS SRI and Parking Brake/
Brake fluid level warning lights remain "ON"
or come on while driving, there may be a
problem with E.B.D (Electronic Brake Force
Distribution).
If this occurs, avoid sudden stops and have
your vehicle checked by your Hyundai dealer
as soon as possible.
Page 112 of 172

DRIVING YOUR HYUNDAI DRIVING YOUR HYUNDAIDRIVING YOUR HYUNDAI DRIVING YOUR HYUNDAI
DRIVING YOUR HYUNDAI
2- 11 accordance with the maintenance schedule in
Section 5. Before winter, have your coolant test-
ed to assure that its freezing point is sufficient for
the temperatures anticipated during the winter.
C160D01A-AAT
Check Battery and Cables Check Battery and CablesCheck Battery and Cables Check Battery and Cables
Check Battery and CablesWinter puts additional burdens on the battery
system. Visually inspect the battery and cables
as described in Section 6. The level of charge in
your battery can be checked by your Hyundai
dealer or a service station.
C160E01A-AATChange to "Winter Weight" Oil if Change to "Winter Weight" Oil ifChange to "Winter Weight" Oil if Change to "Winter Weight" Oil if
Change to "Winter Weight" Oil if
Necessary NecessaryNecessary Necessary
Necessary
In some climates it is recommended that a lower
viscosity "winter weight" oil be used during cold
weather. See Section 9 for recommendations. If
you aren't sure what weight oil you should use,
consult your Hyundai dealer.
C160F01A-AATCheck Spark Plugs and Ignition Check Spark Plugs and IgnitionCheck Spark Plugs and Ignition Check Spark Plugs and Ignition
Check Spark Plugs and Ignition
System SystemSystem System
System
Inspect your spark plugs as described in Section
6 and replace them if necessary. Also check all
ignition wiring and components to be sure they
are not cracked, worn or damaged in any way.
C160G01A-AAT
To Keep Locks from Freezing To Keep Locks from FreezingTo Keep Locks from Freezing To Keep Locks from Freezing
To Keep Locks from FreezingTo keep the locks from freezing, squirt an ap-
proved de-icer fluid or glycerine into the key
opening. If a lock is covered with ice, squirt it with
an approved de-icing fluid to remove the ice. If
the lock is frozen internally, you may be able to
thaw it out by using a heated key. Handle the
heated key with care to avoid burning the fingers.
C160H01A-AATUse Approved Anti-Freeze in Window Use Approved Anti-Freeze in WindowUse Approved Anti-Freeze in Window Use Approved Anti-Freeze in Window
Use Approved Anti-Freeze in Window
Washer System Washer SystemWasher System Washer System
Washer System
To keep the water in the window washer system
from freezing, add an approved anti-freeze solu-
tion in accordance with instructions on the con-
tainer. Window washer anti-freeze is available
from Hyundai dealers and most auto parts out-
lets. Do not use engine coolant or other types of
anti-freeze as these may damage the finish.
C160I01A-AAT
Don't Let Your Parking Brake Freeze Don't Let Your Parking Brake FreezeDon't Let Your Parking Brake Freeze Don't Let Your Parking Brake Freeze
Don't Let Your Parking Brake FreezeUnder some conditions your parking brake can
freeze in the engaged position. This is most likely
to happen when there is an accumulation of snow
or ice around or near the rear brakes or if the
brakes are wet. If there is a risk the parking brake
may freeze, apply it only temporarily while you
put the gear selector lever in "P" (automatic) or in
first or reverse gear (manual transaxle) and
block the rear wheels so the car cannot roll. Then
release the parking brake.
C160K01A-AAT
Carry Emergency Equipment Carry Emergency EquipmentCarry Emergency Equipment Carry Emergency Equipment
Carry Emergency EquipmentDepending on the severity of the weather where
you drive your car, you should carry appropriate
emergency equipment. Some of the items you
may want to carry include tire chains, tow straps
or chains, flashlight, emergency flares, sand, a
shovel, jumper cables, a window scraper, gloves,
ground cloth, coveralls, a blanket, etc.
C160J01A-AAT
Don't Let Ice and Snow Accumulate Don't Let Ice and Snow AccumulateDon't Let Ice and Snow Accumulate Don't Let Ice and Snow Accumulate
Don't Let Ice and Snow Accumulate
Underneath UnderneathUnderneath Underneath
Underneath
Under some conditions, snow and ice can build
up under the fenders and interfere with the steer-
ing. When driving in severe winter conditions
where this may happen, you should periodically
check underneath the car to be sure the move-
ment of the front wheels and the steering compo-
nents is not obstructed.
C170A01A-AAT
HIGHER SPEED MOTORING HIGHER SPEED MOTORINGHIGHER SPEED MOTORING HIGHER SPEED MOTORING
HIGHER SPEED MOTORING
Pre-Trip Inspections Pre-Trip InspectionsPre-Trip Inspections Pre-Trip Inspections
Pre-Trip Inspections
1. Tires:
Adjust the tire inflation pressures to specifica-
tion. Low tire inflation pressures will result in
overheating and possible failure of the tires.
Avoid using worn or damaged tires which may
result in reduced traction or tire failure.
Page 139 of 172
DO-IT-YOURSELF MAINTENANCE DO-IT-YOURSELF MAINTENANCEDO-IT-YOURSELF MAINTENANCE DO-IT-YOURSELF MAINTENANCE
DO-IT-YOURSELF MAINTENANCE
6-3
G020B01A-AAT
Vehicle Exterior Vehicle ExteriorVehicle Exterior Vehicle Exterior
Vehicle ExteriorThe following should be checked monthly:
o Overall appearance and condition
o Wheel condition and wheel nut torque
o Exhaust system condition
o Light condition and operation
o Windshield glass condition
o Wiper blade condition
o Paint condition and body corrosion
o Fluid leaks
o Door and hood lock condition
o Tire pressure and condition (including spare
tire)
G020C01A-AAT
Vehicle Interior Vehicle InteriorVehicle Interior Vehicle Interior
Vehicle InteriorThe following should be checked each time
when the vehicle is driven:
o Lights operation
o Windshield wiper operation
o Horn operation
o Defroster, heating system operation (and air
conditioning, if installed)
o Steering operation and condition
o Mirror condition and operation
o Turn signal operation
o Accelerator pedal operation
o Brake operation, including parking brake
o Manual transaxle operation, including clutch
operation
o Automatic transaxle operation, including
"Park" mechanism operation
o Seat control condition and operation
o Seat belt condition and operation
o Sunvisor operation
If you notice anything that does not operate
correctly or appears to be functioning incorrect-
ly, inspect it carefully and seek assistance from
your Hyundai dealer if service is needed.
G030A01A-AAT
CHECKING THE ENGINE OIL CHECKING THE ENGINE OILCHECKING THE ENGINE OIL CHECKING THE ENGINE OIL
CHECKING THE ENGINE OILEngine oil is essential to the performance and
service of the engine. It is suggested that you
check the oil level at least once a week in
normal use and more often if you are on a trip
or driving in severe conditions.
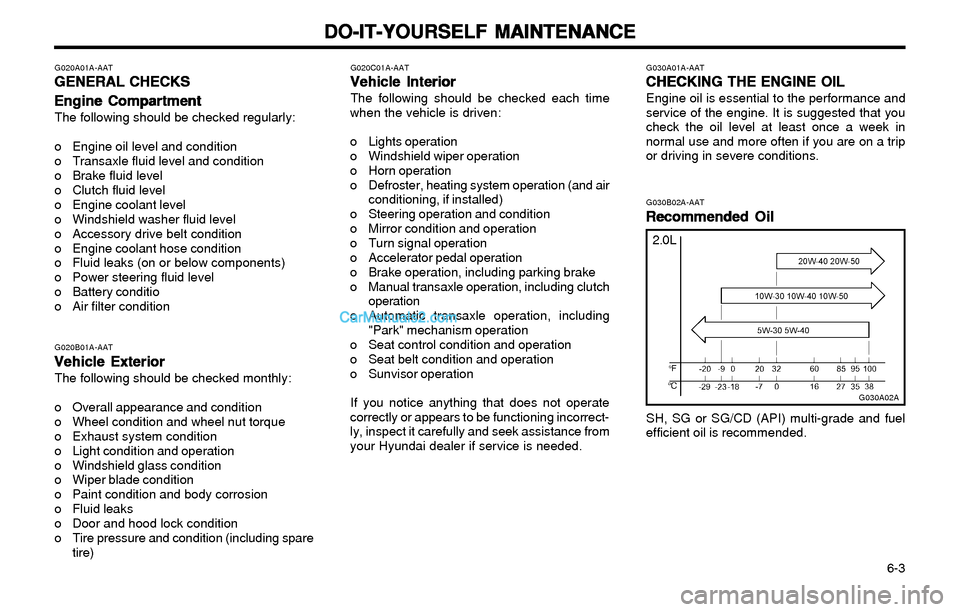
G030B02A-AAT
Recommended Oil Recommended OilRecommended Oil Recommended Oil
Recommended Oil
G030A02A
2.0L
SH, SG or SG/CD (API) multi-grade and fuel
efficient oil is recommended.
G020A01A-AAT
GENERAL CHECKS GENERAL CHECKSGENERAL CHECKS GENERAL CHECKS
GENERAL CHECKS
Engine Compartment Engine CompartmentEngine Compartment Engine Compartment
Engine Compartment
The following should be checked regularly:
o Engine oil level and condition
o Transaxle fluid level and condition
o Brake fluid level
o Clutch fluid level
o Engine coolant level
o Windshield washer fluid level
o Accessory drive belt condition
o Engine coolant hose condition
o Fluid leaks (on or below components)
o Power steering fluid level
o Battery conditio
o Air filter condition
Page 141 of 172
DO-IT-YOURSELF MAINTENANCE DO-IT-YOURSELF MAINTENANCEDO-IT-YOURSELF MAINTENANCE DO-IT-YOURSELF MAINTENANCE
DO-IT-YOURSELF MAINTENANCE
6-5 3. Slide underneath the car and loosen the
drain plug by turning it counterclockwise
with a wrench of the proper size. Be sure
that a drain pan is in position to catch the oil
as it drains out, then remove the drain plug.
WARNING: WARNING:WARNING: WARNING:
WARNING:Be very careful when draining the engine oil Be very careful when draining the engine oilBe very careful when draining the engine oil Be very careful when draining the engine oil
Be very careful when draining the engine oil
as it may be hot enough to burn you! as it may be hot enough to burn you!as it may be hot enough to burn you! as it may be hot enough to burn you!
as it may be hot enough to burn you!
4. When the oil has stopped draining, replace
the drain plug using a new washer and
retighten by turning it clockwise.
Drain plug tightening torque: Drain plug tightening torque:Drain plug tightening torque: Drain plug tightening torque:
Drain plug tightening torque:
4.0 ~ 4.5 kgf.m 4.0 ~ 4.5 kgf.m4.0 ~ 4.5 kgf.m 4.0 ~ 4.5 kgf.m
4.0 ~ 4.5 kgf.m
5. Remove the oil filter. You should be able to
unscrew the filter with your hands. (If your
hands are slippery, try to use a cloth be-
tween your hands and the filter to give
yourself a better grip.) A certain amount of
oil will come out when you remove the filter,
so be sure to have your drain pan in place
underneath it.
6. Install a new oil filter in accordance with the
instructions on the carton or on the filter
itself. Do not over-tighten.
Oil filter tightening torque : 1.2 ~ 1.6 kgf.m Oil filter tightening torque : 1.2 ~ 1.6 kgf.mOil filter tightening torque : 1.2 ~ 1.6 kgf.m Oil filter tightening torque : 1.2 ~ 1.6 kgf.m
Oil filter tightening torque : 1.2 ~ 1.6 kgf.m
Be sure that the mounting surface on the
engine is clean and that the old gasket is
removed completely. Lubricate the new gas-
ket on the filter with clean engine oil before
installation.7. Refill the crankcase with the recommended
engine oil. Refer to the specification in chap-
ter 9 for engine oil capacity.
8. Start the engine and check to be sure no oil
is leaking from the drain plug or oil filter.
9. Shut off the engine and recheck the oil level.NOTE: NOTE:NOTE: NOTE:
NOTE:Always dispose of used engine oil in an Always dispose of used engine oil in anAlways dispose of used engine oil in an Always dispose of used engine oil in an
Always dispose of used engine oil in an
environmentally acceptable manner. It is sug- environmentally acceptable manner. It is sug-environmentally acceptable manner. It is sug- environmentally acceptable manner. It is sug-
environmentally acceptable manner. It is sug-
gested that it be placed in a sealed container gested that it be placed in a sealed containergested that it be placed in a sealed container gested that it be placed in a sealed container
gested that it be placed in a sealed container
and taken to a service station for reclama- and taken to a service station for reclama-and taken to a service station for reclama- and taken to a service station for reclama-
and taken to a service station for reclama-
tion. Do not pour the oil on the ground or tion. Do not pour the oil on the ground ortion. Do not pour the oil on the ground or tion. Do not pour the oil on the ground or
tion. Do not pour the oil on the ground or
put it into the household trash. put it into the household trash.put it into the household trash. put it into the household trash.
put it into the household trash.
WARNING: WARNING:WARNING: WARNING:
WARNING:Used motor oil may cause irritation or can- Used motor oil may cause irritation or can-Used motor oil may cause irritation or can- Used motor oil may cause irritation or can-
Used motor oil may cause irritation or can-
cer of the skin if left in contact with the skin cer of the skin if left in contact with the skincer of the skin if left in contact with the skin cer of the skin if left in contact with the skin
cer of the skin if left in contact with the skin
for prolonged periods of time. Wash your for prolonged periods of time. Wash yourfor prolonged periods of time. Wash your for prolonged periods of time. Wash your
for prolonged periods of time. Wash your
hands thoroughly with soap and warm wa- hands thoroughly with soap and warm wa-hands thoroughly with soap and warm wa- hands thoroughly with soap and warm wa-
hands thoroughly with soap and warm wa-
ter as soon as possible after handling used ter as soon as possible after handling usedter as soon as possible after handling used ter as soon as possible after handling used
ter as soon as possible after handling used
oil. oil.oil. oil.
oil.
G050A01A-AATCHECKING AND CHANGING THE CHECKING AND CHANGING THECHECKING AND CHANGING THE CHECKING AND CHANGING THE
CHECKING AND CHANGING THE
ENGINE COOLANT ENGINE COOLANTENGINE COOLANT ENGINE COOLANT
ENGINE COOLANT
WARNING: WARNING:WARNING: WARNING:
WARNING:
Do not remove the radiator cap when the Do not remove the radiator cap when theDo not remove the radiator cap when the Do not remove the radiator cap when the
Do not remove the radiator cap when the
engine is hot. When the engine is hot, the engine is hot. When the engine is hot, theengine is hot. When the engine is hot, the engine is hot. When the engine is hot, the
engine is hot. When the engine is hot, the
engine coolant is under pressure and may engine coolant is under pressure and mayengine coolant is under pressure and may engine coolant is under pressure and may
engine coolant is under pressure and may
erupt through the opening if the cap is erupt through the opening if the cap iserupt through the opening if the cap is erupt through the opening if the cap is
erupt through the opening if the cap is
removed. You could be seriously burned if removed. You could be seriously burned ifremoved. You could be seriously burned if removed. You could be seriously burned if
removed. You could be seriously burned if
you do not observe this precaution. Do not you do not observe this precaution. Do notyou do not observe this precaution. Do not you do not observe this precaution. Do not
you do not observe this precaution. Do not
G050B01A-AAT
Recommended Engine Coolant Recommended Engine CoolantRecommended Engine Coolant Recommended Engine Coolant
Recommended Engine Coolant
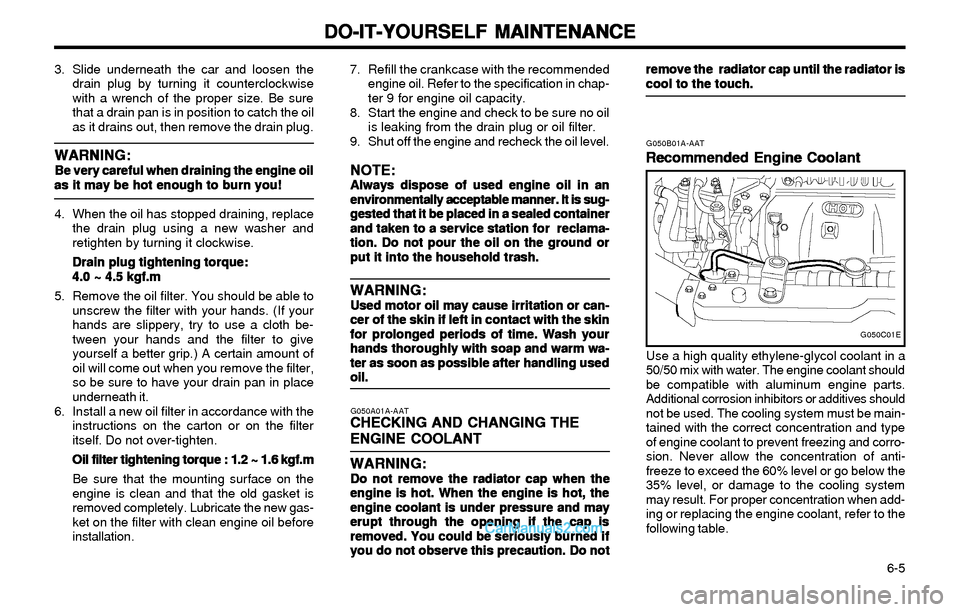
Use a high quality ethylene-glycol coolant in a
50/50 mix with water. The engine coolant should
be compatible with aluminum engine parts.
Additional corrosion inhibitors or additives should
not be used. The cooling system must be main-
tained with the correct concentration and type
of engine coolant to prevent freezing and corro-
sion. Never allow the concentration of anti-
freeze to exceed the 60% level or go below the
35% level, or damage to the cooling system
may result. For proper concentration when add-
ing or replacing the engine coolant, refer to the
following table.
G050C01E
remove the radiator cap until the radiator is remove the radiator cap until the radiator isremove the radiator cap until the radiator is remove the radiator cap until the radiator is
remove the radiator cap until the radiator is
cool to the touch. cool to the touch.cool to the touch. cool to the touch.
cool to the touch.
Page 165 of 172
VEHICLE SPECIFICATIONS VEHICLE SPECIFICATIONSVEHICLE SPECIFICATIONS VEHICLE SPECIFICATIONS
VEHICLE SPECIFICATIONS
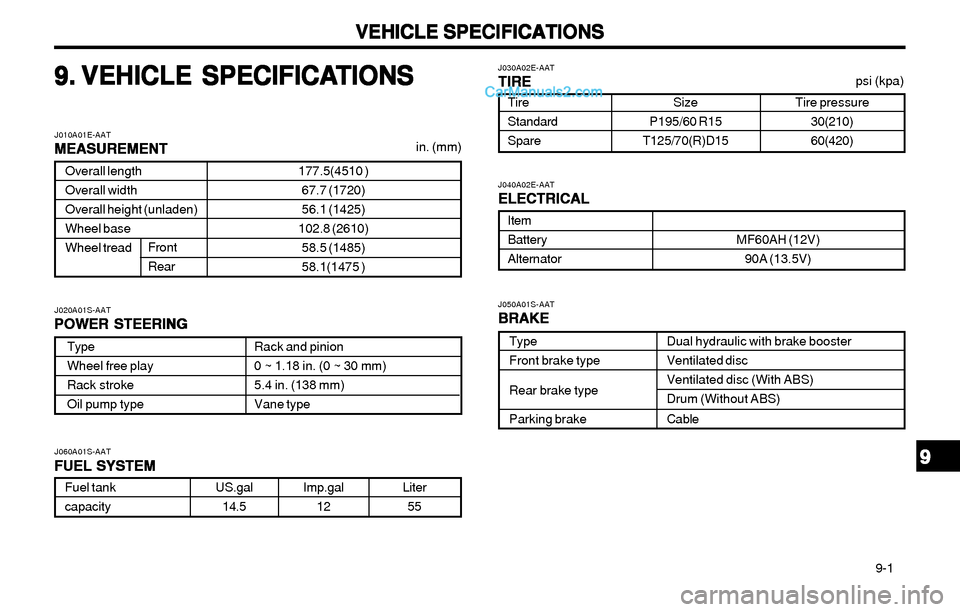
9-1 Liter
55
Item
Battery
Alternator
9. 9.9. 9.
9.
VEHICLE SPECIFICA VEHICLE SPECIFICAVEHICLE SPECIFICA VEHICLE SPECIFICA
VEHICLE SPECIFICA
TIONS TIONSTIONS TIONS
TIONS
Rack and pinion
0 ~ 1.18 in. (0 ~ 30 mm)
5.4 in. (138 mm)
Vane type
in. (mm)
9 99 9
9
Overall length
Overall width
Overall height (unladen)
Wheel base
Wheel tread
J010A01E-AAT
MEASUREMENT MEASUREMENTMEASUREMENT MEASUREMENT
MEASUREMENT
177.5(4510 )
67.7 (1720)
56.1 (1425)
102.8 (2610)
58.5 (1485)
58.1(1475 ) Front
Rear
J020A01S-AAT
POWER STEERING POWER STEERINGPOWER STEERING POWER STEERING
POWER STEERING
Type
Wheel free play
Rack stroke
Oil pump type
J060A01S-AAT
FUEL SYSTEM FUEL SYSTEMFUEL SYSTEM FUEL SYSTEM
FUEL SYSTEM
Fuel tank
capacityUS.gal
14.5Imp.gal
12
J040A02E-AAT
ELECTRICAL ELECTRICALELECTRICAL ELECTRICAL
ELECTRICAL
MF60AH (12V)
90A (13.5V)
J050A01S-AAT
BRAKE BRAKEBRAKE BRAKE
BRAKE
Type
Front brake type
Rear brake type
Parking brakeDual hydraulic with brake booster
Ventilated disc
Ventilated disc (With ABS)
Drum (Without ABS)
Cable Tire
Standard
Spare
Size
P195/60 R15
T125/70(R)D15
J030A02E-AAT
TIRE TIRETIRE TIRE
TIRE
Tire pressure
30(210)
60(420)
psi (kpa)
Page 172 of 172
Seoul Korea
Printing: JAN. 24, 2003
Publication No.: A2DO-EU31P
Printed in Korea
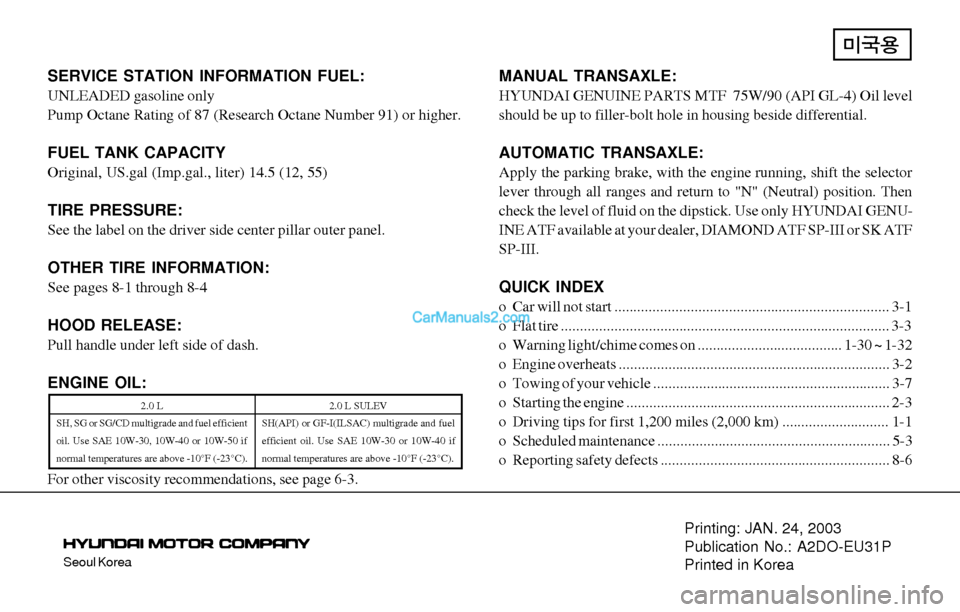
SERVICE STATION INFORMATION FUEL:
UNLEADED gasoline only
Pump Octane Rating of 87 (Research Octane Number 91) or higher.
FUEL TANK CAPACITY
Original, US.gal (Imp.gal., liter) 14.5 (12, 55)
TIRE PRESSURE:
See the label on the driver side center pillar outer panel.
OTHER TIRE INFORMATION:
See pages 8-1 through 8-4
HOOD RELEASE:
Pull handle under left side of dash.
ENGINE OIL:
For other viscosity recommendations, see page 6-3.
MANUAL TRANSAXLE:
HYUNDAI GENUINE PARTS MTF 75W/90 (API GL-4) Oil level
should be up to filler-bolt hole in housing beside differential.
AUTOMATIC TRANSAXLE:
Apply the parking brake, with the engine running, shift the selector
lever through all ranges and return to "N" (Neutral) position. Then
check the level of fluid on the dipstick. Use only HYUNDAI GENU-
INE ATF available at your dealer, DIAMOND ATF SP-III or SK ATF
SP-III.
QUICK INDEX
o Car will not start ........................................................................ 3-1
o Flat tire ...................................................................................... 3-3
o Warning light/chime comes on ...................................... 1-30 ~ 1-32
o Engine overheats ....................................................................... 3-2
o Towing of your vehicle .............................................................. 3-7
o Starting the engine ..................................................................... 2-3
o Driving tips for first 1,200 miles (2,000 km) ............................ 1-1
o Scheduled maintenance ............................................................. 5-3
o Reporting safety defects ............................................................ 8-6
2.0 L
SH, SG or SG/CD multigrade and fuel efficient
oil. Use SAE 10W-30, 10W-40 or 10W-50 if
normal temperatures are above -10°F (-23°C).2.0 L SULEV
SH(API) or GF-I(ILSAC) multigrade and fuel
efficient oil. Use SAE 10W-30 or 10W-40 if
normal temperatures are above -10°F (-23°C).