warning light Hyundai Elantra 2004 Owner's Guide
[x] Cancel search | Manufacturer: HYUNDAI, Model Year: 2004, Model line: Elantra, Model: Hyundai Elantra 2004Pages: 241, PDF Size: 6.5 MB
Page 161 of 241
3WHAT TO DO IN AN EMERGENCY
3
HXDFL523
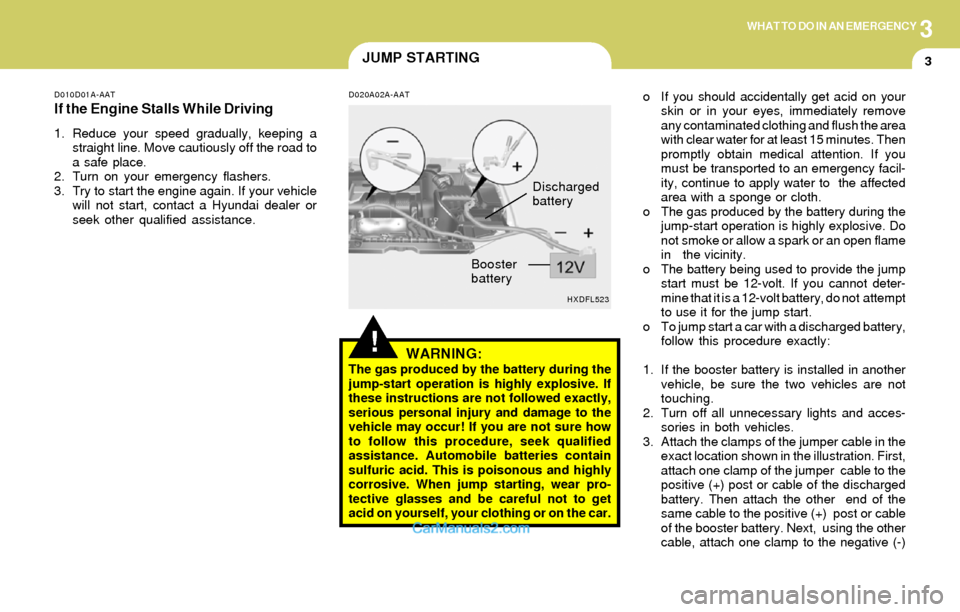
Discharged
battery
Booster
battery
JUMP STARTING
D010D01A-AAT
If the Engine Stalls While Driving
1. Reduce your speed gradually, keeping a
straight line. Move cautiously off the road to
a safe place.
2. Turn on your emergency flashers.
3. Try to start the engine again. If your vehicle
will not start, contact a Hyundai dealer or
seek other qualified assistance.
!
o If you should accidentally get acid on your
skin or in your eyes, immediately remove
any contaminated clothing and flush the area
with clear water for at least 15 minutes. Then
promptly obtain medical attention. If you
must be transported to an emergency facil-
ity, continue to apply water to the affected
area with a sponge or cloth.
o The gas produced by the battery during the
jump-start operation is highly explosive. Do
not smoke or allow a spark or an open flame
in the vicinity.
o The battery being used to provide the jump
start must be 12-volt. If you cannot deter-
mine that it is a 12-volt battery, do not attempt
to use it for the jump start.
o To jump start a car with a discharged battery,
follow this procedure exactly:
1. If the booster battery is installed in another
vehicle, be sure the two vehicles are not
touching.
2. Turn off all unnecessary lights and acces-
sories in both vehicles.
3. Attach the clamps of the jumper cable in the
exact location shown in the illustration. First,
attach one clamp of the jumper cable to the
positive (+) post or cable of the discharged
battery. Then attach the other end of the
same cable to the positive (+) post or cable
of the booster battery. Next, using the other
cable, attach one clamp to the negative (-)D020A02A-AAT
WARNING:The gas produced by the battery during the
jump-start operation is highly explosive. If
these instructions are not followed exactly,
serious personal injury and damage to the
vehicle may occur! If you are not sure how
to follow this procedure, seek qualified
assistance. Automobile batteries contain
sulfuric acid. This is poisonous and highly
corrosive. When jump starting, wear pro-
tective glasses and be careful not to get
acid on yourself, your clothing or on the car.
Page 162 of 241
3WHAT TO DO IN AN EMERGENCY
4IF THE ENGINE OVERHEATS
!
!WARNING:While the engine is running, keep hair,
hands, and clothing away from moving
parts such as the fan and drive belts to
prevent injury.
5. If the water pump drive belt is broken or
engine coolant is leaking out, stop the engine
immediately and call the nearest Hyundai
dealer for assistance.
WARNING:Do not remove the radiator cap when the
engine is hot. This can allow coolant to be
blown out of the opening and cause seri-
ous burns.
6. If you cannot find the cause of the overheat-
ing, wait until the engine temperature has
returned to normal. Then, if coolant has been
lost, carefully add coolant to the reservoir
(page 6-9) to bring the fluid level in the
reservoir up to the halfway mark.
7. Proceed with caution, keeping alert for fur-
ther signs of overheating. If overheating
happens again, call a Hyundai dealer for
assistance.
D030A01A-AAT
If your temperature gauge indicates overheat-
ing, you experience a loss of power, or hear loud
pinging or knocking and the engine is probably
too hot. If this happens and, you should:
1. Pull off the road and stop as soon as it is safe
to do so.
2. Place the gear selector lever in "P" (auto-
matic), or neutral (manual transaxle) and set
the parking brake. If the air conditioning is on,
turn it off.
3. If engine coolant is running out under the car
or steam is coming out from the hood, stop
the engine. Do not open the hood until the
engine coolant has stopped running or the
steaming has stopped. If there is no visible
loss of engine coolant and no steam, leave
the engine running and check to be sure the
engine cooling fan is operating. If the fan is
not running, turn the engine off.
4. Check to see if the water pump drive belt is
missing. If it is not missing, check to see that
it is tight. If the drive belt seems to be
satisfactory, check for engine coolant leak-
ing from the radiator, hoses or under the car.
(If the air conditioning had been in use, it is
normal for cold water to be draining from it
when you stop). post or cable of the booster battery. Then
attach the other end of that cable to a solid
metal part of the engine away from the
battery. Do not connect the cable to any
moving part.
4. Start the engine in the car with the booster
battery and let it run for a few minutes. This
will help to assure that the booster battery is
fully charged. During the jumping operation,
run the engine in this vehicle at about 2,000
rpm.
5. Start the engine in the car with the dis-
charged battery using the normal starting
procedure. After the engine starts, leave the
jumper cables connected and let the engine
run at fast idle or about 2,000 rpm for several
minutes.
6. Carefully remove the jumper cables in the
reverse order of attachment.
If you do not know why your battery became
discharged (because the lights were left on,
etc.), have the charging system checked by
your Hyundai dealer.
Page 166 of 241
3WHAT TO DO IN AN EMERGENCY
8
!WARNING:Wheel and wheel covers may have sharp
edges. Handle them carefully to avoid pos-
sible severe injury.
Before putting the wheel into place, be sure
that there is nothing on the hub or wheel
(such as mud, tar, gravel, etc.) that inter-
feres with the wheel from fitting solidly
against the hub. If there is, remove it. If there
is not good contact on the mounting sur-
face between the wheel and hub, the wheel
nuts could loosen and cause the loss of a
wheel. Loss of a wheel may result in loss of
control of the vehicle. This may cause seri-
ous injury or death.
D060G02E D060G02Y-AAT
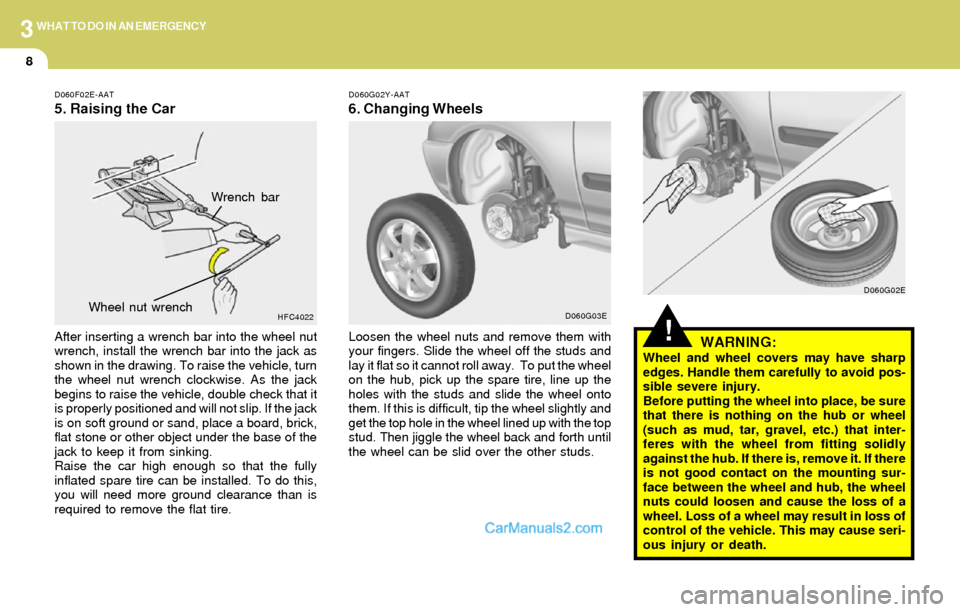
6. Changing Wheels
Loosen the wheel nuts and remove them with
your fingers. Slide the wheel off the studs and
lay it flat so it cannot roll away. To put the wheel
on the hub, pick up the spare tire, line up the
holes with the studs and slide the wheel onto
them. If this is difficult, tip the wheel slightly and
get the top hole in the wheel lined up with the top
stud. Then jiggle the wheel back and forth until
the wheel can be slid over the other studs.
D060F02E-AAT
5. Raising the Car
After inserting a wrench bar into the wheel nut
wrench, install the wrench bar into the jack as
shown in the drawing. To raise the vehicle, turn
the wheel nut wrench clockwise. As the jack
begins to raise the vehicle, double check that it
is properly positioned and will not slip. If the jack
is on soft ground or sand, place a board, brick,
flat stone or other object under the base of the
jack to keep it from sinking.
Raise the car high enough so that the fully
inflated spare tire can be installed. To do this,
you will need more ground clearance than is
required to remove the flat tire.
HFC4022
Wrench bar
Wheel nut wrench
D060G03E
Page 206 of 241
6DO-IT-YOURSELF MAINTENANCE
22
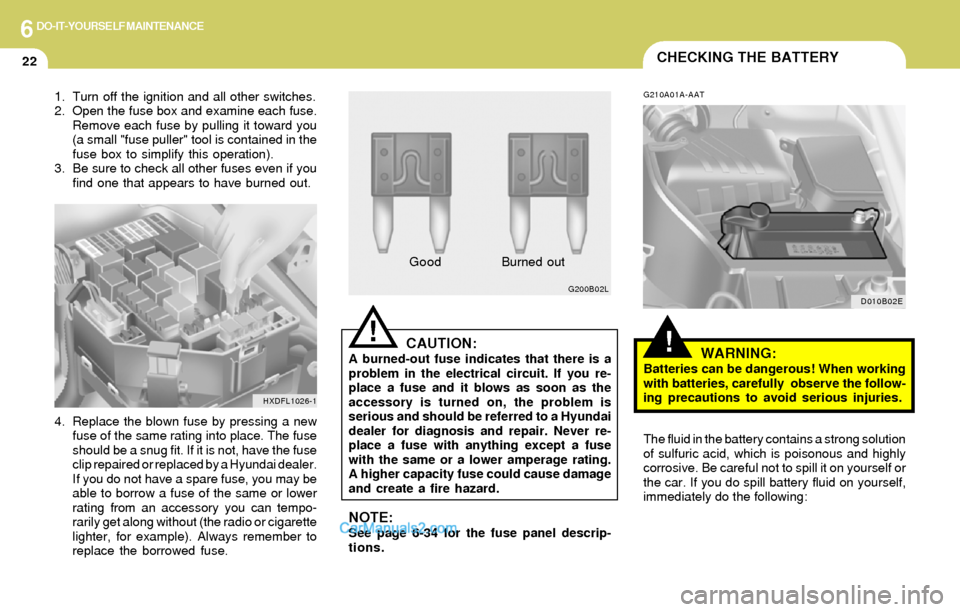
1. Turn off the ignition and all other switches.
2. Open the fuse box and examine each fuse.
Remove each fuse by pulling it toward you
(a small "fuse puller" tool is contained in the
fuse box to simplify this operation).
3. Be sure to check all other fuses even if you
find one that appears to have burned out.
4. Replace the blown fuse by pressing a new
fuse of the same rating into place. The fuse
should be a snug fit. If it is not, have the fuse
clip repaired or replaced by a Hyundai dealer.
If you do not have a spare fuse, you may be
able to borrow a fuse of the same or lower
rating from an accessory you can tempo-
rarily get along without (the radio or cigarette
lighter, for example). Always remember to
replace the borrowed fuse.
HXDFL1026-1
!!
G210A01A-AAT
WARNING:Batteries can be dangerous! When working
with batteries, carefully observe the follow-
ing precautions to avoid serious injuries.
The fluid in the battery contains a strong solution
of sulfuric acid, which is poisonous and highly
corrosive. Be careful not to spill it on yourself or
the car. If you do spill battery fluid on yourself,
immediately do the following:
CAUTION:A burned-out fuse indicates that there is a
problem in the electrical circuit. If you re-
place a fuse and it blows as soon as the
accessory is turned on, the problem is
serious and should be referred to a Hyundai
dealer for diagnosis and repair. Never re-
place a fuse with anything except a fuse
with the same or a lower amperage rating.
A higher capacity fuse could cause damage
and create a fire hazard.
NOTE:See page 6-34 for the fuse panel descrip-
tions.
G200B02L
GoodBurned out
CHECKING THE BATTERY
D010B02E
Page 207 of 241
6DO-IT-YOURSELF MAINTENANCE
23CHECKING ELECTRIC COOLING
FANS
!
!
G220B01A-AATChecking Engine Cooling Fan
The engine cooling fan should come on auto-
matically if the engine coolant temperature is
high.
G220A01A-AAT
G220C01A-AAT
Checking Condenser Cooling Fan
The condenser coolant fan should come on
automatically whenever the air conditioning is in
operation.
WARNING:The cooling fan is controlled by engine
coolant temperature and may sometimes
operate even when the engine is not run-
ning. Use extreme caution when working
near the blades of the coolant fan, so that
you are not injured by a rotating fan blade.
As the engine coolant temperature de-
creases the fan will automatically shut off.
This is a normal condition.
G210B02A-AAT
Checking the Battery
Keep the battery clean. Any evidence of corro-
sion around the battery posts or terminals
should be removed using a solution of house-
hold baking soda and warm water. After the
battery terminals are dry, cover them with a light
coating of grease.
PROPOSITION 65 WARNING:Battery posts, terminals, and related acces-
sories contain lead and lead compounds,
chemicals known to the state of California
to cause cancer and reproductive harm.
Wash hands after handling. o If battery fluid is on your skin, flush the
affected areas with water for at least 15
minutes and then seek medical assistance.
o If battery fluid is in your eyes, rinse out your
eyes with water and get medical assistance
as soon as possible. While you are being
driven to get medical assistance, continue to
rinse your eyes by using a sponge or soft
cloth saturated with water.
o If you swallow battery fluid, drink a large
quantity of water or milk followed by milk of
magnesia, eat a raw egg or drink vegetable
oil. Get medical assistance as soon as
possible.
While batteries are being charged (either by a
battery charger or by the vehicle's generator),
they produce explosive gases. Always ob-
serve these warnings to prevent injuries from
occurring:
o Charge batteries only in a well ventilated
area.
o Do not permit flames, sparks or smoking in
the area.
o Keep children away from the area.
Page 209 of 241
6DO-IT-YOURSELF MAINTENANCE
25
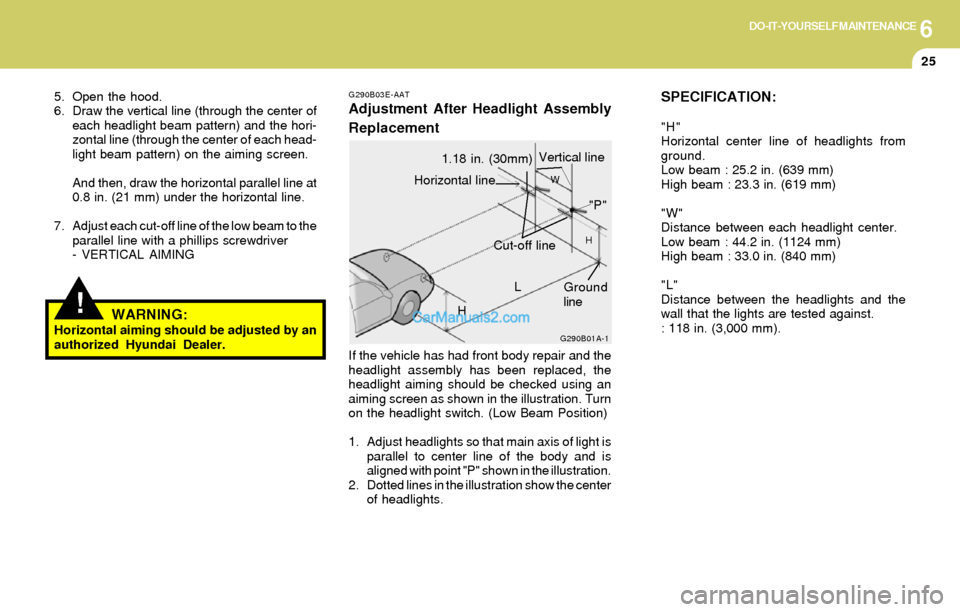
SPECIFICATION:
"H"
Horizontal center line of headlights from
ground.
Low beam : 25.2 in. (639 mm)
High beam : 23.3 in. (619 mm)
"W"
Distance between each headlight center.
Low beam : 44.2 in. (1124 mm)
High beam : 33.0 in. (840 mm)
"L"
Distance between the headlights and the
wall that the lights are tested against.
: 118 in. (3,000 mm).
G290B03E-AAT
Adjustment After Headlight Assembly
Replacement
If the vehicle has had front body repair and the
headlight assembly has been replaced, the
headlight aiming should be checked using an
aiming screen as shown in the illustration. Turn
on the headlight switch. (Low Beam Position)
1. Adjust headlights so that main axis of light is
parallel to center line of the body and is
aligned with point "P" shown in the illustration.
2. Dotted lines in the illustration show the center
of headlights.
!
5. Open the hood.
6. Draw the vertical line (through the center of
each headlight beam pattern) and the hori-
zontal line (through the center of each head-
light beam pattern) on the aiming screen.
And then, draw the horizontal parallel line at
0.8 in. (21 mm) under the horizontal line.
7. Adjust each cut-off line of the low beam to the
parallel line with a phillips screwdriver
- VERTICAL AIMING
WARNING:Horizontal aiming should be adjusted by an
authorized Hyundai Dealer.G290B01A-1
L
W
H
HCut-off line
"P"
1.18 in. (30mm)Vertical line
Horizontal line
Ground
line
Page 211 of 241
6DO-IT-YOURSELF MAINTENANCE
27
!WARNING:This halogen bulb contains gas under pres-
sure and if impacted could shatter, result-
ing in flying fragments. Always wear eye
protection when servicing the bulb. Protect
the bulb against abrasions or scratches
and against liquids when lighted. Turn the
bulb on only when installing in a headlight.
Replace the headlight if damaged or cracked.
Keep the bulb out of the reach of children
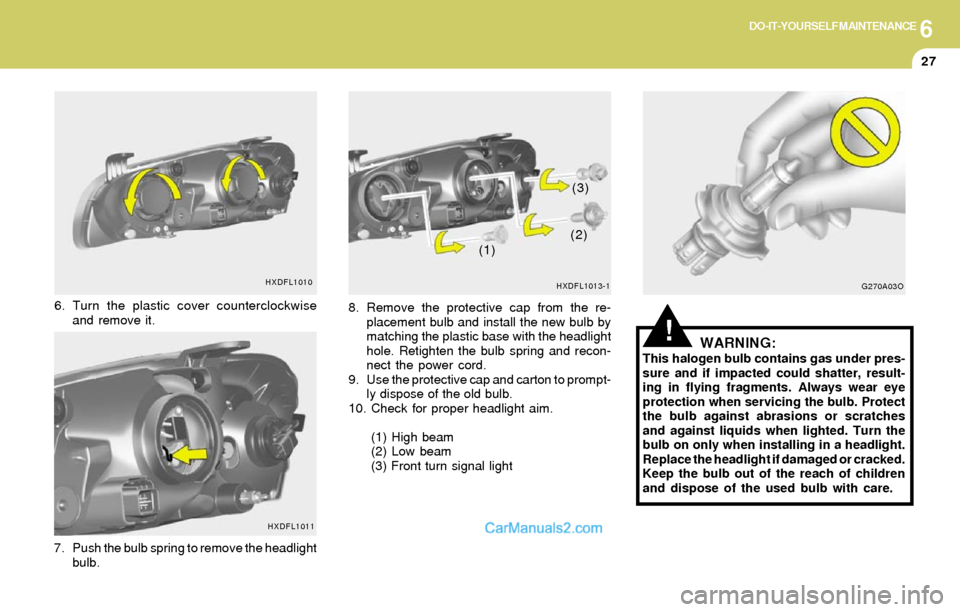
and dispose of the used bulb with care. 8. Remove the protective cap from the re-
placement bulb and install the new bulb by
matching the plastic base with the headlight
hole. Retighten the bulb spring and recon-
nect the power cord.
9. Use the protective cap and carton to prompt-
ly dispose of the old bulb.
10. Check for proper headlight aim.
(1) High beam
(2) Low beam
(3) Front turn signal light
7. Push the bulb spring to remove the headlight
bulb. 6. Turn the plastic cover counterclockwise
and remove it.
HXDFL1011 HXDFL1010
HXDFL1013-1
(1)(2)(3)
G270A03O
Page 217 of 241
6DO-IT-YOURSELF MAINTENANCE
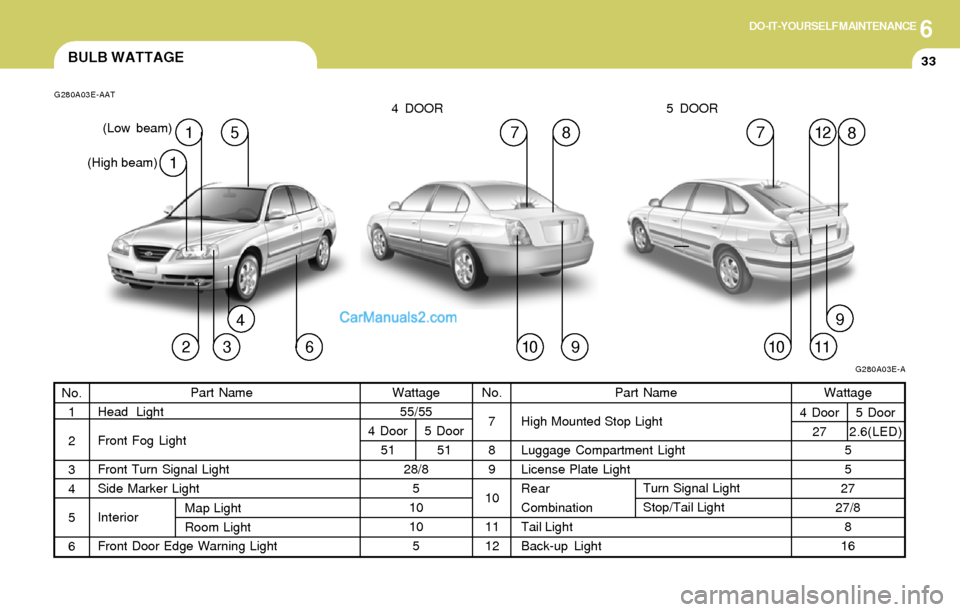
33BULB WATTAGE
G280A03E-AAT
23 678
G280A03E-A
(High beam)(Low beam)4 DOOR 5 DOOR
Wattage
55/55
28/8
5
10
10
5 4 Door
515 Door
51Part Name
High Mounted Stop Light
Luggage Compartment Light
License Plate Light
Rear
Combination
Tail Light
Back-up Light Part Name
Head Light
Front Fog Light
Front Turn Signal Light
Side Marker Light
Interior
Front Door Edge Warning Light
No.
1
2
3
4
5
6Wattage
5
5
27
27/8
8
16
Map Light
Room Light
No.
7
8
9
10
11
12
4 Door
275 Door
2.6(LED)
1
1512 7
4
9 10
9
10 11
8
Turn Signal Light
Stop/Tail Light
Page 237 of 241
10INDEX
3
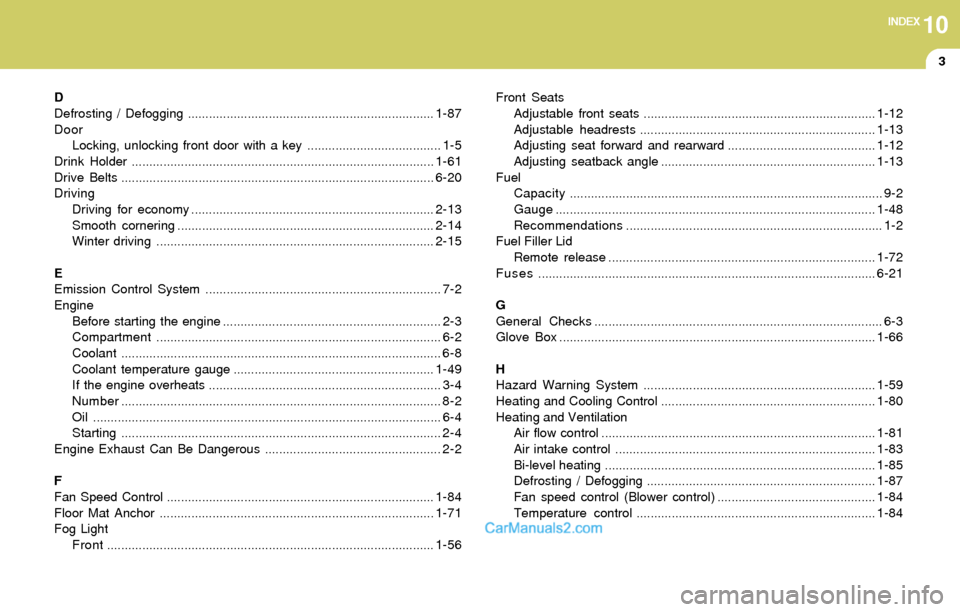
D
Defrosting / Defogging ......................................................................1-87
Door
Locking, unlocking front door with a key ...................................... 1-5
Drink Holder ......................................................................................1-61
Drive Belts.........................................................................................6-20
Driving
Driving for economy .....................................................................2-13
Smooth cornering.........................................................................2-14
Winter driving...............................................................................2-15
E
Emission Control System ................................................................... 7-2
Engine
Before starting the engine .............................................................. 2-3
Compartment................................................................................. 6-2
Coolant........................................................................................... 6-8
Coolant temperature gauge .........................................................1-49
If the engine overheats .................................................................. 3-4
Number........................................................................................... 8-2
Oil ................................................................................................... 6-4
Starting........................................................................................... 2-4
Engine Exhaust Can Be Dangerous .................................................. 2-2
F
Fan Speed Control............................................................................1-84
Floor Mat Anchor ..............................................................................1-71
Fog Light
Front.............................................................................................1-56Front Seats
Adjustable front seats..................................................................1-12
Adjustable headrests...................................................................1-13
Adjusting seat forward and rearward ..........................................1-12
Adjusting seatback angle .............................................................1-13
Fuel
Capacity......................................................................................... 9-2
Gauge...........................................................................................1-48
Recommendations......................................................................... 1-2
Fuel Filler Lid
Remote release............................................................................1-72
Fuses................................................................................................6-21
G
General Checks.................................................................................. 6-3
Glove Box..........................................................................................1-66
H
Hazard Warning System ..................................................................1-59
Heating and Cooling Control.............................................................1-80
Heating and Ventilation
Air flow control..............................................................................1-81
Air intake control ..........................................................................1-83
Bi-level heating.............................................................................1-85
Defrosting / Defogging .................................................................1-87
Fan speed control (Blower control).............................................1-84
Temperature control....................................................................1-84
Page 239 of 241
10INDEX
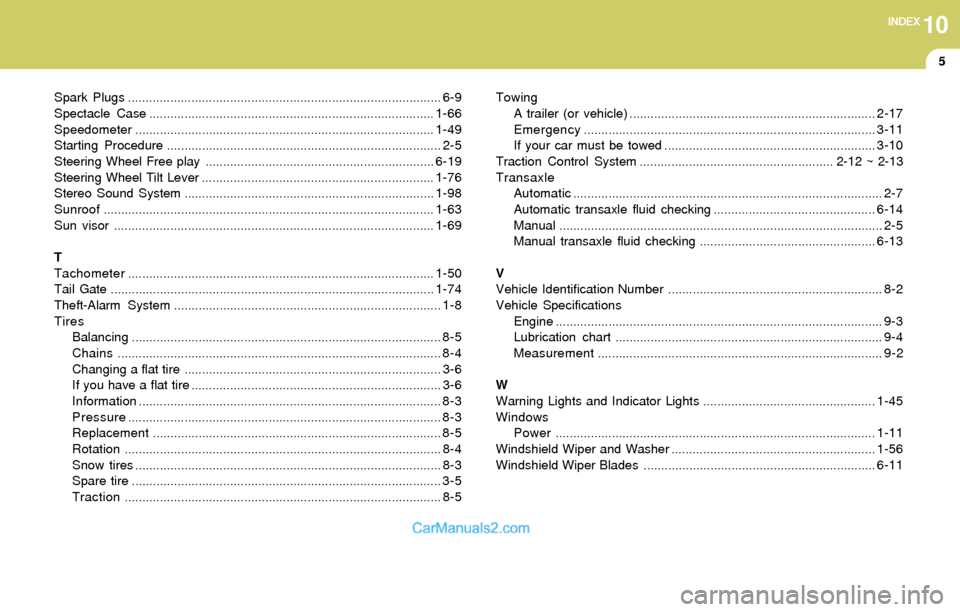
5
Spark Plugs ......................................................................................... 6-9
Spectacle Case.................................................................................1-66
Speedometer.....................................................................................1-49
Starting Procedure.............................................................................. 2-5
Steering Wheel Free play .................................................................6-19
Steering Wheel Tilt Lever ..................................................................1-76
Stereo Sound System .......................................................................1-98
Sunroof..............................................................................................1-63
Sun visor ...........................................................................................1-69
T
Tachometer.......................................................................................1-50
Tail Gate............................................................................................1-74
Theft-Alarm System............................................................................ 1-8
Tires
Balancing........................................................................................ 8-5
Chains............................................................................................ 8-4
Changing a flat tire ......................................................................... 3-6
If you have a flat tire ....................................................................... 3-6
Information...................................................................................... 8-3
Pressure......................................................................................... 8-3
Replacement.................................................................................. 8-5
Rotation.......................................................................................... 8-4
Snow tires....................................................................................... 8-3
Spare tire........................................................................................ 3-5
Traction.......................................................................................... 8-5Towing
A trailer (or vehicle)......................................................................2-17
Emergency...................................................................................3-11
If your car must be towed ............................................................3-10
Traction Control System ....................................................... 2-12 ~ 2-13
Transaxle
Automatic........................................................................................ 2-7
Automatic transaxle fluid checking ..............................................6-14
Manual............................................................................................ 2-5
Manual transaxle fluid checking..................................................6-13
V
Vehicle Identification Number............................................................. 8-2
Vehicle Specifications
Engine ............................................................................................. 9-3
Lubrication chart............................................................................ 9-4
Measurement................................................................................. 9-2
W
Warning Lights and Indicator Lights.................................................1-45
Windows
Power...........................................................................................1-11
Windshield Wiper and Washer ..........................................................1-56
Windshield Wiper Blades..................................................................6-11