CD changer Hyundai Elantra 2006 Owner's Manual
[x] Cancel search | Manufacturer: HYUNDAI, Model Year: 2006, Model line: Elantra, Model: Hyundai Elantra 2006Pages: 277, PDF Size: 10.18 MB
Page 129 of 277
1
FEATURES OF YOUR HYUNDAI
115
H260B03E-AAT
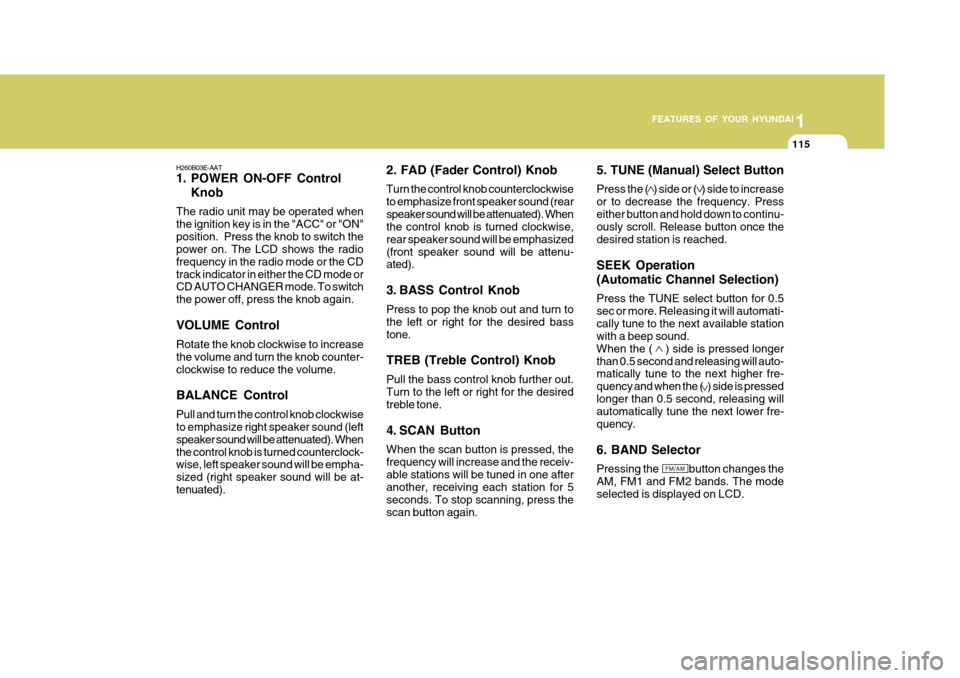
1. POWER ON-OFF Control Knob
The radio unit may be operated when the ignition key is in the "ACC" or "ON"position. Press the knob to switch the power on. The LCD shows the radio frequency in the radio mode or the CDtrack indicator in either the CD mode or CD AUTO CHANGER mode. To switch the power off, press the knob again. VOLUME Control Rotate the knob clockwise to increase the volume and turn the knob counter-clockwise to reduce the volume. BALANCE Control Pull and turn the control knob clockwise to emphasize right speaker sound (left speaker sound will be attenuated). Whenthe control knob is turned counterclock- wise, left speaker sound will be empha- sized (right speaker sound will be at-tenuated). 2. FAD (Fader Control) Knob Turn the control knob counterclockwise to emphasize front speaker sound (rearspeaker sound will be attenuated). When the control knob is turned clockwise, rear speaker sound will be emphasized(front speaker sound will be attenu- ated).
3. BASS Control Knob Press to pop the knob out and turn to the left or right for the desired basstone. TREB (Treble Control) Knob Pull the bass control knob further out. Turn to the left or right for the desired treble tone.
4. SCAN Button When the scan button is pressed, the frequency will increase and the receiv-able stations will be tuned in one after another, receiving each station for 5 seconds. To stop scanning, press thescan button again.5. TUNE (Manual) Select Button Press the ( ) side or ( ) side to increase or to decrease the frequency. Presseither button and hold down to continu- ously scroll. Release button once the desired station is reached. SEEK Operation (Automatic Channel Selection) Press the TUNE select button for 0.5 sec or more. Releasing it will automati-cally tune to the next available station with a beep sound. When the ( ) side is pressed longerthan 0.5 second and releasing will auto- matically tune to the next higher fre- quency and when the ( ) side is pressedlonger than 0.5 second, releasing will automatically tune the next lower fre- quency. 6. BAND Selector Pressing the button changes the AM, FM1 and FM2 bands. The mode selected is displayed on LCD.
FM/AM
Page 134 of 277
1FEATURES OF YOUR HYUNDAI
120
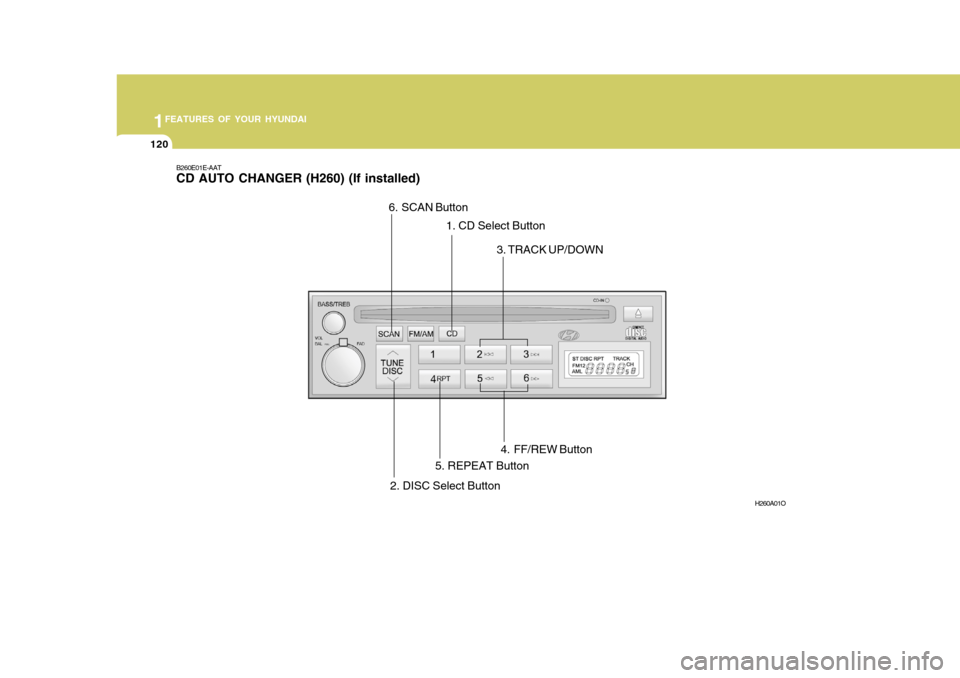
B260E01E-AAT CD AUTO CHANGER (H260) (If installed)
H260A01O
1. CD Select Button
2. DISC Select Button
3. TRACK UP/DOWN
4. FF/REW Button
5. REPEAT Button
6. SCAN Button
Page 135 of 277
1
FEATURES OF YOUR HYUNDAI
121
B260F03E-AAT The CD auto changer is located in the left side of the trunk.
o To use the CD auto changer.
1. Open the sliding lid of the CD auto changer.
2. To eject the compact disc maga-
zine, press the EJECT button lo- cated inside the CD auto changer.
3. Insert the discs into the magazine.
4. Push the magazine into the CD auto changer and close the sliding lid.
o The CD auto changer can be used when the ignition switch is in eitherthe "ON" or "ACC" position.
1. CD Select Button When the CD changer magazine con- tains discs, press the CD button andthe CD changer can be used even if the radio is being used. The Hyundai CD changer can hold up to eight discs. Thedisc number will be lit, and the track number, and elapsed time will be dis- played. 2. DISC Select Button To select the CD you want, push to change the disc number. 3. TRACK UP/DOWN
o The desired track on the disc cur-
rently being played can be selected using the track number.
o Press once to skip forward to
the beginning of the next track.Press once to skip back to the beginning of the track.
4. FF/REW ( / ) If you want to fast forward or reverse through the compact disc track, pushand hold in the FF ( ) or REW ( ) button. When you release the button, the com-pact disc player will resume playing. 5. REPEAT
o To repeat the track you are currently listening to, press the RPT button. To cancel , press again.
o If you do not release RPT operation when the track ends, it will automati-cally be replayed. This process will be continued untilyou push the button again.
6. SCAN Button
o Press the SCAN button to playback the first 10 seconds of each track.
o Press the SCAN button again within 10 sec. When you have reached the desired track.
NOTE:
o When replacing the fuse, replace it with a fuse having the correct capacity.
o This equipment is designed to be
used only in a 12 volt DC batterysystem with negative ground.
o This unit is made of precision
parts. Do not attempt to disas-semble or adjust any parts.
o When driving your vehicle, be sure
to keep the volume of the unit setlow enough to allow you to hear sounds coming from the outside.
TUNEDISC
Page 136 of 277
1FEATURES OF YOUR HYUNDAI
122
!CAUTION:
o Do not insert warped or poor qual- ity discs into the CD changer as damage to the unit may occur.
o Do not insert anything like coins
into the changer slot as damage tothe unit may occur.
o Do not place beverages close to the audio system. The playbackmechanism may be damaged if you spill them.
o Do not impact or strike the audio system, or the playback mecha-nism could be damaged.
o Driving on the off-roads or other vibrations may skip your compactdisc.Do not use the audio system on off-roads as the discs could be scratched and damaged.
o Do not grip or pull out the disc with your hand while the disc isbeing pulled into the unit by theself loading mechanism. These can cause poor disc scratching to occur or damage the compact discchanger. o Avoid using CD-Recordable or CD-
Rewritable as the changer couldnot be operated in recording way of the CD maker. When using the compact disc changer, profes-sionally recorded CDs are recom- mended.
!WARNING:
Never attempt to change CDs the already inserted in the CD changermagazine while the vehicle is mov- ing. This could result in loss of con- trol or an accident that may causedeath, serious insury, or property damage.
Page 138 of 277
1FEATURES OF YOUR HYUNDAI
124
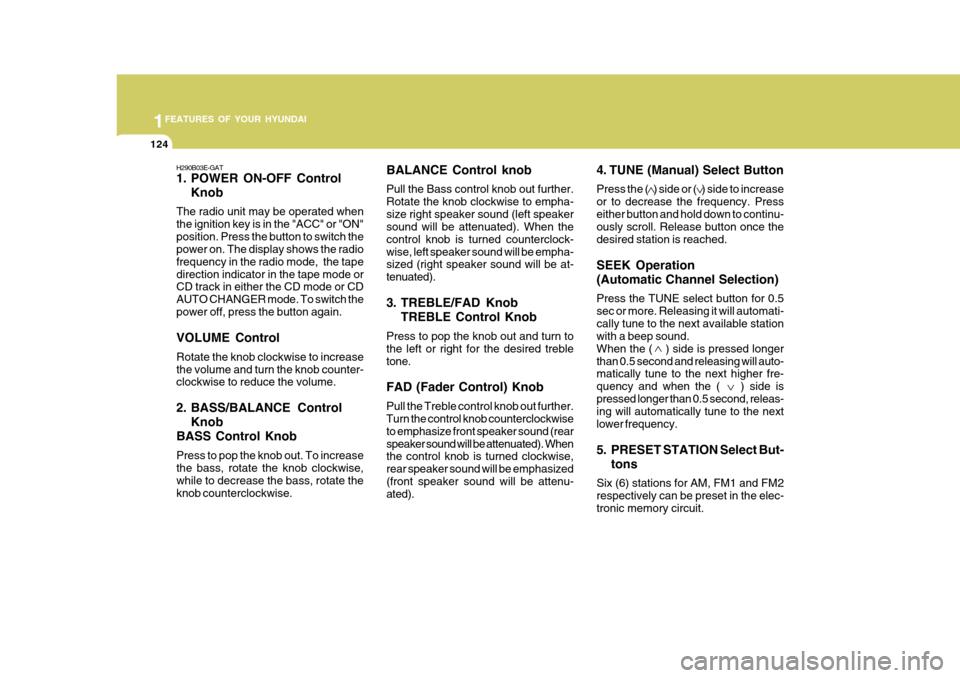
BALANCE Control knob Pull the Bass control knob out further. Rotate the knob clockwise to empha-size right speaker sound (left speaker sound will be attenuated). When the control knob is turned counterclock-wise, left speaker sound will be empha- sized (right speaker sound will be at- tenuated).
3. TREBLE/FAD KnobTREBLE Control Knob
Press to pop the knob out and turn to the left or right for the desired trebletone. FAD (Fader Control) Knob Pull the Treble control knob out further. Turn the control knob counterclockwise to emphasize front speaker sound (rearspeaker sound will be attenuated). When the control knob is turned clockwise, rear speaker sound will be emphasized(front speaker sound will be attenu- ated).
H290B03E-GAT
1. POWER ON-OFF Control
Knob
The radio unit may be operated when the ignition key is in the "ACC" or "ON"position. Press the button to switch the power on. The display shows the radio frequency in the radio mode, the tapedirection indicator in the tape mode or CD track in either the CD mode or CD AUTO CHANGER mode. To switch thepower off, press the button again. VOLUME Control Rotate the knob clockwise to increase the volume and turn the knob counter- clockwise to reduce the volume.
2. BASS/BALANCE Control Knob
BASS Control Knob Press to pop the knob out. To increase the bass, rotate the knob clockwise, while to decrease the bass, rotate theknob counterclockwise. 4. TUNE (Manual) Select Button Press the ( ) side or ( ) side to increase or to decrease the frequency. Presseither button and hold down to continu- ously scroll. Release button once the desired station is reached. SEEK Operation (Automatic Channel Selection) Press the TUNE select button for 0.5 sec or more. Releasing it will automati-cally tune to the next available station with a beep sound. When the ( ) side is pressed longerthan 0.5 second and releasing will auto- matically tune to the next higher fre- quency and when the ( ) side ispressed longer than 0.5 second, releas- ing will automatically tune to the next lower frequency.
5. PRESET STATION Select But-
tons
Six (6) stations for AM, FM1 and FM2 respectively can be preset in the elec-tronic memory circuit.
Page 145 of 277
1
FEATURES OF YOUR HYUNDAI
131
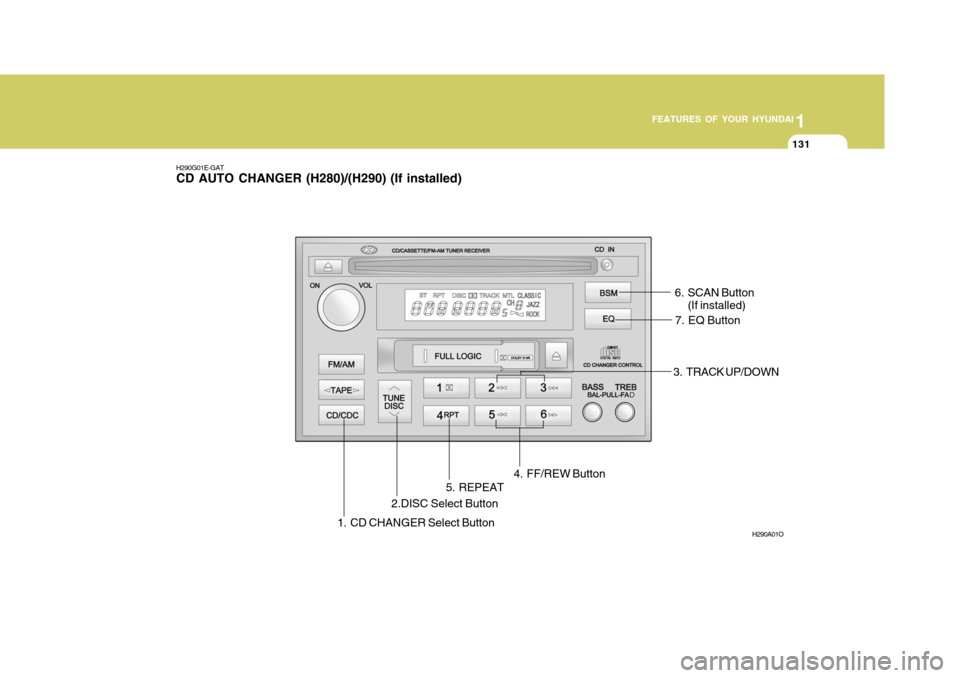
1. CD CHANGER Select Button
H290G01E-GAT CD AUTO CHANGER (H280)/(H290) (If installed)
H290A01O
2.DISC Select Button3. TRACK UP/DOWN
4. FF/REW Button
5. REPEAT 6. SCAN Button
(If installed)
7. EQ Button
Page 146 of 277
1FEATURES OF YOUR HYUNDAI
132
B290H03E-GAT The CD auto changer is located in the left side of the trunk.
o To use the CD auto changer.
1. Open the sliding lid of the CD autochanger.
2. To eject the compact disc maga-
zine, press the EJECT button lo- cated inside the CD auto changer.
3. Insert the discs into the magazine.
4. Push the magazine into the CD auto changer and close the sliding lid.
o The CD auto changer can be used when the ignition switch is in either"ON" or "ACC" position.
1. CD CHANGER Select Button When the CD changer magazine con- tains discs, press the CD/CDC buttonand the CD changer can be used even if the radio or cassette player is being used. The Hyundai CD changer canhold up to eight discs. The disc number will be lit, and the track number, and elapsed time will be displayed. 2. DISC Select Button To select the CD you want, push to change the disc number. 3. TRACK UP/DOWN
o The desired track on the disc cur-
rently being played can be selected using the track number.
o Press once to skip forward to the beginning of the next track.Press once to skip back to thebeginning of the track.
4. FF/REW ( / ) If you want to fast forward or reverse through the compact disc track, push and hold in the FF ( ) or REW ( ) button.When you release the button, the com- pact disc player will resume playing. 5. REPEAT
o To repeat the track you are currently
listening to, press the RPT button. To cancel , press again.
o If you do not release RPT operation
when the track ends, it will automati-cally be replayed. This process will be continued until you push the button again.
6. SCAN Button (If installed)
o Press the SCAN button to playback the first 10 seconds of each track.
o Press the SCAN button again within
10 sec. When you have reached the desired track.
7. EQ Button Press the EQ button to select the CLASSIC, JAZZ, ROCK and DEFEAT MODE for the desired tone quality. Each press of the button changes thedisplay as follows; CLASSIC � JAZZ � ROCK � DEFEAT
TUNE
DISC
Page 147 of 277
1
FEATURES OF YOUR HYUNDAI
133
NOTE:
o When replacing the fuse, replace it with a fuse having the correct capacity.
o This equipment is designed to be used only in a 12 volt DC batterysystem with negative ground.
o This unit is made of precision parts. Do not attempt to disas-semble or adjust any parts.
o When driving your vehicle, be sure to keep the volume of the unit setlow enough to allow you to hearsounds coming from the outside.
!CAUTION:
o Do not insert warped or poor qual- ity discs into the CD changer as damage to the unit may occur.
o Do not insert anything like coins
into the changer slot as damage tothe unit may occur.
o Do not place beverages close to the audio system. The playbackmechanism may be damaged if you spill them.
o Do not impact or strike the audio system, or the playback mecha-nism could be damaged.
o Driving on the off-roads or other vibrations may skip your compactdisc.Do not use the audio system on off-roads as the discs could be scratched and damaged.
o Do not grip or pull out the disc with your hand while the disc isbeing pulled into the unit by theself loading mechanism. These can cause poor disc scratching to occur or damage the compact discchanger. o Avoid using CD-Recordable or CD-
Rewritable as the changer couldnot be operated in recording way of the CD maker. When using the compact disc changer, profes-sionally recorded CDs are recom- mended.
!WARNING:
Never attempt to change CDs the already inserted in the CD changer magazine while the vehicle is mov- ing. This could result in loss of con-trol or an accident that may cause death, serious insury, or property damage.
Page 148 of 277
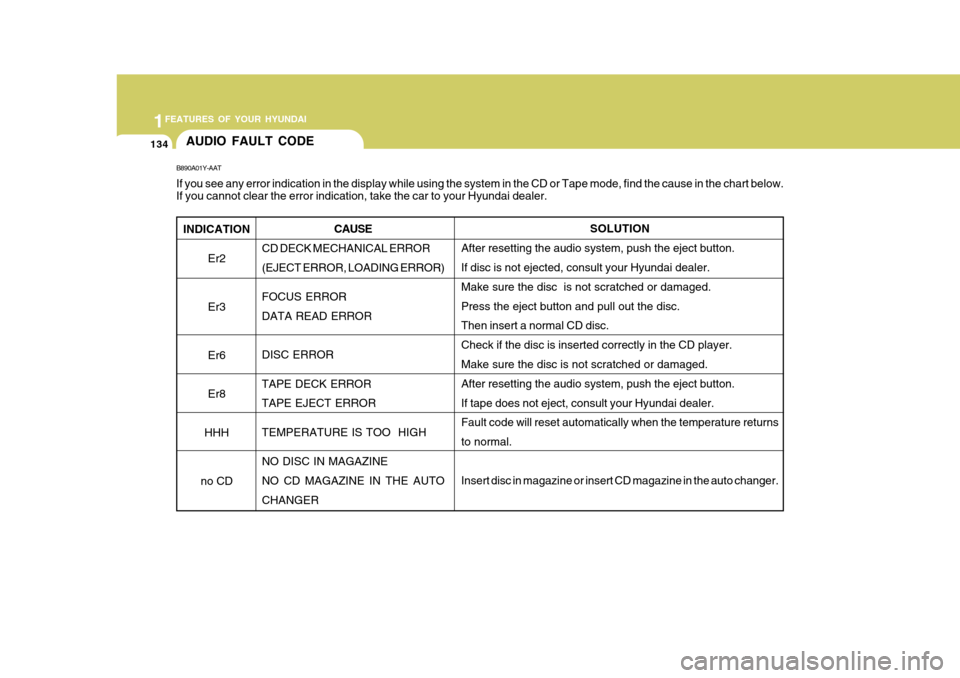
1FEATURES OF YOUR HYUNDAI
134
INDICATION
Er2 Er3Er6 Er8
HHH
no CD
B890A01Y-AAT If you see any error indication in the display while using the system in the CD or Tape mode, find the cause in the chart below .
If you cannot clear the error indication, take the car to your Hyundai dealer.
SOLUTION
After resetting the audio system, push the eject button. If disc is not ejected, consult your Hyundai dealer. Make sure the disc is not scratched or damaged.Press the eject button and pull out the disc. Then insert a normal CD disc. Check if the disc is inserted correctly in the CD player. Make sure the disc is not scratched or damaged. After resetting the audio system, push the eject button.If tape does not eject, consult your Hyundai dealer. Fault code will reset automatically when the temperature returns to normal. Insert disc in magazine or insert CD magazine in the auto changer.
CAUSE
CD DECK MECHANICAL ERROR (EJECT ERROR, LOADING ERROR) FOCUS ERROR DATA READ ERROR DISC ERROR TAPE DECK ERROR TAPE EJECT ERROR TEMPERATURE IS TOO HIGH NO DISC IN MAGAZINE NO CD MAGAZINE IN THE AUTOCHANGER
AUDIO FAULT CODE
Page 273 of 277
10INDEX
2
A Airbag ........................................................................ 1-37
Air Cleaner Filter ....................................................... 6-19
Air Conditioning Care ....................................................................... 6-27
Operation ............................................................... 1-94
Switch ..................................................................... 1-94
Air Filter ........................................................ 1-103, 6-28
Antenna ................................................................... 1-137
Ashtray ...................................................................... 1-66
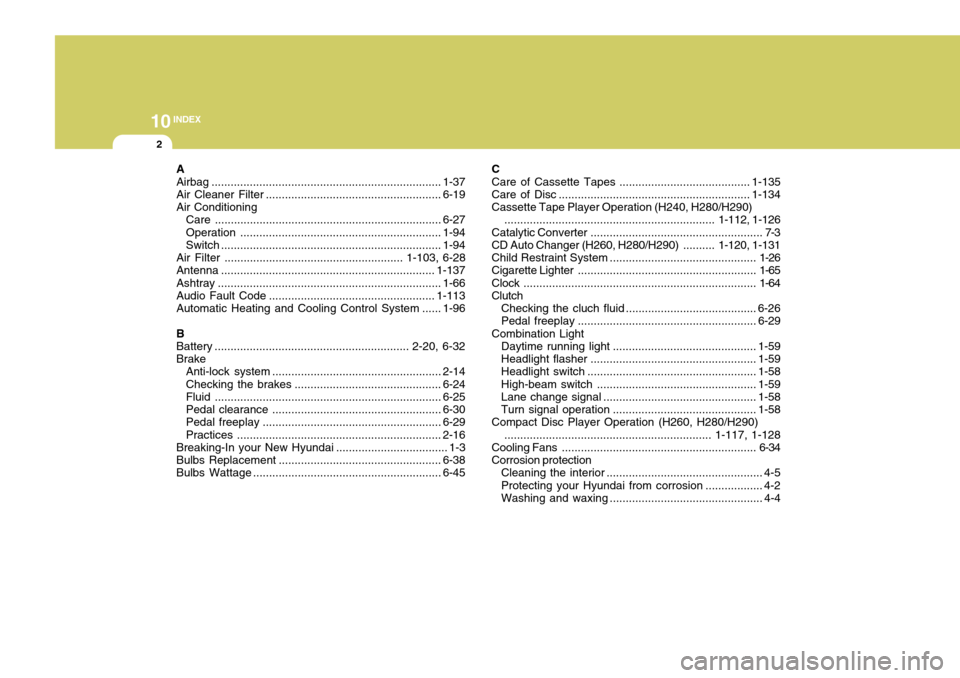
Audio Fault Code .................................................... 1-113
Automatic Heating and Cooling Control System ......1-96
B
Battery ............................................................. 2-20, 6-32 Brake Anti-lock system ..................................................... 2-14
Checking the brakes .............................................. 6-24
Fluid ....................................................................... 6-25
Pedal clearance ..................................................... 6-30
Pedal freepl ay ........................................................ 6-29
Practices ................................................................ 2-16
Breaking-In your New Hyundai ................................... 1-3
Bulbs Repl acement ................................................... 6-38
Bulbs Wat tage ........................................................... 6-45C
Care of Cassette Tapes ....................
..................... 1-135
Care of Disc ............................................................ 1-134
Cassette Tape Player Operation (H240, H280/H290) .................................................................. 1-112, 1-126
Catalytic Converter ...................................................... 7-3
CD Auto Changer (H260, H280/H290) ..........1-120, 1-131
Child Restraint System .............................................. 1-26
Cigarette Lighter ........................................................ 1-65
Clock ......................................................................... 1-64
Clutch
Checking the cluch fluid ............... .......................... 6-26
Pedal freepl ay ........................................................ 6-29
Combination Light Daytime running light ............................................. 1-59
Headlight flasher .................................................... 1-59
Headlight swi tch ..................................................... 1-58
High-beam swi tch .................................................. 1-59
Lane change si gnal ................................................ 1-58
Turn signal oper ation............................................. 1-58
Compact Disc Player Operation (H260, H280/H290)
................................................................. 1-117, 1-128
Cooling Fans ............................................................. 6-34
Corrosion protection Cleaning the interior ................................................. 4-5
Protecting your Hyundai from corrosion .................. 4-2
Washing and waxing ................................................ 4-4