service schedule Hyundai Elantra 2006 Owner's Manual
[x] Cancel search | Manufacturer: HYUNDAI, Model Year: 2006, Model line: Elantra, Model: Hyundai Elantra 2006Pages: 277, PDF Size: 10.18 MB
Page 171 of 277
2 DRIVING YOUR HYUNDAI
18
components. In addition, driving with your foot resting on the brake pedalmay cause the brakes to overheat, which reduces their effectiveness and may lead to more serious con-sequences.
o Take care of your tires. Keep them
inflated to the recommended pres-sure. Incorrect inflation, either too much or too little, results in unnec- essary tire wear. Check the tire pres-sures at least once a month.
o Be sure that the wheels are aligned
correctly. Improper alignment canresult from hitting curbs or driving too fast over irregular surfaces. Poor alignment causes faster tire wearand may also result in other prob- lems as well as greater fuel con- sumption.
o Keep your car in good condition. For better fuel economy and reducedmaintenance costs, maintain yourcar in accordance with the mainte- nance schedule in Section 5. If you drive your car in severe conditions,more frequent maintenance is re- quired (see Section 5 for details). o Keep your car clean. For maximum
service, your Hyundai should be kept clean and free of corrosive materials. It is especially important that mud, dirt, ice, etc. not be al-lowed to accumulate on the under- side of the car. This extra weight can result in increased fuel con-sumption and also contribute to cor- rosion.
o Travel lightly. Don't carry unneces- sary weight in your car. Weight re-duces fuel economy.
o Don't let the engine idle longer than necessary. If you are waiting (andnot in traffic), turn off your engine and restart only when you're readyto go.
o Remember, your Hyundai does not
require extended warm-up. As soonas the engine is running smoothly, you can drive away. In very cold weather, however, give your enginea slightly longer warm-up period.
o Don't "lug" or "over-rev" the engine.
Lugging is driving too slowly in toohigh a gear resulting in the engine bucking. If this happens, shift to a lower gear. Over-revving is racingthe engine beyond its safe limit. This can be avoided by shifting atthe recommended speeds.
o Use your air conditioning sparingly. The air conditioning system is oper-ated by engine power so your fueleconomy is reduced when you use it.
Page 200 of 277
5VEHICLE MAINTENANCE REQUIREMENTS
2MAINTENANCE INTERVALS
F010C01A-GAT
Specified Scheduled Procedures
These are the procedures such as
inspections, adjustments and replace- ments that are listed in the mainte-nance charts starting on page 5-4. These procedures must be performed at the intervals shown in the mainte-nance schedule to assure that your warranty remains in effect. Although it is strongly recommended that they beperformed by the factory-trained or distributor-trained technicians at your Hyundai dealer, these procedures maybe performed at any qualified service facility. F010D01A-AAT
General Checks
These are the regular checks you should perform when you drive your Hyundai or you fill the fuel tank. A list of these items will be found on page6-7.
F010A01A-GAT Service Requirements To assure that you receive the great- est number of kilometers of satisfying operation from your Hyundai, certain maintenance procedures must be per-formed. Although careful design and engineering have reduced these to a minimum, those that are required areof the utmost importance.It is your responsibility to have thesemaintenance procedures performed to comply with the terms of the warran- ties covering your new Hyundai. TheService Passport supplied with your new vehicle provides further informa- tion about these warranties.
F010B01A-AAT
Maintenance Requirements
The maintenance required for your
Hyundai can be divided into three main areas: o Specified scheduled procedures o General checks o Do-it-yourself maintenance It is suggested that genuine Hyundai
service parts be used for any requiredrepairs or replacements. Other parts of equivalent quality such as engine oil, engine coolant, manual or autotransaxle oil, brake fluid and so on which are not supplied by Hyundai Motor Company or its distributor maybe used without affecting your war- ranty coverage but you should always be sure these are equivalent to thequality of the original Hyundai parts. Your Service Passport provides fur- ther information about your warrantycoverage.
Page 201 of 277
5
VEHICLE MAINTENANCE REQUIREMENTS
3
F010E01A-AAT
Do-It-Yourself Maintenance
If you are mechanically inclined, own a few tools that are required and want to take the time to do so, you can inspect and service a number of items. Formore information about doing it your- self, see Section 6. F010F01A-GAT
A Few Tips
Whenever you have your Hyundai ser- viced, keep copies of the service records in your glovebox. This will help ensure that you can document that therequired procedures have been per- formed to keep your warranties in ef- fect. This is especially important whenservice is not performed by an autho- rized Hyundai dealer. F020A03S-GAT
SCHEDULED MAINTENANCE REQUIREMENTS
Inspection should be performed any time a malfunction is experienced or suspected. Receipts for all emission control system services should be re-tained to demonstrate compliance with conditions of the emissions system warranty. For severe usage maintenance require- ments, see page 5-7 of this section.
Page 202 of 277
5VEHICLE MAINTENANCE REQUIREMENTS
4
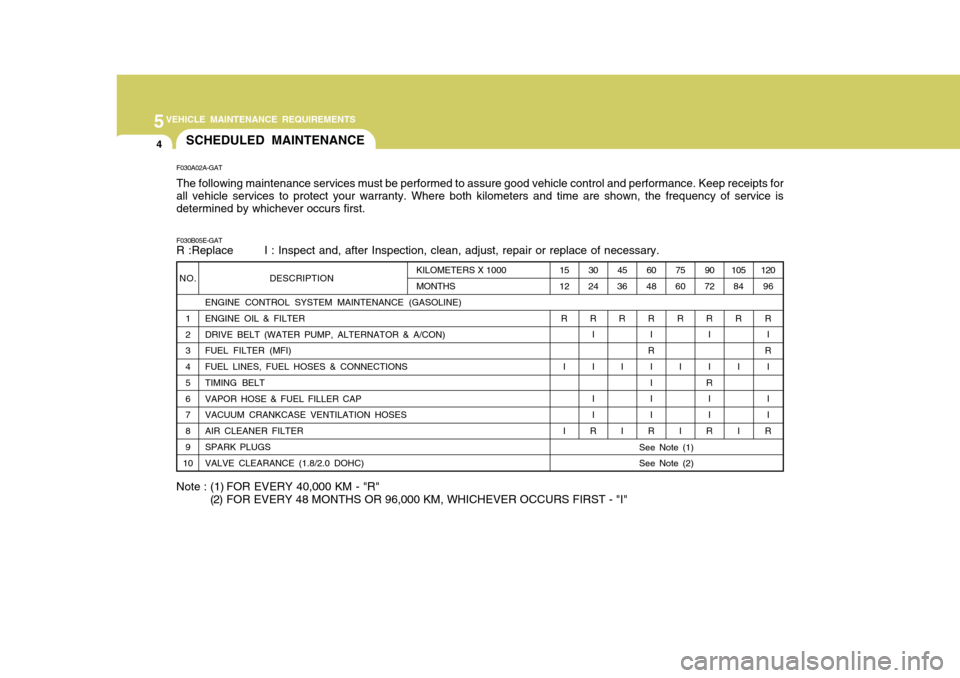
NO.
1 23 4 5 6 7 8 9
10 DESCRIPTION
ENGINE CONTROL SYSTEM MAINTENANCE (GASOLINE) ENGINE OIL & FILTER DRIVE BELT (WATER PUMP, ALTERNATOR & A/CON)FUEL FILTER (MFI) FUEL LINES, FUEL HOSES & CONNECTIONS TIMING BELT VAPOR HOSE & FUEL FILLER CAP VACUUM CRANKCASE VENTILATION HOSES AIR CLEANER FILTER SPARK PLUGS VALVE CLEARANCE (1.8/2.0 DOHC)
F030A02A-GAT The following maintenance services must be performed to assure good vehicle control and performance. Keep receipts for all vehicle services to protect your warranty. Where both kilometers and time are shown, the frequency of service is determined by whichever occurs first. F030B05E-GAT R :Replace I : Inspect and, after Inspection, clean, adjust, repair or replace of necessary.105
84
R
I I 120
96
R I
R I I I
R
90
72
R I I
R I I
R
75
60
R
I I
60
48
R I
R I I I I
R
45
36
R
I I
30
24
R I II I
R
15
12
R
I I
KILOMETERS X 1000 MONTHS
See Note (1) See Note (2)
Note : (1) FOR EVERY 40,000 KM - "R" (2) FOR EVERY 48 MONTHS OR 96,000 KM, WHICHEVER OCCURS FIRST - "I"
SCHEDULED MAINTENANCE
Page 208 of 277
5VEHICLE MAINTENANCE REQUIREMENTS
10
F070F01A-AAT
o Brake Hoses and Lines
Visually check for proper installation, chafing, cracks, deterioration and anyleakage. Replace any deteriorated or damaged parts immediately. F070G02A-AAT
o Brake Fluid
Check brake fluid level in the brake fluid reservoir. The level should be between "MIN" and "MAX" marks on the side of the reservoir. Use onlyhydraulic brake fluid conforming to DOT 3 or DOT 4.
F070H01A-AAT
o Rear Brake Drums/Linings,
Parking Brake
Check the rear brake drums and lin-
ings for scoring, burning, leaking fluid, broken parts, and excessive wear. Inspect the parking brake system in- cluding the parking brake lever andcables. For detailed service proce- dures, refer to the Shop Manual.
F070D01A-AAT
o Manual Transaxle Oil Inspect the manual transaxle oil ac- cording to the maintenance schedule. NOTE: If the oil level is low, check for possible leaks before adding oil.Do not overfill.
F070C02A-AAT
o Coolant The coolant should be changed at the intervals specified in the mainte- nance schedule.
F070E06A-AAT
o Automatic Transaxle Fluid
The fluid level should be in the "HOT" range of the dipstick, after the engine and transaxle are at normal operating temperature. Check the automatictransaxle fluid level with the engine running and the transaxle in neutral, with the parking brake properly ap-plied. Use HYUNDAI GENUINE ATF SP III, DIAMOND ATF SP III, SK ATF SP III or other brands approved byHyundai Motor Co., when adding or changing fluid. Using the wrong ATF may result in damage to the ATM.
Page 221 of 277
6 DO-IT-YOURSELF MAINTENANCE
12
!
G040B03FC-GAT
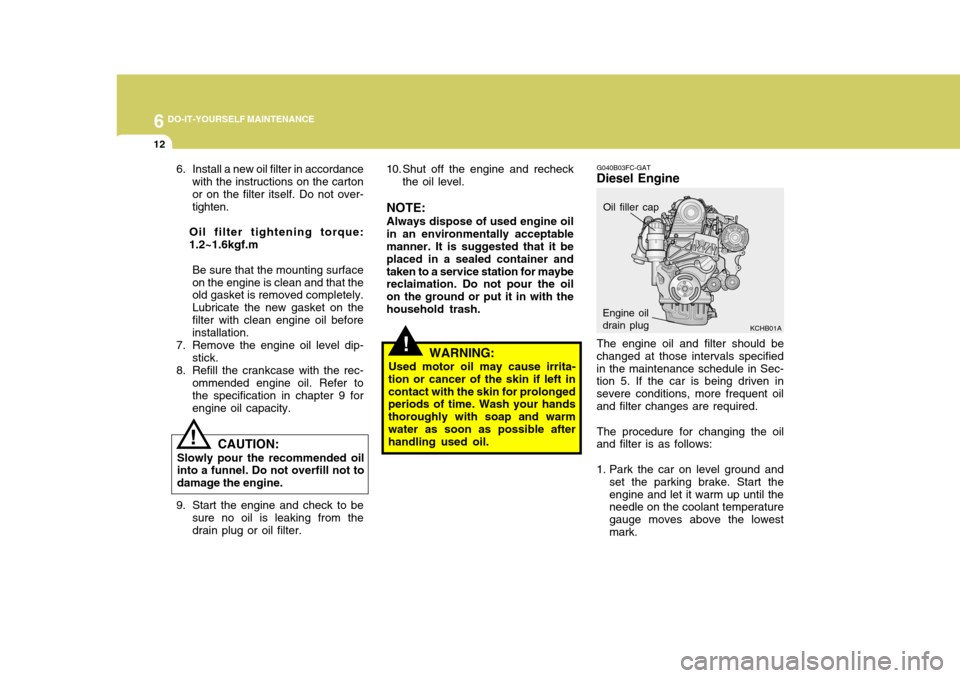
Diesel Engine
KCHB01A
The engine oil and filter should be
changed at those intervals specified in the maintenance schedule in Sec- tion 5. If the car is being driven in severe conditions, more frequent oiland filter changes are required.
The procedure for changing the oil
and filter is as follows:
1. Park the car on level ground and
set the parking brake. Start the engine and let it warm up until the needle on the coolant temperature gauge moves above the lowestmark.
10. Shut off the engine and recheck
the oil level.
NOTE: Always dispose of used engine oil in an environmentally acceptable manner. It is suggested that it be placed in a sealed container andtaken to a service station for maybe reclaimation. Do not pour the oil on the ground or put it in with thehousehold trash.
6. Install a new oil filter in accordance
with the instructions on the cartonor on the filter itself. Do not over- tighten.
Oil filter tightening torque: 1.2~1.6kgf.m Be sure that the mounting surfaceon the engine is clean and that the old gasket is removed completely. Lubricate the new gasket on thefilter with clean engine oil before installation.
7. Remove the engine oil level dip- stick.
8. Refill the crankcase with the rec- ommended engine oil. Refer tothe specification in chapter 9 for engine oil capacity. WARNING:
Used motor oil may cause irrita-
tion or cancer of the skin if left incontact with the skin for prolonged periods of time. Wash your hands thoroughly with soap and warmwater as soon as possible after handling used oil.
Oil filler cap
Engine oil drain plug
! CAUTION:
Slowly pour the recommended oil into a funnel. Do not overfill not to damage the engine.
9. Start the engine and check to be sure no oil is leaking from the drain plug or oil filter.
Page 275 of 277
10INDEX
4
H Hazard Warning Syst em ........................................... 1-64
Headlight Aiming Adjustment ....................................6-36
Headlight Leveling Device Syst em ...........................1-69
Headlight Washer Switch ............ .............................. 1-62
Heating and cooling control ...................................... 1-87
Heating and Ventilation ............................................. 1-88
Air flow control ....................................................... 1-88
Air intake control .................................................... 1-90
Bi-level heating ....................................................... 1-92
Defrost/Defogging .................................................. 1-92
Fan speed control .................................................. 1-91
Temperature control ............................................... 1-91
High-Mounted Rear Stop Light................................. 1-78
Hood Release ............................................................ 1-78
Horn 1-83 I
If your car must be towed ......................................... 3-11
Ignition Switch ............................................................. 2-3
Immobilizer System ..................................................... 1-5
Instrument Cluster and Indicator ............................... 1-44
Instrument Panel Light Control (RHEOSTAT) ............ 1-65
Interior Light Interior light ............................................................ 1-73
Map light ................................................................ 1-72
JJump Starting .............................................................. 3-3 K
Key .............................................................................. 1-5
If you lose your keys ............................................. 3-13
Positions ................................................................... 2-4
Keyless Entry System .............................................. 1-12
LLubrication Chart ......................................................... 9-4
Luggage Net ............................................................. 1-82
MMaintenance Intervals Explanation of scheduled maintenance items ......... 5-8
Maintenance under severe usage conditions .......... 5-7 Scheduled maintenance ........................................... 5-4
Service requ irements............................................... 5-2
Mirrors
Outside rearview mirror .................... ..................... 1-74
Outside rearview mirror heater .............................. 1-76
Folding the outside rearview mirrors ....................... 1-76
Day/night inside rearview ....... .................................1-76
O
Odometer/ Trip Odometer ......... ...............................1-55
P Parking Brake ........................................................... 1-67
Power Outle t ............................................................. 1-66
Power Steering Fluid Level .......................................6-34
Power Windows ......................................................... 1-13