fuse Hyundai Elantra 2009 Owner's Manual
[x] Cancel search | Manufacturer: HYUNDAI, Model Year: 2009, Model line: Elantra, Model: Hyundai Elantra 2009Pages: 345, PDF Size: 19.91 MB
Page 17 of 345
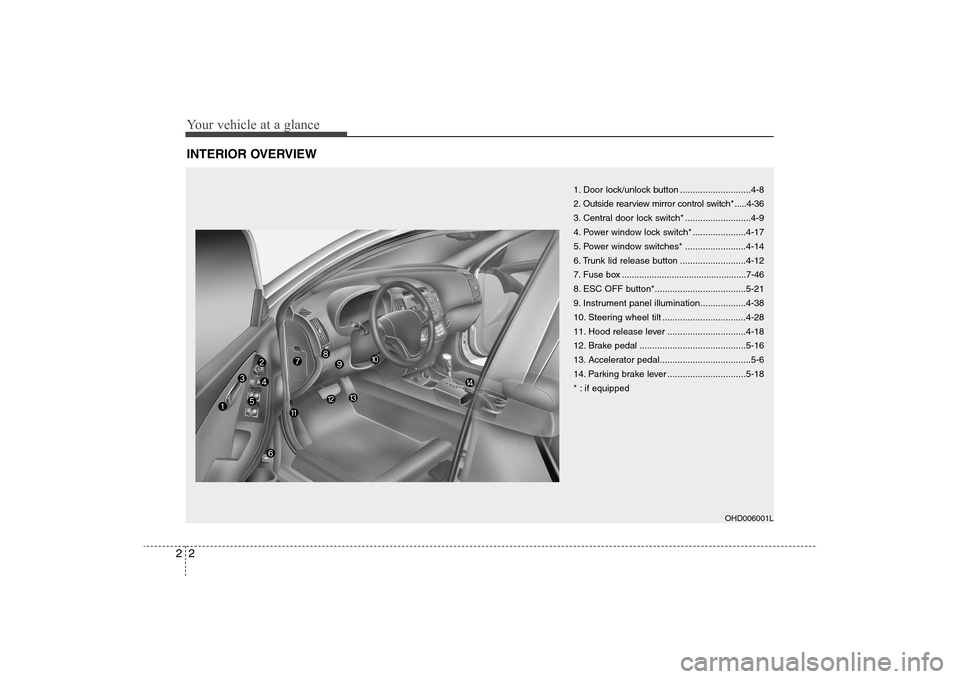
Your vehicle at a glance2 2INTERIOR OVERVIEW
1. Door lock/unlock button ............................4-8
2. Outside rearview mirror control switch* .....4-36
3. Central door lock switch* ..........................4-9
4. Power window lock switch* .....................4-17
5. Power window switches* ........................4-14
6. Trunk lid release button ..........................4-12
7. Fuse box ..................................................7-46
8. ESC OFF button*....................................5-21
9. Instrument panel illumination..................4-38
10. Steering wheel tilt .................................4-28
11. Hood release lever ...............................4-18
12. Brake pedal ..........................................5-16
13. Accelerator pedal....................................5-6
14. Parking brake lever ...............................5-18
* : if equipped
OHD006001L
Page 51 of 345
333
Safety features of your vehicle
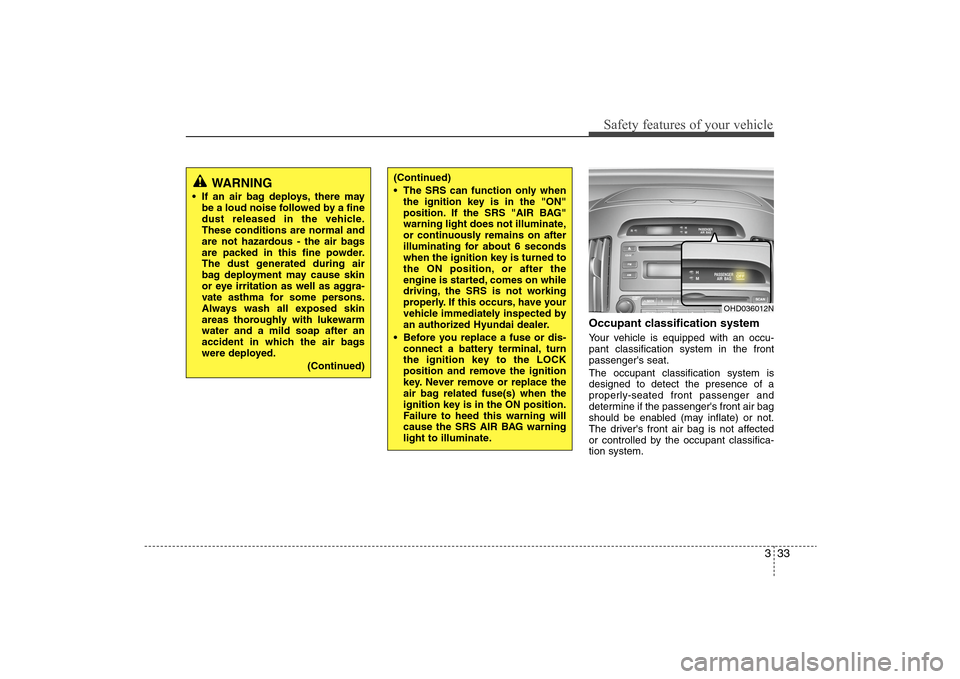
Occupant classification systemYour vehicle is equipped with an occu-
pant classification system in the front
passenger's seat.
The occupant classification system is
designed to detect the presence of a
properly-seated front passenger and
determine if the passenger's front air bag
should be enabled (may inflate) or not.
The driver's front air bag is not affected
or controlled by the occupant classifica-
tion system.
WARNING
If an air bag deploys, there may
be a loud noise followed by a fine
dust released in the vehicle.
These conditions are normal and
are not hazardous - the air bags
are packed in this fine powder.
The dust generated during air
bag deployment may cause skin
or eye irritation as well as aggra-
vate asthma for some persons.
Always wash all exposed skin
areas thoroughly with lukewarm
water and a mild soap after an
accident in which the air bags
were deployed.
(Continued)
(Continued)
The SRS can function only when
the ignition key is in the "ON"
position. If the SRS "AIR BAG"
warning light does not illuminate,
or continuously remains on after
illuminating for about 6 seconds
when the ignition key is turned to
the ON position, or after the
engine is started, comes on while
driving, the SRS is not working
properly. If this occurs, have your
vehicle immediately inspected by
an authorized Hyundai dealer.
Before you replace a fuse or dis-
connect a battery terminal, turn
the ignition key to the LOCK
position and remove the ignition
key. Never remove or replace the
air bag related fuse(s) when the
ignition key is in the ON position.
Failure to heed this warning will
cause the SRS AIR BAG warning
light to illuminate.
OHD036012N
Page 89 of 345
415
Features of your vehicle
The ignition switch must be in the ON
position for power windows to operate.
Each door has a power window switch
that controls the door’s window. However,
the driver has a power window lock
switch which can block the operation of
passenger windows.
The power windows can be operated for
approximately 30 seconds after the igni-
tion key is removed or turned to the ACC
or LOCK position. However, if the front
doors are opened, the power windows
cannot be operated even within the 30
seconds after the ignition key removal.
While driving, if you notice buffeting and
pulsation (wind shock) with either side
window open, you should open the oppo-
site window slightly to reduce the condi-
tion.
Window opening and closingThe driver’s door has a master power
window switch that controls all the win-
dows in the vehicle.
To open or close a window, press down
or pull up the front portion of the corre-
sponding switch to the first detent posi-
tion (5).Auto down window (if equipped)
(driver’s window)Depressing the power window switch
momentarily to the second detent posi-
tion (6) completely lowers the driver’s
window even when the switch is
released. To stop the window at the
desired position while the window is in
operation, pull up the switch momentarily
to the opposite direction of the window
movement.
(Continued)
Never try to operate the main
switch on the driver's door and
the individual door window
switch in opposing directions at
the same time. If this is done, the
window will stop and cannot be
opened or closed.
WARNING -
Windows
Always double check to make
sure all arms, hands, head and
other obstructions are safely out
of the way before closing a win-
dow.
Do not allow children to play with
the power windows. Keep the dri-
ver’s door power window lock
switch in the LOCK position
(depressed). Serious injury can
result from unintentional window
operation by the child.
Do not extend face or arms out-
side through the window opening
while driving.
CAUTION
To prevent the power window
system from the possibility of
damage, do not open or close two
windows at the same time. This
will also ensure the longevity of
the fuse.
(Continued)
Page 100 of 345
Features of your vehicle26 4Resetting the sunroofWhenever the vehicle battery is discon-
nected or discharged, or related fuse is
blown, you must reset your sunroof sys-
tem as follows:
1. Turn the ignition switch to the ON
position and close the sunroof com-
pletely.
2. Release the control button.
3. Press and hold the close button until
the sunroof tilts and slightly moves up
and down. Then, release the button.
4. Press and hold the close button until
the sunroof is operated as follows;
TILT DOWN →SLIDE OPEN →
SLIDE CLOSE
Then, release the control button.
When this is complete, the sunroof sys-
tem is reset.❈For more detailed information, contact
an authorized HYUNDAI dealer.
CAUTION
If the sunroof is not reset when the
vehicle battery is disconnected or
discharged, or related fuse is
blown, the sunroof may operate
improperly.
Page 159 of 345
485
Features of your vehicle
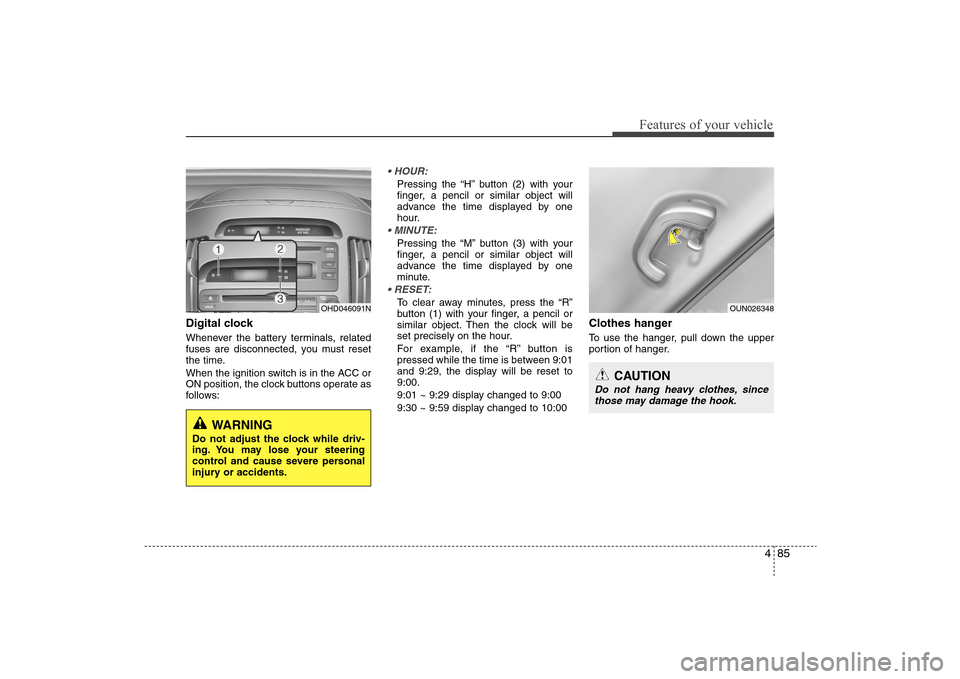
Digital clockWhenever the battery terminals, related
fuses are disconnected, you must reset
the time.
When the ignition switch is in the ACC or
ON position, the clock buttons operate as
follows:
Pressing the “H” button (2) with your
finger, a pencil or similar object will
advance the time displayed by one
hour.Pressing the “M” button (3) with your
finger, a pencil or similar object will
advance the time displayed by one
minute.To clear away minutes, press the “R”
button (1) with your finger, a pencil or
similar object. Then the clock will be
set precisely on the hour.
For example, if the “R” button is
pressed while the time is between 9:01
and 9:29, the display will be reset to
9:00.
9:01 ~ 9:29 display changed to 9:00
9:30 ~ 9:59 display changed to 10:00
Clothes hangerTo use the hanger, pull down the upper
portion of hanger.
OHD046091N
WARNING
Do not adjust the clock while driv-
ing. You may lose your steering
control and cause severe personal
injury or accidents.
OUN026348
CAUTION
Do not hang heavy clothes, since
those may damage the hook.
Page 263 of 345
7
Engine compartment / 7-2
Maintenance services / 7-3
Owner maintenance / 7-5
Scheduled maintenance service / 7-7
Explanation of scheduled maintenance items / 7-12
Engine oil / 7-15
Engine coolant / 7-16
Brakes and clutch fluid / 7-19
Automatic transaxle fluid / 7-20
Washer fluid / 7-22
Parking brake / 7-22
Air cleaner / 7-23
Climate control air filter / 7-25
Wiper blades / 7-27
Battery / 7-29
Tires and wheels / 7-32
Fuses / 7-45
Light bulbs / 7-54
Appearance care / 7-59
Emission control system / 7-65
California perchlorate notice / 7-67
Maintenance
Page 264 of 345
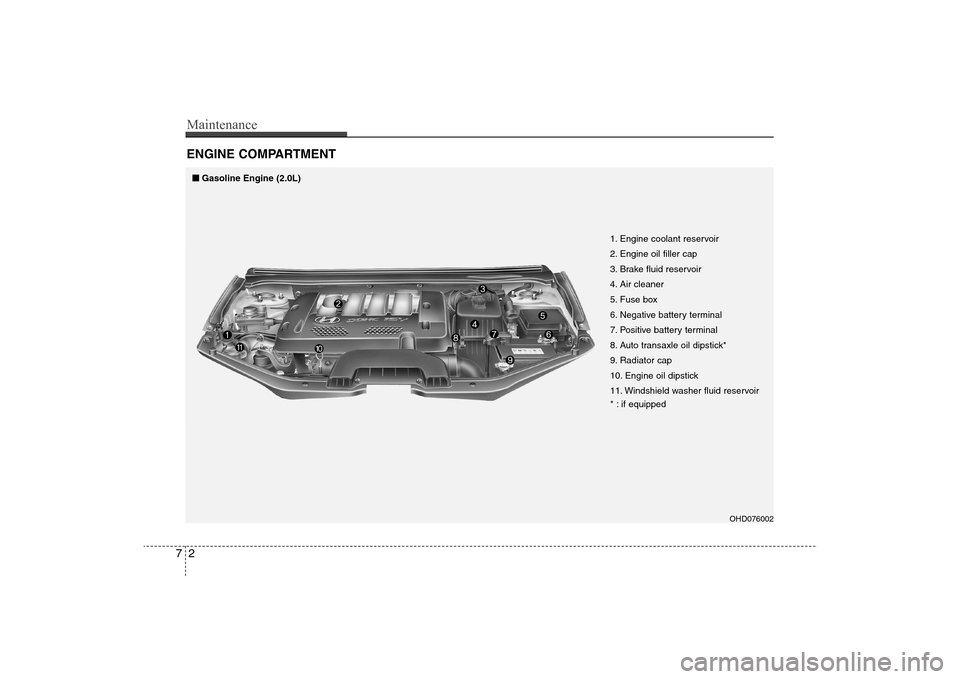
Maintenance2 7ENGINE COMPARTMENT
OHD076002
1. Engine coolant reservoir
2. Engine oil filler cap
3. Brake fluid reservoir
4. Air cleaner
5. Fuse box
6. Negative battery terminal
7. Positive battery terminal
8. Auto transaxle oil dipstick*
9. Radiator cap
10. Engine oil dipstick
11. Windshield washer fluid reservoir
* : if equipped
■ ■
Gasoline Engine (2.0L)
Page 307 of 345
745
Maintenance
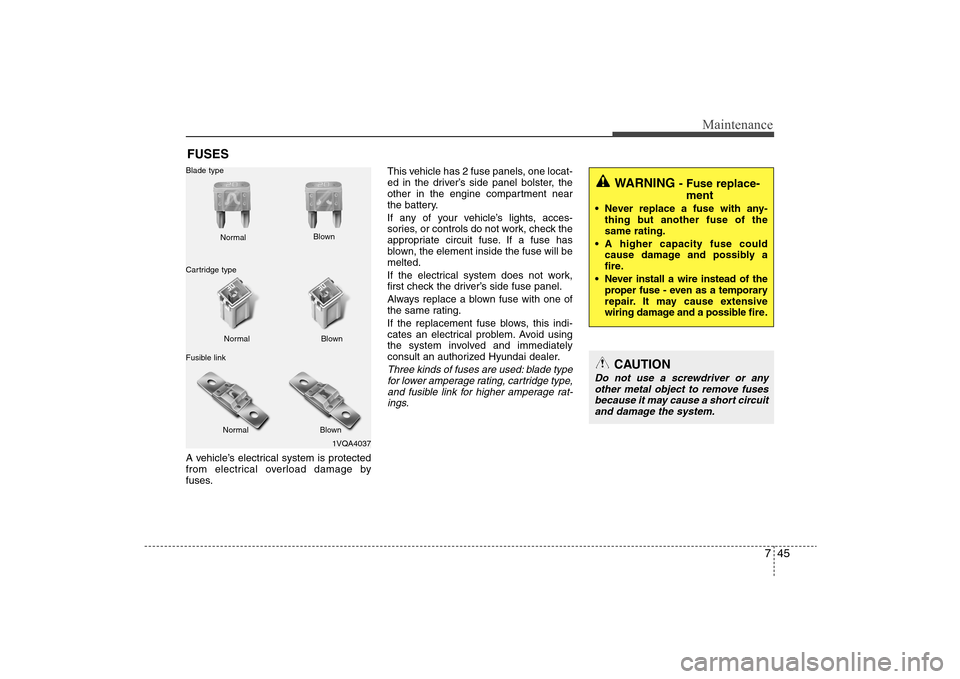
FUSESA vehicle’s electrical system is protected
from electrical overload damage by
fuses.This vehicle has 2 fuse panels, one locat-
ed in the driver’s side panel bolster, the
other in the engine compartment near
the battery.
If any of your vehicle’s lights, acces-
sories, or controls do not work, check the
appropriate circuit fuse. If a fuse has
blown, the element inside the fuse will be
melted.
If the electrical system does not work,
first check the driver’s side fuse panel.
Always replace a blown fuse with one of
the same rating.
If the replacement fuse blows, this indi-
cates an electrical problem. Avoid using
the system involved and immediately
consult an authorized Hyundai dealer.
Three kinds of fuses are used: blade type
for lower amperage rating, cartridge type,
and fusible link for higher amperage rat-
ings.
1VQA4037 Normal Normal Blade type
Cartridge type
Fusible linkBlown
Blown
Normal Blown
WARNING
- Fuse replace-
ment
Never replace a fuse with any-
thing but another fuse of the
same rating.
A higher capacity fuse could
cause damage and possibly a
fire.
Never install a wire instead of the
proper fuse - even as a temporary
repair. It may cause extensive
wiring damage and a possible fire.
CAUTION
Do not use a screwdriver or any
other metal object to remove fuses
because it may cause a short circuit
and damage the system.
Page 308 of 345
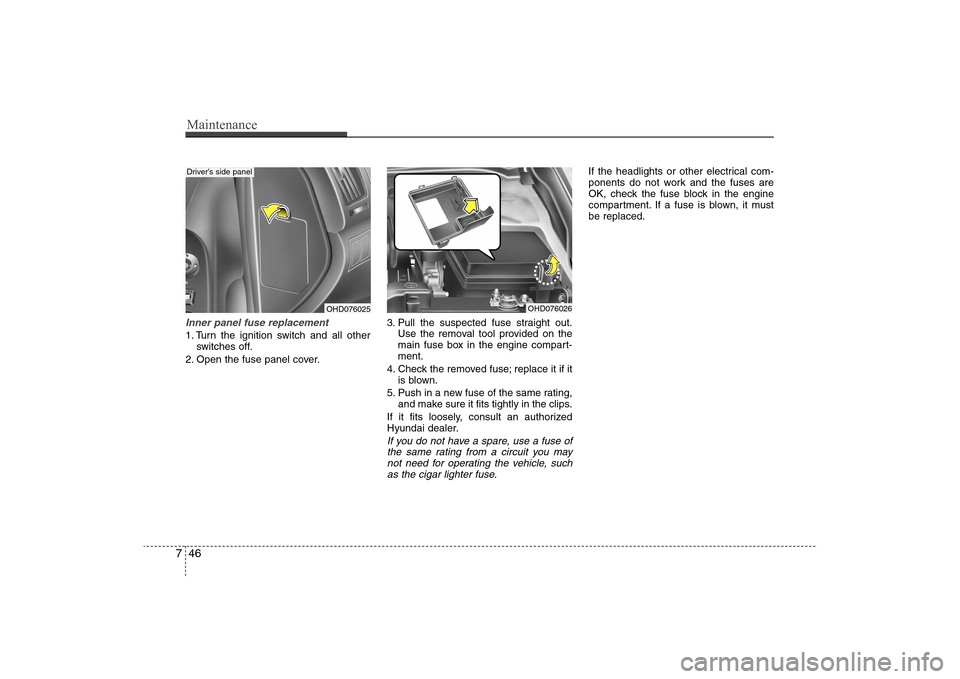
Maintenance46 7Inner panel fuse replacement1. Turn the ignition switch and all other
switches off.
2. Open the fuse panel cover.3. Pull the suspected fuse straight out.
Use the removal tool provided on the
main fuse box in the engine compart-
ment.
4. Check the removed fuse; replace it if it
is blown.
5. Push in a new fuse of the same rating,
and make sure it fits tightly in the clips.
If it fits loosely, consult an authorized
Hyundai dealer.
If you do not have a spare, use a fuse of
the same rating from a circuit you may
not need for operating the vehicle, such
as the cigar lighter fuse.
If the headlights or other electrical com-
ponents do not work and the fuses are
OK, check the fuse block in the engine
compartment. If a fuse is blown, it must
be replaced.
OHD076025
Driver’s side panel
OHD076026
Page 309 of 345
747
Maintenance
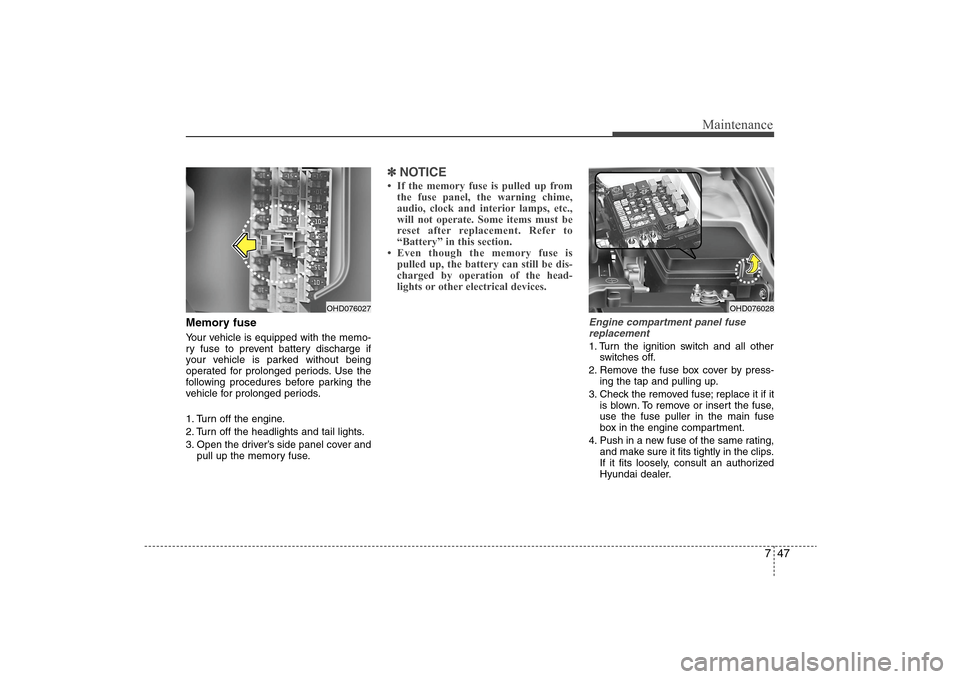
Memory fuseYour vehicle is equipped with the memo-
ry fuse to prevent battery discharge if
your vehicle is parked without being
operated for prolonged periods. Use the
following procedures before parking the
vehicle for prolonged periods.
1. Turn off the engine.
2. Turn off the headlights and tail lights.
3. Open the driver’s side panel cover and
pull up the memory fuse.
✽ ✽
NOTICE• If the memory fuse is pulled up from
the fuse panel, the warning chime,
audio, clock and interior lamps, etc.,
will not operate. Some items must be
reset after replacement. Refer to
“Battery” in this section.
• Even though the memory fuse is
pulled up, the battery can still be dis-
charged by operation of the head-
lights or other electrical devices.
Engine compartment panel fuse
replacement1. Turn the ignition switch and all other
switches off.
2. Remove the fuse box cover by press-
ing the tap and pulling up.
3. Check the removed fuse; replace it if it
is blown. To remove or insert the fuse,
use the fuse puller in the main fuse
box in the engine compartment.
4. Push in a new fuse of the same rating,
and make sure it fits tightly in the clips.
If it fits loosely, consult an authorized
Hyundai dealer.
OHD076027
OHD076028