change time Hyundai Elantra 2010 Owner's Manual
[x] Cancel search | Manufacturer: HYUNDAI, Model Year: 2010, Model line: Elantra, Model: Hyundai Elantra 2010Pages: 348, PDF Size: 5.78 MB
Page 1 of 348
F1
All information in this Owner's Manual is current at the time of publication.
However, Hyundai reserves the right to make changes at any time so that
our policy of continual product improvement may be carried out.
This manual applies to all Hyundai models and includes descriptions and
explanations of optional as well as standard equipment. As a result, you
may find material in this manual that does not apply to your specific vehi-
cle.
O
OW
W N
NE
ER
R '
'S
S M
M A
AN
N U
UA
A L
L
ELANTRA
Operation
Maintenance
Specifications
Page 21 of 348
Safety features of your vehicle
4
3
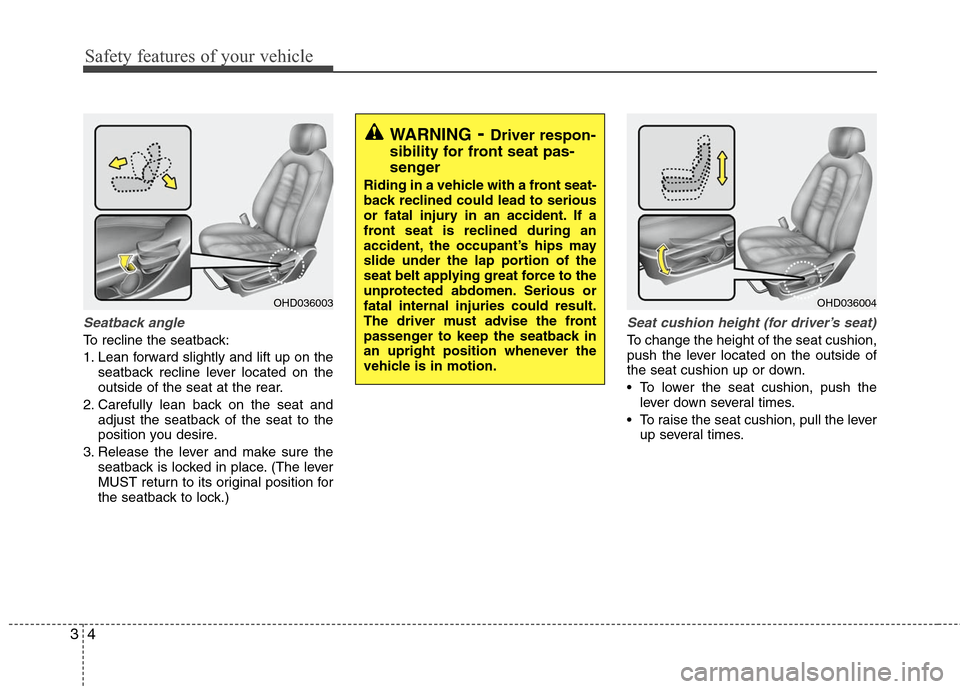
Seatback angle
To recline the seatback:
1. Lean forward slightly and lift up on the
seatback recline lever located on the
outside of the seat at the rear.
2. Carefully lean back on the seat and adjust the seatback of the seat to the
position you desire.
3. Release the lever and make sure the seatback is locked in place. (The lever
MUST return to its original position for
the seatback to lock.)
Seat cushion height (for driver’s seat)
To change the height of the seat cushion,
push the lever located on the outside of
the seat cushion up or down.
• To lower the seat cushion, push thelever down several times.
To raise the seat cushion, pull the lever up several times.
OHD036003
WARNING- Driver respon-
sibility for front seat pas-
senger
Riding in a vehicle with a front seat-
back reclined could lead to serious
or fatal injury in an accident. If a
front seat is reclined during an
accident, the occupant’s hips may
slide under the lap portion of the
seat belt applying great force to the
unprotected abdomen. Serious or
fatal internal injuries could result.
The driver must advise the front
passenger to keep the seatback in
an upright position whenever the
vehicle is in motion.
OHD036004
Page 80 of 348
47
Features of your vehicle
Theft-alarm stage
The alarm will be activated if any of the
following occurs while the system is
armed.
A front or rear door is opened withoutusing the ignition key or transmitter.
The trunk lid is opened without using the ignition key or transmitter.
The engine hood is opened.
The siren will sound and the hazard
warning lights will blink continuously for
27 seconds, and repeat the alarm 3
times unless the system is disarmed. To
turn off the system, unlock the doors with
the ignition key or transmitter.
Withheld alarm
If the trunk lid is opened with the trans-
mitter during the armed stage, the alarm
will not be activated but the armed state
will be maintained for the doors and
hood.
Disarmed stage
The system will be disarmed when the
doors are unlocked by depressing the
unlock button on the transmitter or
unlocked with the ignition key.
After depressing unlock button, the haz-
ard warning lights will blink twice to indi-
cate that the system is disarmed.
After depressing unlock button, if any
door is not opened within 30 seconds,
the system will be rearmed.
✽ ✽ NOTICE
• Avoid trying to start the engine while
the alarm is activated. The vehicle
starting motor is disabled during the
theft-alarm stage. If the system is not
disarmed with the ignition key or
transmitter, insert the key into the
ignition switch, turn the ignition
switch to the ON position and wait for
30 seconds. Then the system will be
disarmed.
• If you lose your keys, consult your authorized Hyundai dealer.
CAUTION
Do not change, alter or adjust the
theft-alarm system because it couldcause the theft-alarm system tomalfunction and should only beserviced by an authorized Hyundaidealer.
Malfunctions caused by improperalterations, adjustments or modifi-cations to the theft-alarm systemare not covered by your vehiclemanufacturer warranty.
Page 146 of 348
473
Features of your vehicle
Air conditioning system operation tips
If the vehicle has been parked in directsunlight during hot weather, open the
windows for a short time to let the hot
air inside the vehicle escape.
To help reduce moisture inside of win- dows on rainy or humid days, decrease
the humidity inside the vehicle by oper-
ating the air conditioning system.
During air conditioning system opera- tion, you may occasionally notice a
slight change in engine speed as the
air conditioning compressor cycles.
This is a normal system operation
characteristic.
Use the air conditioning system every month, even if only for a few minutes,
to ensure maximum system perform-
ance.
When using the air conditioning sys- tem, you may notice clear water drip-
ping (or even puddling) on the ground
under the passenger side of the vehi-
cle. This is a normal system operation
characteristic.
Operating the air conditioning system in the recirculated air position does
provide maximum cooling, however,
continual operation in this mode may
cause the air inside the vehicle to
become stale.
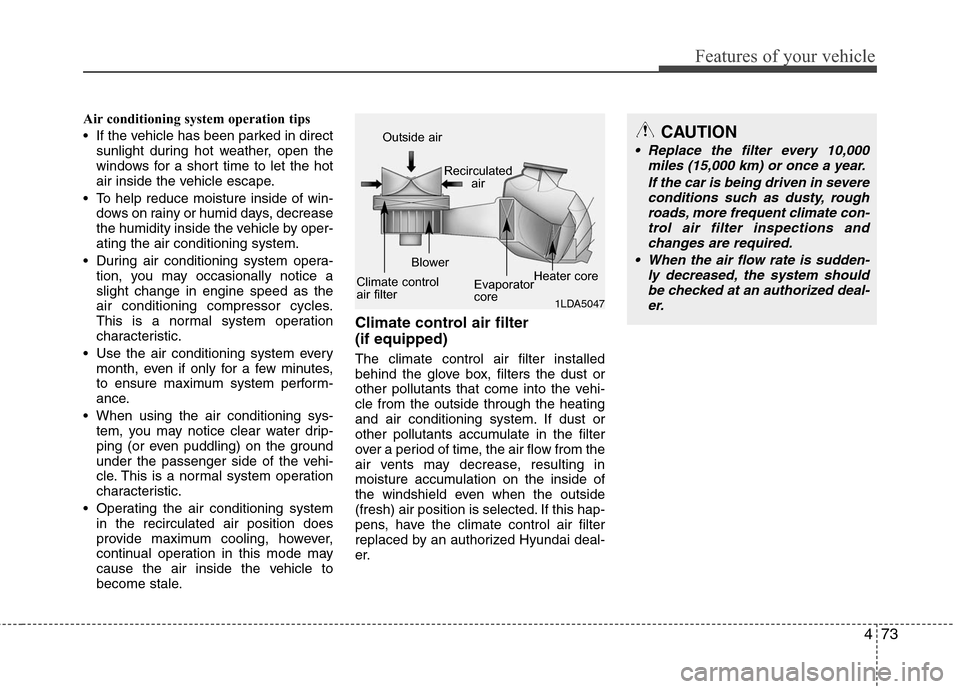
Climate control air filter
(if equipped)
The climate control air filter installed
behind the glove box, filters the dust or
other pollutants that come into the vehi-
cle from the outside through the heating
and air conditioning system. If dust or
other pollutants accumulate in the filter
over a period of time, the air flow from the
air vents may decrease, resulting in
moisture accumulation on the inside of
the windshield even when the outside
(fresh) air position is selected. If this hap-
pens, have the climate control air filter
replaced by an authorized Hyundai deal-
er.
1LDA5047
Outside air
Recirculatedair
Climate control
air filter Blower
Evaporator
coreHeater coreCAUTION
Replace the filter every 10,000
miles (15,000 km) or once a year.
If the car is being driven in severeconditions such as dusty, roughroads, more frequent climate con-trol air filter inspections andchanges are required.
When the air flow rate is sudden- ly decreased, the system shouldbe checked at an authorized deal-er.
Page 163 of 348
Features of your vehicle
90
4
Pressing the “H” button (2) with your
finger, a pencil or similar object will
advance the time displayed by one
hour.
Pressing the “M” button (3) with your
finger, a pencil or similar object will
advance the time displayed by one
minute.
To clear away minutes, press the “R”
button (1) with your finger, a pencil or
similar object. Then the clock will be
set precisely on the hour.
For example, if the “R” button is
pressed while the time is between 9:01
and 9:29, the display will be reset to
9:00.
9:01 ~ 9:29 display changed to 9:00
9:30 ~ 9:59 display changed to 10:00
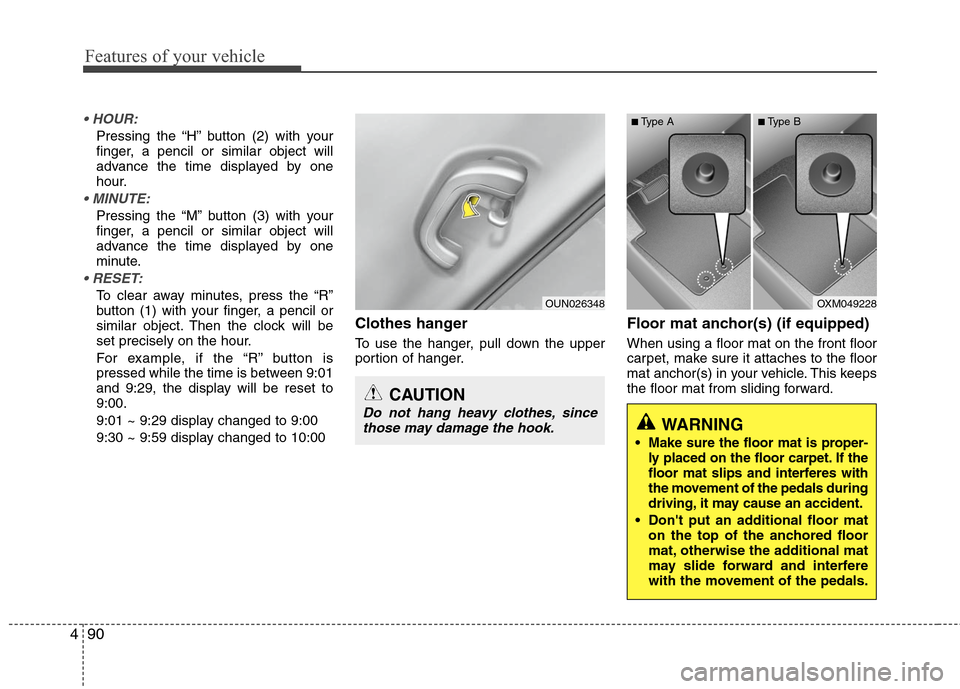
Clothes hanger
To use the hanger, pull down the upper
portion of hanger.
Floor mat anchor(s) (if equipped)
When using a floor mat on the front floor
carpet, make sure it attaches to the floor
mat anchor(s) in your vehicle. This keeps
the floor mat from sliding forward.
OUN026348
CAUTION
Do not hang heavy clothes, since
those may damage the hook.
OXM049228
WARNING
Make sure the floor mat is proper-
ly placed on the floor carpet. If the
floor mat slips and interferes with
the movement of the pedals during
driving, it may cause an accident.
Don't put an additional floor mat on the top of the anchored floor
mat, otherwise the additional mat
may slide forward and interfere
with the movement of the pedals.
■Type A■Type B
Page 174 of 348
4101
Features of your vehicle
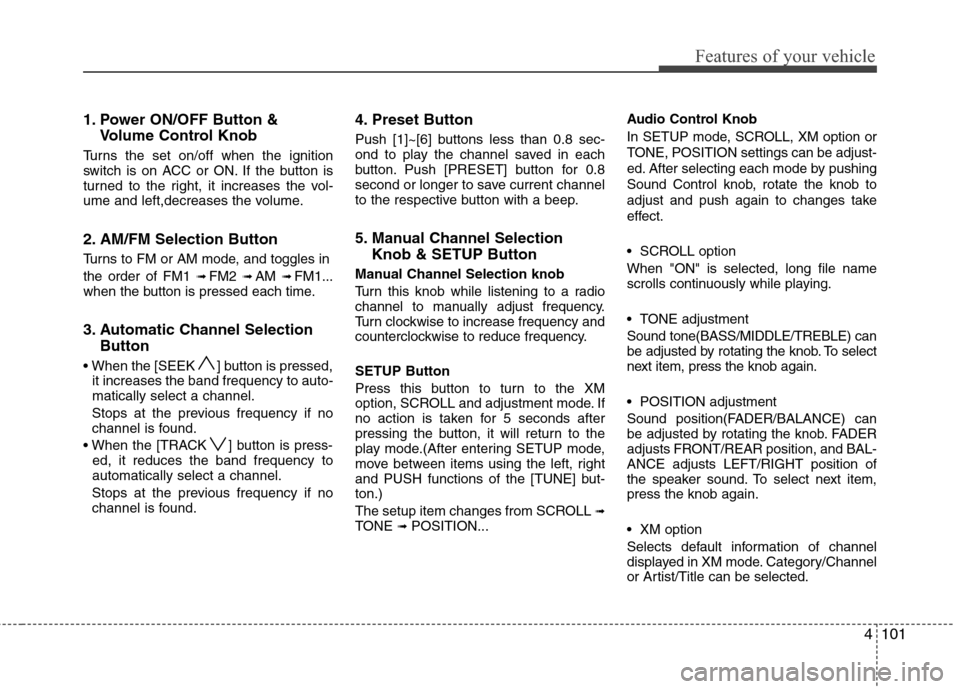
1. Power ON/OFF Button &Volume Control Knob
Turns the set on/off when the ignition
switch is on ACC or ON. If the button is
turned to the right, it increases the vol-
ume and left,decreases the volume.
2. AM/FM Selection Button
Turns to FM or AM mode, and toggles in
the order of FM1
➟ FM2 ➟ AM ➟ FM1...
when the button is pressed each time.
3. Automatic Channel Selection Button
] button is pressed,
it increases the band frequency to auto-
matically select a channel.
Stops at the previous frequency if no
channel is found.
] button is press- ed, it reduces the band frequency to
automatically select a channel.
Stops at the previous frequency if no
channel is found.
4. Preset Button
Push [1]~[6] buttons less than 0.8 sec-
ond to play the channel saved in each
button. Push [PRESET] button for 0.8
second or longer to save current channel
to the respective button with a beep.
5. Manual Channel Selection Knob & SETUP Button
Manual Channel Selection knob
Turn this knob while listening to a radio
channel to manually adjust frequency.
Turn clockwise to increase frequency and
counterclockwise to reduce frequency.
SETUP Button
Press this button to turn to the XM
option, SCROLL and adjustment mode. If
no action is taken for 5 seconds after
pressing the button, it will return to the
play mode.(After entering SETUP mode,
move between items using the left, right
and PUSH functions of the [TUNE] but-
ton.)
The setup item changes from SCROLL
➟TONE ➟ POSITION... Audio Control Knob
In SETUP mode, SCROLL, XM option or
TONE, POSITION settings can be adjust-
ed. After selecting each mode by pushing
Sound Control knob, rotate the knob to
adjust and push again to changes take
effect.
SCROLL option
When "ON" is selected, long file name
scrolls continuously while playing.
TONE adjustment
Sound tone(BASS/MIDDLE/TREBLE) can
be adjusted by rotating the knob. To select
next item, press the knob again.
POSITION adjustment
Sound position(FADER/BALANCE) can
be adjusted by rotating the knob. FADER
adjusts FRONT/REAR position, and BAL-
ANCE adjusts LEFT/RIGHT position of
the speaker sound. To select next item,
press the knob again.
XM option
Selects default information of channel
displayed in XM mode. Category/Channel
or Artist/Title can be selected.
Page 180 of 348
4107
Features of your vehicle
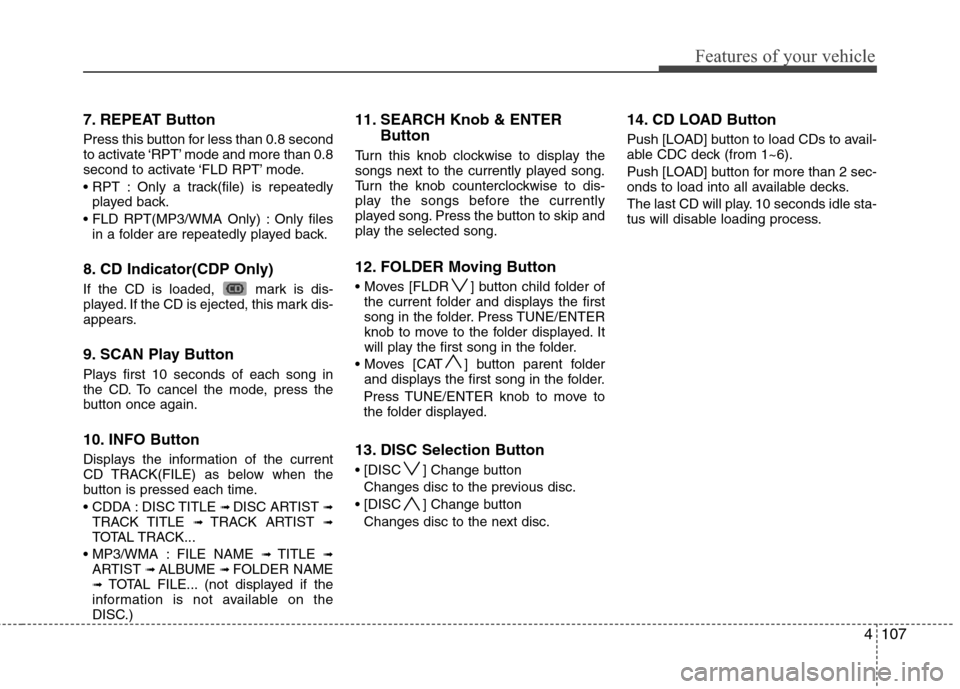
7. REPEAT Button
Press this button for less than 0.8 second
to activate ‘RPT’ mode and more than 0.8
second to activate ‘FLD RPT’ mode.
Only a track(file) is repeatedlyplayed back.
Only files in a folder are repeatedly played back.
8. CD Indicator(CDP Only)
If the CD is loaded, mark is dis-
played. If the CD is ejected, this mark dis-
appears.
9. SCAN Play Button
Plays first 10 seconds of each song in
the CD. To cancel the mode, press the
button once again.
10. INFO Button
Displays the information of the current
CD TRACK(FILE) as below when the
button is pressed each time.
DISC TITLE
➟ DISC ARTIST ➟TRACK TITLE ➟ TRACK ARTIST ➟TOTAL TRACK...
FILE NAME
➟ TITLE ➟ARTIST ➟ ALBUME ➟ FOLDER NAME➟TOTAL FILE... (not displayed if the
information is not available on the
DISC.)
11. SEARCH Knob & ENTER Button
Turn this knob clockwise to display the
songs next to the currently played song.
Turn the knob counterclockwise to dis-
play the songs before the currently
played song. Press the button to skip and
play the selected song.
12. FOLDER Moving Button
] button child folder of
the current folder and displays the first
song in the folder. Press TUNE/ENTER
knob to move to the folder displayed. It
will play the first song in the folder.
] button parent folder and displays the first song in the folder.
Press TUNE/ENTER knob to move to
the folder displayed.
13. DISC Selection Button
] Change button Changes disc to the previous disc.
] Change button Changes disc to the next disc.
14. CD LOAD Button
Push [LOAD] button to load CDs to avail-
able CDC deck (from 1~6).
Push [LOAD] button for more than 2 sec-
onds to load into all available decks.
The last CD will play. 10 seconds idle sta-
tus will disable loading process.
Page 194 of 348
Driving your vehicle
2
5
WARNING- ENGINE EXHAUST CAN BE DANGEROUS!
Engine exhaust fumes can be extremely dangerous. If, at any time, you smell exhaust fumes inside the vehicle, open the win-
dows immediately.
• Do not inhale exhaust fumes.
Exhaust fumes contain carbon monoxide, a colorless, odorless gas that can cause unconsciousness and death by asphyxia-
tion.
The exhaust system should be checked whenever the vehicle is raised to change the oil or for any other purpose. If you hear
a change in the sound of the exhaust or if you drive over something that strikes the underneath side of the car, have the
exhaust system checked as soon as possible by an authorized Hyundai dealer.
Letting the engine idle in your garage, even with the garage door open, is a hazardous practice. Never run the engine in your
garage any longer than it takes to start the engine and back the car out.
If it is necessary to idle the engine for a prolonged period with people inside the car, be sure to do so only in an open area
with the air intake set at "Fresh" and fan operating at one of the higher speeds so fresh air is drawn into the interior.
If you must drive with the trunk lid open because you are carrying objects that make this necessary:
1. Close all windows.
2. Open side vents.
3. Set the air intake control at "Fresh", the air flow control at "Floor" or "Face" and the fan at one of the higher speeds.
To assure proper operation of the ventilation system, be sure the ventilation air intakes located just in front of the windshie ld are
kept clear of snow, ice, leaves or other obstructions.
Page 209 of 348
517
Driving your vehicle
Disc brakes wear indicator
Your vehicle has disc brakes.
When your brake pads are worn and new
pads are required, you will hear a high-
pitched warning sound from your front
brakes or rear brakes (if equipped). You
may hear this sound come and go or it
may occur whenever you depress the
brake pedal.
Please remember that some driving con-
ditions or climates may cause a brake
squeal when you first apply (or lightly
apply) the brakes. This is normal and
does not indicate a problem with your
brakes.
Rear drum brakes (if equipped)
Your rear drum brakes do not have wear
indicators.Therefore, have the rear brake
linings inspected if you hear a rear brake
rubbing noise. Also have your rear
brakes inspected each time you change
or rotate your tires and when you have
the front brakes replaced.
WARNING- Brake wear
This brake wear warning sound
means your vehicle needs service.
If you ignore this audible warning,
you will eventually lose braking
performance, which could lead to a
serious accident.
CAUTION
To avoid costly brake repairs, donot continue to drive with wornbrake pads.
Always replace brake pads as complete front or rear axle sets.
Page 231 of 348
539
Driving your vehicle
If you are considering towing with your
car, you should first check with your
state’s Department of Motor Vehicles to
determine their legal requirements.
Since laws vary from state to state the
requirements for towing trailers, cars, or
other types of vehicles or apparatus may
differ. Ask an authorized Hyundai dealer
for further details before towing.Your vehicle can tow a trailer. To identify
what the vehicle trailering capacity is for
your vehicle, you should read the infor-
mation in “Weight of the trailer” that
appears later in this section.
Remember that trailering is different than
just driving your vehicle by itself.
Trailering means changes in handling,
durability, and fuel economy. Successful,
safe trailering requires correct equip-
ment, and it has to be used properly.This section contains many time-tested,
important trailering tips and safety rules.
Many of these are important for your
safety and that of your passengers.
Please read this section carefully before
you pull a trailer.
Load-pulling components such as the
engine, transaxle, wheel assemblies, and
tires are forced to work harder against
the load of the added weight. The engine
is required to operate at relatively higher
speeds and under greater loads. This
additional burden generates extra heat.
The trailer also adds considerably to
wind resistance, increasing the pulling
requirements.
TRAILER TOWING
WARNING- Towing a trail-
er
If you don't use the correct equip-
ment and drive improperly, you can
lose control when you pull a trailer.
For example, if the trailer is too
heavy, the brakes may not work
well - or even at all. You and your
passengers could be seriously or
fatally injured. Pull a trailer only if
you have followed all the steps in
this section.
WARNING- Weight limits
Before towing, make sure the total
trailer weight, gross combination
weight, gross vehicle weight, gross
axle weight and trailer tongue load
are all within the limits.
CAUTION
Pulling a trailer improperly can
damage your vehicle and result incostly repairs not covered by yourwarranty. To pull a trailer correctly,follow the advice in this section.