warning lights Hyundai Elantra 2012 Owner's Manual - RHD (UK. Australia)
[x] Cancel search | Manufacturer: HYUNDAI, Model Year: 2012, Model line: Elantra, Model: Hyundai Elantra 2012Pages: 384, PDF Size: 26.92 MB
Page 34 of 384
Safety features of your vehicle
18
3
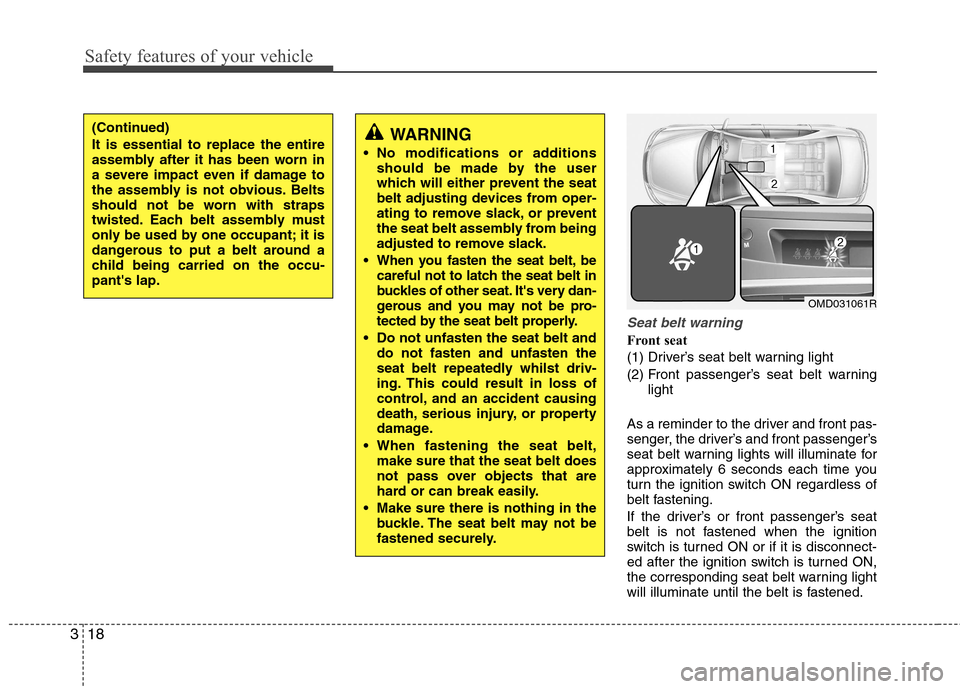
Seat belt warning
Front seat
(1) Driver’s seat belt warning light
(2) Front passenger’s seat belt warning
light
As a reminder to the driver and front pas-
senger, the driver’s and front passenger’s
seat belt warning lights will illuminate for
approximately 6 seconds each time you
turn the ignition switch ON regardless of
belt fastening.
If the driver’s or front passenger’s seat
belt is not fastened when the ignition
switch is turned ON or if it is disconnect-
ed after the ignition switch is turned ON,
the corresponding seat belt warning light
will illuminate until the belt is fastened.
WARNING
No modifications or additions should be made by the user
which will either prevent the seat
belt adjusting devices from oper-
ating to remove slack, or prevent
the seat belt assembly from being
adjusted to remove slack.
When you fasten the seat belt, be careful not to latch the seat belt in
buckles of other seat. It's very dan-
gerous and you may not be pro-
tected by the seat belt properly.
Do not unfasten the seat belt and do not fasten and unfasten the
seat belt repeatedly whilst driv-
ing. This could result in loss of
control, and an accident causing
death, serious injury, or property
damage.
When fastening the seat belt, make sure that the seat belt does
not pass over objects that are
hard or can break easily.
Make sure there is nothing in the buckle. The seat belt may not be
fastened securely.(Continued) It is essential to replace the entire
assembly after it has been worn in
a severe impact even if damage to
the assembly is not obvious. Belts
should not be worn with straps
twisted. Each belt assembly must
only be used by one occupant; it is
dangerous to put a belt around a
child being carried on the occu-pant's lap.
OMD031061R
Page 79 of 384
45
Features of your vehicle
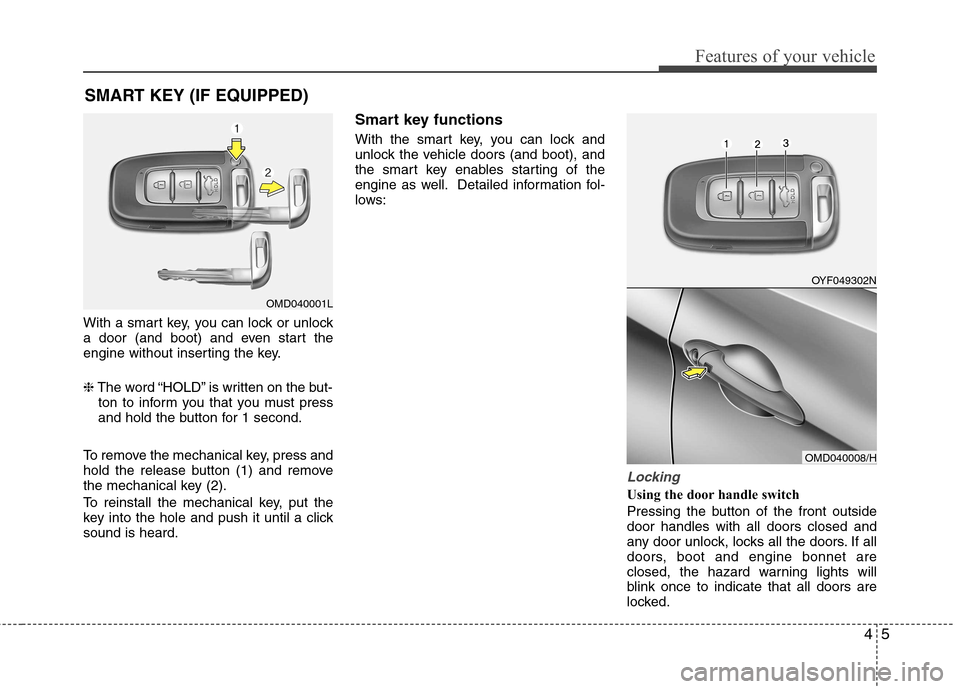
With a smart key, you can lock or unlock
a door (and boot) and even start the
engine without inserting the key. ❈The word “HOLD” is written on the but-
ton to inform you that you must press
and hold the button for 1 second.
To remove the mechanical key, press and
hold the release button (1) and remove
the mechanical key (2).
To reinstall the mechanical key, put the
key into the hole and push it until a clicksound is heard. Smart key functions
With the smart key, you can lock and
unlock the vehicle doors (and boot), and
the smart key enables starting of the
engine as well. Detailed information fol-
lows:
Locking
Using the door handle switch
Pressing the button of the front outside door handles with all doors closed and
any door unlock, locks all the doors. If all
doors, boot and engine bonnet are
closed, the hazard warning lights will
blink once to indicate that all doors are
locked.
SMART KEY (IF EQUIPPED)
OMD040001L
OYF049302N
OMD040008/H
Page 80 of 384
Features of your vehicle
6
4
However, if any door remains open, the
doors won't lock and the chime will sound
for 3 seconds. Close the door and try
again to lock the doors. If boot lid or engine bonnet remains
open, the hazard warning light won't
operate. After this, if boot lid and engine
bonnet are closed, the hazard warning
lights blink once.
The button will only operate when the
smart key is within 0.7~1 m (28~40 in.)
from the outside door handle. If you want
to make sure that a door has locked or
not, you should check the door lock but-
ton inside the vehicle or pull the outside
door handle.
Even though you press the outside door
handle buttons, the doors will not lock
and the chime will sound for 3 seconds if
any of following occur:
The smart key is in the vehicle.
The engine start/stop button is in ACC
or ON position.
Any door except the boot is open. Using the button on the smart key
All doors are locked if the lock button(1)
is pressed. If all doors, boot and bonnet
are closed, the hazard warning lights will
blink once to indicate that all doors are
locked.
However, if any door, boot or engine bon-
net remains open, the hazard warning
lights will not operate. If all doors, bootand engine bonnet are closed after the
lock button is pressed, the hazard warn-
ing lights blink once.
The operating distance of the button is
the area of 10 m (30 feet) from the out-
side door handle.Unlocking
Using the door handle switch
Press the button of the front outside door
handles with all doors closed and locked,
unlocks all the doors. The hazard warn-
ing lights blink twice to indicate that all
doors are unlocked. The button will only
operate when the smart key is within0.7~1 m (28~40 in.) from the outside
door handle.
When the smart key is recognized in the area of 0.7~1 m (28~40 in.) from the front
outside door handle, other people canalso open the door without possession of
the smart key.
After pressing the button, the doors will
lock automatically unless you open any
door within 30 seconds.
Using the button on the smart key
All doors are unlocked if the unlock but-
ton(2) is pressed. The hazard warning
lights will blink twice to indicate that all
doors are unlocked.
After pressing this button, the doors will
lock automatically unless you open any
door within 30 seconds.
The operating distance of the button is
the area of 10 m (30 feet) from the out-
side door handle.
Page 85 of 384
411
Features of your vehicle
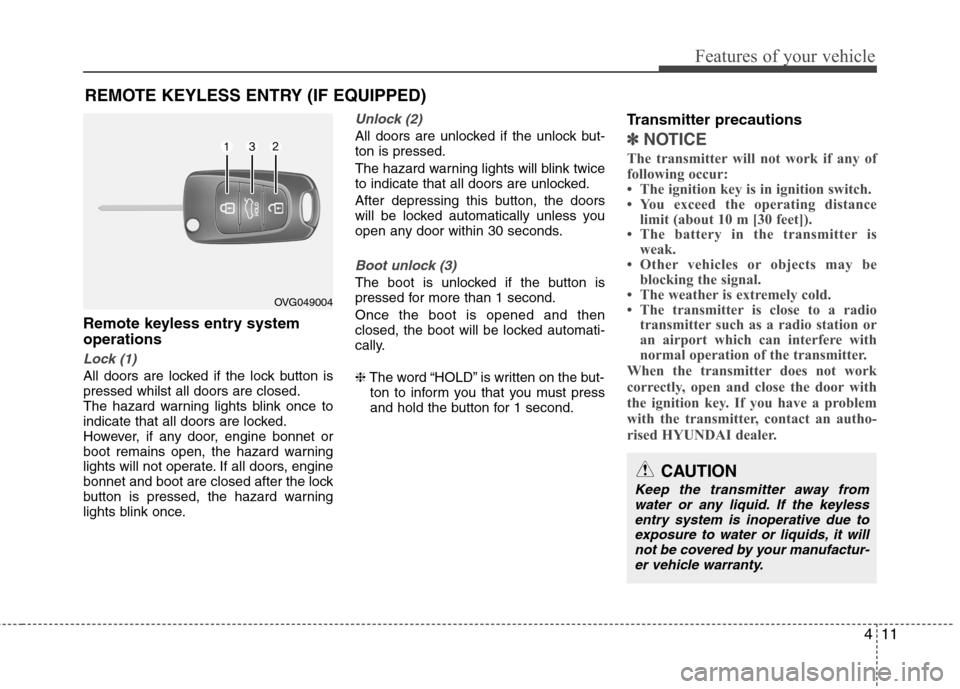
Remote keyless entry system operations
Lock (1)
All doors are locked if the lock button is pressed whilst all doors are closed.
The hazard warning lights blink once to
indicate that all doors are locked.
However, if any door, engine bonnet or
boot remains open, the hazard warning
lights will not operate. If all doors, engine
bonnet and boot are closed after the lock
button is pressed, the hazard warning
lights blink once.
Unlock (2)
All doors are unlocked if the unlock but- ton is pressed.
The hazard warning lights will blink twice
to indicate that all doors are unlocked.
After depressing this button, the doors
will be locked automatically unless you
open any door within 30 seconds.
Boot unlock (3)
The boot is unlocked if the button is
pressed for more than 1 second. Once the boot is opened and then
closed, the boot will be locked automati-
cally. ❈The word “HOLD” is written on the but-
ton to inform you that you must press
and hold the button for 1 second. Transmitter precautions
✽✽
NOTICE
The transmitter will not work if any of
following occur:
The ignition key is in ignition switch.
You exceed the operating distance limit (about 10 m [30 feet]).
The battery in the transmitter is weak.
Other vehicles or objects may be blocking the signal.
The weather is extremely cold.
The transmitter is close to a radio transmitter such as a radio station or
an airport which can interfere with
normal operation of the transmitter.
When the transmitter does not work
correctly, open and close the door with
the ignition key. If you have a problem
with the transmitter, contact an autho-
rised HYUNDAI dealer.
REMOTE KEYLESS ENTRY (IF EQUIPPED)
OVG049004
CAUTION
Keep the transmitter away from water or any liquid. If the keyless
entry system is inoperative due toexposure to water or liquids, it will not be covered by your manufactur-er vehicle warranty.
Page 87 of 384
413
Features of your vehicle
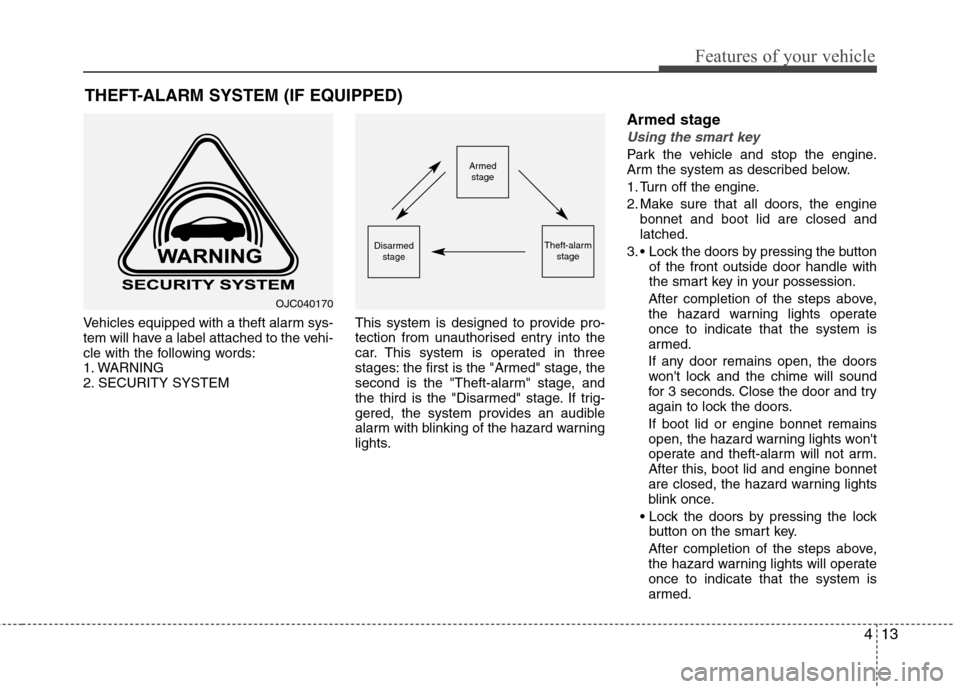
Vehicles equipped with a theft alarm sys-
tem will have a label attached to the vehi-
cle with the following words:
1. WARNING
2. SECURITY SYSTEMThis system is designed to provide pro-
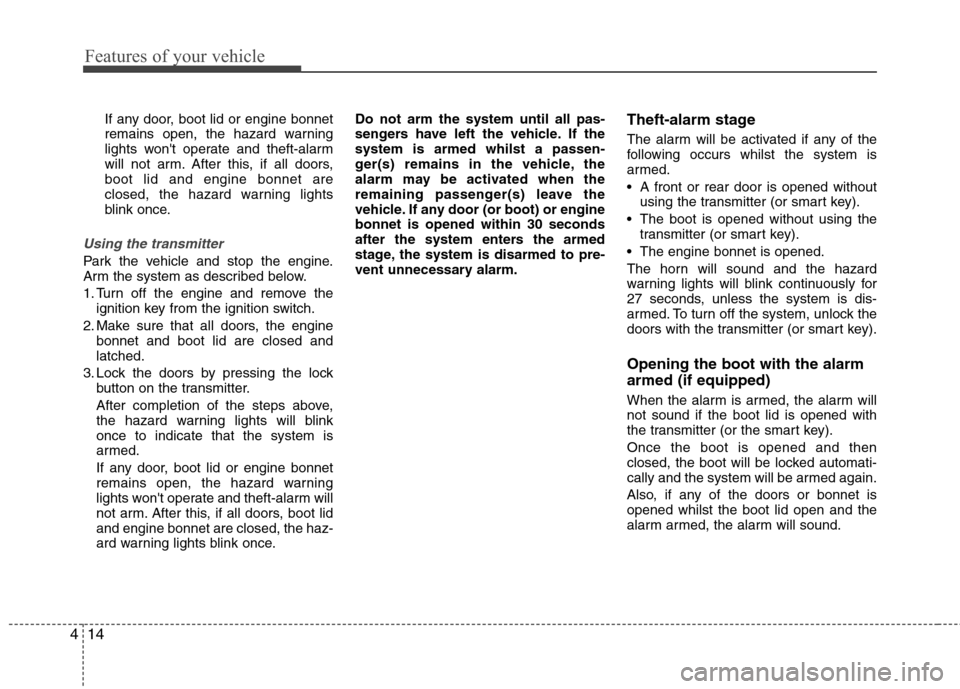
tection from unauthorised entry into the
car. This system is operated in three
stages: the first is the "Armed" stage, the
second is the "Theft-alarm" stage, and
the third is the "Disarmed" stage. If trig-
gered, the system provides an audible
alarm with blinking of the hazard warning
lights.Armed stage
Using the smart key
Park the vehicle and stop the engine.
Arm the system as described below.
1. Turn off the engine.
2. Make sure that all doors, the engine
bonnet and boot lid are closed and latched.
3. Lock the doors by pressing the button of the front outside door handle with
the smart key in your possession.
After completion of the steps above,
the hazard warning lights operateonce to indicate that the system is
armed.
If any door remains open, the doors
won't lock and the chime will sound
for 3 seconds. Close the door and try
again to lock the doors. If boot lid or engine bonnet remains
open, the hazard warning lights won't
operate and theft-alarm will not arm.
After this, boot lid and engine bonnet
are closed, the hazard warning lights
blink once.
button on the smart key.
After completion of the steps above,
the hazard warning lights will operateonce to indicate that the system is
armed.
THEFT-ALARM SYSTEM (IF EQUIPPED)Armed
stage
Theft-alarm stageDisarmedstage
OJC040170
Page 88 of 384
Features of your vehicle
14
4
If any door, boot lid or engine bonnet
remains open, the hazard warning
lights won't operate and theft-alarm
will not arm. After this, if all doors,boot lid and engine bonnet are
closed, the hazard warning lights
blink once.
Using the transmitter
Park the vehicle and stop the engine.
Arm the system as described below.
1. Turn off the engine and remove the
ignition key from the ignition switch.
2. Make sure that all doors, the engine bonnet and boot lid are closed and latched.
3. Lock the doors by pressing the lock button on the transmitter.
After completion of the steps above,
the hazard warning lights will blinkonce to indicate that the system is
armed.
If any door, boot lid or engine bonnet
remains open, the hazard warning
lights won't operate and theft-alarm will
not arm. After this, if all doors, boot lidand engine bonnet are closed, the haz-
ard warning lights blink once. Do not arm the system until all pas-
sengers have left the vehicle. If thesystem is armed whilst a passen-
ger(s) remains in the vehicle, the
alarm may be activated when the
remaining passenger(s) leave the
vehicle. If any door (or boot) or enginebonnet is opened within 30 seconds
after the system enters the armed
stage, the system is disarmed to pre-
vent unnecessary alarm.
Theft-alarm stage
The alarm will be activated if any of the
following occurs whilst the system is
armed.
A front or rear door is opened without
using the transmitter (or smart key).
The boot is opened without using the transmitter (or smart key).
The engine bonnet is opened.
The horn will sound and the hazard
warning lights will blink continuously for
27 seconds, unless the system is dis-
armed. To turn off the system, unlock the
doors with the transmitter (or smart key). Opening the boot with the alarm armed (if equipped)
When the alarm is armed, the alarm will not sound if the boot lid is opened with
the transmitter (or the smart key). Once the boot is opened and then
closed, the boot will be locked automati-
cally and the system will be armed again.
Also, if any of the doors or bonnet is opened whilst the boot lid open and the
alarm armed, the alarm will sound.
Page 89 of 384
415
Features of your vehicle
Disarmed stage
The system will be disarmed when:
Transmitter
- The door unlock button is pressed.
Smart key
- The door unlock button is pressed.
- The button of the front outside door ispressed whilst carrying the smart key.
After the doors are unlocked, the hazard
warning lights will blink twice to indicate
that the system is disarmed.
After pressing the unlock button, if any door (or boot) is not opened within 30
seconds, the system will be rearmed.
✽✽ NOTICE - Non-Smart key
If the system is not disarmed with the transmitter, open the door with the
key and insert the key into the ignition
switch, turn the ignition switch to the
ON position and wait for 30 seconds.
Then the system will be disarmed.
If you lose your keys, consult your
authorised HYUNDAI dealer.
✽
✽ NOTICE - Smart key
If the system is not disarmed with the smart key, open the door with the
mechanical key and start the engine.
Then the system will be disarmed.
If you lose your keys, consult your
authorised HYUNDAI dealer.
CAUTION
Do not change, alter or adjust the
theft-alarm system because it could
cause the theft-alarm system to malfunction and should only beserviced by an authorisedHYUNDAI dealer.
Malfunctions caused by improperalterations, adjustments or modifi-cations to the theft-alarm system are not covered by your vehicle
manufacturer’s warranty.
Page 111 of 384
437
Features of your vehicle
✽✽NOTICE
If the steering wheel is turned to full
lock in either direction for a long period
of time whilst stationary (especially dur-
ing parking) the system could overheat.
Should this occur, steering assistance
will be reduced until the system cools
down. This is to protect the electric
power steering system.Tilt steering
Tilt steering allows you to adjust the
steering wheel before you drive. You can
also raise it to give your legs more room
when you exit and enter the vehicle.
The steering wheel should be positioned
so that it is comfortable for you to drive,
whilst permitting you to see the instru-
ment panel warning lights and gauges.
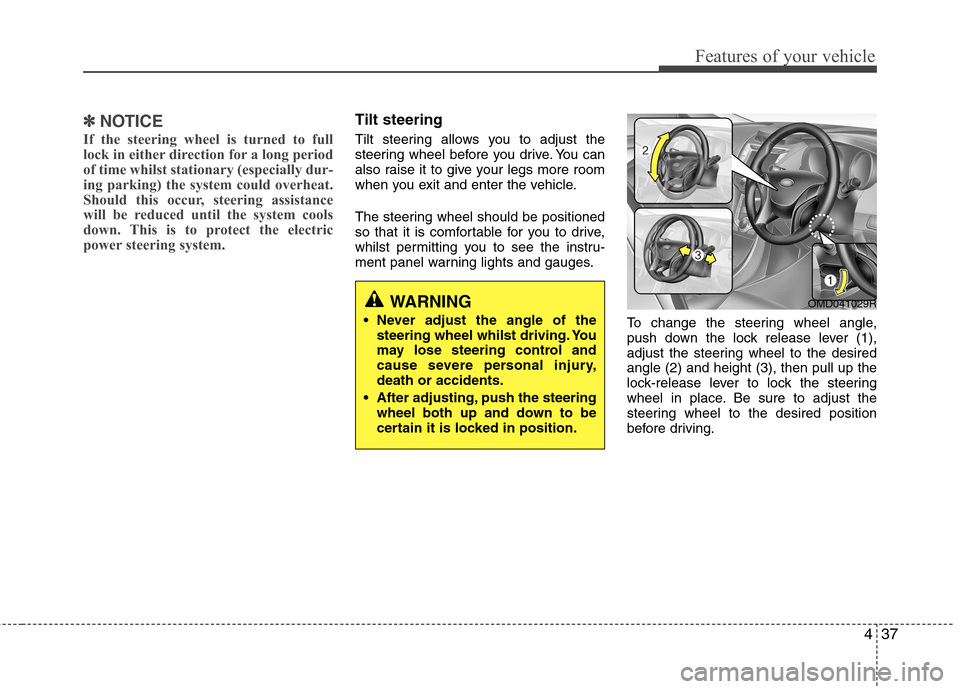
To change the steering wheel angle,
push down the lock release lever (1),
adjust the steering wheel to the desiredangle (2) and height (3), then pull up the
lock-release lever to lock the steering
wheel in place. Be sure to adjust the
steering wheel to the desired position
before driving.
WARNING
Never adjust the angle of the steering wheel whilst driving. You
may lose steering control and
cause severe personal injury,death or accidents.
After adjusting, push the steering wheel both up and down to be
certain it is locked in position.OMD041029R
Page 112 of 384
Features of your vehicle
38
4
WARNING - Rear visibility
Do not place objects in the rear
seat or cargo area which would
interfere with your vision out of the
rear window.
WARNING
Do not adjust the rearview mirror
whilst the vehicle is moving. This
could result in loss of control, and
an accident which could cause
death, serious injury or property
damage.
WARNING
Do not modify the inside mirror and
do not install a wide mirror. It could
result in injury, during an accident
or deployment of the air bag.
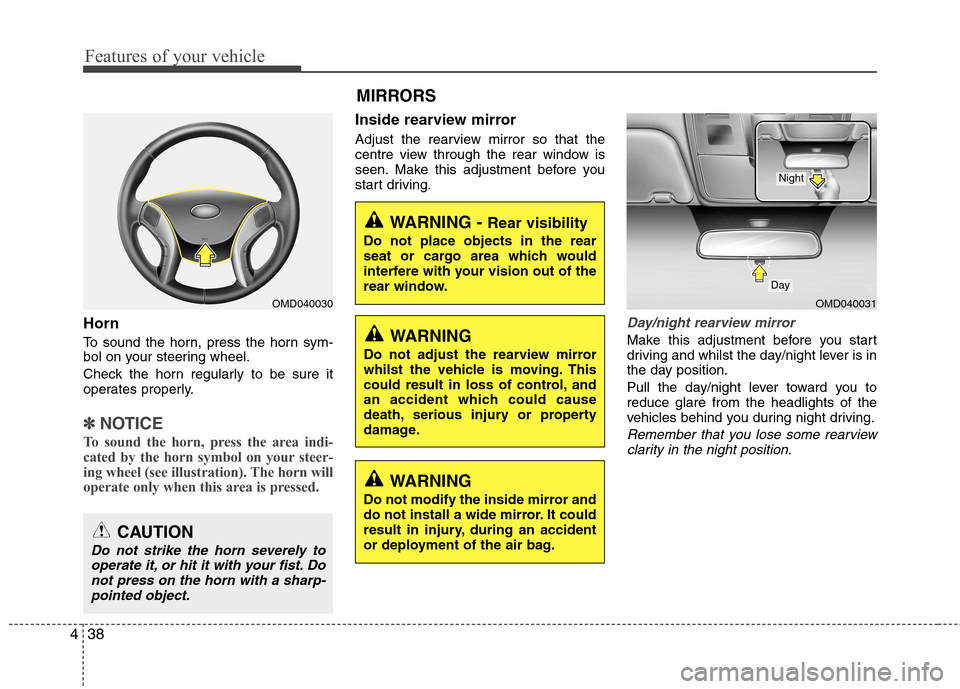
Horn
To sound the horn, press the horn sym-
bol on your steering wheel.
Check the horn regularly to be sure it
operates properly.
✽✽ NOTICE
To sound the horn, press the area indi-
cated by the horn symbol on your steer-
ing wheel (see illustration). The horn will
operate only when this area is pressed.
Inside rearview mirror
Adjust the rearview mirror so that the
centre view through the rear window is
seen. Make this adjustment before you
start driving.
Day/night rearview mirror
Make this adjustment before you start
driving and whilst the day/night lever is in
the day position.
Pull the day/night lever toward you to reduce glare from the headlights of the
vehicles behind you during night driving.
Remember that you lose some rearview clarity in the night position.
CAUTION
Do not strike the horn severely to operate it, or hit it with your fist. Donot press on the horn with a sharp-pointed object.
OMD040030 MIRRORS OMD040031
Day
Night
Page 113 of 384
439
Features of your vehicle
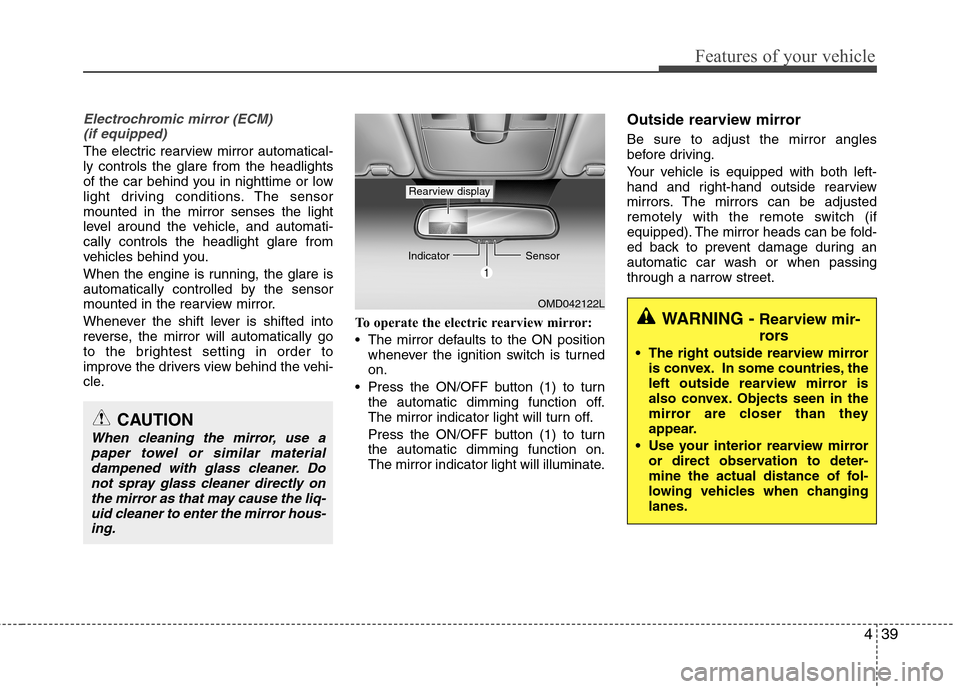
Electrochromic mirror (ECM) (if equipped)
The electric rearview mirror automatical- ly controls the glare from the headlights
of the car behind you in nighttime or low
light driving conditions. The sensormounted in the mirror senses the light
level around the vehicle, and automati-cally controls the headlight glare from
vehicles behind you.
When the engine is running, the glare is
automatically controlled by the sensor
mounted in the rearview mirror.
Whenever the shift lever is shifted into
reverse, the mirror will automatically go
to the brightest setting in order to
improve the drivers view behind the vehi-
cle. To operate the electric rearview mirror:
The mirror defaults to the ON position
whenever the ignition switch is turned on.
Press the ON/OFF button (1) to turn the automatic dimming function off.
The mirror indicator light will turn off.
Press the ON/OFF button (1) to turn the automatic dimming function on.
The mirror indicator light will illuminate. Outside rearview mirror Be sure to adjust the mirror angles
before driving.
Your vehicle is equipped with both left-
hand and right-hand outside rearview
mirrors. The mirrors can be adjusted
remotely with the remote switch (if
equipped). The mirror heads can be fold-
ed back to prevent damage during an
automatic car wash or when passing
through a narrow street.
CAUTION
When cleaning the mirror, use a
paper towel or similar materialdampened with glass cleaner. Do
not spray glass cleaner directly onthe mirror as that may cause the liq-uid cleaner to enter the mirror hous- ing.
OMD042122L
Indicator
Sensor
Rearview display
WARNING - Rearview mir-
rors
The right outside rearview mirror is convex. In some countries, the
left outside rearview mirror is
also convex. Objects seen in the
mirror are closer than they
appear.
Use your interior rearview mirror or direct observation to deter-
mine the actual distance of fol-
lowing vehicles when changinglanes.