Repair manual Hyundai Elantra 2013 Owner's Manual
[x] Cancel search | Manufacturer: HYUNDAI, Model Year: 2013, Model line: Elantra, Model: Hyundai Elantra 2013Pages: 383, PDF Size: 8.94 MB
Page 229 of 383

Driving your vehicle
22 5
Disc brakes wear indicator
(if equipped)
Your vehicle has disc brakes.
When your brake pads are worn and new
pads are required, you will hear a high-
pitched warning sound from your front
brakes or rear brakes. You may hear this
sound come and go or it may occur
whenever you depress the brake pedal.
Please remember that some driving con-
ditions or climates may cause a brake
squeal when you first apply (or lightly
apply) the brakes. This is normal and does
not indicate a problem with your brakes.
Rear drum brakes (if equipped)
Your rear drum brakes do not have wear
indicators.Therefore, have the rear brake
linings inspected if you hear a rear brake
rubbing noise. Also have your rear
brakes inspected each time you change
or rotate your tires and when you have
the front brakes replaced.
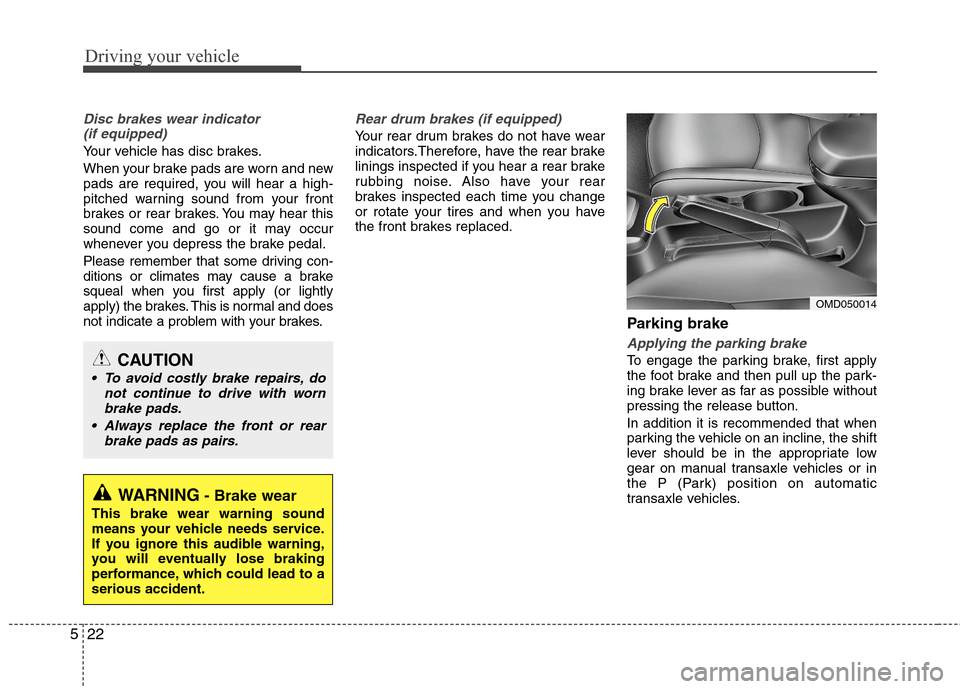
Parking brake
Applying the parking brake
To engage the parking brake, first apply
the foot brake and then pull up the park-
ing brake lever as far as possible without
pressing the release button.
In addition it is recommended that when
parking the vehicle on an incline, the shift
lever should be in the appropriate low
gear on manual transaxle vehicles or in
the P (Park) position on automatic
transaxle vehicles.
WARNING- Brake wear
This brake wear warning sound
means your vehicle needs service.
If you ignore this audible warning,
you will eventually lose braking
performance, which could lead to a
serious accident.
CAUTION
To avoid costly brake repairs, do
not continue to drive with worn
brake pads.
Always replace the front or rear
brake pads as pairs.
OMD050014
Page 262 of 383

63
What to do in an emergency
2. When the vehicle is stopped, turn on
your emergency hazard flashers, set
the parking brake and put the transaxle
in P (automatic transaxle) or reverse
(manual transaxle).
3. Have all passengers get out of the car.
Be sure they all get out on the side of
the car that is away from traffic.
4. When repairing a flat tire, follow the
instruction provided later in this sec-
tion.
If engine stalls while driving
1. Reduce your speed gradually, keeping
a straight line. Move cautiously off the
road to a safe place.
2. Turn on your emergency flashers.
3. Try to start the engine again. If your
vehicle will not start, contact an
authorized HYUNDAI dealer or seek
other qualified assistance.
If engine doesn't turn over or
turns over slowly
1. If your vehicle has an automatic
transaxle, be sure the shift lever is in N
(Neutral) or P (Park) and the emer-
gency brake is set.
2. Check the battery connections to be
sure they are clean and tight.
3. Turn on the interior light. If the light
dims or goes out when you operate the
starter, the battery is discharged.
4. Do not push or pull the vehicle to start
it. See instructions for "Jump starting".
If engine turns over normally but
does not start
1. Check fuel level.
2. With the ignition switch in the LOCK
position, check all connectors at igni-
tion coils and spark plugs. Reconnect
any that may be disconnected or
loose.
3. If the engine still does not start, call an
authorized HYUNDAI dealer or seek
other qualified assistance.
IF THE ENGINE WILL NOT START
WARNING
If the engine will not start, do not
push or pull the vehicle to start it.
This could result in a collision or
cause other damage. In addition,
push or pull starting may cause the
catalytic converter to be over-
loaded and create a fire hazard.
Page 279 of 383

What to do in an emergency
20 6
IF YOU HAVE A FLAT TIRE (WITH TIRE MOBILITY KIT, IF EQUIPPED)
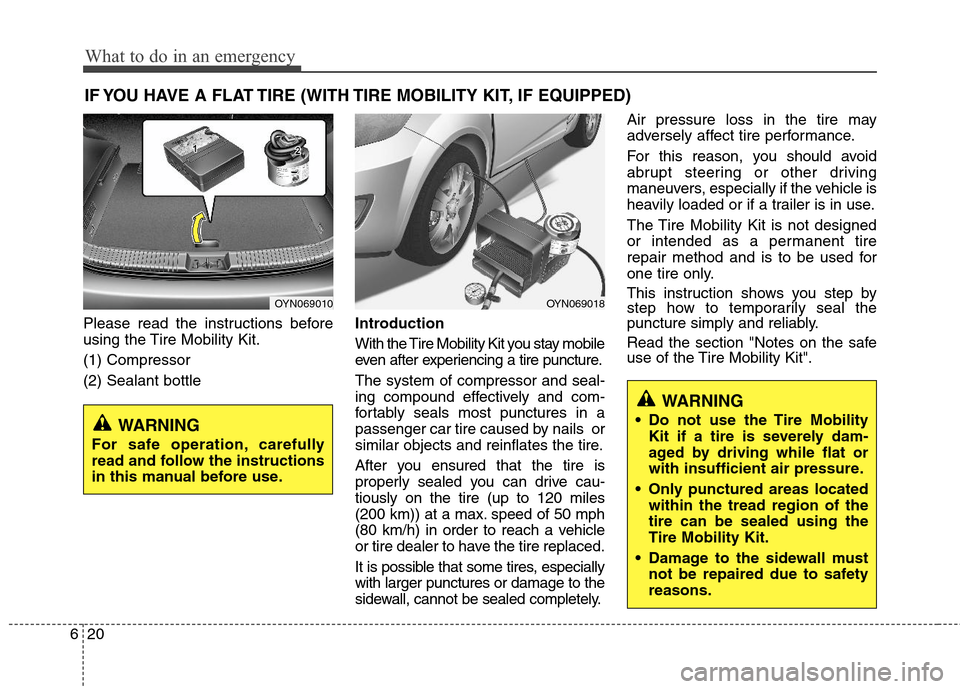
Please read the instructions before
using the Tire Mobility Kit.
(1) Compressor
(2) Sealant bottleIntroduction
With the Tire Mobility Kit you stay mobile
even after experiencing a tire puncture.
The system of compressor and seal-
ing compound effectively and com-
fortably seals most punctures in a
passenger car tire caused by nails or
similar objects and reinflates the tire.
After you ensured that the tire is
properly sealed you can drive cau-
tiously on the tire (up to 120 miles
(200 km)) at a max. speed of 50 mph
(80 km/h) in order to reach a vehicle
or tire dealer to have the tire replaced.
It is possible that some tires, especially
with larger punctures or damage to the
sidewall, cannot be sealed completely.Air pressure loss in the tire may
adversely affect tire performance.
For this reason, you should avoid
abrupt steering or other driving
maneuvers, especially if the vehicle is
heavily loaded or if a trailer is in use.
The Tire Mobility Kit is not designed
or intended as a permanent tire
repair method and is to be used for
one tire only.
This instruction shows you step by
step how to temporarily seal the
puncture simply and reliably.
Read the section "Notes on the safe
use of the Tire Mobility Kit".
OYN069010OYN069018
WARNING
Do not use the Tire Mobility
Kit if a tire is severely dam-
aged by driving while flat or
with insufficient air pressure.
Only punctured areas located
within the tread region of the
tire can be sealed using the
Tire Mobility Kit.
Damage to the sidewall must
not be repaired due to safety
reasons.WARNING
For safe operation, carefully
read and follow the instructions
in this manual before use.
Page 305 of 383

717
Maintenance
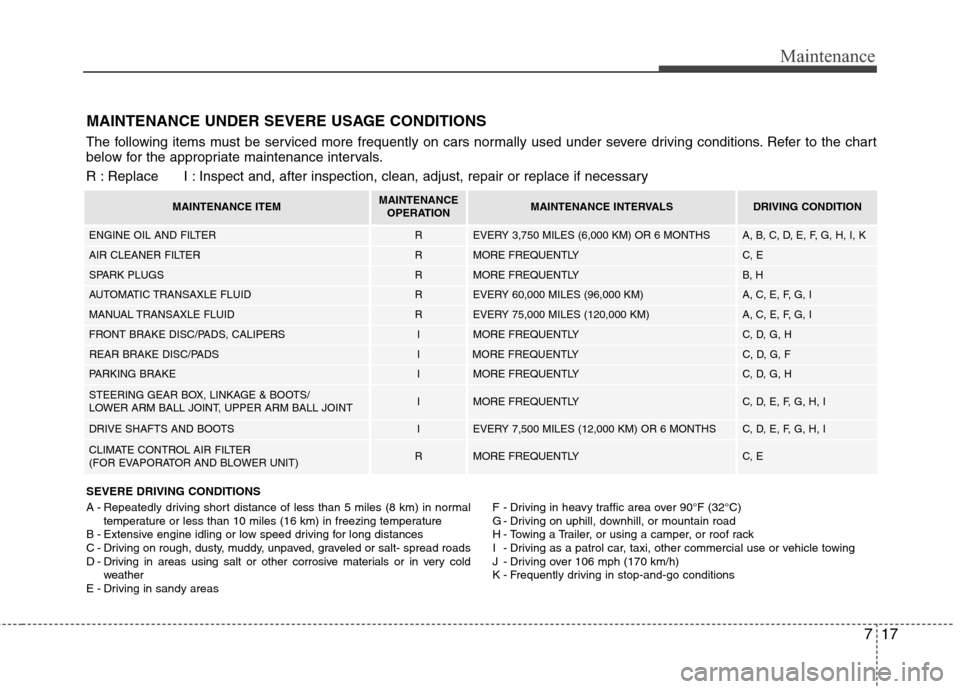
MAINTENANCE UNDER SEVERE USAGE CONDITIONS
SEVERE DRIVING CONDITIONS
A - Repeatedly driving short distance of less than 5 miles (8 km) in normal
temperature or less than 10 miles (16 km) in freezing temperature
B - Extensive engine idling or low speed driving for long distances
C - Driving on rough, dusty, muddy, unpaved, graveled or salt- spread roads
D - Driving in areas using salt or other corrosive materials or in very cold
weather
E - Driving in sandy areasF - Driving in heavy traffic area over 90°F (32°C)
G - Driving on uphill, downhill, or mountain road
H - Towing a Trailer, or using a camper, or roof rack
I - Driving as a patrol car, taxi, other commercial use or vehicle towing
J - Driving over 106 mph (170 km/h)
K - Frequently driving in stop-and-go conditions
The following items must be serviced more frequently on cars normally used under severe driving conditions. Refer to the chart
below for the appropriate maintenance intervals.
R : Replace I : Inspect and, after inspection, clean, adjust, repair or replace if necessary
MAINTENANCE ITEMMAINTENANCE
OPERATIONMAINTENANCE INTERVALSDRIVING CONDITION
ENGINE OIL AND FILTERREVERY 3,750 MILES (6,000 KM) OR 6 MONTHSA, B, C, D, E, F, G, H, I, K
AIR CLEANER FILTERRMORE FREQUENTLYC, E
SPARK PLUGSRMORE FREQUENTLYB, H
AUTOMATIC TRANSAXLE FLUIDREVERY 60,000 MILES (96,000 KM) A, C, E, F, G, I
MANUAL TRANSAXLE FLUIDREVERY 75,000 MILES (120,000 KM) A, C, E, F, G, I
FRONT BRAKE DISC/PADS, CALIPERSIMORE FREQUENTLYC, D, G, H
REAR BRAKE DISC/PADSIMORE FREQUENTLYC, D, G, F
PARKING BRAKEIMORE FREQUENTLYC, D, G, H
STEERING GEAR BOX, LINKAGE & BOOTS/
LOWER ARM BALL JOINT, UPPER ARM BALL JOINTIMORE FREQUENTLYC, D, E, F, G, H, I
DRIVE SHAFTS AND BOOTSIEVERY 7,500 MILES (12,000 KM) OR 6 MONTHSC, D, E, F, G, H, I
CLIMATE CONTROL AIR FILTER
(FOR EVAPORATOR AND BLOWER UNIT)RMORE FREQUENTLYC, E