tail lights Hyundai Elantra 2013 Owner's Manual
[x] Cancel search | Manufacturer: HYUNDAI, Model Year: 2013, Model line: Elantra, Model: Hyundai Elantra 2013Pages: 383, PDF Size: 8.94 MB
Page 84 of 383
Features of your vehicle
6 4
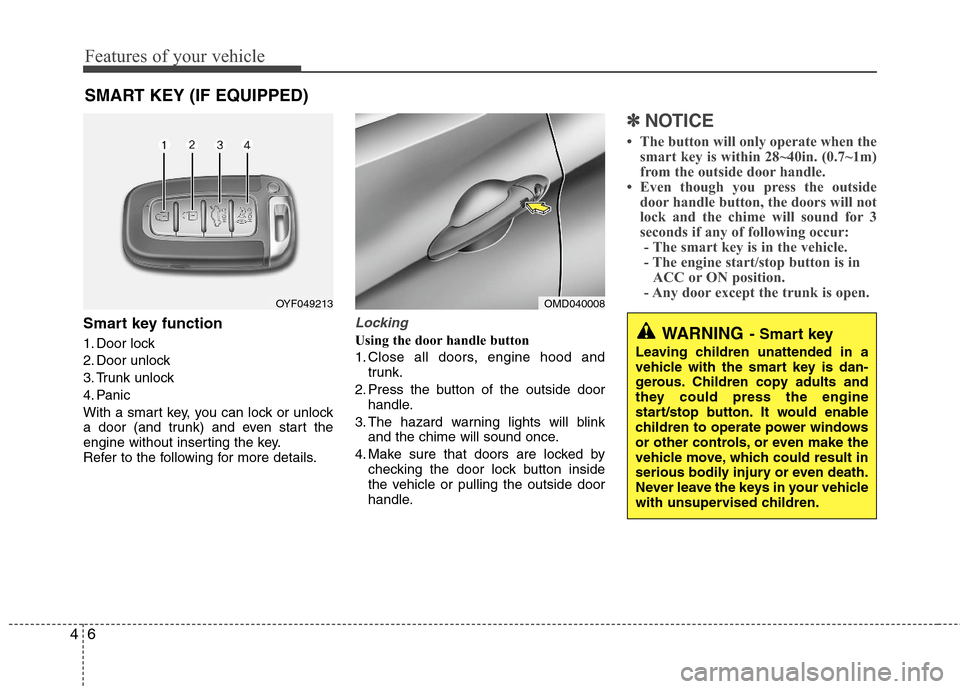
Smart key function
1. Door lock
2. Door unlock
3. Trunk unlock
4. Panic
With a smart key, you can lock or unlock
a door (and trunk) and even start the
engine without inserting the key.
Refer to the following for more details.
Locking
Using the door handle button
1. Close all doors, engine hood and
trunk.
2. Press the button of the outside door
handle.
3. The hazard warning lights will blink
and the chime will sound once.
4. Make sure that doors are locked by
checking the door lock button inside
the vehicle or pulling the outside door
handle.
✽ ✽
NOTICE
• The button will only operate when the
smart key is within 28~40in. (0.7~1m)
from the outside door handle.
• Even though you press the outside
door handle button, the doors will not
lock and the chime will sound for 3
seconds if any of following occur:
- The smart key is in the vehicle.
- The engine start/stop button is in
ACC or ON position.
- Any door except the trunk is open.
SMART KEY (IF EQUIPPED)
OYF049213OMD040008
WARNING- Smart key
Leaving children unattended in a
vehicle with the smart key is dan-
gerous. Children copy adults and
they could press the engine
start/stop button. It would enable
children to operate power windows
or other controls, or even make the
vehicle move, which could result in
serious bodily injury or even death.
Never leave the keys in your vehicle
with unsupervised children.
Page 86 of 383
Features of your vehicle
8 4
Trunk unlocking
Using the trunk handle button
1. Carry the smart key.
2. Press the trunk handle button.
3. When all doors are locked, the hazard
warning lights will blink two times.
Once the trunk is opened and then
closed, the trunk will lock automatical-
ly.
✽ ✽
NOTICE
The button will only operate when the
smart key is within 28~40in. (0.7~1m)
from the trunk handle.
Using the button on the smart key
1. Press the trunk unlock button(3) for
more than 1 second.
2. When all doors are locked, the hazard
warning lights will blink two times.
Panic
1. Press the panic button(4) for more than
1.5 second.
2. The horn sounds and hazard warning
light flash for about 30 seconds.
✽ ✽
NOTICE
To stop the horn and lights, press any
button on the smart key.
Start-up
You can start the engine without inserting
the key. For detailed information refer to
the “Engine start/stop button” in section 5.
Loss of the smart key
A maximum of 2 smart keys can be reg-
istered to a single vehicle.
If you happen to lose your smart key, you
will not be able to start the engine. You
should immediately take the vehicle and
remaining key to your authorized
HYUNDAI dealer(tow the vehicle, if nec-
essary) to protect it from potential theft.
Smart key precautions
The smart key will not work if any of
the following occur:
- The smart key is close to a radio
transmitter such as a radio station or
an airport which can interfere with
normal operation of the smart key.
- The smart key is near a mobile two
way radio system or a cellular phone.
- Another vehicle’s smart key is being
operated close to your vehicle.
When the smart key does not work cor-
rectly, open and close the door with the
mechanical key and contact an author-
ized HYUNDAI dealer.
CAUTION
Keep the smart key away from
water or any liquid. If the keyless
entry system is inoperative due to
exposure to water or other liquids,
it will not be covered by your manu-
facturer’s vehicle warranty.
Page 121 of 383
443
Features of your vehicle
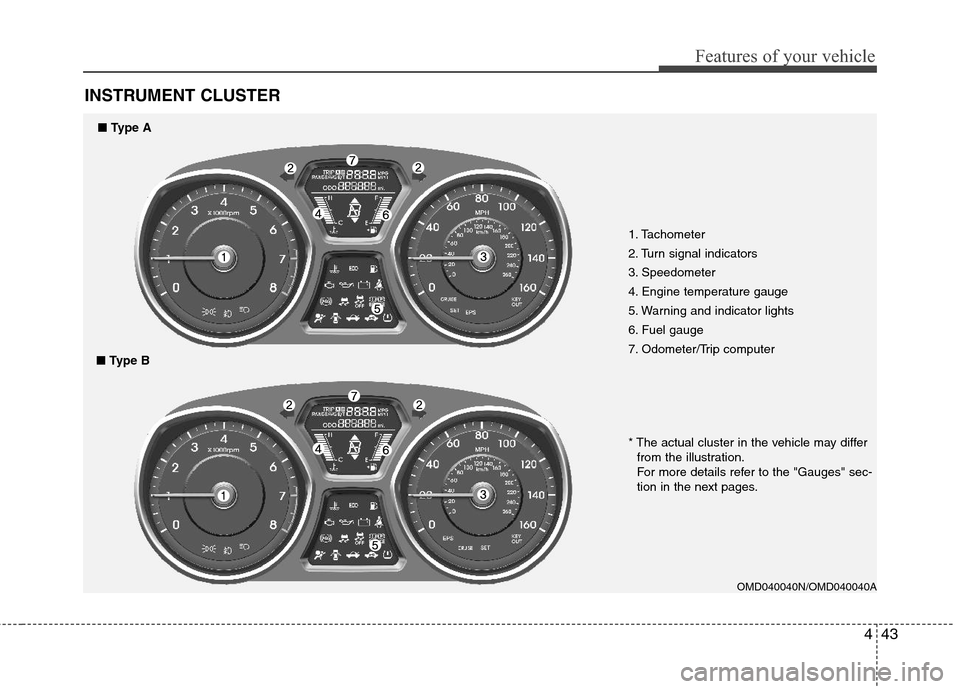
INSTRUMENT CLUSTER
1. Tachometer
2. Turn signal indicators
3. Speedometer
4. Engine temperature gauge
5. Warning and indicator lights
6. Fuel gauge
7. Odometer/Trip computer
OMD040040N/OMD040040A
* The actual cluster in the vehicle may differ
from the illustration.
For more details refer to the "Gauges" sec-
tion in the next pages.
■Type A
■Type B
Page 122 of 383
Features of your vehicle
44 4
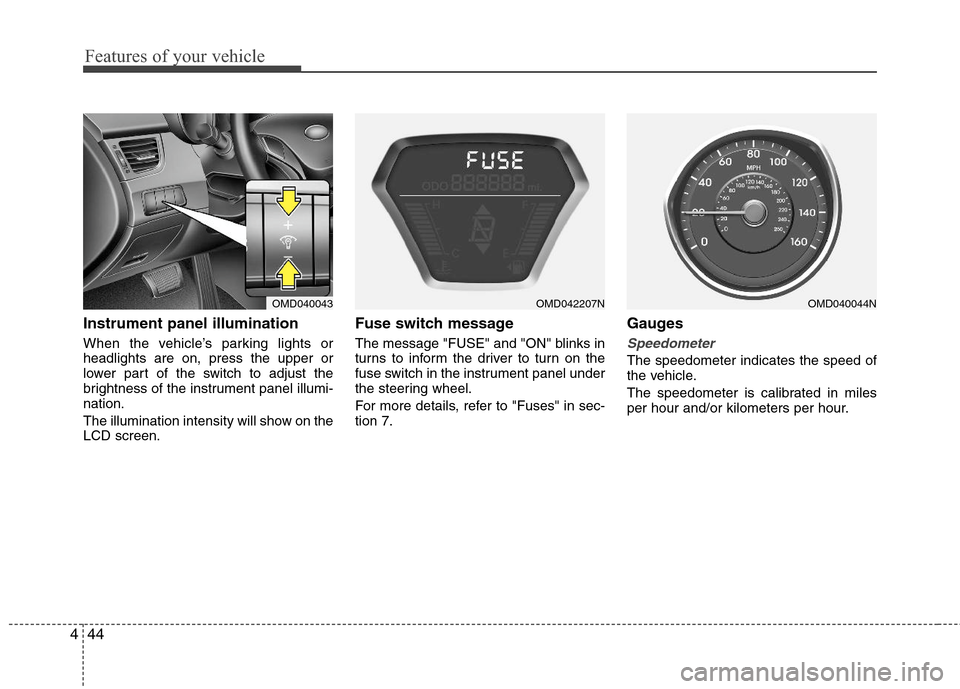
Instrument panel illumination
When the vehicle’s parking lights or
headlights are on, press the upper or
lower part of the switch to adjust the
brightness of the instrument panel illumi-
nation.
The illumination intensity will show on the
LCD screen.
Fuse switch message
The message "FUSE" and "ON" blinks in
turns to inform the driver to turn on the
fuse switch in the instrument panel under
the steering wheel.
For more details, refer to "Fuses" in sec-
tion 7.
Gauges
Speedometer
The speedometer indicates the speed of
the vehicle.
The speedometer is calibrated in miles
per hour and/or kilometers per hour.
OMD040043OMD040044NOMD042207N
Page 128 of 383
Features of your vehicle
50 4
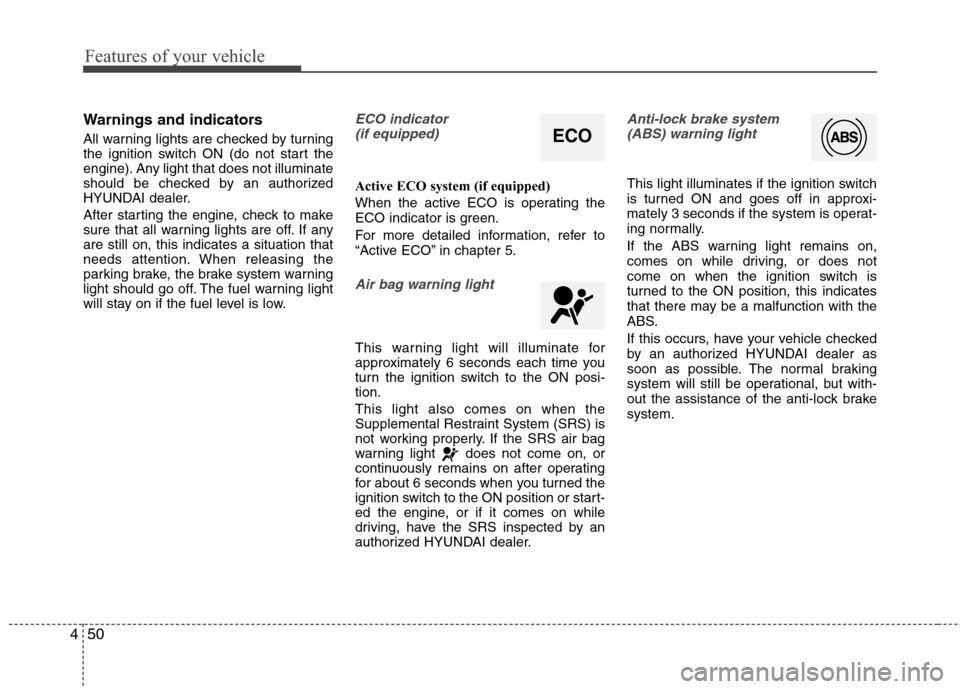
Warnings and indicators
All warning lights are checked by turning
the ignition switch ON (do not start the
engine). Any light that does not illuminate
should be checked by an authorized
HYUNDAI dealer.
After starting the engine, check to make
sure that all warning lights are off. If any
are still on, this indicates a situation that
needs attention. When releasing the
parking brake, the brake system warning
light should go off. The fuel warning light
will stay on if the fuel level is low.
ECO indicator
(if equipped)
Active ECO system (if equipped)
When the active ECO is operating the
ECO indicator is green.
For more detailed information, refer to
“Active ECO” in chapter 5.
Air bag warning light
This warning light will illuminate for
approximately 6 seconds each time you
turn the ignition switch to the ON posi-
tion.
This light also comes on when the
Supplemental Restraint System (SRS) is
not working properly. If the SRS air bag
warning light does not come on, or
continuously remains on after operating
for about 6 seconds when you turned the
ignition switch to the ON position or start-
ed the engine, or if it comes on while
driving, have the SRS inspected by an
authorized HYUNDAI dealer.
Anti-lock brake system
(ABS) warning light
This light illuminates if the ignition switch
is turned ON and goes off in approxi-
mately 3 seconds if the system is operat-
ing normally.
If the ABS warning light remains on,
comes on while driving, or does not
come on when the ignition switch is
turned to the ON position, this indicates
that there may be a malfunction with the
ABS.
If this occurs, have your vehicle checked
by an authorized HYUNDAI dealer as
soon as possible. The normal braking
system will still be operational, but with-
out the assistance of the anti-lock brake
system.
ECO
Page 130 of 383
Features of your vehicle
52 4
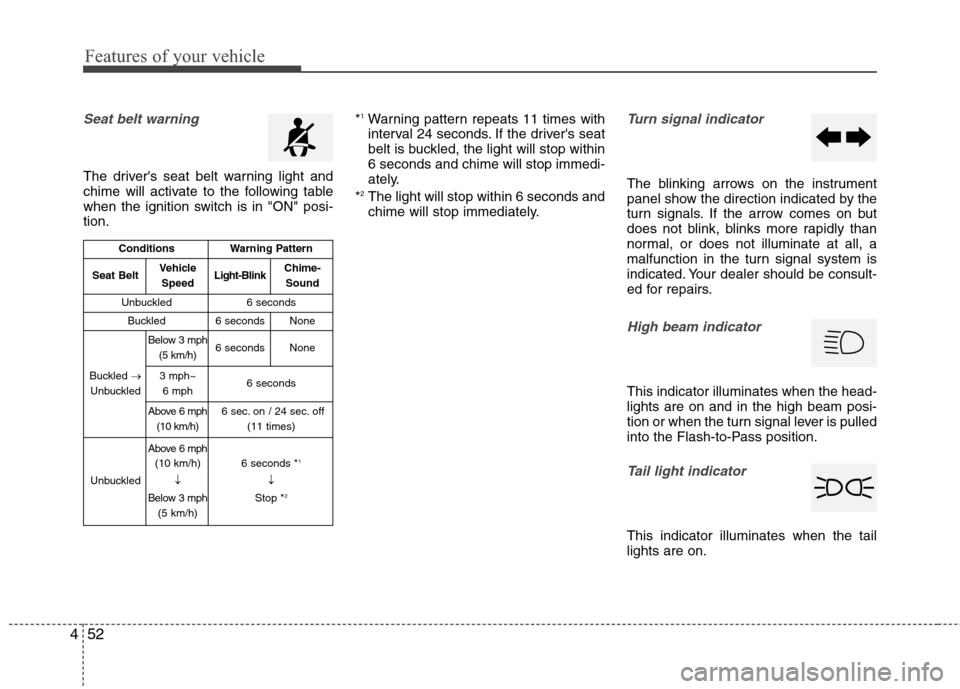
Seat belt warning
The driver's seat belt warning light and
chime will activate to the following table
when the ignition switch is in "ON" posi-
tion.*
1Warning pattern repeats 11 times with
interval 24 seconds. If the driver's seat
belt is buckled, the light will stop within
6 seconds and chime will stop immedi-
ately.
*
2The light will stop within 6 seconds and
chime will stop immediately.
Turn signal indicator
The blinking arrows on the instrument
panel show the direction indicated by the
turn signals. If the arrow comes on but
does not blink, blinks more rapidly than
normal, or does not illuminate at all, a
malfunction in the turn signal system is
indicated. Your dealer should be consult-
ed for repairs.
High beam indicator
This indicator illuminates when the head-
lights are on and in the high beam posi-
tion or when the turn signal lever is pulled
into the Flash-to-Pass position.
Tail light indicator
This indicator illuminates when the tail
lights are on.
ConditionsWarning Pattern
Seat BeltVehicle
SpeedLight-BlinkChime-
Sound
Unbuckled6 seconds
Buckled6 secondsNone
Buckled →
Unbuckled
Below 3 mph
(5 km/h)6 secondsNone
3 mph~
6 mph6 seconds
Above 6 mph
(10 km/h)6 sec. on / 24 sec. off
(11 times)
Unbuckled
Above 6 mph
(10 km/h)
↓
Below 3 mph
(5 km/h)6 seconds *1
↓
Stop *2
Page 140 of 383
Features of your vehicle
62 4
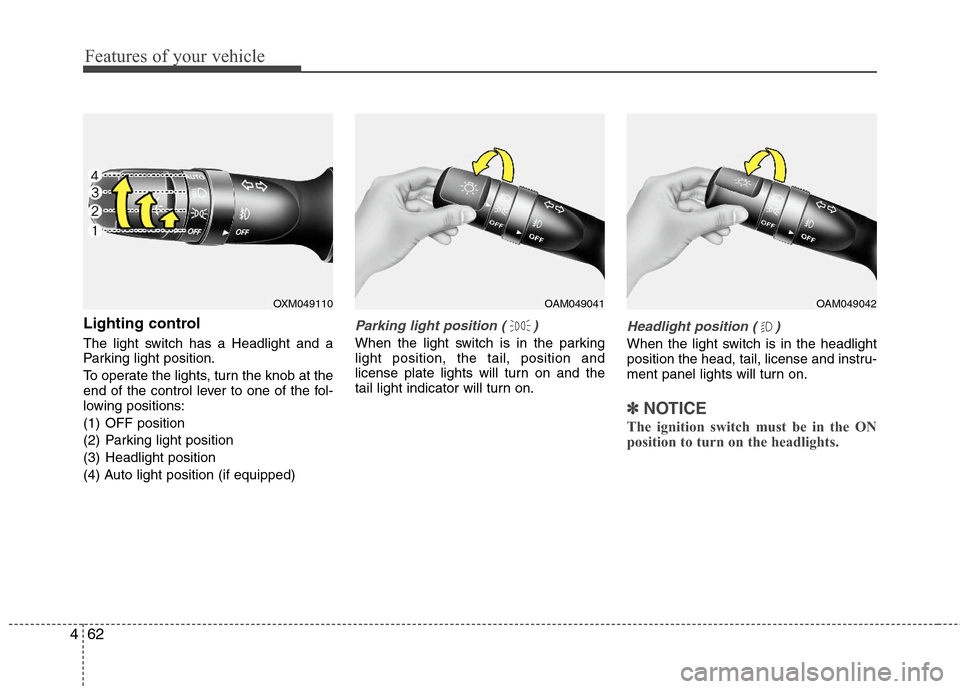
Lighting control
The light switch has a Headlight and a
Parking light position.
To operate the lights, turn the knob at the
end of the control lever to one of the fol-
lowing positions:
(1) OFF position
(2) Parking light position
(3) Headlight position
(4) Auto light position (if equipped)
Parking light position ( )
When the light switch is in the parking
light position, the tail, position and
license plate lights will turn on and the
tail light indicator will turn on.
Headlight position ( )
When the light switch is in the headlight
position the head, tail, license and instru-
ment panel lights will turn on.
✽ ✽
NOTICE
The ignition switch must be in the ON
position to turn on the headlights.
OXM049110OAM049041OAM049042
Page 141 of 383
463
Features of your vehicle
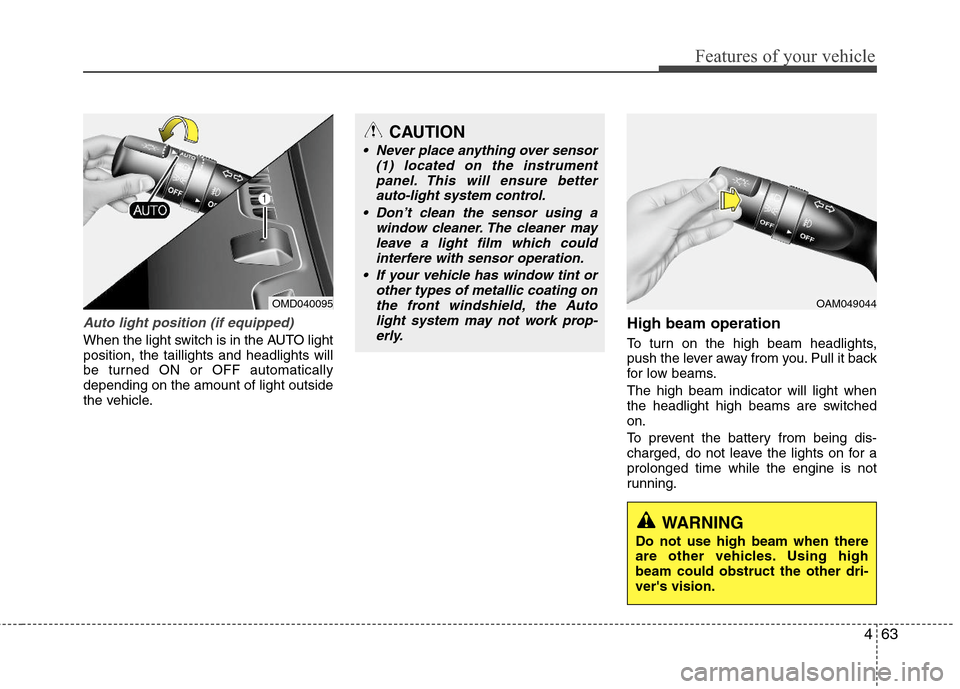
Auto light position (if equipped)
When the light switch is in the AUTO light
position, the taillights and headlights will
be turned ON or OFF automatically
depending on the amount of light outside
the vehicle.
High beam operation
To turn on the high beam headlights,
push the lever away from you. Pull it back
for low beams.
The high beam indicator will light when
the headlight high beams are switched
on.
To prevent the battery from being dis-
charged, do not leave the lights on for a
prolonged time while the engine is not
running.
CAUTION
Never place anything over sensor
(1) located on the instrument
panel. This will ensure better
auto-light system control.
Don’t clean the sensor using a
window cleaner. The cleaner may
leave a light film which could
interfere with sensor operation.
If your vehicle has window tint or
other types of metallic coating on
the front windshield, the Auto
light system may not work prop-
erly.
OMD040095OAM049044
WARNING
Do not use high beam when there
are other vehicles. Using high
beam could obstruct the other dri-
ver's vision.
Page 210 of 383
53
Driving your vehicle
Before entering vehicle
• Be sure that all windows, outside mir-
ror(s), and outside lights are clean.
Check the condition of the tires.
Check under the vehicle for any sign of
leaks.
Be sure there are no obstacles behind
you if you intend to back up.
Necessary inspections
Fluid levels, such as engine oil, engine
coolant, brake fluid, and washer fluid
should be checked on a regular basis,
with the exact interval depending on the
fluid. Further details are provided in sec-
tion 7, “Maintenance”.
BEFORE DRIVING
CALIFORNIA PROPOSI-
TION 65 WARNING
Engine exhaust and a wide variety
of automobile components and
parts, including components found
in the interior furnishings in a vehi-
cle, contain or emit chemicals
known to the State of California to
cause cancer and birth defects and
reproductive harm. In addition, cer-
tain fluids contained in vehicles
and certain products of component
wear contain or emit chemicals
known to the State of California to
cause cancer and birth defects or
other reproductive harm.
WARNING
Driving while distracted can result
in a loss of vehicle control, that
may lead to an accident, severe
personal injury, and death. The dri-
ver’s primary responsibility is in
the safe and legal operation of a
vehicle, and use of any handheld
devices, other equipment, or vehi-
cle systems which take the driver’s
eyes, attention and focus away
from the safe operation of a vehicle
or which are not permissible by law
should never be used during oper-
ation of the vehicle.
Page 243 of 383
Driving your vehicle
36 5
Your vehicle's fuel economy depends
mainly on your style of driving, where you
drive and when you drive.
Each of these factors affects how many
miles (kilometers) you can get from a gal-
lon (liter) of fuel. To operate your vehicle
as economically as possible, use the fol-
lowing driving suggestions to help save
money in both fuel and repairs:
Drive smoothly. Accelerate at a moder-
ate rate. Don't make "jack-rabbit" starts
or full-throttle shifts and maintain a
steady cruising speed. Don't race
between stoplights. Try to adjust your
speed to that of the other traffic so you
don't have to change speeds unneces-
sarily. Avoid heavy traffic whenever
possible. Always maintain a safe dis-
tance from other vehicles so you can
avoid unnecessary braking. This also
reduces brake wear.
Drive at a moderate speed. The faster
you drive, the more fuel your car uses.
Driving at a moderate speed, especial-
ly on the highway, is one of the most
effective ways to reduce fuel consump-
tion. Don't "ride" the brake pedal. This can
increase fuel consumption and also
increase wear on these components.
In addition, driving with your foot rest-
ing on the brake pedal may cause the
brakes to overheat, which reduces
their effectiveness and may lead to
more serious consequences.
Take care of your tires. Keep them
inflated to the recommended pressure.
Incorrect inflation, either too much or
too little, results in unnecessary tire
wear. Check the tire pressures at least
once a month.
Be sure that the wheels are aligned
correctly. Improper alignment can
result from hitting curbs or driving too
fast over irregular surfaces. Poor align-
ment causes faster tire wear and may
also result in other problems as well as
greater fuel consumption. Keep your car in good condition. For
better fuel economy and reduced
maintenance costs, maintain your car
in accordance with the maintenance
schedule in section 7. If you drive your
car in severe conditions, more frequent
maintenance is required (see section 7
for details).
Keep your car clean. For maximum serv-
ice, your vehicle should be kept clean
and free of corrosive materials. It is
especially important that mud, dirt, ice,
etc. not be allowed to accumulate on the
underside of the car. This extra weight
can result in increased fuel consumption
and also contribute to corrosion.
Travel lightly. Don't carry unnecessary
weight in your car. Weight reduces fuel
economy.
Don't let the engine idle longer than
necessary. If you are waiting (and not
in traffic), turn off your engine and
restart only when you're ready to go.
ECONOMICAL OPERATION