chapter 7 Hyundai Elantra 2014 Owner's Manual
[x] Cancel search | Manufacturer: HYUNDAI, Model Year: 2014, Model line: Elantra, Model: Hyundai Elantra 2014Pages: 668, PDF Size: 35.58 MB
Page 9 of 668
Introduction
21
We want to help you get the greatest
possible driving pleasure from your
vehicle. Your Owner’s Manual can
assist you in many ways. We strongly
recommend that you read the entire
manual. In order to minimize the
chance of death or injury, you must
read the WARNING and CAUTION
sections in this manual.
Illustrations complement the words
in this manual to best explain how to
enjoy your vehicle. By reading your
manual, you will learn about fea-
tures, important safety information,
and driving tips under various road
conditions.
The general layout of the manual is
provided in the Table of Contents. A
good place to start is the index; it has
an alphabetical listing of all informa-
tion in your manual.Sections: This manual has eight
chapters plus an index. Each chapter
begins with a brief list of contents so
you can tell at a glance if that chap-
ter has the information you want.
You will find various WARNINGs,
CAUTIONs, and NOTICEs in this
manual. These WARNINGs were pre-
pared to enhance your personal safe-
ty. You should carefully read and fol-
low ALL procedures and recommen-
dations provided in these WARN-
INGS, CAUTIONS and NOTICES.
✽ ✽
NOTICE
A NOTICE indicates interesting or
helpful information is being provided.
HOW TO USE THIS MANUAL
WARNING
A WARNING indicates a situa-
tion in which harm, serious bod-
ily injury, or death could result if
the warning is ignored.
CAUTION
A CAUTION indicates a situation
in which damage to your vehiclecould result if the caution isignored.
UD(FL) HMA 1.QXP 8/28/2014 5:02 PM Page 2
Page 44 of 668
Seat Belt – Passenger’s 3-pointsystem with combination lockingretractor
This type of seat belt combines the
features of both an emergency lock-
ing retractor seat belt and an auto-
matic locking retractor seat belt.
Combination retractor type seat belts
are installed in the rear seat positions
to help accommodate the installation
of child restraint systems. Although a
combination retractor is also installed
in the front passenger seat position,
NEVER place any infant restraint sys-
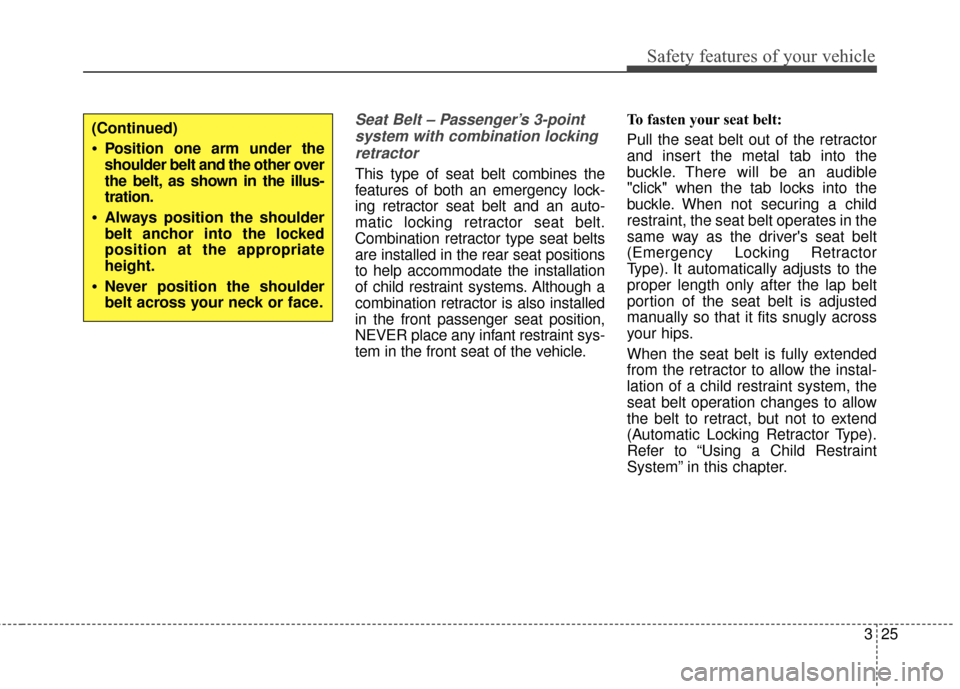
tem in the front seat of the vehicle. To fasten your seat belt:
Pull the seat belt out of the retractor
and insert the metal tab into the
buckle. There will be an audible
"click" when the tab locks into the
buckle. When not securing a child
restraint, the seat belt operates in the
same way as the driver's seat belt
(Emergency Locking Retractor
Type). It automatically adjusts to the
proper length only after the lap belt
portion of the seat belt is adjusted
manually so that it fits snugly across
your hips.
When the seat belt is fully extended
from the retractor to allow the instal-
lation of a child restraint system, the
seat belt operation changes to allow
the belt to retract, but not to extend
(Automatic Locking Retractor Type).
Refer to “Using a Child Restraint
System” in this chapter.
Safety features of your vehicle
325
(Continued)
Position one arm under the
shoulder belt and the other over
the belt, as shown in the illus-
tration.
Always position the shoulder
belt anchor into the locked
position at the appropriate
height.
Never position the shoulder
belt across your neck or face.
Page 49 of 668
Safety features of your vehicle
30
3
Seat belt use and children
Infant and small children
All 50 states have child restraint laws
which require children to travel in
approved child restraint devices,
including booster seats. The age at
which seat belts can be used instead
of child restraints differs among
states, so you should be aware of the
specific requirements in your state,
and where you are travelling. Infant
and child restraints must be properly
placed and installed in a rear seat.
For more information refer to the
“Child Restraint Systems” in this
chapter. Small children are best protected
from injury in an accident when prop-
erly restrained in the rear seat by a
child restraint system that meets the
requirements of the Federal Motor
Vehicle Safety Standards. Before
buying any child restraint system,
make sure that it has a label certify-
ing that it meets Federal Motor
Vehicle Safety Standard 213. The
restraint must be appropriate for your
child's height and weight. Check the
label on the child restraint for this
information. Refer to “Child Restraint
Systems” in this chapter.WARNING
ALWAYS properly restrain infants
and small children in a child
restraint appropriate for the
child’s height and weight.
To reduce the risk of serious
injury or death to a child and
other passengers, NEVER hold a
child in your lap or arms when
the vehicle is moving. The violent
forces created during an acci-
dent will tear the child from your
arms and throw the child against
the interior of the vehicle.
Page 62 of 668
Safety features of your vehicle
343
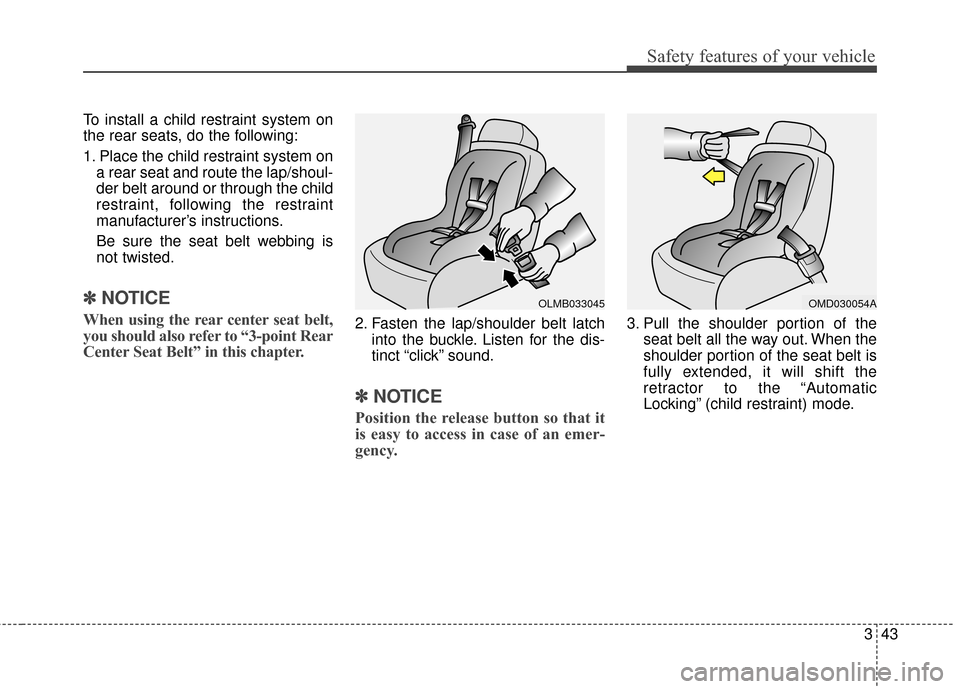
To install a child restraint system on
the rear seats, do the following:
1. Place the child restraint system ona rear seat and route the lap/shoul-
der belt around or through the child
restraint, following the restraint
manufacturer’s instructions.
Be sure the seat belt webbing is
not twisted.
✽ ✽ NOTICE
When using the rear center seat belt,
you should also refer to “3-point Rear
Center Seat Belt” in this chapter.2. Fasten the lap/shoulder belt latch
into the buckle. Listen for the dis-
tinct “click” sound.
✽ ✽NOTICE
Position the release button so that it
is easy to access in case of an emer-
gency.
3. Pull the shoulder portion of the
seat belt all the way out. When the
shoulder portion of the seat belt is
fully extended, it will shift the
retractor to the “Automatic
Locking” (child restraint) mode.
OLMB033045OMD030054A
Page 90 of 668
Features of your vehicle
44
Unlocking
To unlock:
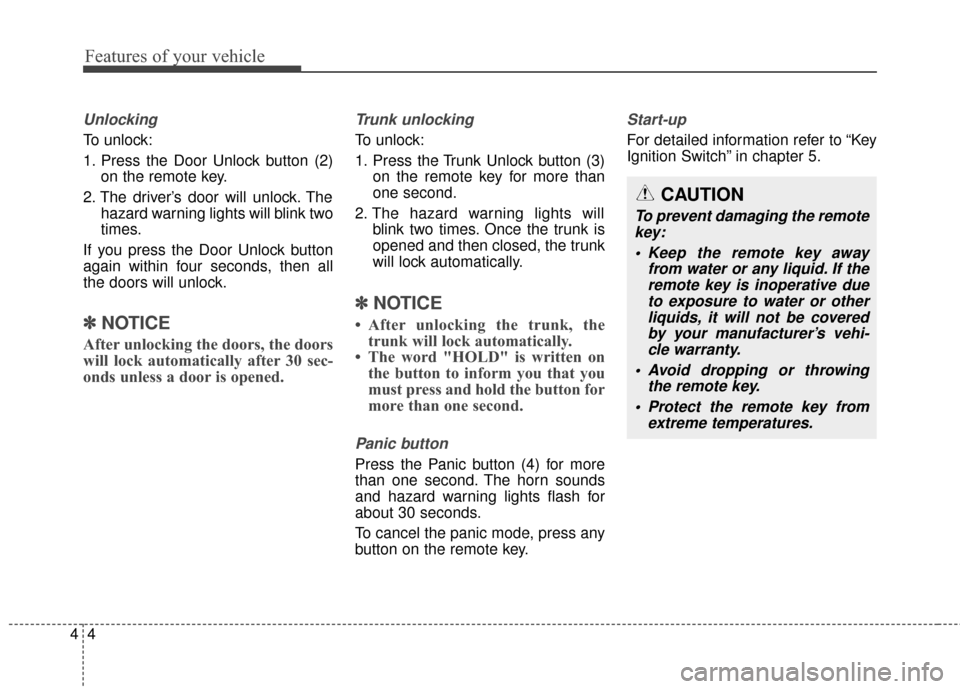
1. Press the Door Unlock button (2)on the remote key.
2. The driver’s door will unlock. The hazard warning lights will blink two
times.
If you press the Door Unlock button
again within four seconds, then all
the doors will unlock.
✽ ✽ NOTICE
After unlocking the doors, the doors
will lock automatically after 30 sec-
onds unless a door is opened.
Trunk unlocking
To unlock:
1. Press the Trunk Unlock button (3)
on the remote key for more than
one second.
2. The hazard warning lights will blink two times. Once the trunk is
opened and then closed, the trunk
will lock automatically.
✽ ✽NOTICE
• After unlocking the trunk, the
trunk will lock automatically.
• The word "HOLD" is written on the button to inform you that you
must press and hold the button for
more than one second.
Panic button
Press the Panic button (4) for more
than one second. The horn sounds
and hazard warning lights flash for
about 30 seconds.
To cancel the panic mode, press any
button on the remote key.
Start-up
For detailed information refer to “Key
Ignition Switch” in chapter 5.
CAUTION
To prevent damaging the remote
key:
• Keep the remote key away from water or any liquid. If theremote key is inoperative dueto exposure to water or otherliquids, it will not be coveredby your manufacturer’s vehi-cle warranty.
Avoid dropping or throwing the remote key.
Protect the remote key from extreme temperatures.
Page 96 of 668
Features of your vehicle
10
4
Start-up
You can start the engine without
inserting the key. For detailed infor-
mation refer to the Engine Start/Stop
button in chapter 5.
Mechanical key
If the Smart Key does not operate
normally, you can lock or unlock the
door by using the mechanical key.
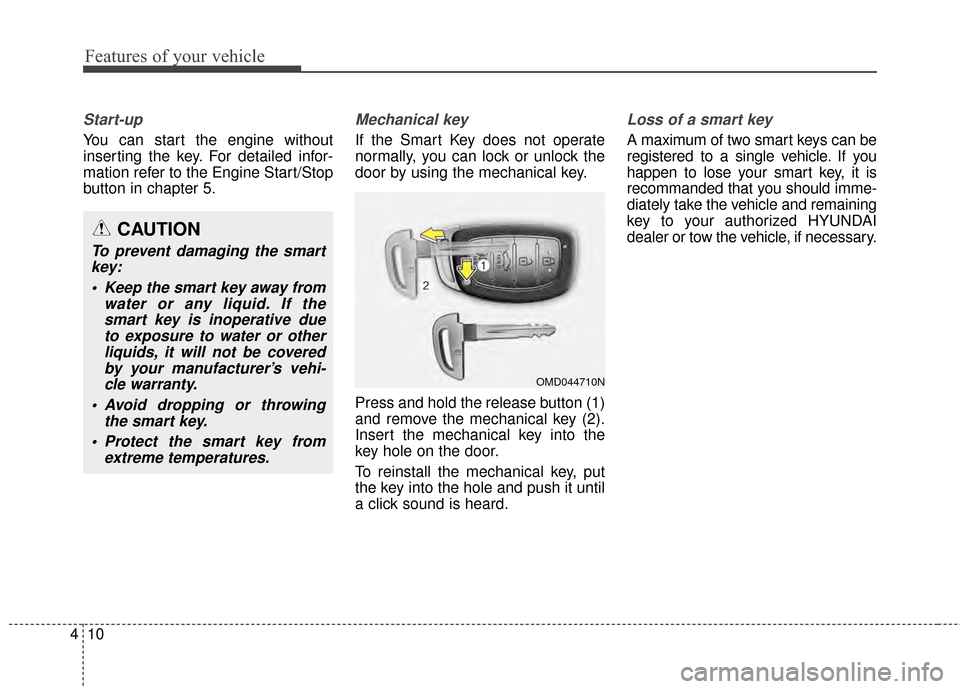
Press and hold the release button (1)
and remove the mechanical key (2).
Insert the mechanical key into the
key hole on the door.
To reinstall the mechanical key, put
the key into the hole and push it until
a click sound is heard.
Loss of a smart key
A maximum of two smart keys can be
registered to a single vehicle. If you
happen to lose your smart key, it is
recommanded that you should imme-
diately take the vehicle and remaining
key to your authorized HYUNDAI
dealer or tow the vehicle, if necessary.
OMD044710N
CAUTION
To prevent damaging the smart
key:
Keep the smart key away from water or any liquid. If thesmart key is inoperative dueto exposure to water or otherliquids, it will not be coveredby your manufacturer’s vehi-cle warranty.
Avoid dropping or throwing the smart key.
Protect the smart key from extreme temperatures.
Page 128 of 668
Features of your vehicle
42
4
Inside rearview mirror
Before you start driving, adjust the
rearview mirror to the center on the
view through the rear window.
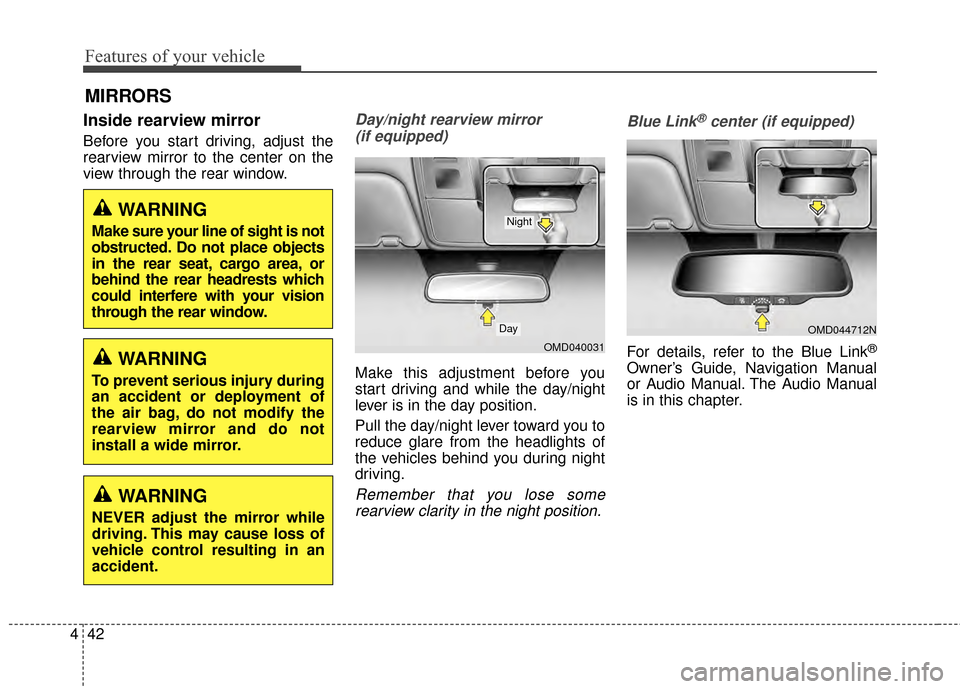
Day/night rearview mirror
(if equipped)
Make this adjustment before you
start driving and while the day/night
lever is in the day position.
Pull the day/night lever toward you to
reduce glare from the headlights of
the vehicles behind you during night
driving.
Remember that you lose somerearview clarity in the night position. Blue Link
®center (if equipped)
For details, refer to the Blue Link®
Owner’s Guide, Navigation Manual
or Audio Manual. The Audio Manual
is in this chapter.
MIRRORS
WARNING
Make sure your line of sight is not
obstructed. Do not place objects
in the rear seat, cargo area, or
behind the rear headrests which
could interfere with your vision
through the rear window.
WARNING
To prevent serious injury during
an accident or deployment of
the air bag, do not modify the
rearview mirror and do not
install a wide mirror.
WARNING
NEVER adjust the mirror while
driving. This may cause loss of
vehicle control resulting in an
accident.
OMD040031
Day
Night
OMD044712N
Page 133 of 668
447
Features of your vehicle
Gate operator & Canadian program-ming
During programming, your handheld
transmitter may automatically stop
transmitting. Continue to press the
Integrated HomeLink
®Wireless
Control System button (note
steps 2 through 4 in the Standard
Programming portion of this docu-
ment) while you press and re-press
("cycle") your handheld transmitter
every two seconds until the frequen-
cy signal has been learned. The indi-
cator light will flash slowly and then
rapidly after several seconds upon
successful training.
Operating HomeLink®
To operate, simply press and release
the programmed HomeLink®button.
Activation will now occur for the
trained device (i.e. garage door
opener, gate operator, security sys-
tem, entry door lock, home/office
lighting, etc.). For convenience, the
hand-held transmitter of the device
may also be used at any time.
Reprogramming a single HomeLink®
button
To program a new device to a previ-
ously trained HomeLink®button, fol-
low these steps:
1. Press and hold the desired HomeLink
®button. Do NOT
release until step 4 has been com-
pleted.
2. When the indicator light begins to flash slowly (after 20 seconds),
position the handheld transmitter 1
to 3 inches away from the
HomeLink
® surface.
3. Press and hold the handheld transmitter button. The HomeLink
®
indicator light will flash, first slowly
and then rapidly.
4. When the indicator light begins to flash rapidly, release both buttons.
5. Press and hold the just-trained HomeLink
®button and observe
the red Status Indicator LED. If the
indicator light stays on constantly,
programming is complete and
your new device should activate.
Erasing HomeLink®buttons
Individual buttons cannot be erased.
However, to erase all three pro-
grammed buttons:
1. Press and hold the two outer HomeLink
®buttons until the indi-
cator light begins to flash-after 20
seconds.
2. Release both buttons. Do not hold for longer than 30 seconds.
The Integrated HomeLink
®Wireless
Control System is now in the training
(learn) mode and can be pro-
grammed at any time following the
appropriate steps in the
Programming chapters above.
Page 137 of 668
451
Features of your vehicle
INSTRUMENT CLUSTER
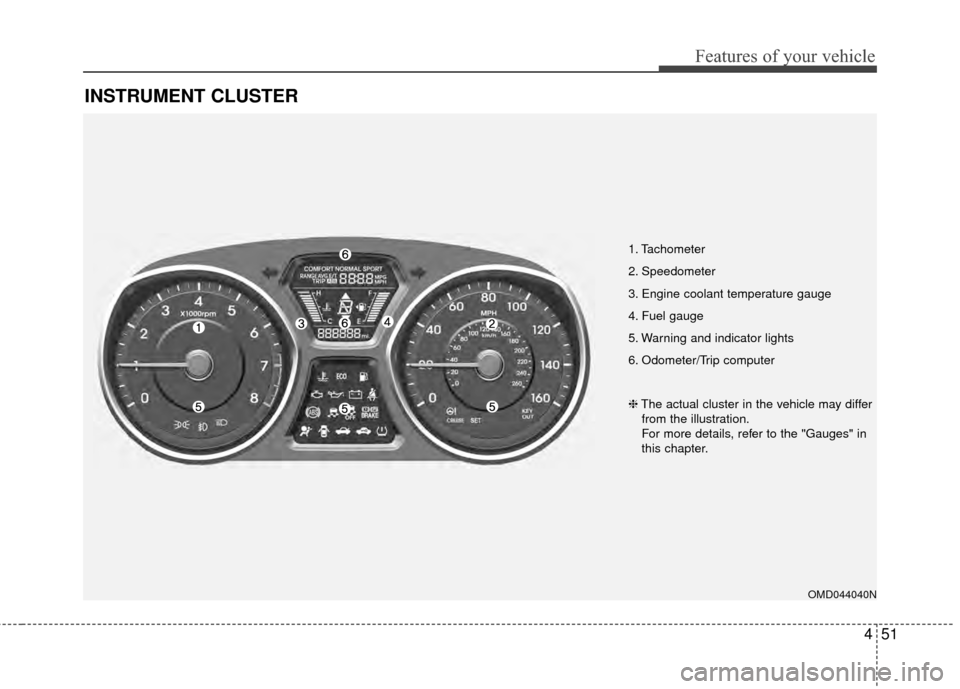
1. Tachometer
2. Speedometer
3. Engine coolant temperature gauge
4. Fuel gauge
5. Warning and indicator lights
6. Odometer/Trip computer
OMD044040N
❈The actual cluster in the vehicle may differ
from the illustration.
For more details, refer to the "Gauges" in
this chapter.
Page 138 of 668
Features of your vehicle
52
4
Instrument Cluster Control
Adjusting Instrument Cluster
Illumination
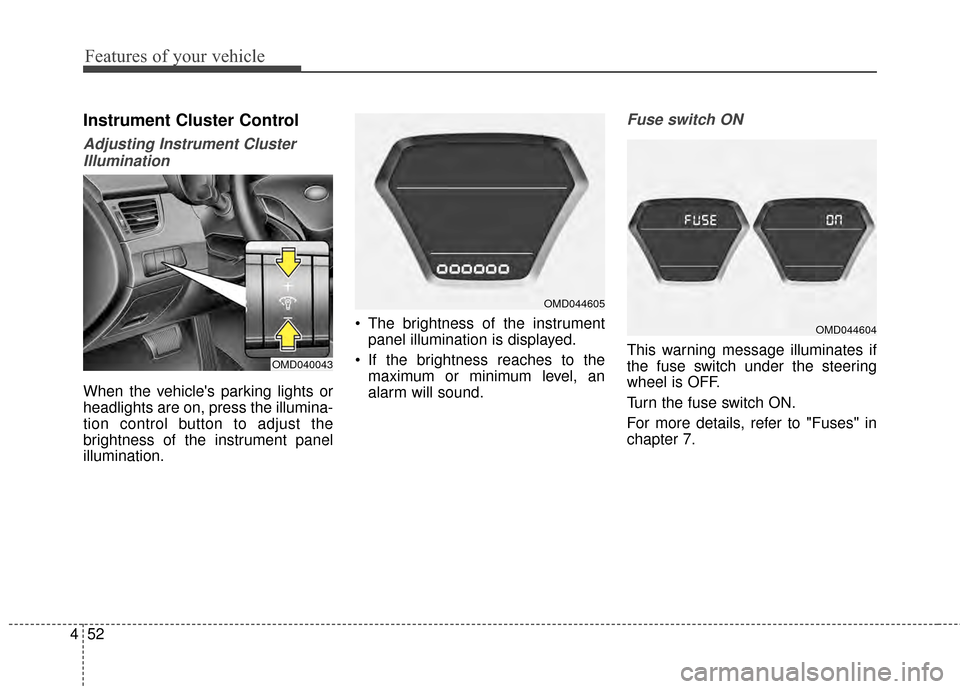
When the vehicle's parking lights or
headlights are on, press the illumina-
tion control button to adjust the
brightness of the instrument panel
illumination. The brightness of the instrument
panel illumination is displayed.
If the brightness reaches to the maximum or minimum level, an
alarm will sound.
Fuse switch ON
This warning message illuminates if
the fuse switch under the steering
wheel is OFF.
Turn the fuse switch ON.
For more details, refer to "Fuses" in
chapter 7.OMD040043
OMD044605
OMD044604