trunk lock Hyundai Elantra 2015 User Guide
[x] Cancel search | Manufacturer: HYUNDAI, Model Year: 2015, Model line: Elantra, Model: Hyundai Elantra 2015Pages: 668, PDF Size: 35.58 MB
Page 107 of 668
421
Features of your vehicle
Opening the trunk
1. Make sure the shift lever is in P(Park, for automatic transaxle) or first
gear or R (Reverse, for manual
transaxle) and set the parking brake.
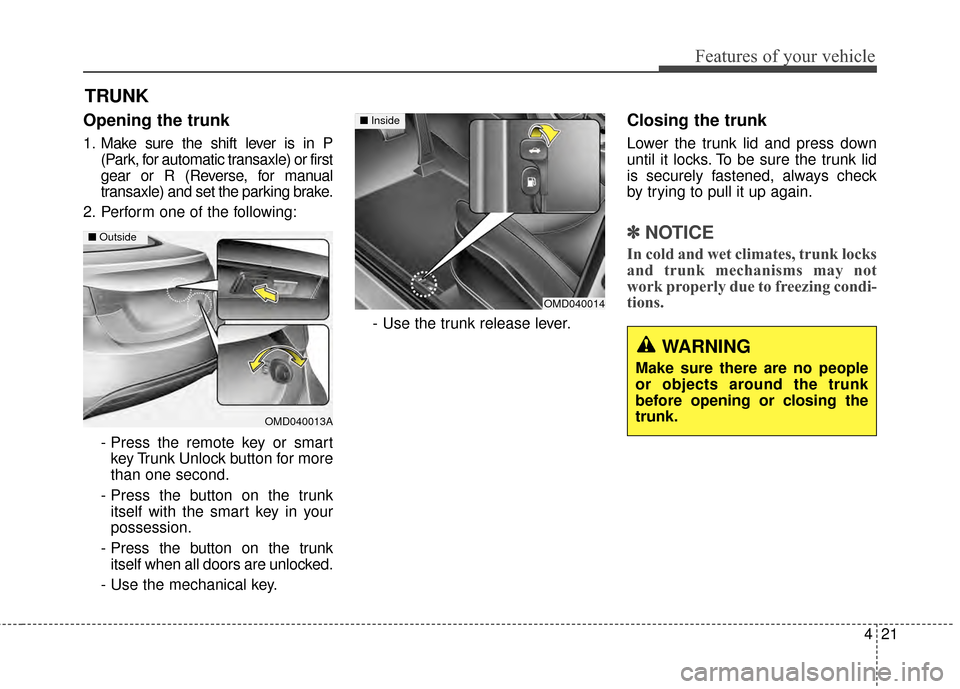
2. Perform one of the following:
- Press the remote key or smartkey Trunk Unlock button for more
than one second.
- Press the button on the trunk itself with the smart key in your
possession.
- Press the button on the trunk itself when all doors are unlocked.
- Use the mechanical key. - Use the trunk release lever.
Closing the trunk
Lower the trunk lid and press down
until it locks. To be sure the trunk lid
is securely fastened, always check
by trying to pull it up again.
✽ ✽
NOTICE
In cold and wet climates, trunk locks
and trunk mechanisms may not
work properly due to freezing condi-
tions.
TRUNK
OMD040013A
■ Outside
WARNING
Make sure there are no people
or objects around the trunk
before opening or closing the
trunk.
OMD040014
■ Inside
Page 108 of 668
Features of your vehicle
22
4
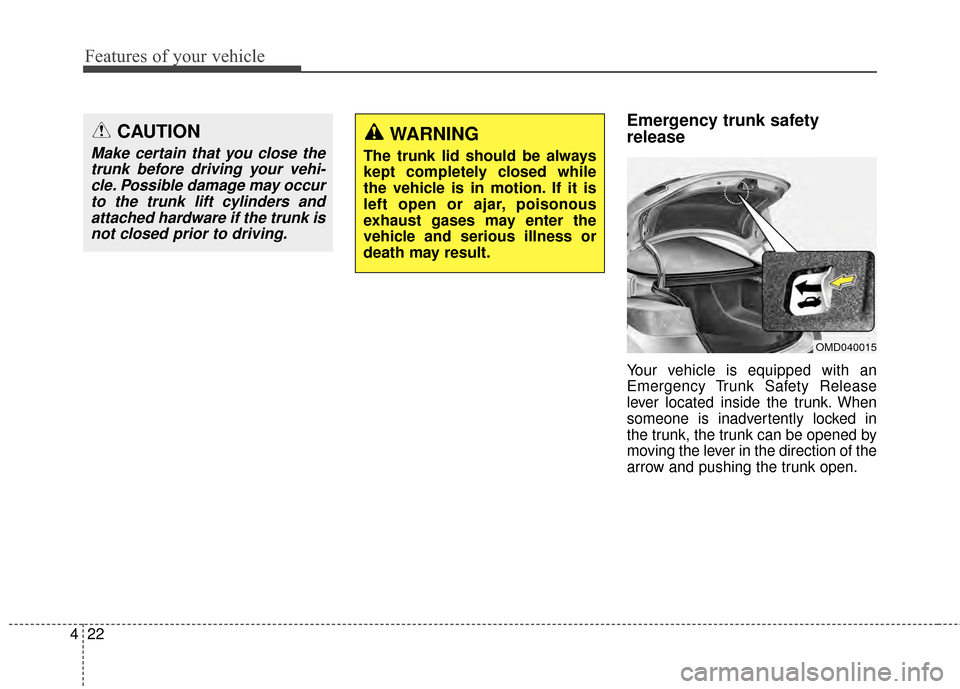
Emergency trunk safety
release
Your vehicle is equipped with an
Emergency Trunk Safety Release
lever located inside the trunk. When
someone is inadvertently locked in
the trunk, the trunk can be opened by
moving the lever in the direction of the
arrow and pushing the trunk open.
CAUTION
Make certain that you close the
trunk before driving your vehi-cle. Possible damage may occurto the trunk lift cylinders andattached hardware if the trunk isnot closed prior to driving.
WARNING
The trunk lid should be always
kept completely closed while
the vehicle is in motion. If it is
left open or ajar, poisonous
exhaust gases may enter the
vehicle and serious illness or
death may result.
OMD040015
Page 109 of 668
423
Features of your vehicle
WARNING
You and your passengersmust be aware of the location
of the Emergency Trunk
Safety Release lever in this
vehicle and how to open the
trunk in case you are acciden-
tally locked in the trunk.
NEVER allow anyone to occu- py the trunk of the vehicle at
any time. If the trunk is partial-
ly or totally latched and the per-
son is unable to get out, seri-
ous injury or death could occur
due to lack of ventilation,
exhaust fumes and rapid heat
build-up, or because of expo-
sure to cold weather condi-
tions. The trunk is also a highly
dangerous location in the
event of a crash because it is
not a protected occupant
space but is a part of the vehi-
cle’s crush zone.
(Continued)
(Continued)
Your vehicle should be keptlocked and the key should be
kept out of the reach of chil-
dren. Parents should teach
their children about the dan-
gers of playing in the trunk.
Use the release lever for emergencies only.
Page 459 of 668
Before entering the vehicle
• Be sure all windows, outside mir-ror(s), and outside lights are clean
and unobstructed.
Remove frost, snow, or ice.
Visually check the tires for uneven wear and damage.
Check under the vehicle for any sign of leaks.
Be sure there are no obstacles behind you if you intend to back up.
Before starting
Make sure the hood, the trunk, andthe doors are securely closed and
locked.
Adjust the position of the seat and steering wheel.
Adjust the inside and outside rearview mirrors.
Verify all the lights work.
Fasten your seatbelt. Check that all passengers have fastened their
seatbelts.
Check the gauges and indicators in the instrument panel and the mes-
sages on the instrument display
when the ignition switch is in the
ON position.
Check that any items you are car- rying are stored properly or fas-
tened down securely.
53
Driving your vehicle
WARNING - CALIFORNIA
PROPOSITION 65 WARNING
Engine exhaust and a wide vari-
ety of automobile components
including components found in
the interior furnishings in a
vehicle, contain or emit harmful
chemicals known to the State of
California to cause cancer and
birth defects and reproductive
harm. In addition, certain fluids
contained in vehicles and cer-
tain products of components
contain or emit chemicals
known to the State of California
to cause cancer and birth
defects or other reproductive
harm.
BEFORE DRIVING
UD(FL) HMA 5.qxp 6/26/2014 3:21 PM Page 3
Page 546 of 668
629
What to do in an emergency
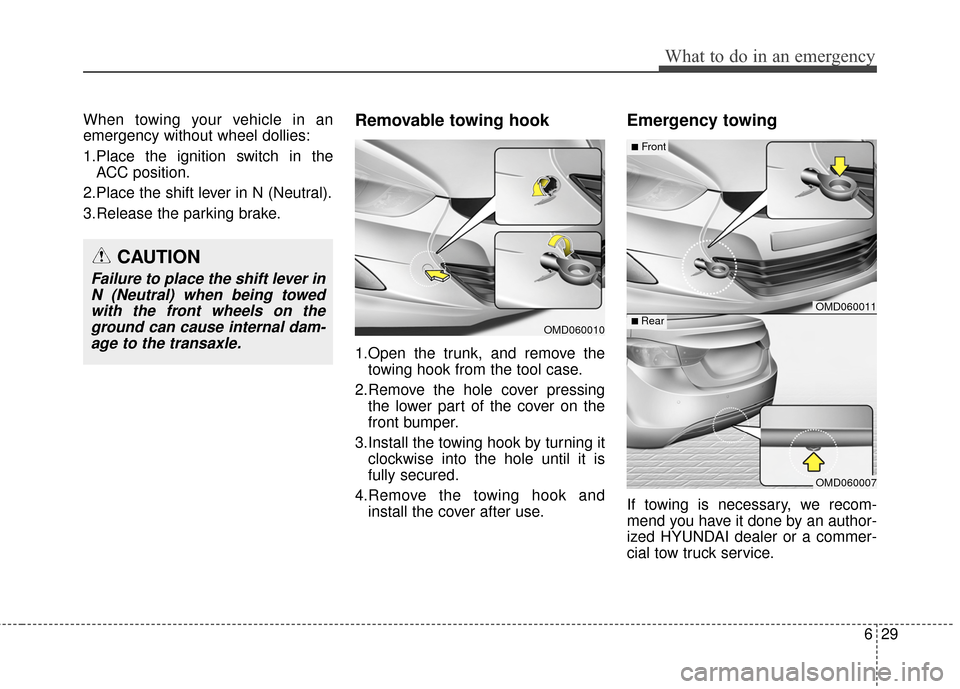
When towing your vehicle in an
emergency without wheel dollies:
1.Place the ignition switch in theACC position.
2.Place the shift lever in N (Neutral).
3.Release the parking brake.Removable towing hook
1.Open the trunk, and remove the towing hook from the tool case.
2.Remove the hole cover pressing the lower part of the cover on the
front bumper.
3.Install the towing hook by turning it clockwise into the hole until it is
fully secured.
4.Remove the towing hook and install the cover after use.
Emergency towing
If towing is necessary, we recom-
mend you have it done by an author-
ized HYUNDAI dealer or a commer-
cial tow truck service.
CAUTION
Failure to place the shift lever inN (Neutral) when being towedwith the front wheels on theground can cause internal dam-age to the transaxle.
OMD060010
OMD060011
OMD060007
■Front
■ Rear
Page 618 of 668
Maintenance
70
7
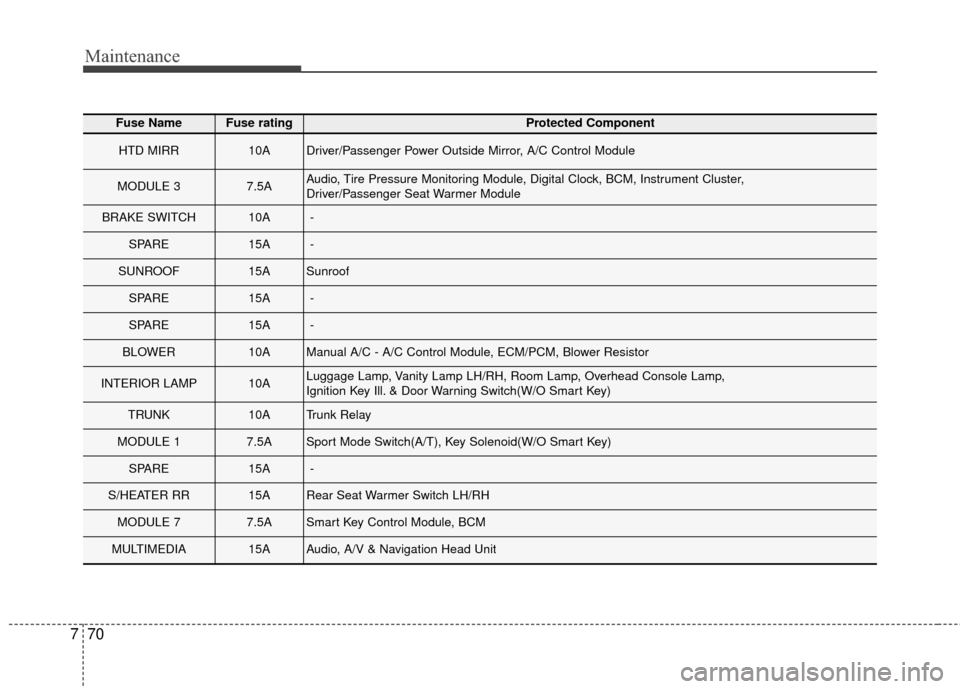
Fuse NameFuse ratingProtected Component
HTD MIRR10ADriver/Passenger Power Outside Mirror, A/C Control Module
MODULE 37.5AAudio, Tire Pressure Monitoring Module, Digital Clock, BCM, Instrument Cluster,
Driver/Passenger Seat Warmer Module
BRAKE SWITCH10A-
SPARE15A-
SUNROOF15ASunroof
SPARE15A-
SPARE15A-
BLOWER10AManual A/C - A/C Control Module, ECM/PCM, Blower Resistor
INTERIOR LAMP10ALuggage Lamp, Vanity Lamp LH/RH, Room Lamp, Overhead Console Lamp,
Ignition Key Ill. & Door Warning Switch(W/O Smart Key)
TRUNK10ATrunk Relay
MODULE 17.5ASport Mode Switch(A/T), Key Solenoid(W/O Smart Key)
SPARE15A-
S/HEATER RR15ARear Seat Warmer Switch LH/RH
MODULE 77.5ASmart Key Control Module, BCM
MULTIMEDIA15AAudio, A/V & Navigation Head Unit
Page 621 of 668
773
Maintenance
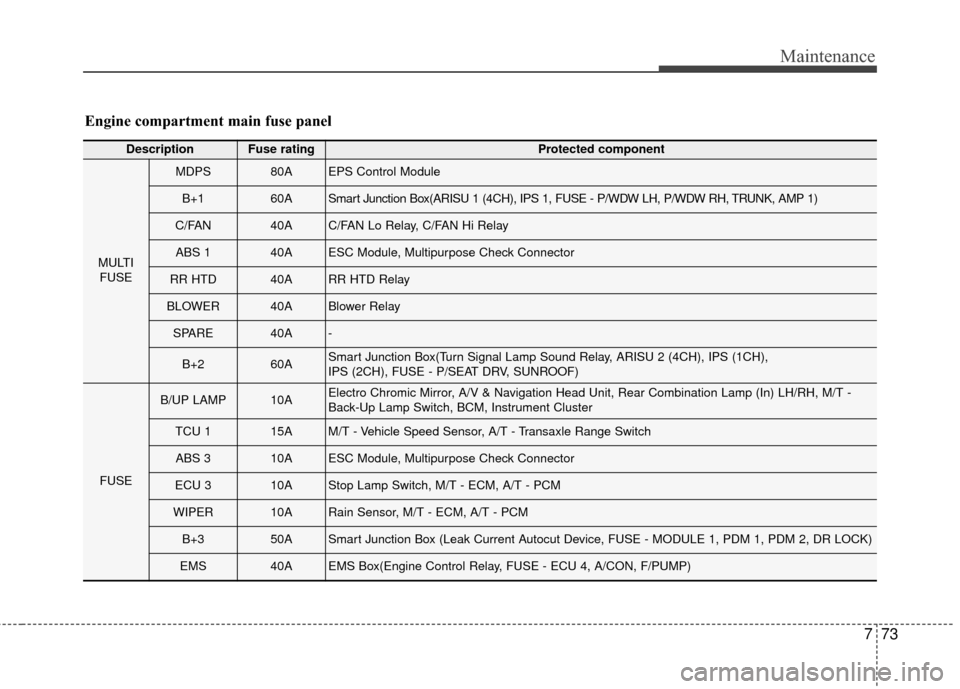
Engine compartment main fuse panel
DescriptionFuse ratingProtected component
MULTIFUSE
MDPS80AEPS Control Module
B+160ASmart Junction Box(ARISU 1 (4CH), IPS 1, FUSE - P/WDW LH, P/WDW RH, TRUNK, AMP 1)
C/FAN40AC/FAN Lo Relay, C/FAN Hi Relay
ABS 140AESC Module, Multipurpose Check Connector
RR HTD40ARR HTD Relay
BLOWER40ABlower Relay
SPARE40A-
B+260ASmart Junction Box(Turn Signal Lamp Sound Relay, ARISU 2 (4CH), IPS (1CH),
IPS (2CH), FUSE - P/SEAT DRV, SUNROOF)
FUSE
B/UP LAMP10AElectro Chromic Mirror, A/V & Navigation Head Unit, Rear Combination Lamp (In) LH/RH, M/T -
Back-Up Lamp Switch, BCM, Instrument Cluster
TCU 115AM/T - Vehicle Speed Sensor, A/T - Transaxle Range Switch
ABS 310AESC Module, Multipurpose Check Connector
ECU 310AStop Lamp Switch, M/T - ECM, A/T - PCM
WIPER10ARain Sensor, M/T - ECM, A/T - PCM
B+350ASmart Junction Box (Leak Current Autocut Device, FUSE - MODULE 1, PDM 1, PDM 2, DR LOCK)
EMS40AEMS Box(Engine Control Relay, FUSE - ECU 4, A/CON, F/PUMP)
Page 631 of 668
783
Maintenance
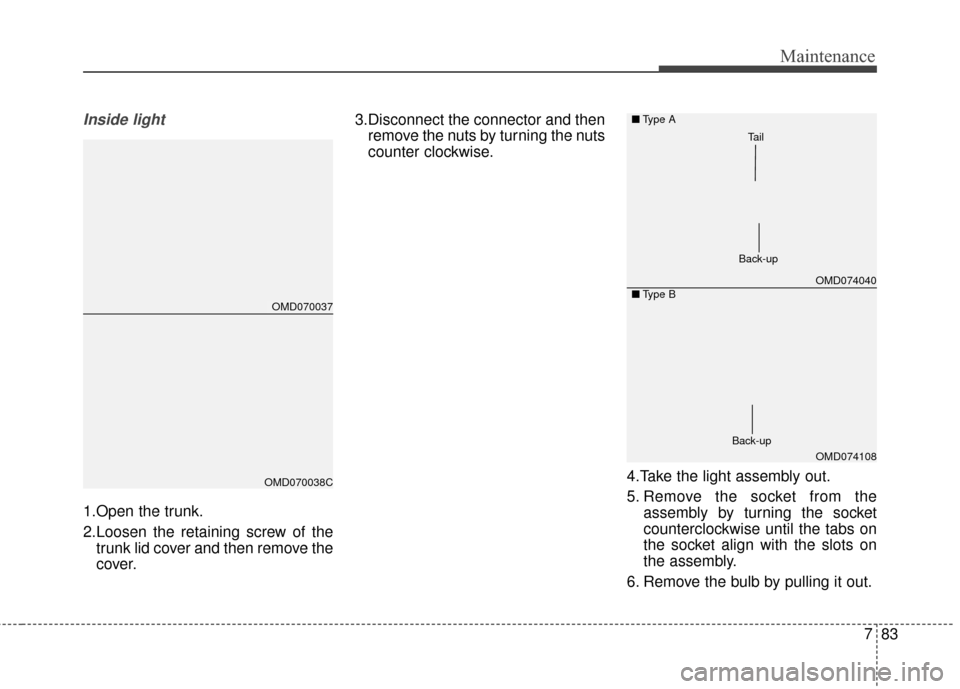
Inside light
1.Open the trunk.
2.Loosen the retaining screw of thetrunk lid cover and then remove the
cover. 3.Disconnect the connector and then
remove the nuts by turning the nuts
counter clockwise.
4.Take the light assembly out.
5. Remove the socket from theassembly by turning the socket
counterclockwise until the tabs on
the socket align with the slots on
the assembly.
6. Remove the bulb by pulling it out.
OMD070037
OMD070038C
OMD074040
OMD074108
■
Type A
■ Type B
Back-up
Tail
Back-up
Page 632 of 668
Maintenance
84
7
7.Insert a new bulb by inserting it into
the socket.
8.Install the light assembly to the trunk.
9.Reinstall the nuts and connector and then the trunk lid cover by
pushing in the screw.
Stop/Tail light (Type B)
If the LED light does not operate,
have the vehicle checked by an
authorized HYUNDAI dealer.High mounted stop light
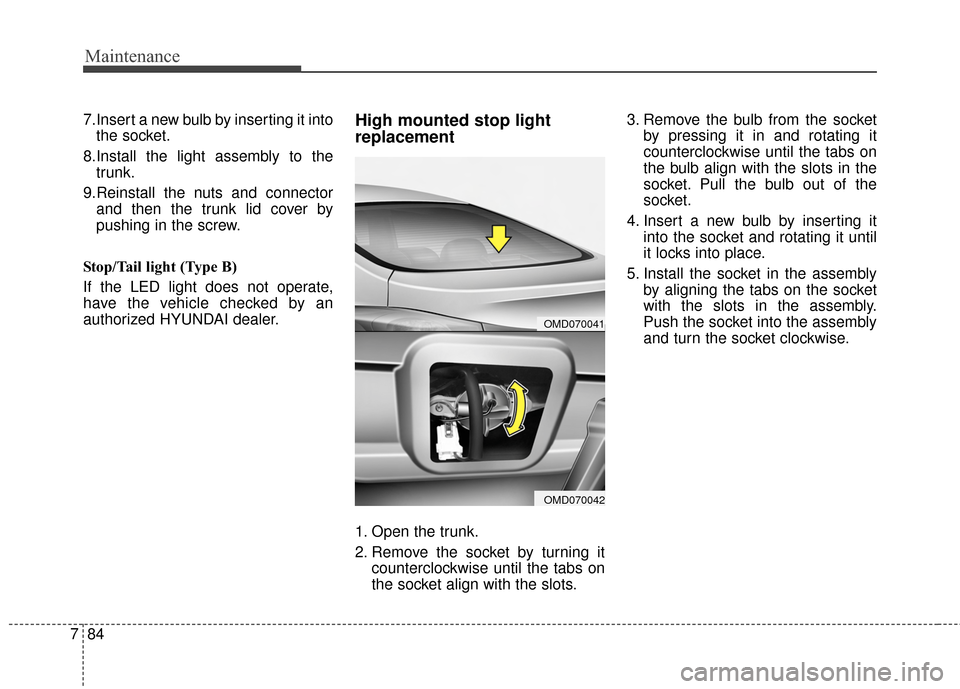
replacement
1. Open the trunk.
2. Remove the socket by turning it counterclockwise until the tabs on
the socket align with the slots. 3. Remove the bulb from the socket
by pressing it in and rotating it
counterclockwise until the tabs on
the bulb align with the slots in the
socket. Pull the bulb out of the
socket.
4. Insert a new bulb by inserting it into the socket and rotating it until
it locks into place.
5. Install the socket in the assembly by aligning the tabs on the socket
with the slots in the assembly.
Push the socket into the assembly
and turn the socket clockwise.
OMD070041
OMD070042