bulb Hyundai Elantra 2016 Owner's Manual - RHD (UK. Australia)
[x] Cancel search | Manufacturer: HYUNDAI, Model Year: 2016, Model line: Elantra, Model: Hyundai Elantra 2016Pages: 498, PDF Size: 9.45 MB
Page 161 of 498
481
Features of your vehicle
One-touch lane change function
(if equipped)
To activate a one-touch lane change
function, move the turn signal lever
slightly and then release it. The lane
change signals will blink 3 times.
✽NOTICE
If the turn signal indicator stays on
and does not flash, or if it flashes
abnormally, a bulb may be burned
out or have a poor electrical connec-
tion in the circuit. The bulb may
require replacement.
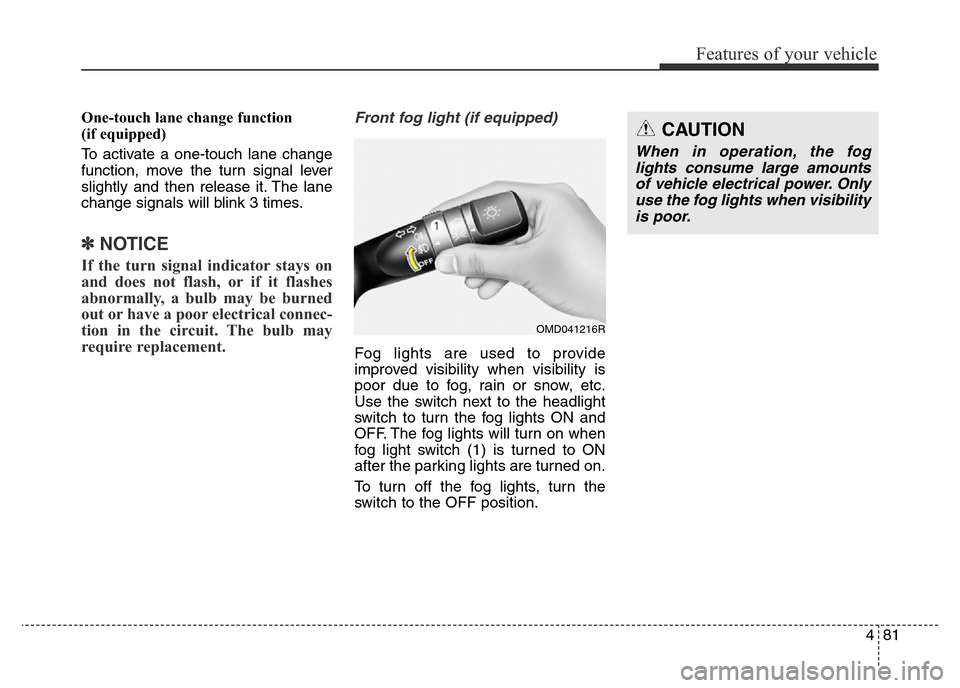
Front fog light (if equipped)
Fog lights are used to provide
improved visibility when visibility is
poor due to fog, rain or snow, etc.
Use the switch next to the headlight
switch to turn the fog lights ON and
OFF. The fog lights will turn on when
fog light switch (1) is turned to ON
after the parking lights are turned on.
To turn off the fog lights, turn the
switch to the OFF position.
CAUTION
When in operation, the fog
lights consume large amounts
of vehicle electrical power. Only
use the fog lights when visibility
is poor.
OMD041216R
Page 372 of 498
Driving your vehicle
68 5
Reversing
Hold the bottom of the steering
wheel with one hand. Then, to move
the trailer to the left, move your hand
to the left. To move the trailer to the
right, move your hand to the right.
Always reverse slowly and, if possi-
ble, have someone guide you.
Making turns
When you’re turning with a trailer,
make wider turns than normal. Do
this so your trailer won’t strike soft
shoulders, curbs, road signs, trees,
or other objects. Avoid jerky or sud-
den manoeuvres. Signal well in
advance.
Turn signals
When you tow a trailer, your vehicle
has to have a different turn signal
flasher and extra wiring. The green
arrows on your instrument panel will
flash whenever you signal a turn or
lane change. Properly connected,
the trailer lights will also flash to alert
other drivers you’re about to turn,
change lanes, or stop.
When towing a trailer, the green
arrows on your instrument cluster will
flash for turns even if the bulbs on
the trailer are burned out. Thus, you
may think drivers behind you are
seeing your signals when, in fact,
they are not. It’s important to check
occasionally to be sure the trailer
bulbs are still working. You must also
check the lights every time you dis-
connect and then reconnect the
wires.WARNING
Do not connect a trailer lighting
system directly to your vehi-
cle’s lighting system. Use an
approved trailer wiring harness.
Failure to do so could result in
damage to the vehicle electrical
system and/or personal injury.
Consult an authorised
HYUNDAI dealer for assistance.
Page 397 of 498
Light bulbs . . . . . . . . . . . . . . . . . . . . . . . . . . . . . . . 7-66
• Headlight, position light, turn signal light,
front fog light bulb replacement . . . . . . . . . . . . . . . 7-67
• Headlight and front fog light aiming . . . . . . . . . . . . . 7-72
• Side repeater light bulb replacement . . . . . . . . . . . . 7-77
• Rear combination light bulb replacement . . . . . . . . 7-77
• High mounted stop light replacement . . . . . . . . . . . 7-81
• Licence plate light bulb replacement . . . . . . . . . . . . 7-82
• Interior light bulb replacement . . . . . . . . . . . . . . . . . 7-83
Appearance care . . . . . . . . . . . . . . . . . . . . . . . . . . . 7-84
• Exterior care . . . . . . . . . . . . . . . . . . . . . . . . . . . . . . . . 7-84
• Interior care . . . . . . . . . . . . . . . . . . . . . . . . . . . . . . . . . 7-89
Emission control system . . . . . . . . . . . . . . . . . . . . 7-91
• Crankcase emission control system . . . . . . . . . . . . . . 7-91
• Evaporative emission control system. . . . . . . . . . . . . 7-92
• Exhaust emission control system . . . . . . . . . . . . . . . . 7-92
7
Page 401 of 498
Maintenance
6 7
(Continued)
• When you remove the interior
trim cover with a flat head (-)
driver, be careful not to dam-
age the cover.
• Be careful when you replace
and clean bulbs to avoid
burns or electrical shock.
Page 461 of 498
Maintenance
66 7
LIGHT BULBS
Use only the bulbs of the specified
wattage.
All bulbs are available from your
HYUNDAI dealers Parts
Department.
WARNING - Working on
the lights
Prior to working on a light, firm-
ly apply the parking brake,
ensure that the ignition switch
is turned to the LOCK position
and turn off the lights to avoid
sudden movement of the vehi-
cle and burning your fingers or
receiving an electric shock.CAUTION
Be sure to replace a blown bulb
with one of the same wattage
rating. Otherwise, it may cause
damage to the fuse or electric
wiring system.
CAUTION
Headlight aiming adjustment
may be necessary after the
headlight assembly is rein-
stalled. If you are unsure how to
replace or aim the headlight, we
recommend that you consult
with an authorised HYUNDAI
dealer.
CAUTION
If you don’t have the necessary
tools, the correct bulbs and the
expertise, consult an authorised
HYUNDAI dealer. In many cases,
it is difficult to replace vehicle
light bulbs because other parts
of the vehicle must be removed
before you can get to the bulb.
This is especially true if you
have to remove the headlight
assembly to get to the bulb(s).
Take care when
removing/installing the head-
light assembly to prevent dam-
age to the vehicle.
Page 462 of 498
767
Maintenance
✽NOTICE
After heavy, driving rain or washing,
headlight and taillight lenses could
appear frosty. This condition is
caused by the temperature difference
between the lamp inside and outside.
This is similar to the condensation on
your windows inside your vehicle
when it is raining and doesn’t indi-
cate a problem with your vehicle. If
the water leaks into the lamp bulb
circuitry, we recommend that the
system be checked by an authorised
HYUNDAI dealer.
Headlight, position light, turn
signal light, front fog light bulb
replacement
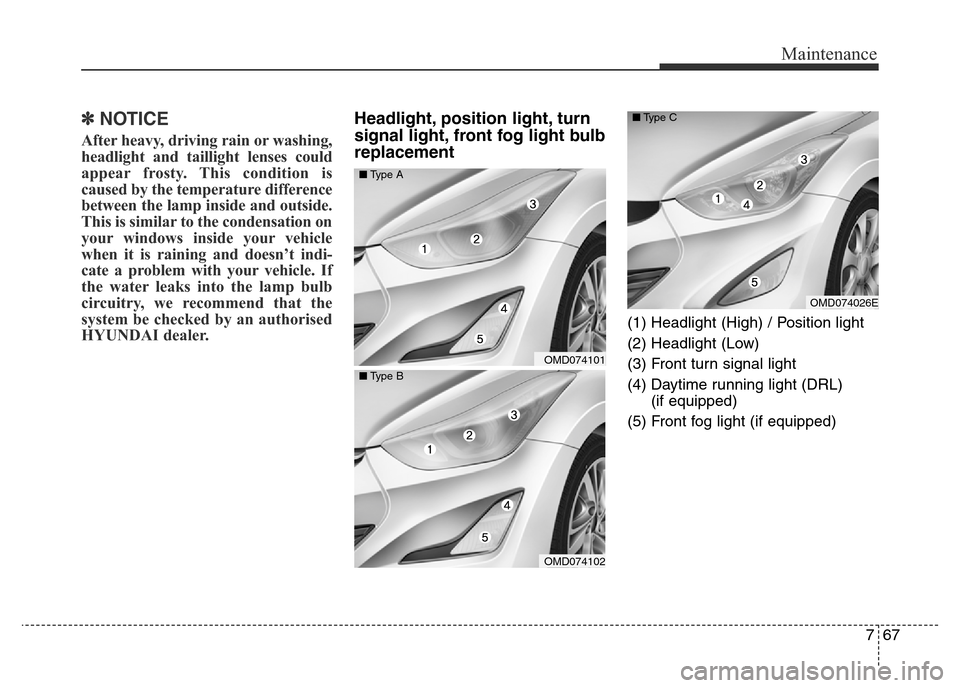
(1) Headlight (High) / Position light
(2) Headlight (Low)
(3) Front turn signal light
(4) Daytime running light (DRL)
(if equipped)
(5) Front fog light (if equipped)
OMD074101 ■Type A
OMD074102 ■Type B
OMD074026E ■Type C
Page 463 of 498
Maintenance
68 7
Headlight (Low, HID type)
If the light bulb does not operate, we
recommend that the system be
checked by an authorised HYUNDAI
dealer.(Continued)
• Always handle them carefully,
and avoid scratches and abra-
sions. If the bulbs are lit, avoid
contact with liquids. Never
touch the glass with bare
hands. Residual oil may cause
the bulb to overheat and burst
when lit. A bulb should be
operated only when installed
in a headlight.
• If a bulb becomes damaged or
cracked, replace it immediate-
ly and carefully dispose of it.
• Wear eye protection when
changing a bulb. Allow the
bulb to cool down before han-
dling it.
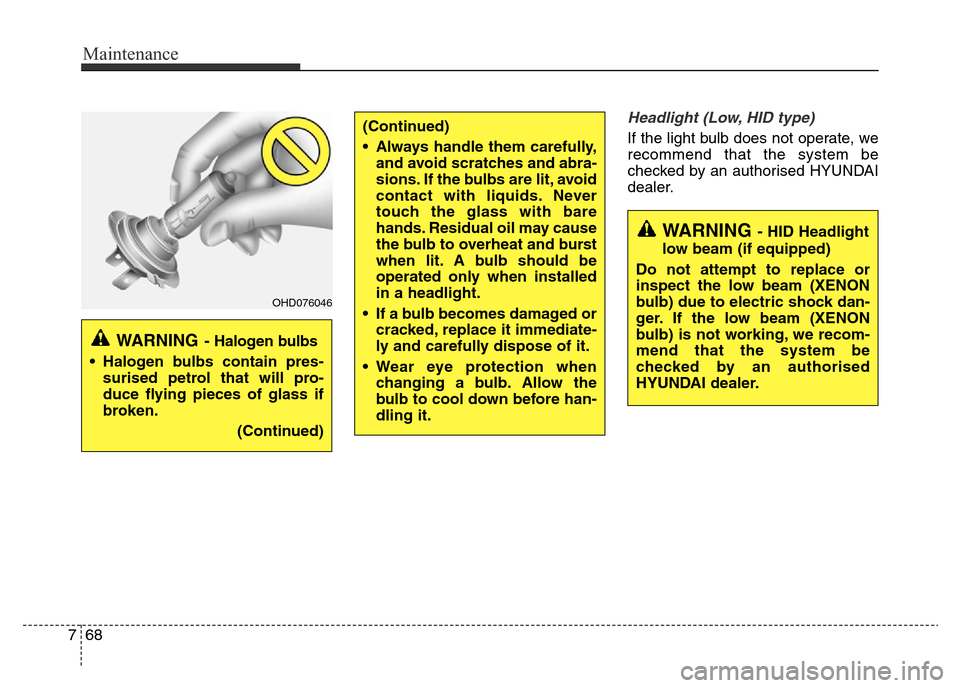
WARNING- Halogen bulbs
• Halogen bulbs contain pres-
surised petrol that will pro-
duce flying pieces of glass if
broken.
(Continued)
OHD076046
WARNING - HID Headlight
low beam (if equipped)
Do not attempt to replace or
inspect the low beam (XENON
bulb) due to electric shock dan-
ger. If the low beam (XENON
bulb) is not working, we recom-
mend that the system be
checked by an authorised
HYUNDAI dealer.
Page 464 of 498
769
Maintenance
✽NOTICE
HID lamps have superior perform-
ance vs. halogen bulbs. HID lamps
are estimated by the manufacturer
to last twice as long or longer than
halogen bulbs depending on their
frequency of use. They will probably
require replacement at some point
in the life of the vehicle. Cycling the
headlights on and off more than typ-
ical use will shorten HID lamps life.
HID lamps do not fail in the same
manner as halogen incandescent
lamps. If a headlight goes out after a
period of operation, but will imme-
diately relight when the headlight
switch is cycled, it is likely the HID
lamp needs to be replaced. HID
lighting components are more com-
plex than conventional halogen
bulbs, and so have higher replace-
ment cost.
✽NOTICE
We recommend that the headlight
aiming be adjusted after an accident
or after the headlight assembly is rein-
stalled, at an authorised HYUNDAI
dealer.
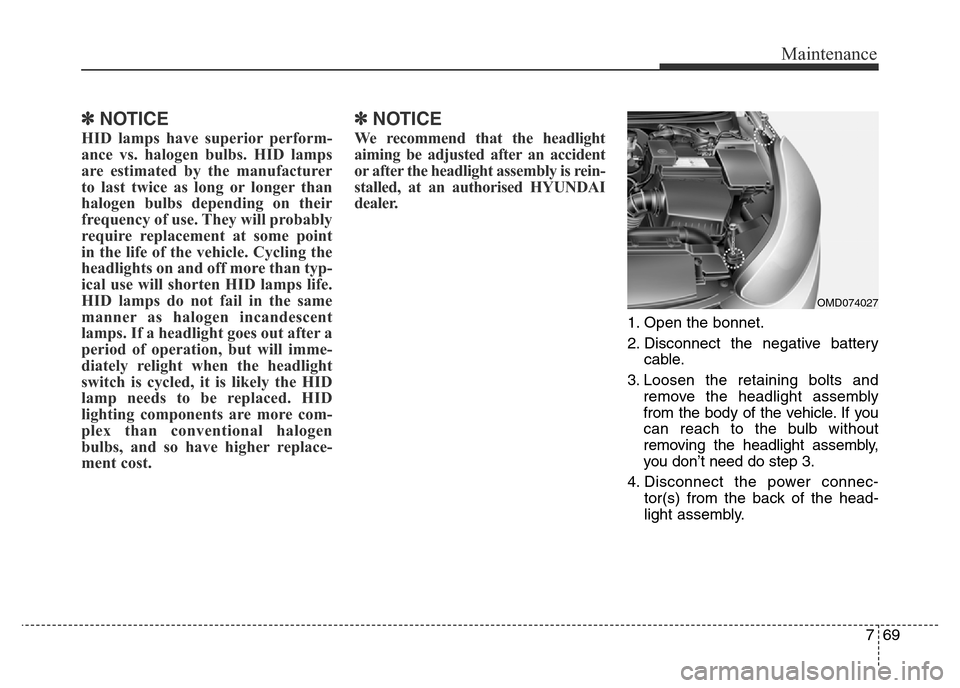
1. Open the bonnet.
2. Disconnect the negative battery
cable.
3. Loosen the retaining bolts and
remove the headlight assembly
from the body of the vehicle. If you
can reach to the bulb without
removing the headlight assembly,
you don’t need do step 3.
4. Disconnect the power connec-
tor(s) from the back of the head-
light assembly.
OMD074027
Page 465 of 498
Maintenance
70 7
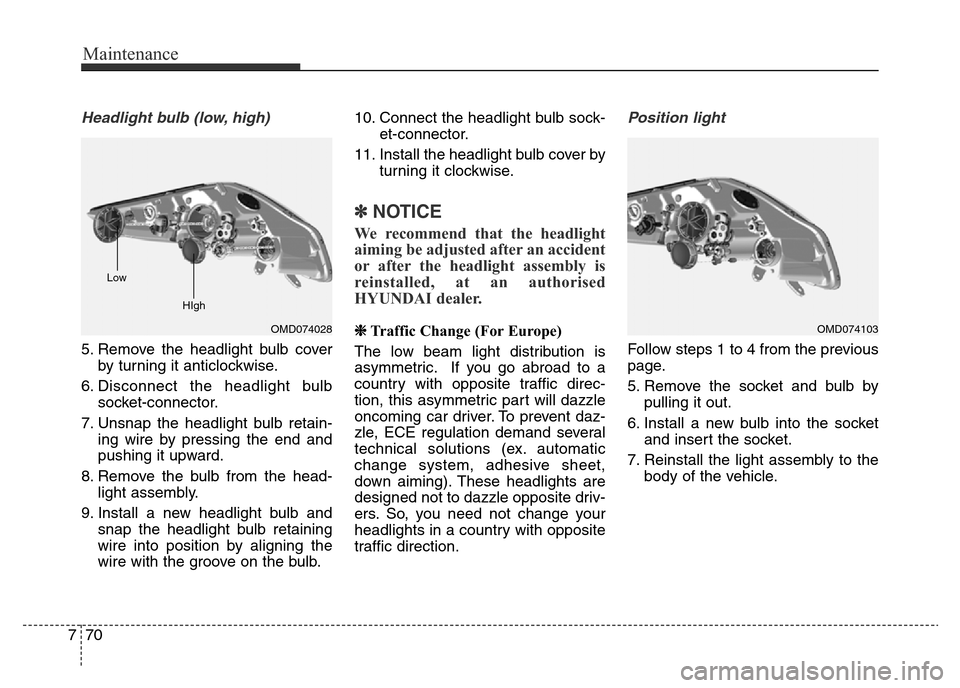
Headlight bulb (low, high)
5. Remove the headlight bulb cover
by turning it anticlockwise.
6. Disconnect the headlight bulb
socket-connector.
7. Unsnap the headlight bulb retain-
ing wire by pressing the end and
pushing it upward.
8. Remove the bulb from the head-
light assembly.
9. Install a new headlight bulb and
snap the headlight bulb retaining
wire into position by aligning the
wire with the groove on the bulb.10. Connect the headlight bulb sock-
et-connector.
11. Install the headlight bulb cover by
turning it clockwise.
✽NOTICE
We recommend that the headlight
aiming be adjusted after an accident
or after the headlight assembly is
reinstalled, at an authorised
HYUNDAI dealer.
❈Traffic Change (For Europe)
The low beam light distribution is
asymmetric. If you go abroad to a
country with opposite traffic direc-
tion, this asymmetric part will dazzle
oncoming car driver. To prevent daz-
zle, ECE regulation demand several
technical solutions (ex. automatic
change system, adhesive sheet,
down aiming). These headlights are
designed not to dazzle opposite driv-
ers. So, you need not change your
headlights in a country with opposite
traffic direction.
Position light
Follow steps 1 to 4 from the previous
page.
5. Remove the socket and bulb by
pulling it out.
6. Install a new bulb into the socket
and insert the socket.
7. Reinstall the light assembly to the
body of the vehicle.
OMD074103OMD074028 Low
HIgh
Page 466 of 498
771
Maintenance
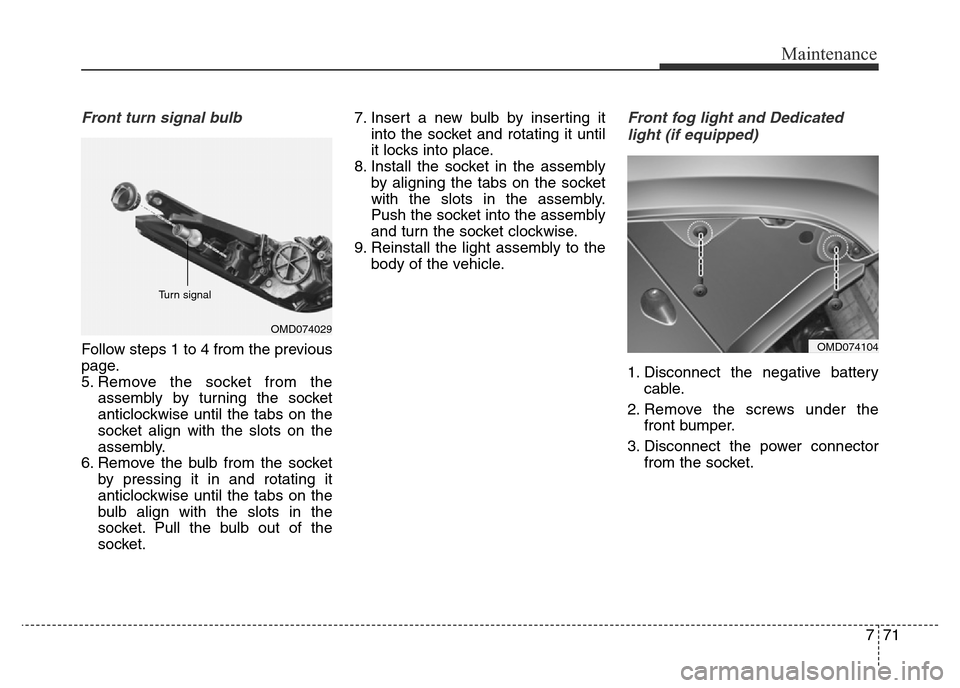
Front turn signal bulb
Follow steps 1 to 4 from the previous
page.
5. Remove the socket from the
assembly by turning the socket
anticlockwise until the tabs on the
socket align with the slots on the
assembly.
6. Remove the bulb from the socket
by pressing it in and rotating it
anticlockwise until the tabs on the
bulb align with the slots in the
socket. Pull the bulb out of the
socket.7. Insert a new bulb by inserting it
into the socket and rotating it until
it locks into place.
8. Install the socket in the assembly
by aligning the tabs on the socket
with the slots in the assembly.
Push the socket into the assembly
and turn the socket clockwise.
9. Reinstall the light assembly to the
body of the vehicle.
Front fog light and Dedicated
light (if equipped)
1. Disconnect the negative battery
cable.
2. Remove the screws under the
front bumper.
3. Disconnect the power connector
from the socket.
OMD074104
OMD074029 Turn signal