turn signal Hyundai Elantra 2017 User Guide
[x] Cancel search | Manufacturer: HYUNDAI, Model Year: 2017, Model line: Elantra, Model: Hyundai Elantra 2017Pages: 637, PDF Size: 15.02 MB
Page 439 of 637
5-53
Driving your vehicle
5
The hazard warning flasher turns
OFF, when the driving speed exceeds
10 km/h (6 mph) after a complete
stop. The hazard warning flasher
turns OFF, when the vehicle drives at
a low speed for a certain period of
time. The driver can manually turn
OFF the hazard warning flasher by
pressing the button.
Information
The Emergency Stop Signal (ESS) sys-
tem will not work if the hazard warn-
ing flasher already blinks.
Good braking practices
Wet brakes can be dangerous! The
brakes may get wet if the vehicle is
driven through standing water or if it
is washed. Your vehicle will not stop
as quickly if the brakes are wet. Wet
brakes may cause the vehicle to pull
to one side.To dry the brakes, apply the brakes
lightly until the braking action returns
to normal, taking care to keep the
vehicle under control at all times. If
the braking action does not return to
normal, stop as soon as it is safe to
do so and we recommend that you
call an authorized HYUNDAI dealer
for assistance.
DO NOT drive with your foot resting
on the brake pedal. Even light, but
constant pedal pressure can result in
the brakes overheating, brake wear,
and possibly even brake failure.
If a tire goes flat while you are driv-
ing, apply the brakes gently and
keep the vehicle pointed straight
ahead while you slow down. When
you are moving slowly enough for it
to be safe to do so, pull off the road
and stop in a safe location.
Keep your foot firmly on the brake
pedal when the vehicle is stopped to
prevent the vehicle from rolling for-
ward.
i
Whenever leaving the vehicle or
parking, always come to a com-
plete stop and continue to
depress the brake pedal. Move
the shift lever into the P (Park)
position, then apply the parking
brake, and place the Engine
Start/Stop button in the OFF
position.
Vehicles parked with the park-
ing brake not applied or not
fully engaged may roll inadver-
tently and may cause injury to
the driver and others. ALWAYS
apply the parking brake before
exiting the vehicle.
WARNING
Page 448 of 637

5-62
Driving your vehicle
The Blind Spot Detection System
(BSD) uses radar sensors in the rear
bumper to monitor and warn the driv-
er of an approaching vehicle in the
driver's blind spot area.
The system monitors the rear area of
the vehicle and provides information
to the driver with an audible alert and
a indicator on the outside side view
mirrors.(1) BSD (Blind Spot Detection)
The blind spot detection range
varies relative to vehicle speed.
Note that if your vehicle is travel-
ing much faster than the vehicles
around you, the warning will not
occur.
(2) LCA (Lane Change Assist)
The Lane Change Assist feature
will alert you when a vehicle is
approaching in an adjacent lane
at a high rate of speed. If the driv-
er activates the turn signal when
the system detects an oncoming
vehicle, the system sounds an
audible alert.
(3) RCTA (Rear Cross Traffic Alert)
The Rear Cross Traffic Alert fea-
ture monitors approaching cross
traffic from the left and right side
of the vehicle when your vehicle is
in reverse. The feature will operate
when the vehicle is moving in
reverse below about 10 km/h (6
mph). If oncoming cross traffic is
detected a warning chime will
sound.
BLIND SPOT DETECTION SYSTEM (BSD) (IF EQUIPPED)
OTL055139
Blind spot area
Closing at high speed
•Always be aware of road con-
ditions while driving and be
alert for unexpected situations
even though the Blind Spot
Detection System is operat-
ing.
•The Blind Spot Detection
System (BSD) is a supplemen-
tal system to assist you. Do
not entirely rely on the sys-
tem. Always pay attention,
while driving, for your safety.
•The Blind Spot Detection
System (BSD) is not a substi-
tute for proper and safe driving.
Always drive safely and use
caution when changing lanes
or backing up the vehicle. The
Blind Spot Detection System
(BSD) may not detect every
object alongside the vehicle.
WARNING
Page 450 of 637
5-64
Driving your vehicle
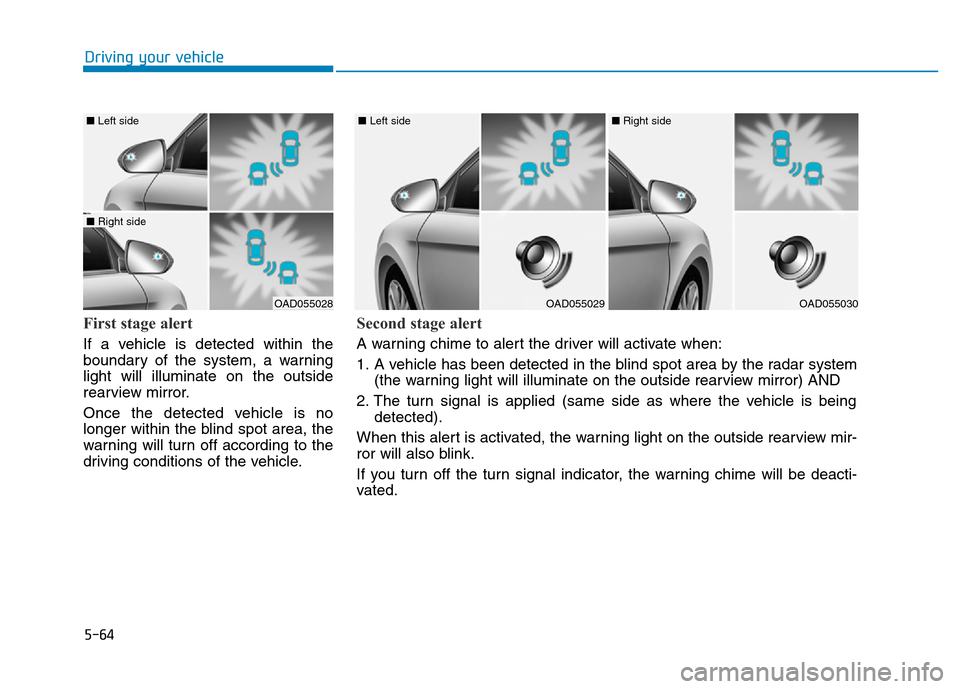
First stage alert
If a vehicle is detected within the
boundary of the system, a warning
light will illuminate on the outside
rearview mirror.
Once the detected vehicle is no
longer within the blind spot area, the
warning will turn off according to the
driving conditions of the vehicle.
OAD055028
■ Left side
■ Right side
OAD055029
■ Left side
OAD055030
■ Right side
Second stage alert
A warning chime to alert the driver will activate when:
1. A vehicle has been detected in the blind spot area by the radar system
(the warning light will illuminate on the outside rearview mirror) AND
2. The turn signal is applied (same side as where the vehicle is being
detected).
When this alert is activated, the warning light on the outside rearview mir-
ror will also blink.
If you turn off the turn signal indicator, the warning chime will be deacti-
vated.
Page 479 of 637
5-93
Driving your vehicle
5
Making turns
When you're turning with a trailer,
make wider turns than normal. Do
this so your trailer won't strike soft
shoulders, curbs, road signs, trees,
or other objects. Avoid jerky or sud-
den maneuvers. Signal well in
advance.
Turn signals
When you tow a trailer, your vehicle
has to have a different turn signal
flasher and extra wiring. The green
arrows on your instrument panel will
flash whenever you signal a turn or
lane change. Properly connected,
the trailer lights will also flash to alert
other drivers you're about to turn,
change lanes, or stop.When towing a trailer, the green
arrows on your instrument panel will
flash for turns even if the bulbs on
the trailer are burned out. Thus, you
may think drivers behind you are
seeing your signals when, in fact,
they are not. It's important to check
occasionally to be sure the trailer
bulbs are still working. You must also
check the lights every time you dis-
connect and then reconnect the
wires.
Driving on hills
Reduce speed and shift to a lower
gear before you start down a long or
steep downgrade. If you don't shift
down, you might have to use your
brakes so much that they would get
overheated and may not operate effi-
ciently.
On a long uphill grade, shift down
and reduce your speed to around 70
km/h (45 mph) to reduce the possi-
bility of engine and transmission
overheating.
If your trailer weighs more than the
maximum trailer weight without trail-
er brakes and you have an automat-
ic transmission, you should drive in D
(Drive) when towing a trailer.
Operating your vehicle in D (Drive)
when towing a trailer will minimize
heat build-up and extend the life of
your transmission. Do not connect a trailer lighting
system directly to your vehi-
cle's lighting system. Use an
approved trailer wiring harness.
Failure to do so could result in
damage to the vehicle electrical
system and/or personal injury.
Consult an authorized HYUNDAI
dealer for assistance.
WARNING
Page 482 of 637
5-96
Driving your vehicle
Maintenance when towing a
trailer
Your vehicle will need service more
often when you regularly pull a trail-
er. Important items to pay particular
attention to include engine oil, auto-
matic transmission fluid, axle lubri-
cant and cooling system fluid. Brake
condition is another important item to
frequently check. If you're trailering,
it's a good idea to review these items
before you start your trip. Don't forget
to also maintain your trailer and
hitch. Follow the maintenance sched-
ule that accompanied your trailer and
check it periodically. Preferably,
inspect the vehicle and trailer at the
start of each day's driving. Inspect
the hitch mounting to make sure the
hitch is properly secured to the vehi-
cle. Inspect the trailer electrical
wiring to make sure brake lights, turn
signal lights, running lights, and haz-
ard lights are working properly.To prevent vehicle damage:
• Due to higher load during trailer
usage, overheating might occur
on hot days or during uphill driv-
ing. If the coolant gauge indi-
cates over-heating, switch off
the air conditioner and stop the
vehicle in a safe area to cool
down the engine.
• When towing check the automat-
ic transmission fluid more fre-
quently. (Note: This is not appli-
cable for vehicles equipped with
the dual clutch transmission.)
• If your vehicle is not equipped
with an air conditioner, you
should install a condenser fan
to improve engine performance
when towing a trailer.
NOTICE
Page 485 of 637
6-2
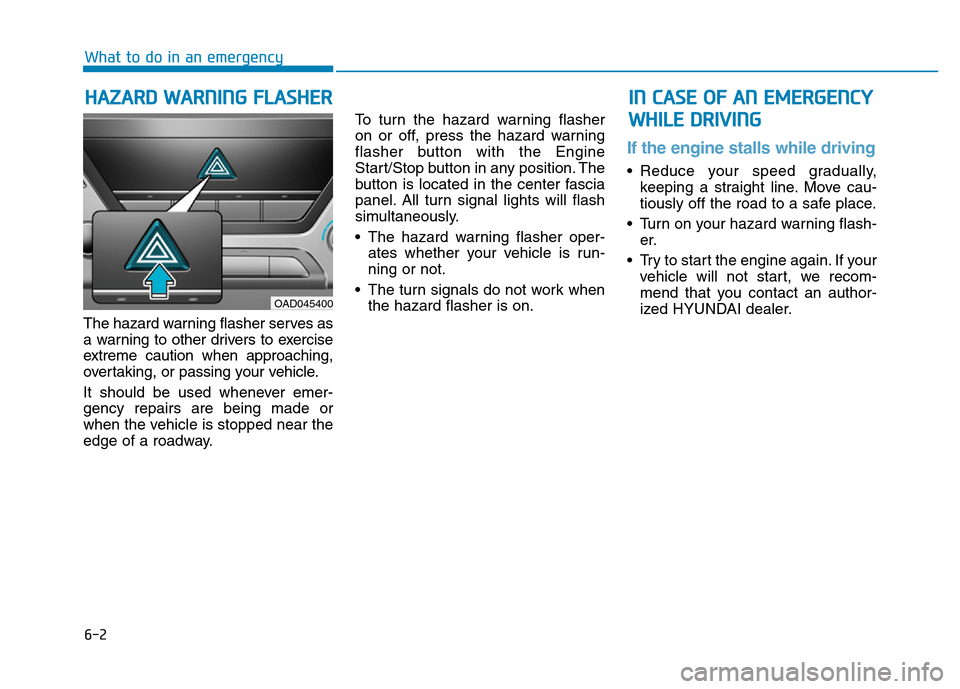
The hazard warning flasher serves as
a warning to other drivers to exercise
extreme caution when approaching,
overtaking, or passing your vehicle.
It should be used whenever emer-
gency repairs are being made or
when the vehicle is stopped near the
edge of a roadway.To turn the hazard warning flasher
on or off, press the hazard warning
flasher button with the Engine
Start/Stop button in any position. The
button is located in the center fascia
panel. All turn signal lights will flash
simultaneously.
• The hazard warning flasher oper-
ates whether your vehicle is run-
ning or not.
• The turn signals do not work when
the hazard flasher is on.
If the engine stalls while driving
• Reduce your speed gradually,
keeping a straight line. Move cau-
tiously off the road to a safe place.
• Turn on your hazard warning flash-
er.
• Try to start the engine again. If your
vehicle will not start, we recom-
mend that you contact an author-
ized HYUNDAI dealer.
HAZARD WARNING FLASHER
What to do in an emergency
IN CASE OF AN EMERGENCY
WHILE DRIVING
OAD045400
Page 513 of 637
7
Tires and wheels ..................................................7-52
Tire care ............................................................................7-52
Recommended cold tire inflation pressures.............7-52
Checking tire inflation pressure ..................................7-54
Tire rotation .....................................................................7-55
Wheel alignment and tire balance ..............................7-56
Tire replacement .............................................................7-56
Wheel replacement .........................................................7-58
Tire traction ......................................................................7-58
Tire maintenance ............................................................7-58
Tire sidewall labeling ......................................................7-58
Low aspect ratio tire ......................................................7-63
Fuses ......................................................................7-64
Fuse/Relay panel description ......................................7-70
Light bulbs.............................................................7-84
Headlamp, position lamp, turn signal lamp and
fog lamp light bulb replacement .................................7-85
Side repeater lamp replacement .................................7-91
Headlamp and front fog lamp aiming (for Europe) ...7-92
Rear combination lamp bulb replacement ................7-97
High mounted stop lamp replacement .....................7-101
License plate light bulb replacement .......................7-101
Interior light bulb replacement ..................................7-102
Appearance care ................................................7-103
Exterior care ..................................................................7-103
Interior care ...................................................................7-109
Emission control system ...................................7-111
Crankcase emission control system .........................7-111
Evaporative emission control system ......................7-111
Exhaust emission control system .............................7-112
Page 520 of 637
At least monthly:
• Check coolant level in the engine
coolant reservoir.
• Check the operation of all exterior
lights, including the stoplights, turn
signals and hazard warning flashers.
• Check the inflation pressures of all
tires including the spare for tires
that are worn, show uneven wear,
or are damaged.
• Check for loose wheel lug nuts.
At least twice a year:
(i.e., every Spring and Fall)
• Check radiator, heater and air condi-
tioning hoses for leaks or damage.
• Check windshield washer spray
and wiper operation. Clean wiper
blades with clean cloth dampened
with washer fluid.
• Check headlamp alignment.
• Check muffler, exhaust pipes,
shields and clamps.
• Check the seat belts for wear and
function.
At least once a year:
• Clean body and door drain holes.
• Lubricate door hinges and hood
hinges.
• Lubricate door and hood locks and
latches.
• Lubricate door rubber weather
strips.
• Lubricate door checker
• Check the air conditioning system.
• Inspect and lubricate automatic
transmission linkage and controls.
• Clean the battery and terminals.
• Check the brake fluid level.
7-9
7
Maintenance
Page 596 of 637
7-85
7
Maintenance
Information
After heavy driving, rain or washing,
headlamp and tail lamp lenses could
appear frosty. This condition is caused
by the temperature difference between
the lamp inside and outside.
This is similar to the condensation on
your windows inside your vehicle dur-
ing the rain and doesn’t indicate a
problem with your vehicle. If the
water leaks into the lamp bulb circuit-
ry, we recommend that the system be
checked by an authorized HYUNDAI
dealer.
Information(For Europe)
The low beam light distribution is
asymmetric. If you go abroad to a
country with opposite traffic direction,
this asymmetric part will dazzle
oncoming car driver. To prevent daz-
zle, ECE regulation demand several
technical solutions (ex. automatic
change system, adhesive sheet, down
aiming). These headlamps are designed
not to dazzle opposite drivers. So, you
need not change your headlamps in a
country with opposite traffic direction.
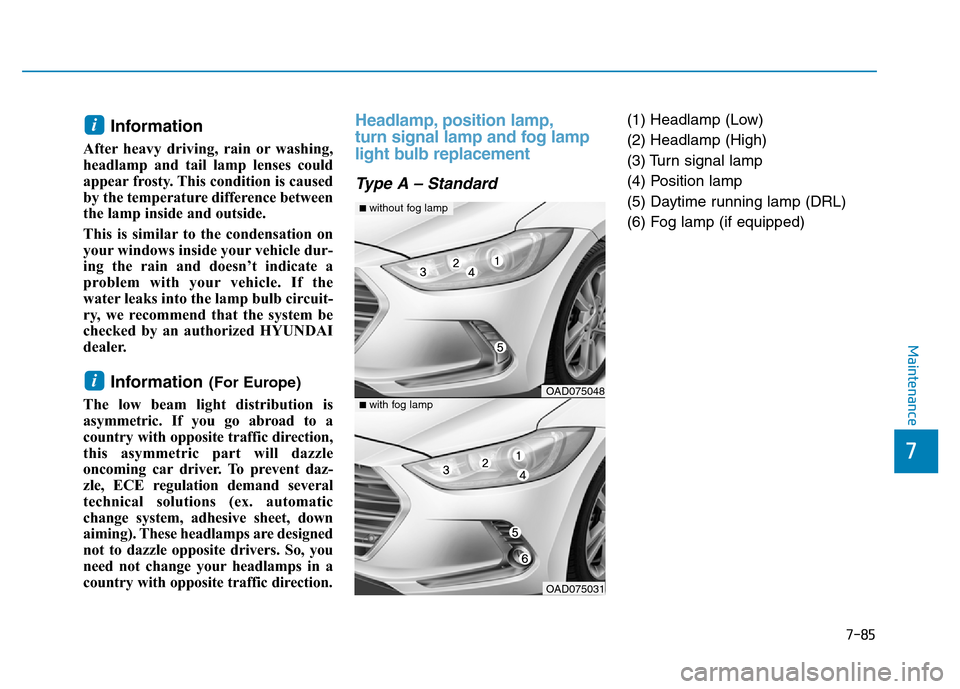
Headlamp, position lamp,
turn signal lamp and fog lamp
light bulb replacement
Type A – Standard
(1) Headlamp (Low)
(2) Headlamp (High)
(3) Turn signal lamp
(4) Position lamp
(5) Daytime running lamp (DRL)
(6) Fog lamp (if equipped)
i
i
OAD075048
■ without fog lamp
OAD075031
■ with fog lamp
Page 598 of 637

7-87
7
Maintenance
8. Connect the headlamp bulb sock-
et-connector.
9. Install the headlamp bulb cover by
turning it clockwise.
Information
The headlamp aiming should be
adjusted after an accident or after the
headlamp assembly is reinstalled at an
authorized HYUNDAI dealer.
Turn signal lamp
1. Open the hood.
2. Disconnect the negative battery
cable.
3.Remove the socket from the
assembly by turning the socket
counterclockwise until the tabs on
the socket align with the slots on
the assembly.
4.Remove the bulb from the socket
by pressing it in and rotating it
counterclockwise until the tabs on
the bulb align with the slots in the
socket. Pull the bulb out of the
socket.5.Insert a new bulb by inserting it into
the socket and rotating it until it
locks into place.
6.Install the socket in the assembly
by aligning the tabs on the socket
with the slots in the assembly.
7.Push the socket into the assembly
and turn the socket clockwise.
Daytime running lamp/
Position lamp/Fog lamp
If the LED lamp does not operate, we
recommend that the system be
checked by an authorized HYUNDAI
dealer.
i
OAD075033