push to start Hyundai Elantra 2017 Owner's Manual
[x] Cancel search | Manufacturer: HYUNDAI, Model Year: 2017, Model line: Elantra, Model: Hyundai Elantra 2017Pages: 637, PDF Size: 15.02 MB
Page 53 of 637

2-23
Safety system of your vehicle
2
Rear seat warmers (if equipped)
While the engine is running, push
either of the switches to warm the rear
seat.
During mild weather or under condi-
tions where the operation of the seat
warmer is not needed, keep the
switches in the OFF position.Each time you push the switch, the
temperature setting of the seat is
changed as follows :
The seat warmer defaults to the OFF
position whenever the ignition switch
is placed in the ON position.
Information
With the seat warmer switch in the
ON position, the heating system in the
seat turns off or on automatically
depending on the seat temperature.
i
(Continued)
•Avoid spilling liquids on the
surface of the front seats and
seatbacks; this may cause the
air vent holes to become
blocked and not work properly.
•Do not place materials such
as plastic bags or newspa-
pers under the seats. They
may block the air intake caus-
ing the air vents to not work
properly.
•Do not change the seat cov-
ers. It may damage the seat
warmer or air ventilation seat.
•If the air vents do not operate,
restart the vehicle. If there is
no change, we recommend
that you have your vehicle
inspected by an authorized
HYUNDAI dealer.
OAD035024
OFF →HIGH ( ) →LOW ( )
→
Page 105 of 637
3-10
Convenient features of your vehicle
Trunk unlocking
To unlock:
1. Carry the smart key.
2. Either press the trunk handle but-
ton or press the Trunk Unlock but-
ton (3) on the smart key for more
than one second.
3. The hazard warning lights will
blink two times.
Once the trunk is opened and then
closed, the trunk will lock automati-
cally.
Information
After unlocking the trunk, the trunk
will lock automatically after 30 sec-
onds unless the trunk is opened.
Start-up
You can start the engine without
inserting the key.For detailed infor-
mation refer to the Engine
Start/Stop button in chapter 5.
To prevent damaging the smart
key:
• Keep the smart key away from
water or any liquid and fire. If the
inside of the smart key gets
damp (due to drinks or moisture),
or is heated, internal circuit may
malfunction, excluding the car
from the warranty.
• Avoid dropping or throwing the
smart key.
• Protect the smart key from
extreme temperatures.
Mechanical key
If the Smart Key does not operate
normally, you can lock or unlock the
door by using the mechanical key.
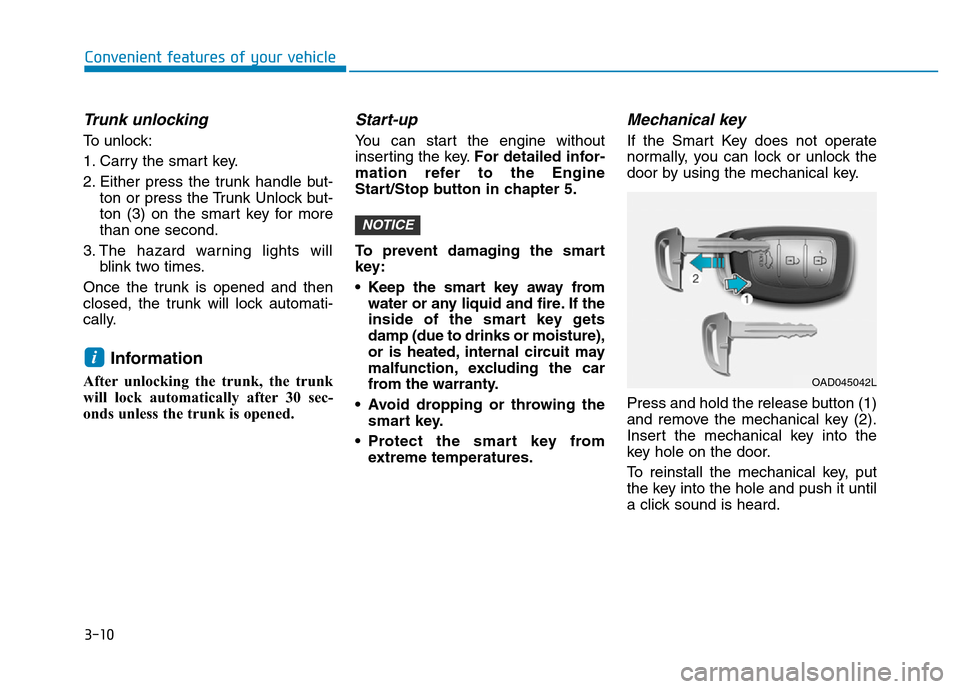
Press and hold the release button (1)
and remove the mechanical key (2).
Insert the mechanical key into the
key hole on the door.
To reinstall the mechanical key, put
the key into the hole and push it until
a click sound is heard.
NOTICE
i
OAD045042L
Page 135 of 637
3-40
Convenient features of your vehicle
Resetting the sunroof
Sunroof needs to be reset if (in the fol-
lowings)
- Battery is discharged or disconnect-
ed or the related fuse has been
replaced or disconnected
- The one-touch sliding function of the
sunroof does not normally operate
1. Place the ignition switch to the ON
position or start the engine. It is rec-
ommended to reset the sunroof
while the engine is running.
2. Push the control lever forward. The
sunroof will close completely or tilt
depending on the condition of the
sunroof.
3. Release the control lever until the
sunroof does not move.4. Push the control lever forward
about 10 seconds.
- When the sunroof is in the close
position :
The glass will tilt and slightly move
up and down.
- When the sunroof is in the tilt posi-
tion:
The glass will slightly move up
and down.
Do not release the lever until the
operation is completed.
If you release the lever during opera-
tion, try again from step 2.
5. Within 3 seconds, push the control
lever forward until the sunroof
operates as follows:
Tilt down →Slide Open →Slide
Close.
Do not release the lever until the
operation is completed.
If you release the lever during opera-
tion, try again from step 2.6. Release the sunroof control lever
after all operation has completed.
(The sunroof system has been
reset.)
Information
• If the sunroof does not reset when
the vehicle battery is disconnected
or discharged, or related fuse is
blown, the sunroof may not operate
normally.
• For more detailed information, we
recommend that you contact an
authorized HYUNDAI dealer.
i
Page 225 of 637
3-130
Convenient features of your vehicle
Operation Tips
• To keep dust or unpleasant fumes
from entering the car through the
ventilation system, temporarily set
the air intake control to the recircu-
lated air position. Be sure to return
the control to the fresh air position
when the irritation has passed to
keep fresh air in the vehicle. This
will help keep the driver alert and
comfortable.
• Air for the heating/cooling system
is drawn in through the grilles just
ahead of the windshield. Care
should be taken that these are not
blocked by leaves, snow, ice or
other obstructions.
• To prevent interior fog on the wind-
shield, set the air intake control to
the fresh air position and fan speed
to the desired position, turn on the
air conditioning system, and adjust
the temperature control to desired
temperature.
Air conditioning
HYUNDAI Air Conditioning Systems
are filled with R-134a or R1234yf
refrigerant.
1. Start the engine. Push the air con-
ditioning button.
2. Set the mode to the position.
3. Set the air intake control to the out-
side air or recirculated air position.
4. Adjust the fan speed control and
temperature control to maintain
maximum comfort.
Information
Your vehicle is filled with R-134a or
R-1234yf according to the regulation
in your country at the time of produc-
tion. You can find out which air condi-
tioning refrigerant is applied to your
vehicle on the label located inside of
the hood. • The refrigerant system should
only be serviced by trained and
certified technicians to insure
proper and safe operation.
• The refrigerant system should
be serviced in a well-ventilated
place.
• The air conditioning evaporator
(cooling coil) shall never be
repaired or replaced with one
removed from a used or sal-
vaged vehicle and new replace-
ment MAC evaporators shall be
certified (and labeled) as meet-
ing SAE Standard J2842.
NOTICE
i
Page 231 of 637

3-136
Convenient features of your vehicle
Information
Never place anything near the sensor
to ensure better control of the heating
and cooling system.
Manual heating and air condi-
tioning
The heating and cooling system can be
controlled manually by pushing buttons
other than the AUTO button. In this
case, the system works sequentially
according to the order of buttons select-
ed. When pressing any button except
the AUTO button while using automatic
operation, the functions not selected
will be controlled automatically.
1.Start the engine.
2.Set the mode to the desired position.
For improving the effectiveness of
heating and cooling;
- Heating:
- Cooling:
3.Set the temperature control to the
desired position.4.Set the air intake control to the out-
side (fresh) air position.
5.Set the fan speed control to the
desired speed.
6.If air conditioning is desired, turn
the air conditioning system on.
Press the AUTO button in order to
convert to full automatic control of
the system.
i
OAD045313
Page 239 of 637
3-144
Convenient features of your vehicle
Operation Tips
• To keep dust or unpleasant fumes
from entering the vehicle through
the ventilation system, temporarily
set the air intake control to the
recirculated air position. Be sure to
return the control to the fresh air
position when the irritation has
passed to keep fresh air in the
vehicle. This will help keep the driv-
er alert and comfortable.
• Air for the heating/cooling system
is drawn in through the grilles just
ahead of the windshield. Care
should be taken that these are not
blocked by leaves, snow, ice or
other obstructions.
• To prevent interior fog on the wind-
shield, set the air intake control to
the fresh air position and fan speed
to the desired position, turn on the
air conditioning system, and adjust
the temperature control to desired
temperature.
Air conditioning
HYUNDAI Air Conditioning Systems
are filled with R-134a or R1234yf
refrigerant.
1. Start the engine. Push the air con-
ditioning button.
2. Set the mode to the position.
3. Set the air intake control to the out-
side air or recirculated air position.
4. Adjust the fan speed control and
temperature control to maintain
maximum comfort.
Information
Your vehicle is filled with R-134a or
R-1234yf according to the regulation
in your country at the time of produc-
tion. You can find out which air condi-
tioning refrigerant is applied to your
vehicle on the label located inside of
the hood. • The refrigerant system should
only be serviced by trained and
certified technicians to insure
proper and safe operation.
• The refrigerant system should
be serviced in a well-ventilated
place.
• The air conditioning evaporator
(cooling coil) shall never be
repaired or replaced with one
removed from a used or sal-
vaged vehicle and new replace-
ment MAC evaporators shall be
certified (and labeled) as meet-
ing SAE Standard J2842.
NOTICE
i
Page 396 of 637
5-10
Driving your vehicle
Starting and stopping the engine
for turbocharger intercooler
1. Do not race or accelerate the
engine immediately after starting
the engine.
If the engine is cold, idle for sever-
al seconds before sufficient lubri-
cation is ensured in the turbo
charger unit.
2. After high speed or extended driv-
ing that requires heavy engine load,
idle the engine about 1 minute
before turning the engine off.
This idle time will allow the tur-
bocharger to cool prior to shutting
the engine off.Do not turn off the engine immedi-
ately after it has been subjected to
a heavy load. Doing so may cause
severe damage to the engine or
turbo charger unit.To prevent damage to the vehicle:
• Do not hold the ignition key in
the START position for more
than 10 seconds. Wait 5 to 10
seconds before trying again.
• Do not turn the ignition switch to
the START position with the
engine running. It may damage
the starter.
• If traffic and road conditions
permit, you may put the shift
lever in the N (Neutral) position
while the vehicle is still moving
and turn the ignition switch to
the START position in an attempt
to restart the engine.
• Do not push or tow your vehicle
to start the engine.
NOTICENOTICE
Page 404 of 637
5-18
Driving your vehicle
Starting and stopping the engine
for turbocharger intercooler
1. Do not race or accelerate the
engine immediately after starting
the engine.
If the engine is cold, idle for sever-
al seconds before sufficient lubri-
cation is ensured in the turbo
charger unit.
2. After high speed or extended driv-
ing that requires heavy engine
load, idle the engine about 1
minute before turning the engine
off. This idle time will allow the tur-
bocharger to cool prior to shutting
the engine off.
Do not turn off the engine immedi-
ately after it has been subjected to
a heavy load. Doing so may cause
severe damage to the engine or
turbo charger unit.To prevent damage to the vehicle:
• If the engine stalls while you are
in motion, do not attempt to
move the shift lever to the P
(Park) position.
If traffic and road conditions
permit, you may put the shift
lever in the N (Neutral) position
while the vehicle is still moving
and press the Engine Start/Stop
button in an attempt to restart
the engine.
• Do not push or tow your vehicle
to start the engine.To prevent damage to the vehicle:
Do not press the Engine Start/
Stop button for more than 10 sec-
onds except when the stop lamp
fuse is blown.
When the stop lamp fuse is blown,
you can't start the engine normal-
ly. Replace the fuse with a new
one. If you are not able to replace
the fuse, you can start the engine
by pressing and holding the
Engine Start/Stop button for 10
seconds with the Engine Start/
Stop button in the ACC position.
For your safety always depress the
brake and/or clutch pedal before
starting the engine.
NOTICENOTICE
NOTICE
Page 414 of 637
5-28
Driving your vehicle
Shift-lock system
For your safety, the automatic trans-
mission has a shift-lock system
which prevents shifting the transmis-
sion from P (Park) into R (Reverse)
unless the brake pedal is depressed.
To shift the transmission from P
(Park) into R (Reverse):
1. Depress and hold the brake pedal.
2. Start the engine or place the igni-
tion switch in the ON position.
3. Move the shift lever.
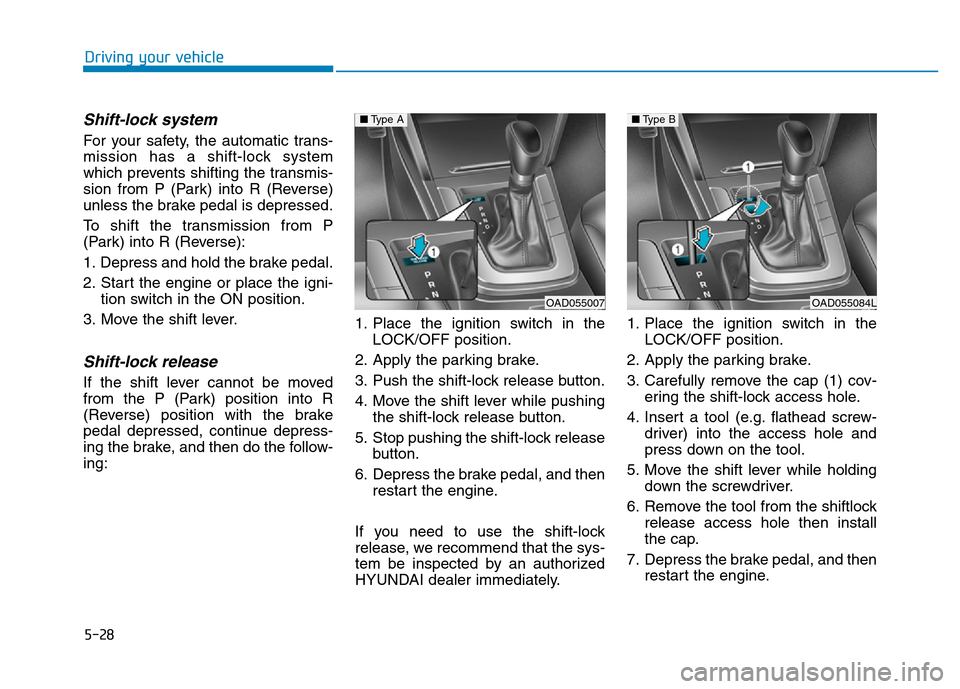
Shift-lock release
If the shift lever cannot be moved
from the P (Park) position into R
(Reverse) position with the brake
pedal depressed, continue depress-
ing the brake, and then do the follow-
ing:1. Place the ignition switch in the
LOCK/OFF position.
2. Apply the parking brake.
3. Push the shift-lock release button.
4. Move the shift lever while pushing
the shift-lock release button.
5. Stop pushing the shift-lock release
button.
6. Depress the brake pedal, and then
restart the engine.
If you need to use the shift-lock
release, we recommend that the sys-
tem be inspected by an authorized
HYUNDAI dealer immediately.1. Place the ignition switch in the
LOCK/OFF position.
2. Apply the parking brake.
3. Carefully remove the cap (1) cov-
ering the shift-lock access hole.
4. Insert a tool (e.g. flathead screw-
driver) into the access hole and
press down on the tool.
5. Move the shift lever while holding
down the screwdriver.
6. Remove the tool from the shiftlock
release access hole then install
the cap.
7. Depress the brake pedal, and then
restart the engine.
OAD055007
■Type A
OAD055084L
■Type B
Page 422 of 637
5-36
R (Reverse)
Use this position to drive the vehicle
backward.
Always come to a complete stop
before shifting into or out of R
(Reverse); you may damage the
transmission if you shift into R
(Reverse) while the vehicle is in
motion.
N (Neutral)
The wheels and transmission are not
engaged.
Use N (Neutral) if you need to restart
a stalled engine, or if it is necessary
to stop with the engine ON. Shift into
P (Park) if you need to leave your
vehicle for any reason.
Always depress the brake pedal
when you are shifting from N
(Neutral) to another gear.
D (Drive)
This is the normal driving position.
The transmission will automatically
shift through a 7-gear sequence, pro-
viding the best fuel economy and
power.
For extra power when passing anoth-
er vehicle or driving uphill, depress
the accelerator fully. The transmis-
sion will automatically downshift to
the next lower gear (or gears, as
appropriate).
The DRIVE MODE switch, located on
the shift lever console, allows the driv-
er to switch from NORMAL mode to
ECO or SPORT mode. (if equipped)
For more information, refer to
"Drive Mode Integrated Control
System" later in this chapter.
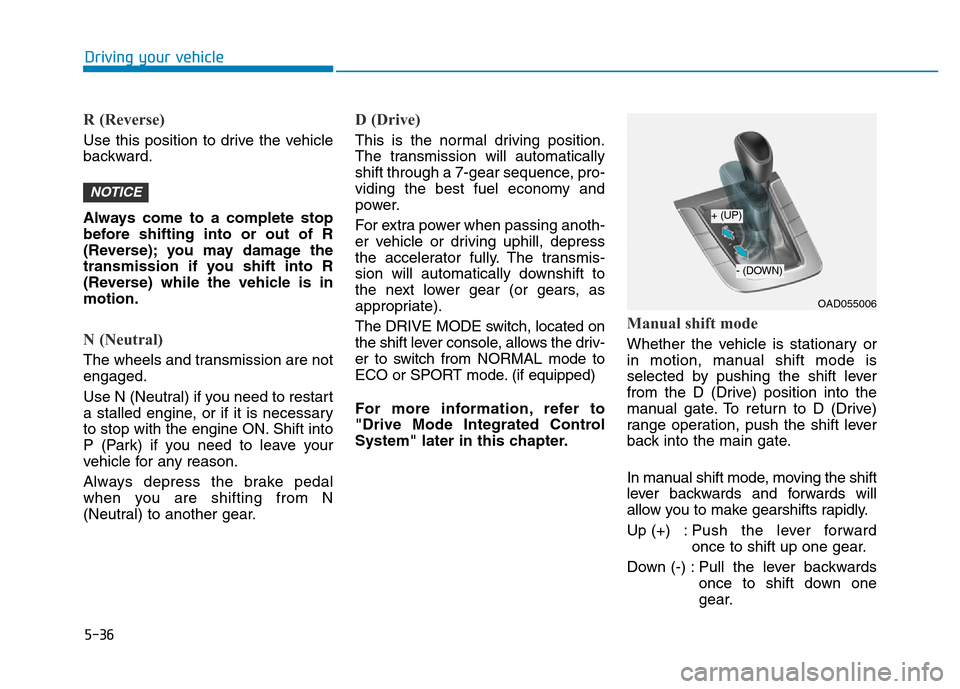
Manual shift mode
Whether the vehicle is stationary or
in motion, manual shift mode is
selected by pushing the shift lever
from the D (Drive) position into the
manual gate. To return to D (Drive)
range operation, push the shift lever
back into the main gate.
In manual shift mode, moving the shift
lever backwards and forwards will
allow you to make gearshifts rapidly.
Up (+) : Push the lever forward
once to shift up one gear.
Down (-) : Pull the lever backwards
once to shift down one
gear.
NOTICE
Driving your vehicle
OAD055006
+ (UP)
- (DOWN)