start stop button Hyundai Elantra 2017 Owner's Manual
[x] Cancel search | Manufacturer: HYUNDAI, Model Year: 2017, Model line: Elantra, Model: Hyundai Elantra 2017Pages: 637, PDF Size: 15.02 MB
Page 16 of 637
F16F16
Audio (With Touch Screen) ................................4-54
Feature of Your Audio ...................................................4-55
Radio Mode
(Type B-1, Type B-2,Type B-3, Type B-4) ..............4-72
Radio Mode (Type B-5, Type B-6) .............................4-74
Media Mode......................................................................4-75
Phone Mode .....................................................................4-90
Bluetooth® ®Wireless Technology
(Type B-1, Type B-2,Type B-3, Type B-4) ..............4-90
Bluetooth® ®Wireless Technology
(Type B-5, Type B-6) .....................................................4-97
Setup Mode
(Type B-1, Type B-2,Type B-3, Type B-4) ............4-103
Setup Mode (Type B-5, Type B-6) ..........................4-110
Declaration of Conformity ..............................4-117
FCC ..................................................................................4-117
CE for EU ........................................................................4-119
NCC for Taiwan ..............................................................4-121
ACMA for Australia ......................................................4-122
ANATEL for Brazil .........................................................4-124
SMA for Jamaica ...........................................................4-127
IFETEL for Mexico ........................................................4-128
MOC for Israel ...............................................................4-129
Before driving.........................................................5-4
Before entering the vehicle ...........................................5-4
Before starting...................................................................5-4
Ignition switch ........................................................5-5
Key ignition switch ............................................................5-6
Engine Start/Stop button ..............................................5-11
Manual transmission............................................5-20
Manual transmission operation ...................................5-20
Good driving practices ...................................................5-22
Automatic transmission .......................................5-24
Automatic transmission operation ..............................5-24
Parking ...............................................................................5-29
Good driving practices ...................................................5-29
Dual clutch transmission .....................................5-31
Dual clutch transmission operation ............................5-31
Parking ...............................................................................5-39
Good driving practices ...................................................5-39
5Driving your vehicle
Page 27 of 637
1-6
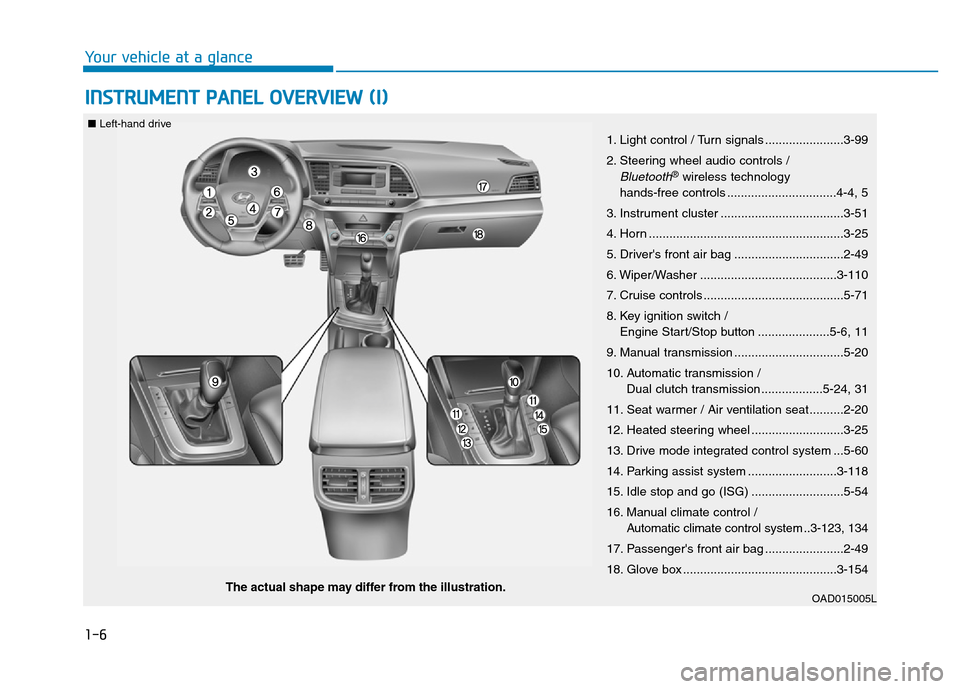
INSTRUMENT PANEL OVERVIEW (I)
Your vehicle at a glance
OAD015005LThe actual shape may differ from the illustration.
■Left-hand drive
1. Light control / Turn signals .......................3-99
2. Steering wheel audio controls /
Bluetooth®wireless technology
hands-free controls ................................4-4, 5
3. Instrument cluster ....................................3-51
4. Horn .........................................................3-25
5. Driver's front air bag ................................2-49
6. Wiper/Washer ........................................3-110
7. Cruise controls .........................................5-71
8. Key ignition switch /
Engine Start/Stop button .....................5-6, 11
9. Manual transmission ................................5-20
10. Automatic transmission /
Dual clutch transmission ..................5-24, 31
11. Seat warmer / Air ventilation seat ..........2-20
12. Heated steering wheel ...........................3-25
13. Drive mode integrated control system ...5-60
14. Parking assist system ..........................3-118
15. Idle stop and go (ISG) ...........................5-54
16. Manual climate control /
Automatic climate control system ..3-123, 134
17. Passenger's front air bag .......................2-49
18. Glove box .............................................3-154
Page 28 of 637
1-7
Your vehicle at a glance
1
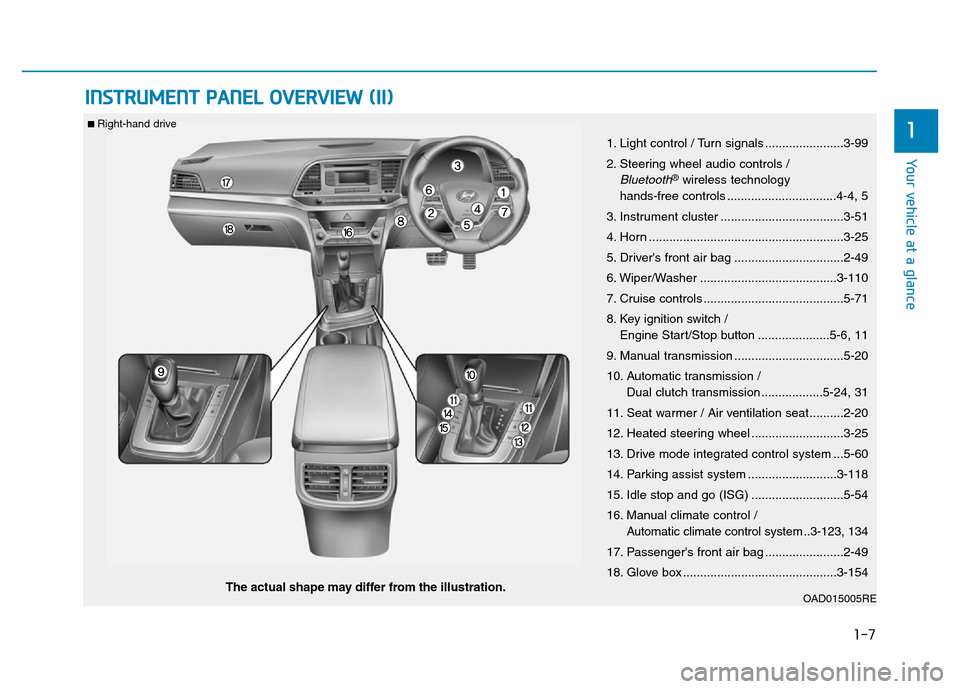
INSTRUMENT PANEL OVERVIEW (II)
OAD015005REThe actual shape may differ from the illustration.
■ Right-hand drive
1. Light control / Turn signals .......................3-99
2. Steering wheel audio controls /
Bluetooth®wireless technology
hands-free controls ................................4-4, 5
3. Instrument cluster ....................................3-51
4. Horn .........................................................3-25
5. Driver's front air bag ................................2-49
6. Wiper/Washer ........................................3-110
7. Cruise controls .........................................5-71
8. Key ignition switch /
Engine Start/Stop button .....................5-6, 11
9. Manual transmission ................................5-20
10. Automatic transmission /
Dual clutch transmission ..................5-24, 31
11. Seat warmer / Air ventilation seat ..........2-20
12. Heated steering wheel ...........................3-25
13. Drive mode integrated control system ...5-60
14. Parking assist system ..........................3-118
15. Idle stop and go (ISG) ...........................5-54
16. Manual climate control /
Automatic climate control system ..3-123, 134
17. Passenger's front air bag .......................2-49
18. Glove box .............................................3-154
Page 104 of 637
3-9
Convenient features of your vehicle
Even though you press the outside
door handle button, the doors will not
lock and the chime will sound for
three seconds if any of the following
occur:
• The Smart Key is in the vehicle.
• The Engine Start/Stop button is in
ACC or ON position.
• Any door except the trunk is open.Unlocking
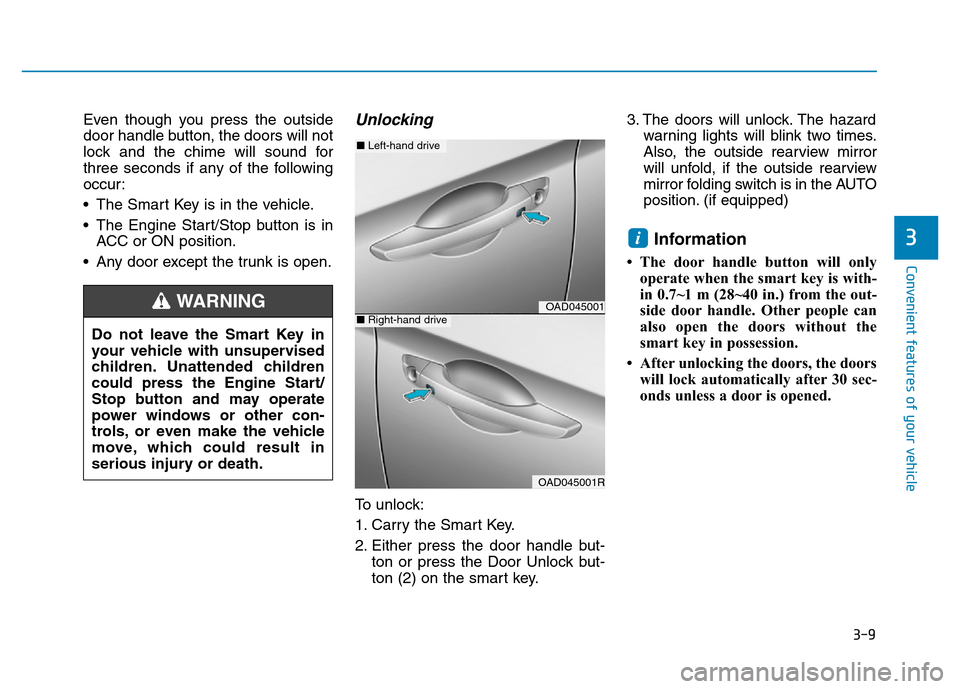
To unlock:
1. Carry the Smart Key.
2. Either press the door handle but-
ton or press the Door Unlock but-
ton (2) on the smart key.3. The doors will unlock. The hazard
warning lights will blink two times.
Also, the outside rearview mirror
will unfold, if the outside rearview
mirror folding switch is in the AUTO
position. (if equipped)
Information
• The door handle button will only
operate when the smart key is with-
in 0.7~1 m (28~40 in.) from the out-
side door handle. Other people can
also open the doors without the
smart key in possession.
• After unlocking the doors, the doors
will lock automatically after 30 sec-
onds unless a door is opened.
i3
Do not leave the Smart Key in
your vehicle with unsupervised
children. Unattended children
could press the Engine Start/
Stop button and may operate
power windows or other con-
trols, or even make the vehicle
move, which could result in
serious injury or death.
WARNINGOAD045001
OAD045001R
■Left-hand drive
■Right-hand drive
Page 105 of 637
3-10
Convenient features of your vehicle
Trunk unlocking
To unlock:
1. Carry the smart key.
2. Either press the trunk handle but-
ton or press the Trunk Unlock but-
ton (3) on the smart key for more
than one second.
3. The hazard warning lights will
blink two times.
Once the trunk is opened and then
closed, the trunk will lock automati-
cally.
Information
After unlocking the trunk, the trunk
will lock automatically after 30 sec-
onds unless the trunk is opened.
Start-up
You can start the engine without
inserting the key.For detailed infor-
mation refer to the Engine
Start/Stop button in chapter 5.
To prevent damaging the smart
key:
• Keep the smart key away from
water or any liquid and fire. If the
inside of the smart key gets
damp (due to drinks or moisture),
or is heated, internal circuit may
malfunction, excluding the car
from the warranty.
• Avoid dropping or throwing the
smart key.
• Protect the smart key from
extreme temperatures.
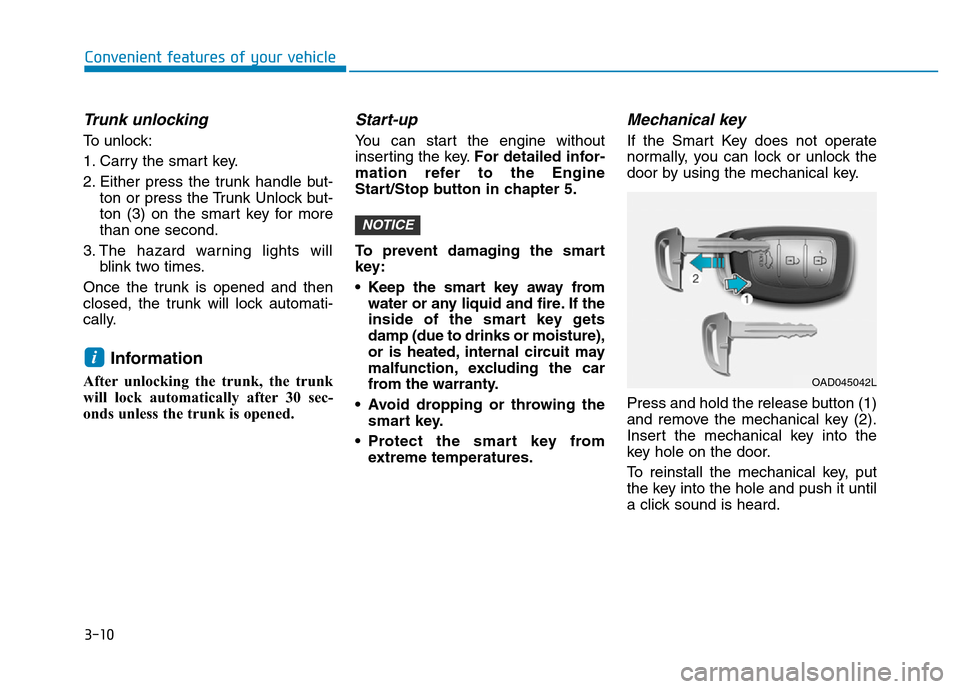
Mechanical key
If the Smart Key does not operate
normally, you can lock or unlock the
door by using the mechanical key.
Press and hold the release button (1)
and remove the mechanical key (2).
Insert the mechanical key into the
key hole on the door.
To reinstall the mechanical key, put
the key into the hole and push it until
a click sound is heard.
NOTICE
i
OAD045042L
Page 116 of 637
3-21
Convenient features of your vehicle
3
The Driver Position Memory System
is provided to store and recall the fol-
lowing memory settings with a sim-
ple button operation.
- Driver's seat position
- Outside rearview mirror position
- Instrument panel illumination intensityInformation
• If the battery is disconnected, the
memory settings will be erased.
• If the Driver Position Memory
System does not operate normally,
we recommend that you have the
system checked by an authorized
HYUNDAI dealer.
Storing memory positions
1. Move the shift lever into P (for
automatic transmission/dual clutch
transmission) or Neutral (for manu-
al transmission) while the ignition
switch or the Engine Start/Stop
button is in the ON position.
2. Adjust the driver's seat position,
outside rearview mirror position
and instrument panel illumination
intensity to the desired position.
3. Press the SET button. The system
will beep once and notify you
"Press button to save settings"on
the LCD display.
4. Press one of the memory buttons
(1 or 2) within 5 seconds. The sys-
tem will beep twice when the mem-
ory has been successfully stored.
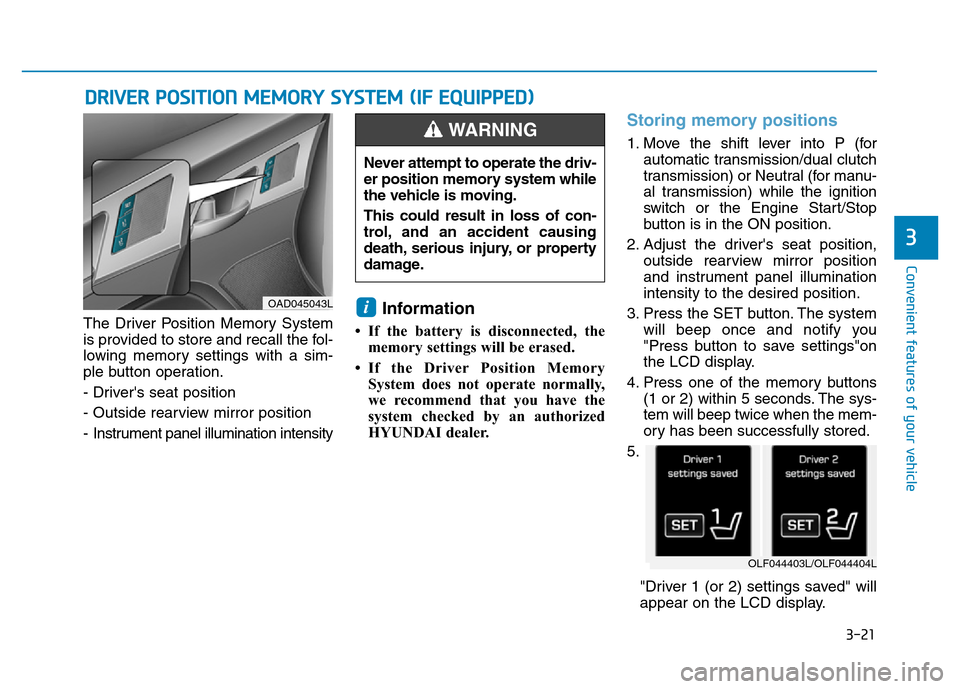
5.
"Driver 1 (or 2) settings saved" will
appear on the LCD display.
i
DRIVER POSITION MEMORY SYSTEM (IF EQUIPPED)
OAD045043L
Never attempt to operate the driv-
er position memory system while
the vehicle is moving.
This could result in loss of con-
trol, and an accident causing
death, serious injury, or property
damage.
WARNING
OLF044403L/OLF044404L
Page 117 of 637
3-22
Convenient features of your vehicle
Recalling memory position
1. Move the shift lever into P (for auto-
matic transmission/dual clutch
transmission) or Neutral (for manu-
al transmission) while the ignition
switch or the Engine Start/Stop but-
ton is in the ON position.
2. Press the desired memory button
(1 or 2). The system will beep
once, then the driver’s seat posi-
tion, outside rearview mirror and
instrument panel illumination will
automatically adjust to the stored
position (if equipped).
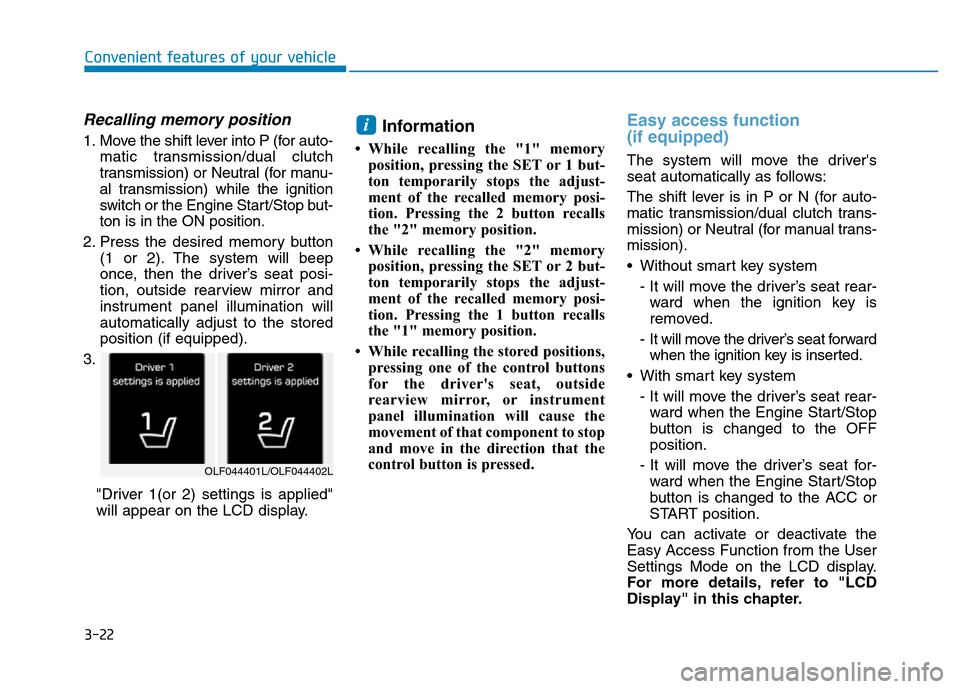
3.
"Driver 1(or 2) settings is applied"
will appear on the LCD display.Information
• While recalling the "1" memory
position, pressing the SET or 1 but-
ton temporarily stops the adjust-
ment of the recalled memory posi-
tion. Pressing the 2 button recalls
the "2" memory position.
• While recalling the "2" memory
position, pressing the SET or 2 but-
ton temporarily stops the adjust-
ment of the recalled memory posi-
tion. Pressing the 1 button recalls
the "1" memory position.
• While recalling the stored positions,
pressing one of the control buttons
for the driver's seat, outside
rearview mirror, or instrument
panel illumination will cause the
movement of that component to stop
and move in the direction that the
control button is pressed.
Easy access function
(if equipped)
The system will move the driver's
seat automatically as follows:
The shift lever is in P or N (for auto-
matic transmission/dual clutch trans-
mission) or Neutral (for manual trans-
mission).
• Without smart key system
- It will move the driver’s seat rear-
ward when the ignition key is
removed.
- It will move the driver’s seat forward
when the ignition key is inserted.
• With smart key system
- It will move the driver’s seat rear-
ward when the Engine Start/Stop
button is changed to the OFF
position.
- It will move the driver’s seat for-
ward when the Engine Start/Stop
button is changed to the ACC or
START position.
You can activate or deactivate the
Easy Access Function from the User
Settings Mode on the LCD display.
For more details, refer to "LCD
Display" in this chapter.
i
OLF044401L/OLF044402L
Page 118 of 637

3-23
Convenient features of your vehicle
3
STEERING WHEEL
Electric power steering (EPS)
The system assists you with steering
the vehicle. If the engine is off or if
the power steering system becomes
inoperative, the vehicle may still be
steered, but it will require increased
steering effort.
Also, the steering effort becomes
heavier as the vehicle’s speed
increases and becomes lighter as
the vehicle’s speed decreases for
better control of the steering wheel.
Should you notice any change in the
effort required to steer during normal
vehicle operation, we recommend
that the system be checked by an
authorized HYUNDAI dealer.If the Electric Power Steering
System does not operate normal-
ly, the warning light ( ) will illu-
minate on the instrument cluster.
The steering wheel may become
difficult to control or operate. Take
your vehicle to an authorized
HYUNDAI dealer and have the sys-
tem checked as soon as possible.
Information
The following symptoms may occur
during normal vehicle operation:
• The steering effort may be high
immediately after placing the igni-
tion switch or the Engine Start/Stop
button in the ON position.
This happens as the system per-
forms the EPS system diagnostics.
When the diagnostics is completed,
the steering wheel will return to its
normal condition.
(Continued)(Continued)
• A click noise may be heard from the
EPS relay after the ignition switch is
placed to the ON or LOCK/OFF
position (Without Smart key system).
A click noise may be heard from the
EPS relay after the Engine Start/Stop
button is in the ON or OFF position.
(With Smart key system)
• Motor noise may be heard when the
vehicle is at a stop or at a low driv-
ing speed.
• When you operate the steering
wheel in low temperature, abnormal
noise may occur. If temperature
rises, the noise will disappear. This
is a normal condition.
• When the vehicle is stationary, if
you turn the steering wheel all the
way to the left or right continuously,
the steering wheel effort increases.
This is not a system malfunction. As
time passes, the steering wheel
effort will return to its normal con-
dition.
i
NOTICE
Page 122 of 637
3-27
Convenient features of your vehicle
3
Electric Chromic Mirror (ECM)
(if equipped)
The electric rearview mirror automati-
cally controls the glare from the head-
lamp of the car behind you in night-
time or low light driving conditions.
When the engine is running, the
glare is automatically controlled by
the sensor mounted in the rearview
mirror. The sensor detects the light
level around the vehicle, and auto-
matically adjusts to control the head-
lamp glare from vehicles behind you.
Whenever the shift lever is placed in
R (Reverse), the mirror will automat-
ically go to the brightest setting in
order to improve the drivers view
behind the vehicle.
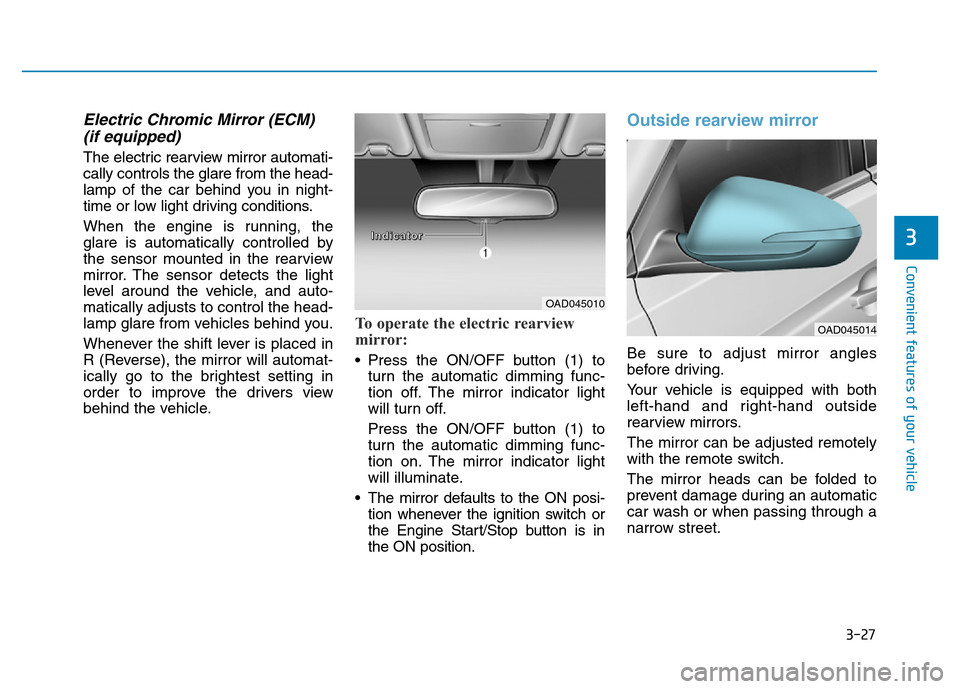
To operate the electric rearview
mirror:
• Press the ON/OFF button (1) to
turn the automatic dimming func-
tion off. The mirror indicator light
will turn off.
Press the ON/OFF button (1) to
turn the automatic dimming func-
tion on. The mirror indicator light
will illuminate.
• The mirror defaults to the ON posi-
tion whenever the ignition switch or
the Engine Start/Stop button is in
the ON position.
Outside rearview mirror
Be sure to adjust mirror angles
before driving.
Your vehicle is equipped with both
left-hand and right-hand outside
rearview mirrors.
The mirror can be adjusted remotely
with the remote switch.
The mirror heads can be folded to
prevent damage during an automatic
car wash or when passing through a
narrow street.
OAD045010
OAD045014
I I
n n
d d
i i
c c
a a
t t
o o
r r
Page 152 of 637
3-57
Convenient features of your vehicle
3
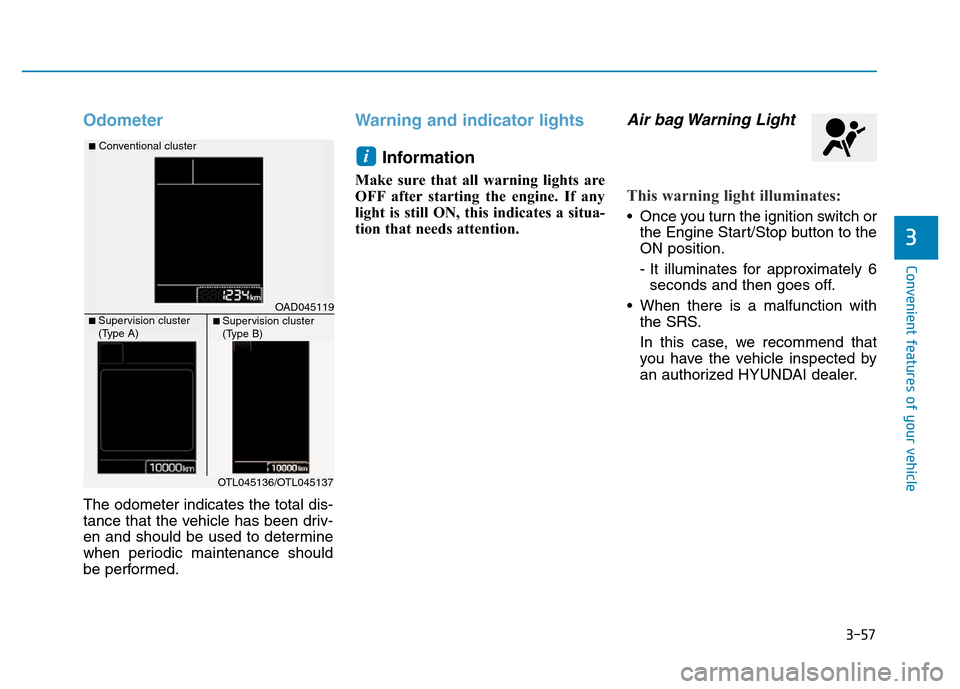
Odometer
The odometer indicates the total dis-
tance that the vehicle has been driv-
en and should be used to determine
when periodic maintenance should
be performed.
Warning and indicator lights
Information
Make sure that all warning lights are
OFF after starting the engine. If any
light is still ON, this indicates a situa-
tion that needs attention.
Air bag Warning Light
This warning light illuminates:
• Once you turn the ignition switch or
the Engine Start/Stop button to the
ON position.
- It illuminates for approximately 6
seconds and then goes off.
• When there is a malfunction with
the SRS.
In this case, we recommend that
you have the vehicle inspected by
an authorized HYUNDAI dealer.
i
OAD045119
■Conventional cluster
■ Supervision cluster
(Type A)■ Supervision cluster
(Type B)
OTL045136/OTL045137