headlamp Hyundai Elantra 2018 User Guide
[x] Cancel search | Manufacturer: HYUNDAI, Model Year: 2018, Model line: Elantra, Model: Hyundai Elantra 2018Pages: 526, PDF Size: 17.2 MB
Page 184 of 526
3-107
Convenient features of your vehicle
3
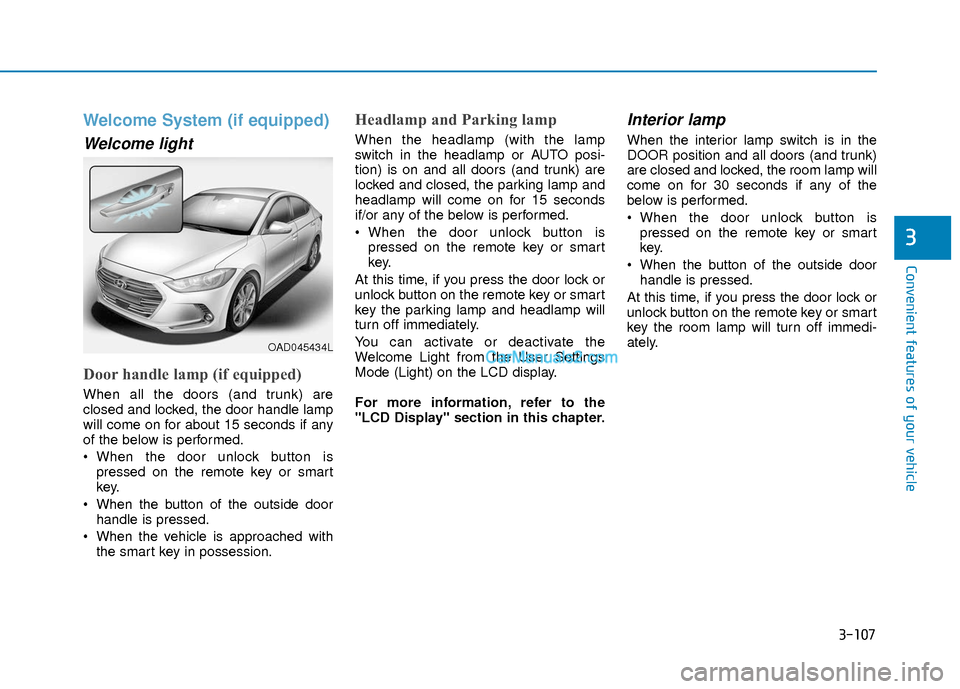
Welcome System (if equipped)
Welcome light
Door handle lamp (if equipped)
When all the doors (and trunk) are
closed and locked, the door handle lamp
will come on for about 15 seconds if any
of the below is performed.
When the door unlock button ispressed on the remote key or smart
key.
When the button of the outside door handle is pressed.
When the vehicle is approached with the smart key in possession.
Headlamp and Parking lamp
When the headlamp (with the lamp
switch in the headlamp or AUTO posi-
tion) is on and all doors (and trunk) are
locked and closed, the parking lamp and
headlamp will come on for 15 seconds
if/or any of the below is performed.
When the door unlock button ispressed on the remote key or smart
key.
At this time, if you press the door lock or
unlock button on the remote key or smart
key the parking lamp and headlamp will
turn off immediately.
You can activate or deactivate the
Welcome Light from the User Settings
Mode (Light) on the LCD display.
For more information, refer to the
"LCD Display" section in this chapter.
Interior lamp
When the interior lamp switch is in the
DOOR position and all doors (and trunk)
are closed and locked, the room lamp will
come on for 30 seconds if any of the
below is performed.
When the door unlock button is pressed on the remote key or smart
key.
When the button of the outside door handle is pressed.
At this time, if you press the door lock or
unlock button on the remote key or smart
key the room lamp will turn off immedi-
ately.
OAD045434L
Page 349 of 526
5-66
Driving your vehicle
The LKAS system will not be in the
ENABLED state and the steering
wheel will not be assisted when:
Vehicle speed is below 40 mph (60 km/h) and over 110 mph (180
km/h).
Only one lane line is detected.
The turn signal is turned on before changing a lane. If you change lanes
without the turn signal on, the steering
wheel might be controlled.
The hazard warning flasher is on.
The width of the lane is below 10 feet (3.1 m) and over 15 feet (4.5
m).
ESC (Electronic Stability Control) is activated.
The vehicle is driven on a sharp curve.
The vehicle brakes suddenly.
The vehicle makes sharp lane changes.
Information
When the system is turned on or right
after changing a lane, drive in the middle
of the lane. If not, the system will not pro-
vide steering assist function.
Limitations of the System
The LKAS may operate prematurely
even if the vehicle does not depart from
the intended lane, OR, the LKAS may not
warn you if the vehicle leaves the intend-
ed lane under the following circum-
stances:
The lanes ahead are not visible due torain, snow, water on the road, dam-
aged or stained road surface, or other
factors.
The brightness outside changes sud- denly such as when entering or exiting
a tunnel.
The brightness outside is too low such as when the headlamps are not on at
night or the vehicle is going through a
tunnel.
It is difficult to distinguish the lane marking from the road surface or the
lane marking is faded or not clearly
marked.
Driving on a steep grade, over a hill, or when driving on a curved road.
When light coming from a street light or an oncoming vehicle is reflected on a
wet road surface such as a puddle in
the road.
The windshield or the LKAS camera lens is blocked with dirt or debris. The field of view in front is obstructed
by sun glare.
The lanes are incomplete or the area is in a construction zone.
There are more than two lane lines on the road in front of you.
The lane markings are not clearly visi- ble from the road.
The lane width is too wide or too nar- row. See previous page.
The windshield glass is fogged up; a clear view of the road is obstructed.
There are markings on the road sur- face that look like a lane line that is
inadvertently being detected by the
camera.
There is a boundary structure in the roadway such as a concrete barrier,
guardrail and reflector post that is
inadvertently being detected by the
camera.
There is not enough distance between you and the vehicle in front to be able
to detect the lane line or the vehicle
ahead is driving on the lane line.
The adverse road conditions cause excessive vehicle vibrations while driv-
ing.
i
Page 371 of 526
5-88
Driving your vehicle
If you are still stuck after rocking the
vehicle a few times, have the vehicle
pulled out by a tow vehicle to avoid
engine overheating, possible damage
to the transmission, and tire damage.
See "Towing" in chapter 6.
Smooth Cornering
Avoid braking or gear changing in cor-
ners, especially when roads are wet.
Ideally, corners should always be taken
under gentle acceleration.
Driving at Night
Night driving presents more hazards
than driving in the daylight. Here are
some important tips to remember:
Slow down and keep more distancebetween you and other vehicles, as it
may be more difficult to see at night,
especially in areas where there may
not be any street lights.
Adjust your mirrors to reduce the glare from other driver's headlamps.
Keep your headlamps clean and prop- erly aimed. Dirty or improperly aimed
headlamps will make it much more dif-
ficult to see at night.
Avoid staring directly at the headlamps of oncoming vehicles. You could be
temporarily blinded, and it will take
several seconds for your eyes to read-
just to the darkness.
Driving in the Rain
Rain and wet roads can make driving
dangerous. Here are a few things to con-
sider when driving in the rain or on slick
pavement:
Slow down and allow extra followingdistance. A heavy rainfall makes it
harder to see and increases the dis-
tance needed to stop your vehicle.
Turn OFF your Cruise Control.
Replace your windshield wiper blades when they show signs of streaking or
missing areas on the windshield.
Tires should be properly maintained with at least 2/32nds of an inch of tread
depth. If your tires do not have enough
tread, making a quick stop on wet
pavement can cause a skid and possi-
bly lead to an accident. See "Tire
Tread" in chapter 7.
Turn on your headlamps to make it easier for others to see you.
Driving too fast through large puddles can affect your brakes. If you must go
through puddles, try to drive through
them slowly.
If you believe your brakes may be wet, apply them lightly while driving until
normal braking operation returns.
NOTICE
Page 420 of 526

7
Tires and Wheels .................................................7-33
Tire Care ........................................................................\
....7-33
Recommended Cold Tire Inflation Pressures ...........7-34
Check Tire Inflation Pressure ......................................7-35
Tire Rotation...................................................................\
..7-36
Wheel Alignment and Tire Balance ............................7-37
Tire Replacement ............................................................7-37
Wheel Replacement ........................................................7-38
Tire Traction .....................................................................7-3\
8
Tire Maintenance ............................................................7-39
Tire Sidewall Labeling ....................................................7-39
Tire Terminology and Definitions................................7-43
All Season Tires ...............................................................7-46
Summer Tires ...................................................................7-46
Snow Tires ........................................................................\
7-46
Radial-Ply Tires ...............................................................7-46
Low Aspect Ratio Tires..................................................7-47
Fuses ......................................................................7-\
48
Instrument Panel Fuse Replacement..........................7-49
Engine Compartment Panel Fuse Replacement.......7-50
Fuse/Relay Panel Description ......................................7-53
Light Bulbs ............................................................7-59
Headlamp, Parking Lamp,
Turn Signal Lamp and Side Marker ............................7-59
Side Repeater Lamp Replacement ..............................7-70
Rear Combination Light Bulb Replacement ..............7-70
High Mounted Stop Light Replacement ....................7-74
License Plate Light Bulb Replacement ......................7-74
Interior Light Bulb Replacement .................................7-75
Appearance Care..................................................7-76
Exterior Care ....................................................................7-76\
Interior Care .....................................................................7-8\
0
Emission Control System ....................................7-83
Crankcase Emission Control System ..........................7-83
Evaporative Emission Control System Including
Onboard Refueling Vapor Recovery (ORVR)............7-83
Exhaust Emission Control System ..............................7-84
California Perchlorate Notice.............................7-86
Page 424 of 526
7-6
Maintenance
At least monthly:
Check coolant level in the enginecoolant reservoir.
Check the operation of all exterior lights, including the brake lights, turn
signals and hazard warning flashers.
Check the inflation pressures of all tires including the spare for tires that
are worn, show uneven wear, or are
damaged.
Check for loose wheel lug nuts.
At least twice a year: (i.e., every Spring and Fall)
Check radiator, heater and air condi-
tioning hoses for leaks or damage.
Check windshield washer spray and wiper operation. Clean wiper blades
with clean cloth dampened with wash-
er fluid.
Check headlamp alignment.
Check muffler, exhaust pipes, shields and clamps.
Check the seat belts for wear and func- tion.
At least once a year:
Clean body and door drain holes.
Lubricate door hinges and hoodhinges.
Lubricate door and hood locks and latches.
Lubricate door rubber weather strips.
Lubricate door checker.
Check the air conditioning system.
Inspect and lubricate automatic trans- mission linkage and controls.
Clean the battery and terminals.
Check the brake fluid level. Follow Normal Maintenance Schedule if
the vehicle is usually operated where
none of the following conditions apply. If
any of the following conditions apply, you
must follow the Maintenance Under
Severe Usage Conditions.
Repeated short distance driving.
Driving in dusty conditions or sandy
areas.
Extensive use of brakes.
Driving in areas where salt or other corrosive materials are used.
Driving on rough or muddy roads.
Driving in mountainous areas.
Extended periods of idling or low speed operation.
Driving for a prolonged period in cold temperatures and/or extremely humid
climates.
More than 50% driving in heavy city traffic during hot weather above 90°F
(32°C).
For additional information or assistance
see your authorized HYUNDAI dealer.
S S C
C H
H E
ED
D U
U L
LE
E D
D
M
M A
AI
IN
N T
TE
EN
N A
AN
N C
CE
E
S
S E
E R
R V
V I
IC
C E
E S
S
Page 467 of 526
7-49
7
Maintenance
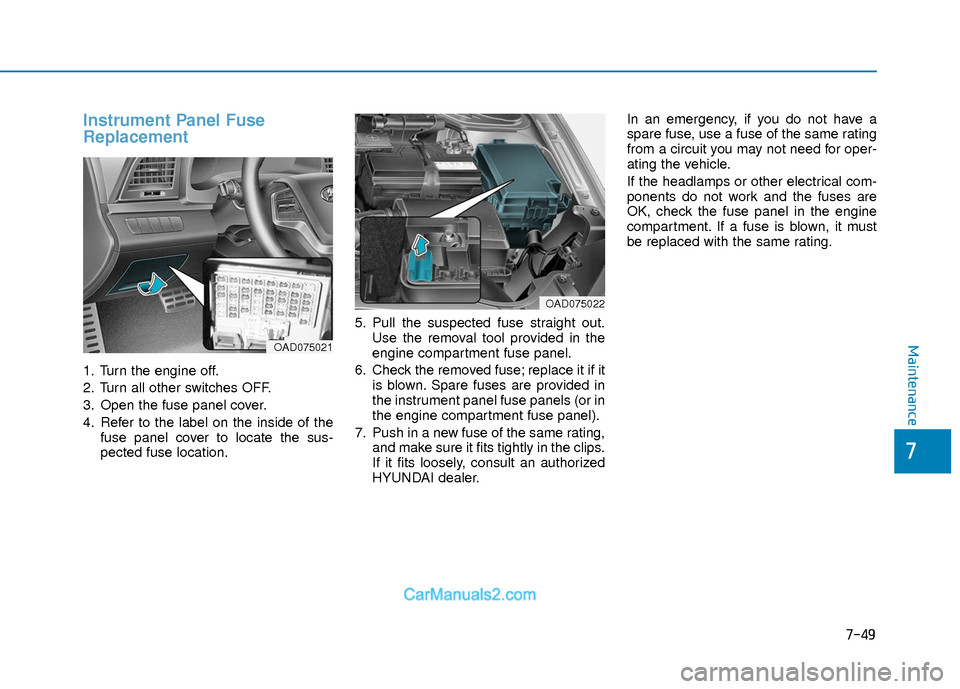
Instrument Panel Fuse
Replacement
1. Turn the engine off.
2. Turn all other switches OFF.
3. Open the fuse panel cover.
4. Refer to the label on the inside of thefuse panel cover to locate the sus-
pected fuse location. 5. Pull the suspected fuse straight out.
Use the removal tool provided in the
engine compartment fuse panel.
6. Check the removed fuse; replace it if it is blown. Spare fuses are provided in
the instrument panel fuse panels (or in
the engine compartment fuse panel).
7. Push in a new fuse of the same rating, and make sure it fits tightly in the clips.
If it fits loosely, consult an authorized
HYUNDAI dealer. In an emergency, if you do not have a
spare fuse, use a fuse of the same rating
from a circuit you may not need for oper-
ating the vehicle.
If the headlamps or other electrical com-
ponents do not work and the fuses are
OK, check the fuse panel in the engine
compartment. If a fuse is blown, it must
be replaced with the same rating.
OAD075022
OAD075021
Page 477 of 526
7-59
7
Maintenance
L
LI
IG
G H
H T
T
B
B U
U L
LB
B S
S
Consult an authorized HYUNDAI dealer
to replace most vehicle light bulbs. It is
difficult to replace vehicle light bulbs
because other parts of the vehicle must
be removed before you can get to the
bulb. This is especially true for removing
the headlamp assembly to get to the
bulb(s).
Removing/installing the headlamp
assembly can result in damage to the
vehicle.
Information
After heavy driving, rain or washing,
headlamp and trunk lenses could appear
frosty. This condition is caused by the tem-
perature difference between the lamp
inside and the outside temperature. This is
similar to the condensation on your win-
dows inside your vehicle during the rain
and doesn ’t indicate a problem with your
vehicle. If the water leaks into the lamp
bulb circuitry, have your vehicle checked
by an authorized HYUNDAI dealer.
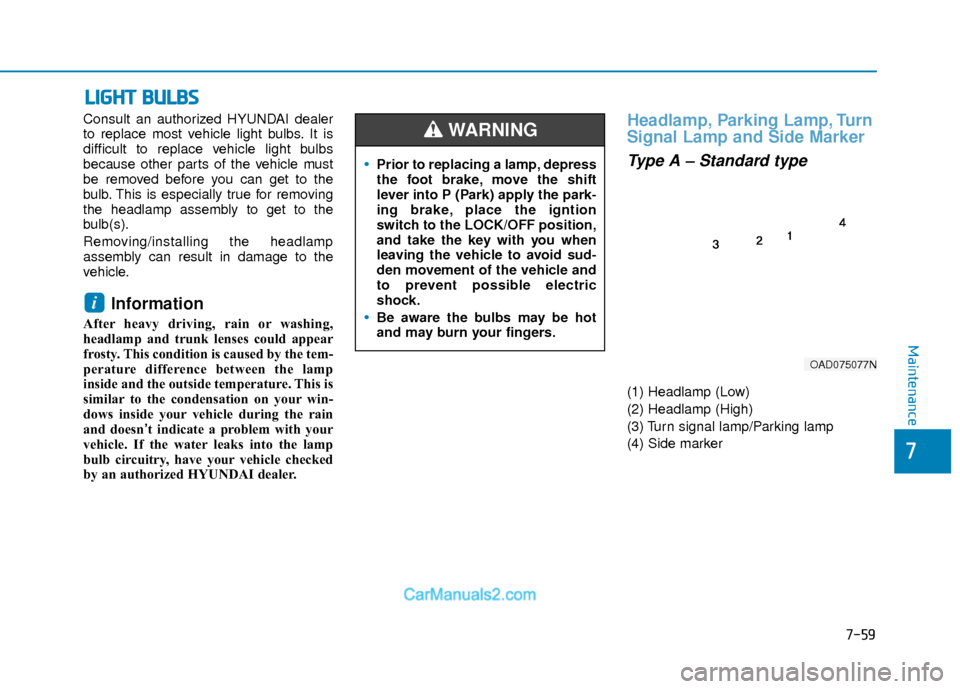
Headlamp, Parking Lamp, Turn
Signal Lamp and Side Marker
Type A – Standard type
(1) Headlamp (Low)
(2) Headlamp (High)
(3) Turn signal lamp/Parking lamp
(4) Side marker
i
Prior to replacing a lamp, depress
the foot brake, move the shift
lever into P (Park) apply the park-
ing brake, place the igntion
switch to the LOCK/OFF position,
and take the key with you when
leaving the vehicle to avoid sud-
den movement of the vehicle and
to prevent possible electric
shock.
Be aware the bulbs may be hot
and may burn your fingers.
WARNING
OAD075077N
Page 478 of 526
7-60
Maintenance
Headlamp (Halogen bulb)
Always handle them carefully, andavoid scratches and abrasions. If the
bulbs are lit, avoid contact with liquids.
Never touch the glass with bare hands. Residual oil may cause the bulb to
overheat and burst when lit.
A bulb should be operated only when installed in a headlamp.
If a bulb becomes damaged or cracked, replace it immediately and
carefully dispose of it.
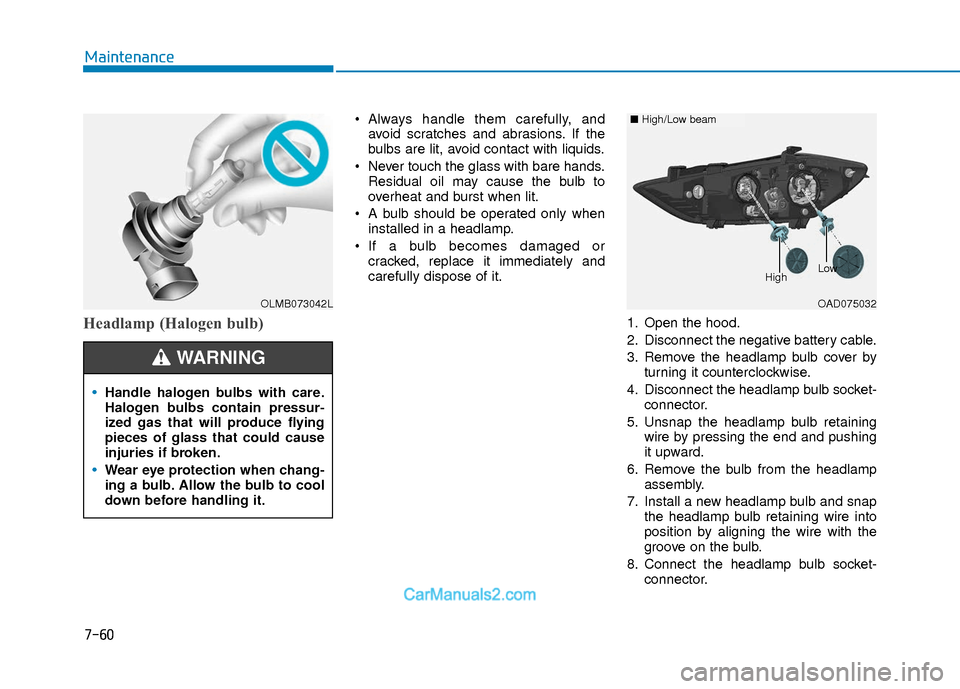
1. Open the hood.
2. Disconnect the negative battery cable.
3. Remove the headlamp bulb cover byturning it counterclockwise.
4. Disconnect the headlamp bulb socket- connector.
5. Unsnap the headlamp bulb retaining wire by pressing the end and pushing
it upward.
6. Remove the bulb from the headlamp assembly.
7. Install a new headlamp bulb and snap the headlamp bulb retaining wire into
position by aligning the wire with the
groove on the bulb.
8. Connect the headlamp bulb socket- connector.
OLMB073042L
Handle halogen bulbs with care.
Halogen bulbs contain pressur-
ized gas that will produce flying
pieces of glass that could cause
injuries if broken.
Wear eye protection when chang-
ing a bulb. Allow the bulb to cool
down before handling it.
WARNING
OAD075032
■High/Low beam
LowHigh
Page 479 of 526
7-61
7
Maintenance
9. Install the headlamp bulb cover byturning it clockwise.
Information
The headlamp aiming should be adjusted
after an accident or after the headlamp
assembly is reinstalled at an authorized
HYUNDAI dealer.
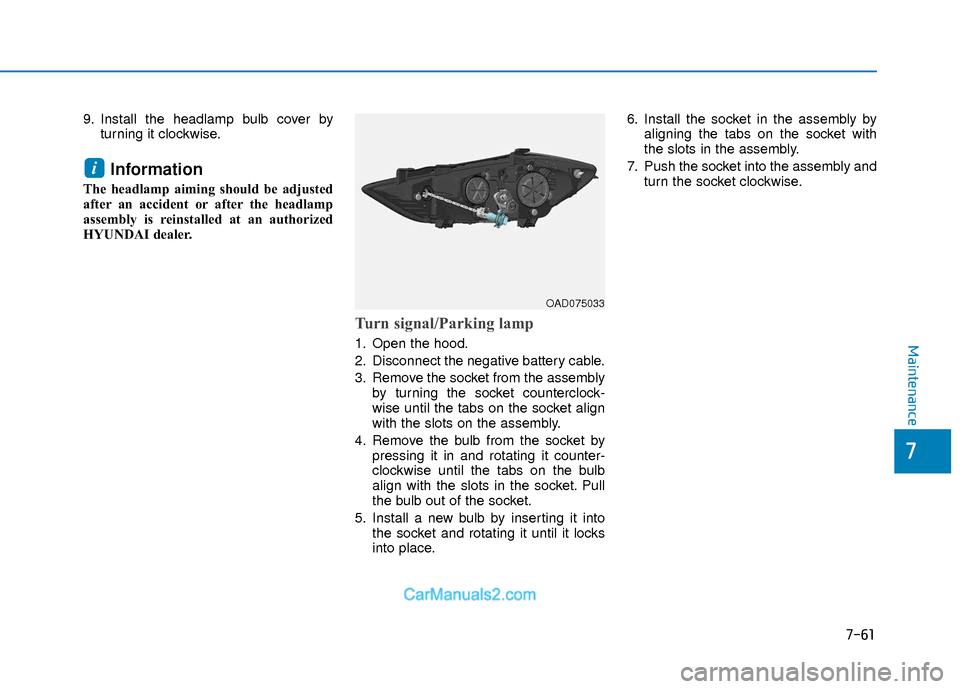
Turn signal/Parking lamp
1. Open the hood.
2. Disconnect the negative battery cable.
3. Remove the socket from the assemblyby turning the socket counterclock-
wise until the tabs on the socket align
with the slots on the assembly.
4. Remove the bulb from the socket by pressing it in and rotating it counter-
clockwise until the tabs on the bulb
align with the slots in the socket. Pull
the bulb out of the socket.
5. Install a new bulb by inserting it into the socket and rotating it until it locks
into place. 6. Install the socket in the assembly by
aligning the tabs on the socket with
the slots in the assembly.
7. Push the socket into the assembly and turn the socket clockwise.
i
OAD075033
Page 480 of 526
7-62
Maintenance
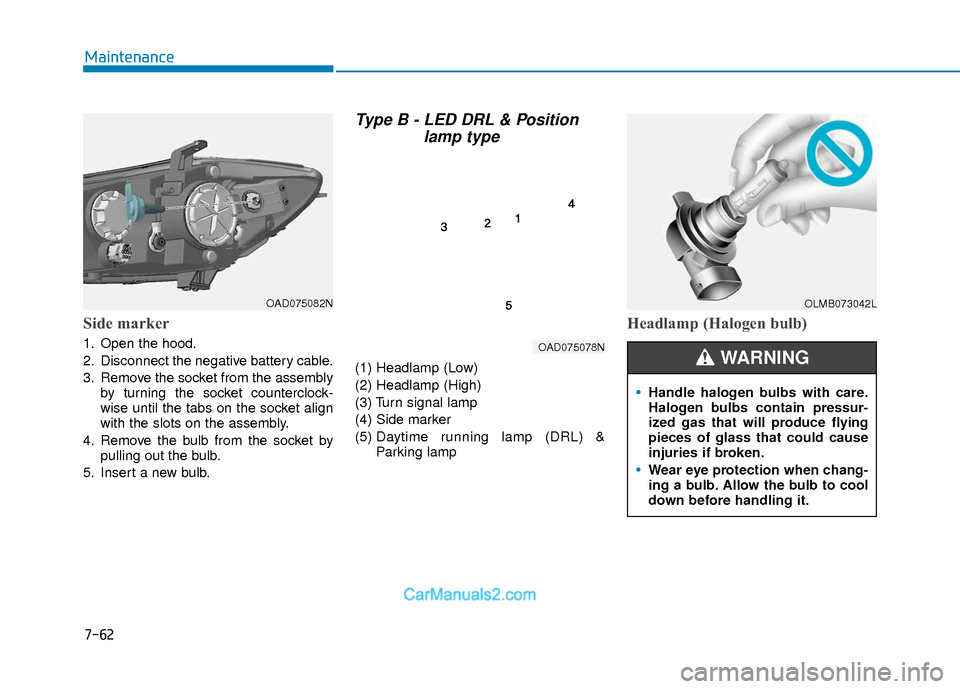
Side marker
1. Open the hood.
2. Disconnect the negative battery cable.
3. Remove the socket from the assemblyby turning the socket counterclock-
wise until the tabs on the socket align
with the slots on the assembly.
4. Remove the bulb from the socket by pulling out the bulb.
5. Insert a new bulb.
Type B - LED DRL & Position lamp type
(1) Headlamp (Low)
(2) Headlamp (High)
(3) Turn signal lamp
(4) Side marker
(5) Daytime running lamp (DRL) &
Parking lamp
Headlamp (Halogen bulb)
OAD075082N
OAD075078N
OLMB073042L
Handle halogen bulbs with care.
Halogen bulbs contain pressur-
ized gas that will produce flying
pieces of glass that could cause
injuries if broken.
Wear eye protection when chang-
ing a bulb. Allow the bulb to cool
down before handling it.
WARNING