tow HYUNDAI ELANTRA 2021 Owners Manual
[x] Cancel search | Manufacturer: HYUNDAI, Model Year: 2021, Model line: ELANTRA, Model: HYUNDAI ELANTRA 2021Pages: 570, PDF Size: 52.21 MB
Page 41 of 570
3-10
Rear Seats
Folding the rear seat (if equipped)
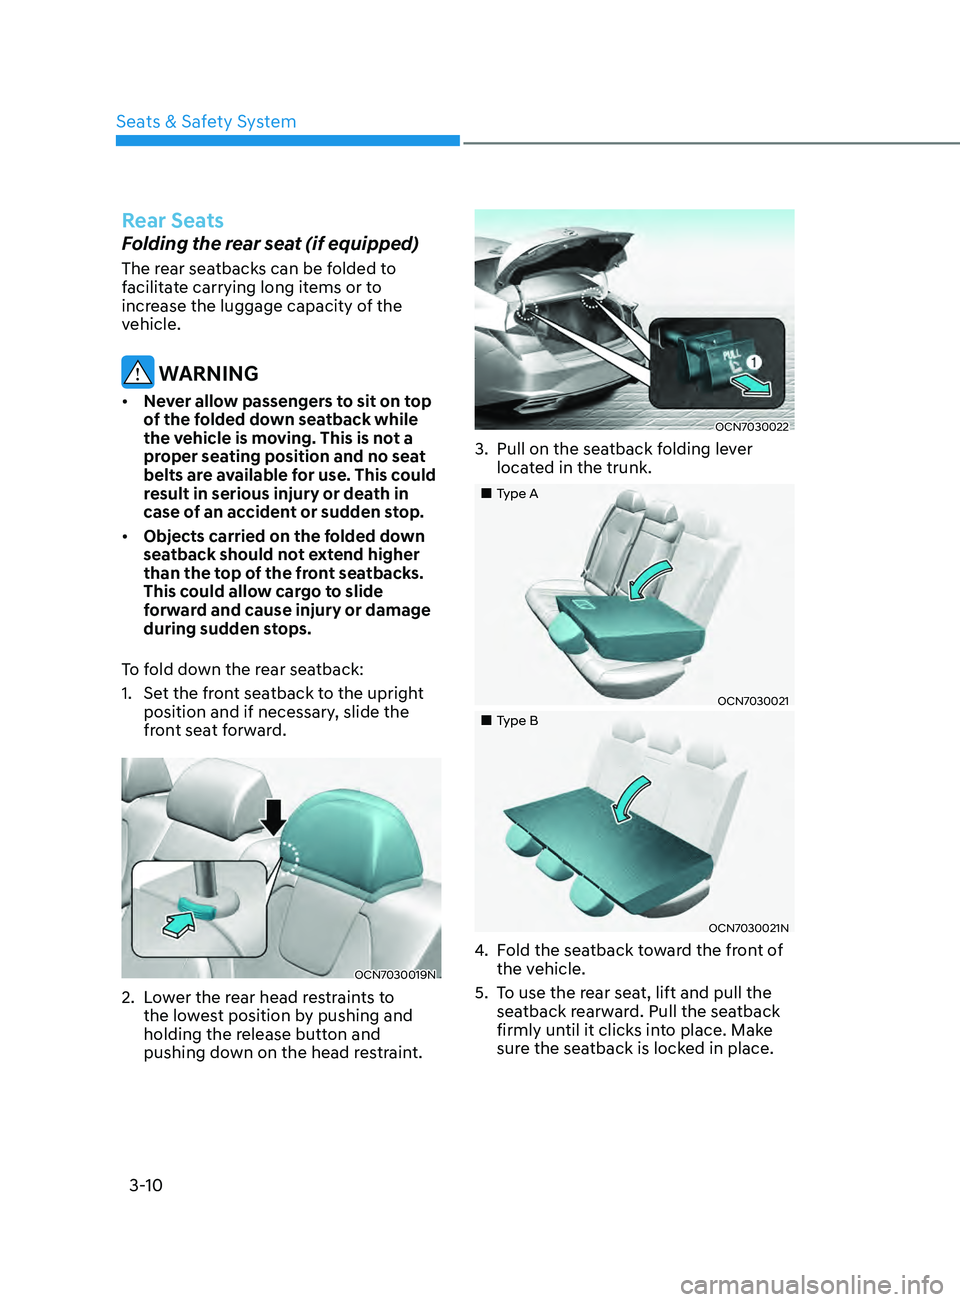
The rear seatbacks can be folded to
facilitate carrying long items or to
increase the luggage capacity of the
vehicle.
WARNING
• Never allow passengers to sit on top
of the folded down seatback while
the vehicle is moving. This is not a
proper seating position and no seat
belts are available for use. This could
result in serious injury or death in
case of an accident or sudden stop.
• Objects carried on the folded down
seatback should not extend higher
than the top of the front seatbacks.
This could allow cargo to slide
forward and cause injury or damage
during sudden stops.
To fold down the rear seatback:
1.
Set the fr
ont seatback to the upright
position and if necessary, slide the
front seat forward.
OCN7030019N
2. Lower the rear head restraints to
the lo west position by pushing and
holding the release button and
pushing down on the head restraint.
OCN7030022
3. Pull on the seatback f olding lever
located in the trunk.
„„Type A
OCN7030021
„„Type B
OCN7030021N
4. Fold the seatback toward the front of
the v ehicle.
5.
To use the r
ear seat, lift and pull the
seatback rearward. Pull the seatback
firmly until it clicks into place. Make
sure the seatback is locked in place.
Seats & Safety System
Page 44 of 570
03
3-13
OCN7030009
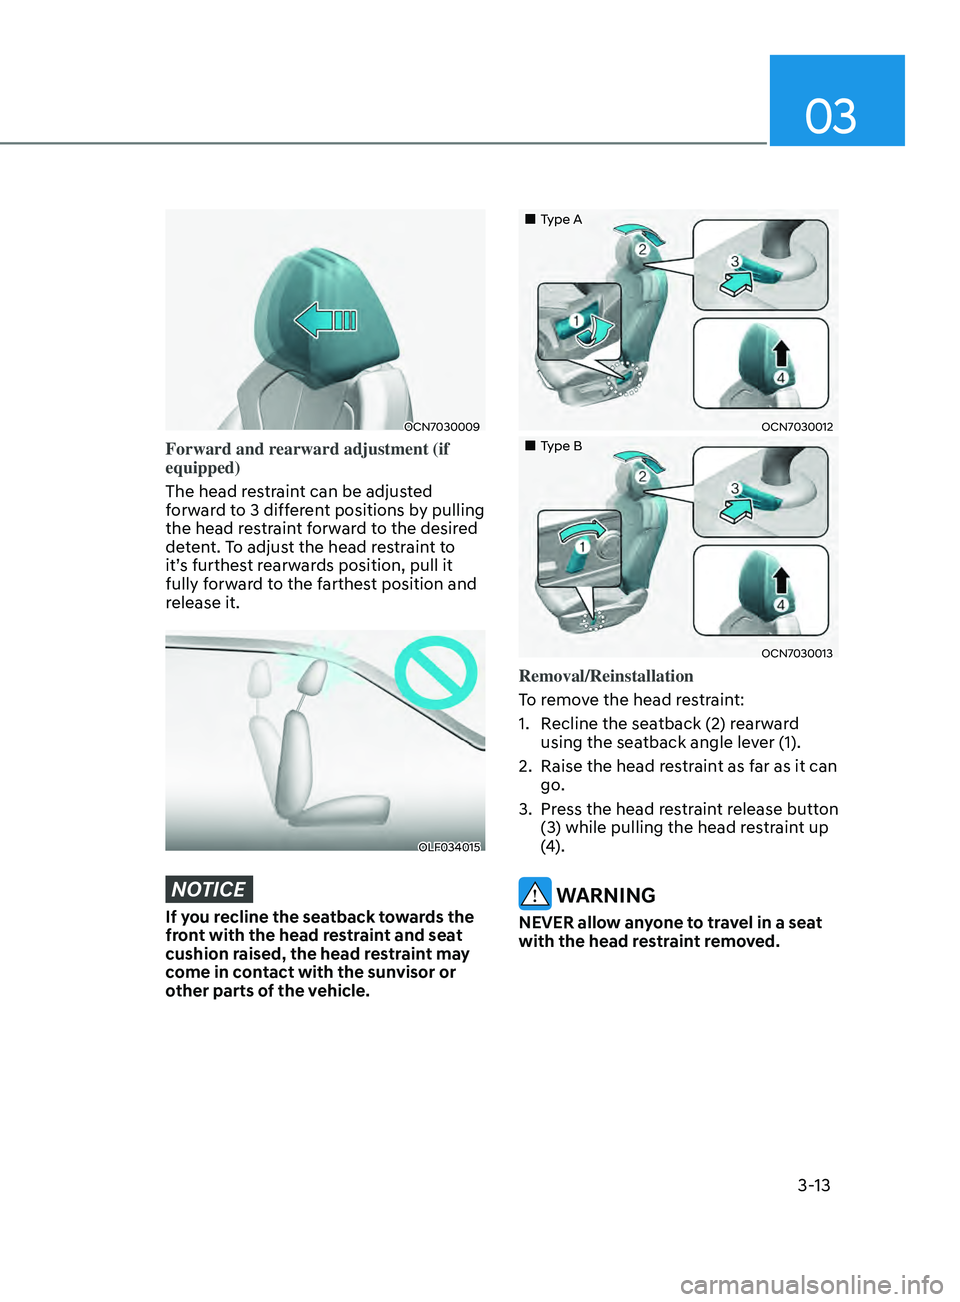
Forward and rearward adjustment (if
equipped)
The head restraint can be adjusted
forward to 3 different positions by pulling
the head restraint forward to the desired
detent. To adjust the head restraint to
it’s furthest rearwards position, pull it
fully forward to the farthest position and
release it.
OLF034015
NOTICE
If you recline the seatback towards the
front with the head restraint and seat
cushion raised, the head restraint may
come in contact with the sunvisor or
other parts of the vehicle.
„„Type A
OCN7030012
„„Type B
OCN7030013
Removal/Reinstallation
To remove the head restraint:
1.
Recline the sea
tback (2) rearward
using the seatback angle lever (1).
2.
Raise the head res
traint as far as it can
go.
3.
Press the head r
estraint release button
(3) while pulling the head restraint up
(4).
WARNING
NEVER allow anyone to travel in a seat
with the head restraint removed.
Page 65 of 570
3-34
OLF034075
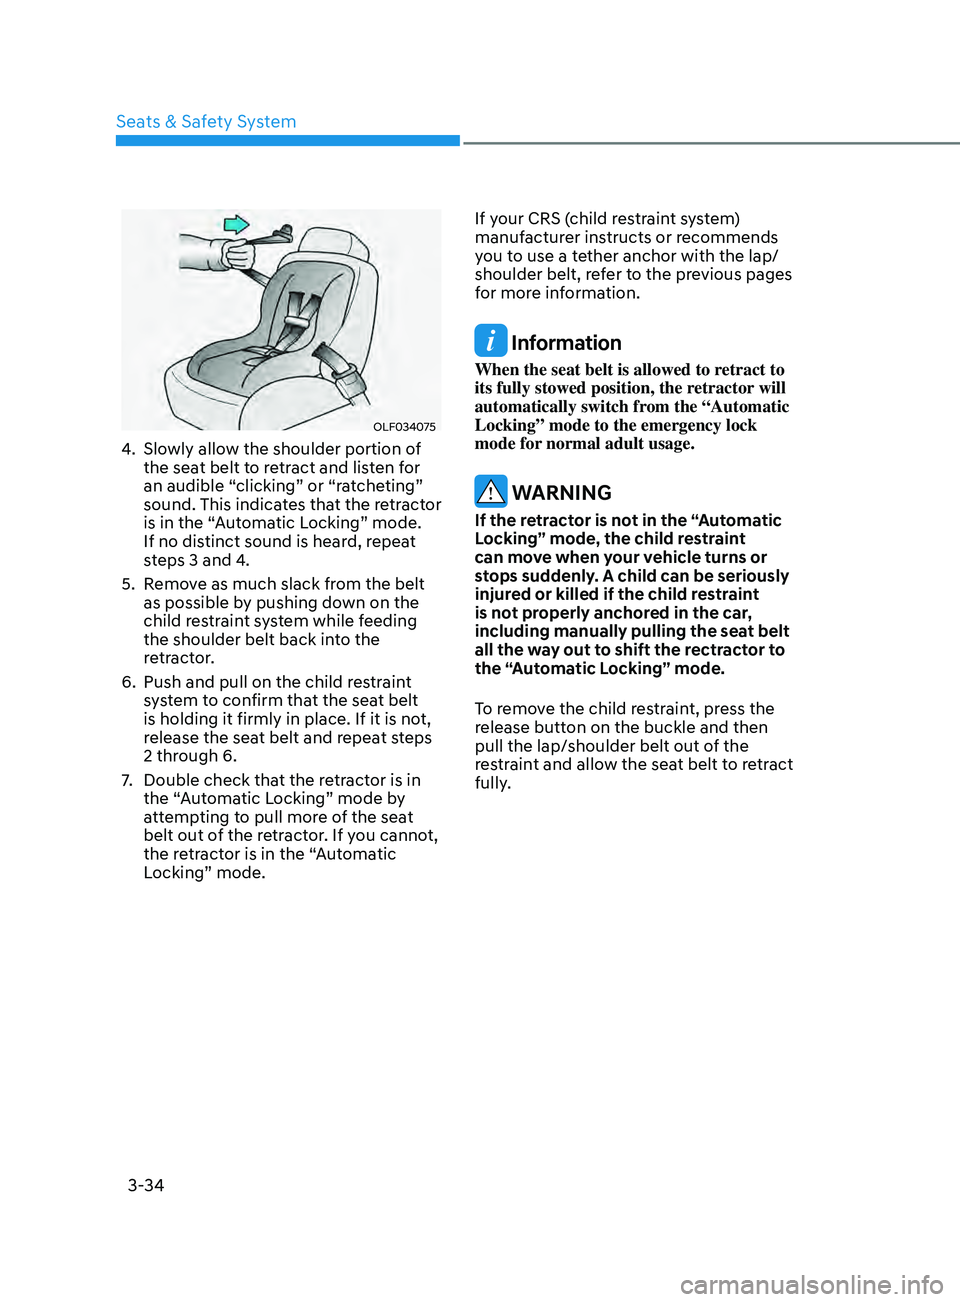
4. Slowly allow the shoulder portion of
the seat belt to retract and listen for
an audible “clicking” or “ratcheting”
sound. This indicates that the retractor
is in the “Automatic Locking” mode.
If no distinct sound is heard, repeat
steps 3 and 4.
5.
Remo
ve as much slack from the belt
as possible by pushing down on the
child restraint system while feeding
the shoulder belt back into the
retractor.
6.
Push and pull on the child res
traint
system to confirm that the seat belt
is holding it firmly in place. If it is not,
release the seat belt and repeat steps
2 through 6.
7.
Double check that the r
etractor is in
the “Automatic Locking” mode by
attempting to pull more of the seat
belt out of the retractor. If you cannot,
the retractor is in the “Automatic
Locking” mode. If your CRS (child restraint system)
manufacturer instructs or recommends
you to use a tether anchor with the lap/
shoulder belt, refer to the previous pages
for more information.
Information
When the seat belt is allowed to retract to
its fully stowed position, the retractor will
automatically switch from the “Automatic
Locking” mode to the emergency lock
mode for normal adult usage.
WARNING
If the retractor is not in the “Automatic
Locking” mode, the child restraint
can move when your vehicle turns or
stops suddenly. A child can be seriously
injured or killed if the child restraint
is not properly anchored in the car,
including manually pulling the seat belt
all the way out to shift the rectractor to
the “Automatic Locking” mode.
To remove the child restraint, press the
release button on the buckle and then
pull the lap/shoulder belt out of the
restraint and allow the seat belt to retract
fully.
Seats & Safety System
Page 76 of 570
03
3-45
For example, if a child restraint of the
type specified in the regulations is on the
seat, the occupant classification sensor
can detect it and cause the air bag to
turn OFF.
Front passenger seat adult occupants
who are properly seated and wearing the
seat belt properly, should not cause the
passenger air bag to be automatically
turned OFF. For small adults it may be
turned OFF, however, if the occupant
does not sit in the seat properly (for
example, by not sitting upright, by sitting
on the edge of the seat, or by otherwise
being out of position), this could cause
the sensor to turn the air bag OFF.
You will find the “PASSENGER AIR BAG
OFF” indicator on the overhead console.
This system detects the conditions 1-4
in the following table and activates or
deactivates the front passenger air bag
based on these conditions.
Always be sure that you and all vehicle
occupants are seated properly and
wearing the seat belt properly for the
most effective protection by the air bag
and the seat belt.
Never install a Child Restraint System in
the front passenger’s seat. If you should
install a CRS (Child Restraint System)
inevitably, use a forward-facing CRS with
3-point ALR safety seat belt and adjust
the front passenger’s seat as far to the
rear as possible. If the PASSENGER AIR
BAG “OFF” indicator is OFF after a CRS
(Child Restraint System) is equipped,
the front passenger’s airbag is operating
so you should install the CRS in the rear
seats of the vehicle immediately.The OCS may not function properly if the
passenger takes actions which can affect
the classification system. These include:
•
Failing to sit in an upright position.
• Leaning against the door or center
console.
• Sitting towards the sides of the front
of the seat.
• Putting their legs on the dashboard or
resting them on other locations which
reduce the passenger weight on the
front seat.
• Wearing the seat belt improperly.
• Reclining the seatback.
• Wearing a thick cloth like ski wear or
hip protection wear.
• Putting an additional thick cushion on
the seat.
• Putting electrical devices (e.g.
notebook, satellite radio) on the seat
with inverter charging.
Page 78 of 570
03
3-47
WARNING
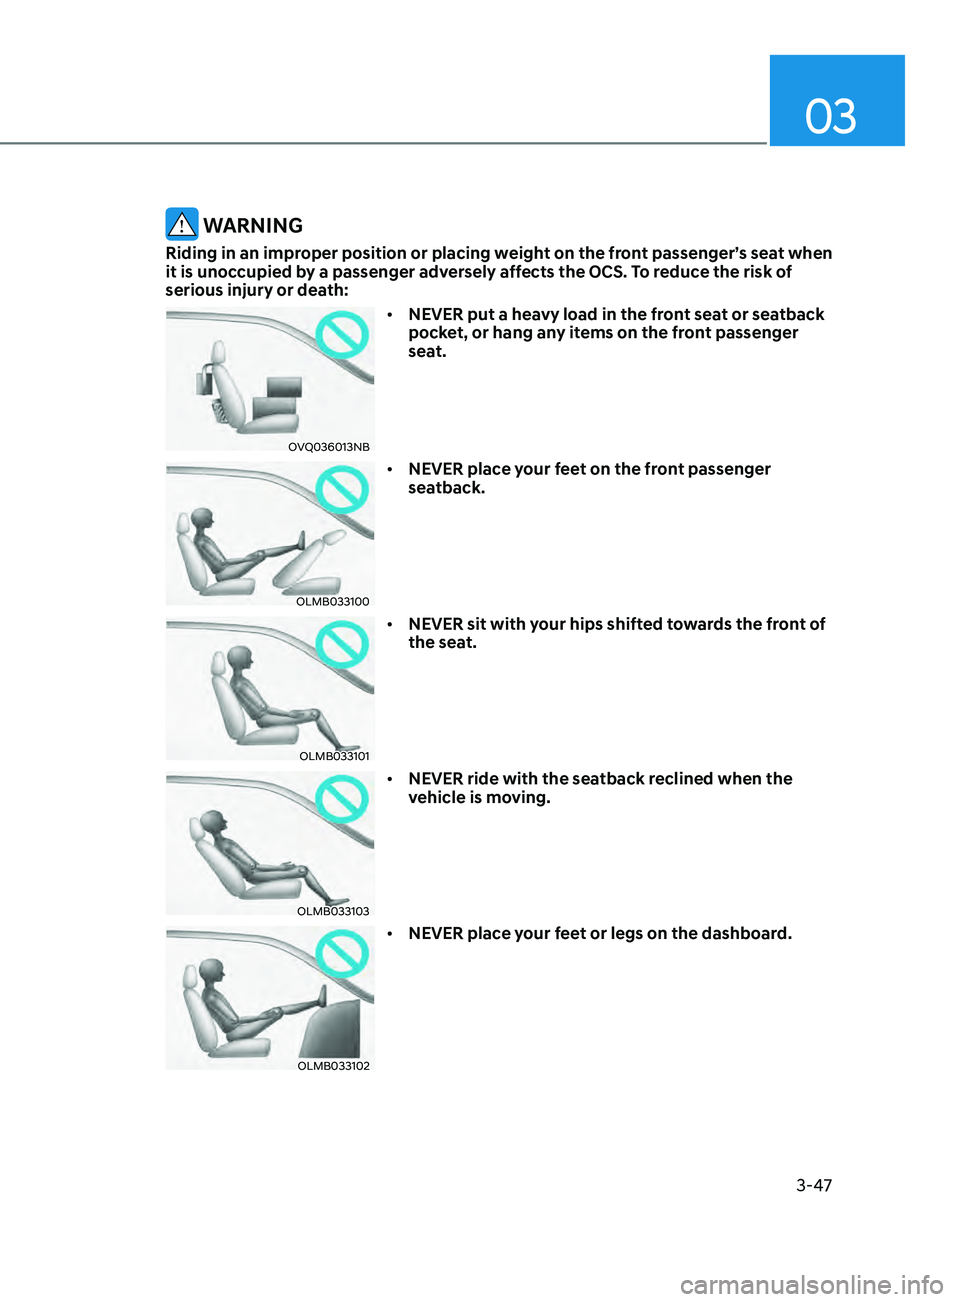
Riding in an improper position or placing weight on the front passenger’s seat when
it is unoccupied by a passenger adversely affects the OCS. To reduce the risk of
serious injury or death:
OVQ036013NB
• NEVER put a heavy load in the front seat or seatback
pocket, or hang any items on the front passenger
seat.
OLMB033100
• NEVER place your feet on the front passenger
seatback.
OLMB033101
• NEVER sit with your hips shifted towards the front of
the seat.
OLMB033103
• NEVER ride with the seatback reclined when the
vehicle is moving.
OLMB033102
• NEVER place your feet or legs on the dashboard.
Page 81 of 570
3-50
Do Not Install a Child Restraint in the
Front Passenger’s Seat
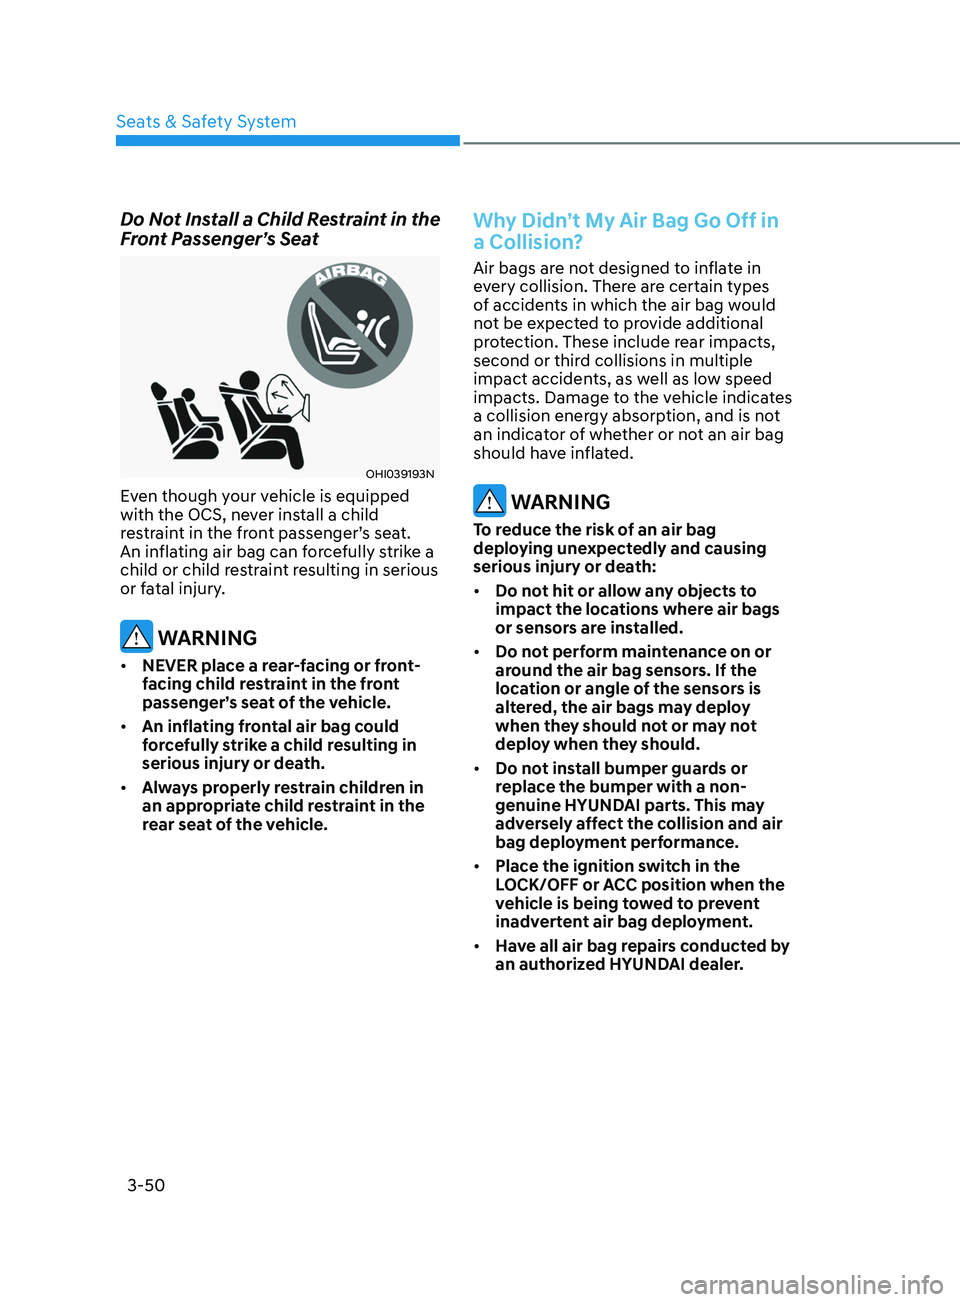
OHI039193N
Even though your vehicle is equipped
with the OCS, never install a child
restraint in the front passenger’s seat.
An inflating air bag can forcefully strike a
child or child restraint resulting in serious
or fatal injury.
WARNING
• NEVER place a rear-facing or front-
facing child restraint in the front
passenger’s seat of the vehicle.
• An inflating frontal air bag could
forcefully strike a child resulting in
serious injury or death.
• Always properly restrain children in
an appropriate child restraint in the
rear seat of the vehicle.
Why Didn’t My Air Bag Go Off in
a Collision?
Air bags are not designed to inflate in
every collision. There are certain types
of accidents in which the air bag would
not be expected to provide additional
protection. These include rear impacts,
second or third collisions in multiple
impact accidents, as well as low speed
impacts. Damage to the vehicle indicates
a collision energy absorption, and is not
an indicator of whether or not an air bag
should have inflated.
WARNING
To reduce the risk of an air bag
deploying unexpectedly and causing
serious injury or death:
• Do not hit or allow any objects to
impact the locations where air bags
or sensors are installed.
• Do not perform maintenance on or
around the air bag sensors. If the
location or angle of the sensors is
altered, the air bags may deploy
when they should not or may not
deploy when they should.
• Do not install bumper guards or
replace the bumper with a non-
genuine HYUNDAI parts. This may
adversely affect the collision and air
bag deployment performance.
• Place the ignition switch in the
LOCK/OFF or ACC position when the
vehicle is being towed to prevent
inadvertent air bag deployment.
• Have all air bag repairs conducted by
an authorized HYUNDAI dealer.
Seats & Safety System
Page 92 of 570
Instrument Cluster
4-6
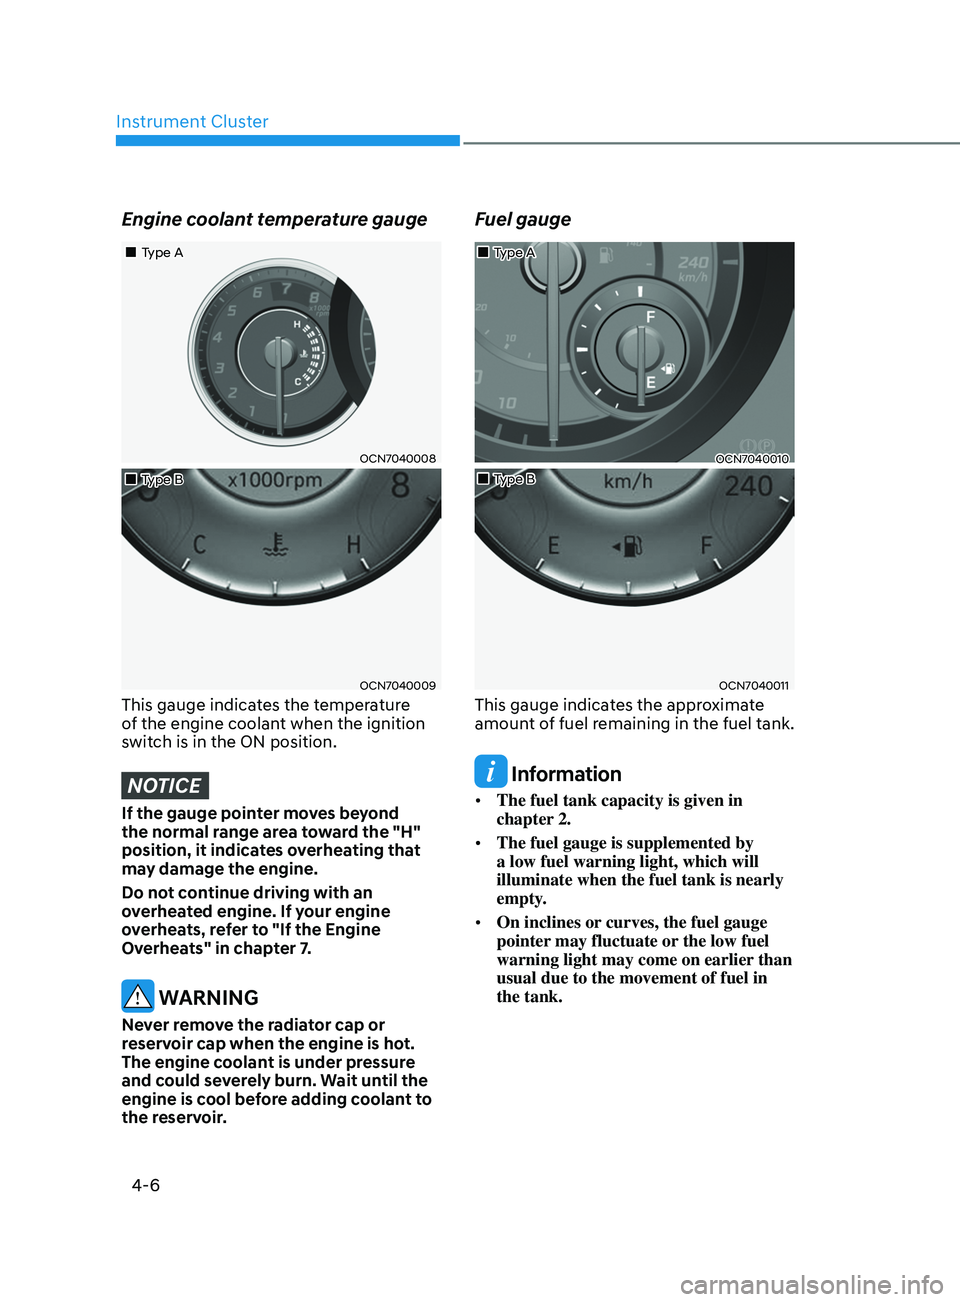
Engine coolant temperature gauge
OCN7040008
OCN7040009
„„Type A
„
„Type B
This gauge indicates the temperature
of the engine coolant when the ignition
switch is in the ON position.
NOTICE
If the gauge pointer moves beyond
the normal range area toward the "H"
position, it indicates overheating that
may damage the engine.
Do not continue driving with an
overheated engine. If your engine
overheats, refer to "If the Engine
Overheats" in chapter 7.
WARNING
Never remove the radiator cap or
reservoir cap when the engine is hot.
The engine coolant is under pressure
and could severely burn. Wait until the
engine is cool before adding coolant to
the reservoir.
Fuel gauge
OCN7040010
OCN7040011
„„Type B
„
„Type A
This gauge indicates the approximate
amount of fuel remaining in the fuel tank.
Information
•
The fuel tank capacity is given in
chapter 2.
• The fuel gauge is supplemented by
a low fuel warning light, which will
illuminate when the fuel tank is nearly
empty.
• On inclines or curves, the fuel gauge
pointer may fluctuate or the low fuel
warning light may come on earlier than
usual due to the movement of fuel in
the tank.
Page 148 of 570
Convenient Features
5-12
Start-up
You can start the engine without
inserting the key. For detailed
information refer to the Engine Start/
Stop button in chapter 6.
Information
If the smart key is not moved for some
time, the detection function for smart key
operation will pause. Lift the smart key to
activate the detection again.
NOTICE
To prevent damaging the smart key:
• Keep the smart key away from water
or any liquid and fire. If the inside
of the smart key gets damp (due to
drinks or moisture), or is heated,
internal circuit may malfunction and
may void the vehicle warranty.
• Avoid dropping or throwing the
smart key.
• Protect the smart key from extreme
temperatures.
NOTICE
Always have the smart key with you
when leaving the vehicle. If the smart
key is left near the vehicle, the vehicle
battery may be discharged.
Mechanical key
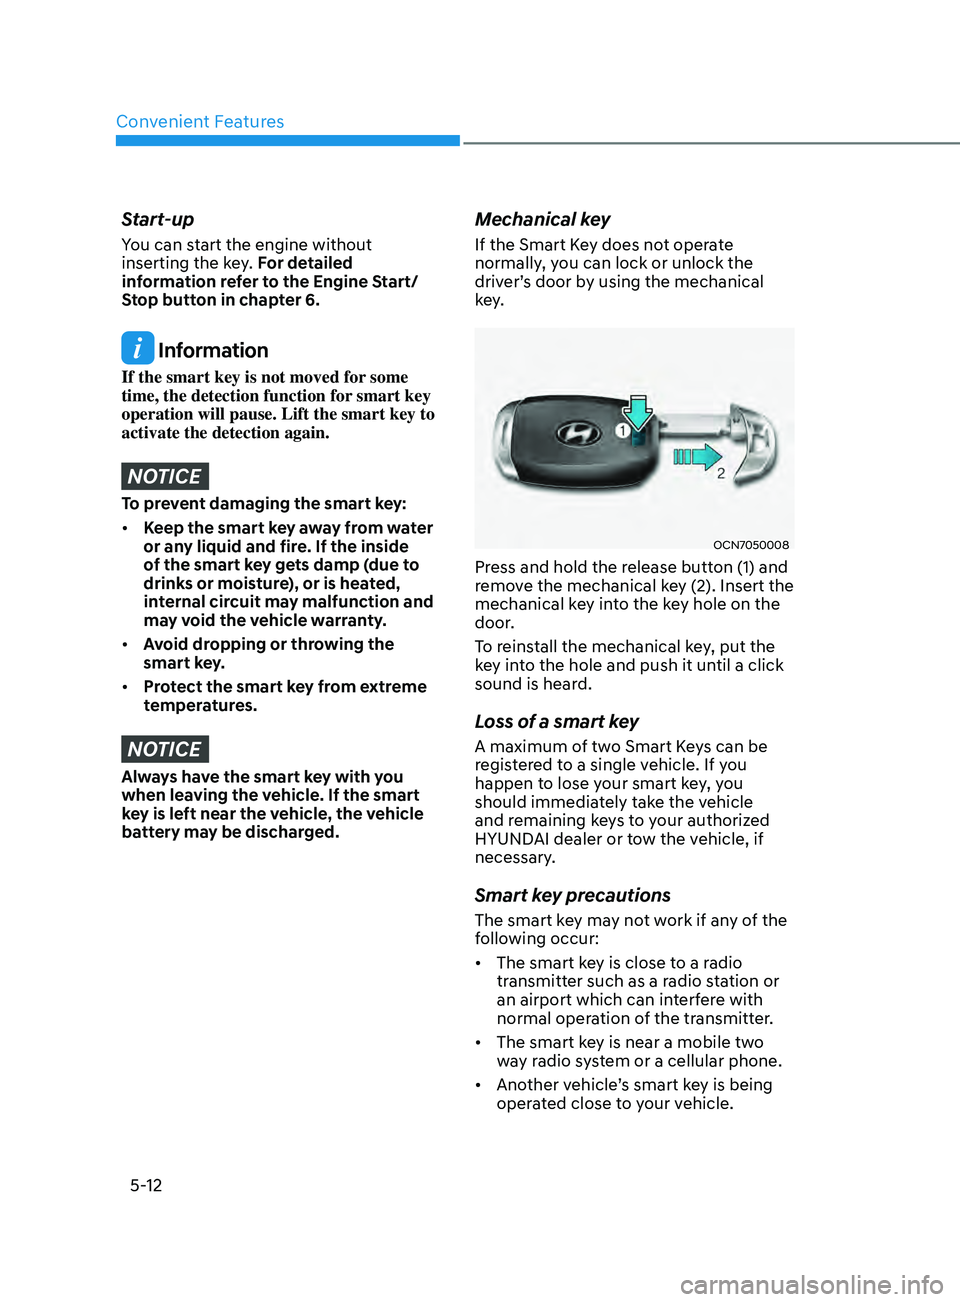
If the Smart Key does not operate
normally, you can lock or unlock the
driver’s door by using the mechanical
key.
OCN7050008
Press and hold the release button (1) and
remove the mechanical key (2). Insert the
mechanical key into the key hole on the
door.
To reinstall the mechanical key, put the
key into the hole and push it until a click
sound is heard.
Loss of a smart key
A maximum of two Smart Keys can be
registered to a single vehicle. If you
happen to lose your smart key, you
should immediately take the vehicle
and remaining keys to your authorized
HYUNDAI dealer or tow the vehicle, if
necessary.
Smart key precautions
The smart key may not work if any of the
following occur:
• The smart key is close to a radio
transmitter such as a radio station or
an airport which can interfere with
normal operation of the transmitter.
• The smart key is near a mobile two
way radio system or a cellular phone.
• Another vehicle’s smart key is being
operated close to your vehicle.
Page 167 of 570
05
5-31
Door locKs
Operating Door Locks from
Outside the Vehicle
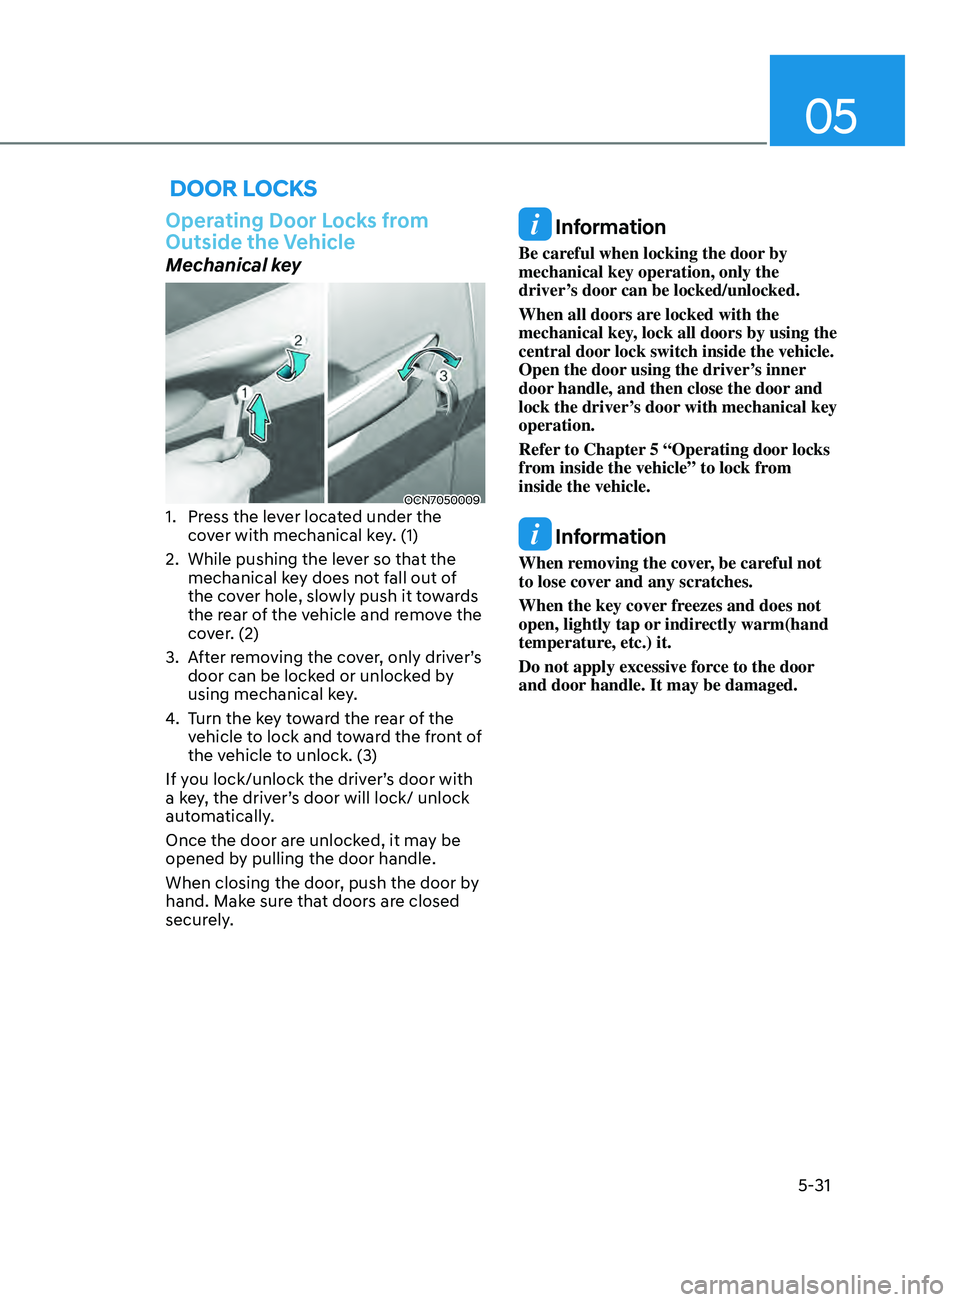
Mechanical key
OCN70500091. Press the lever located under the
cover with mechanical key. (1)
2.
While pushing the lev
er so that the
mechanical key does not fall out of
the cover hole, slowly push it towards
the rear of the vehicle and remove the
cover. (2)
3.
Aft
er removing the cover, only driver’s
door can be locked or unlocked by
using mechanical key.
4.
Turn the k
ey toward the rear of the
vehicle to lock and toward the front of
the vehicle to unlock. (3)
If you lock/unlock the driver’s door with
a key, the driver’s door will lock/ unlock
automatically.
Once the door are unlocked, it may be
opened by pulling the door handle.
When closing the door, push the door by
hand. Make sure that doors are closed
securely.
Information
Be careful when locking the door by
mechanical key operation, only the
driver’s door can be locked/unlocked.
When all doors are locked with the
mechanical key, lock all doors by using the
central door lock switch inside the vehicle.
Open the door using the driver’s inner
door handle, and then close the door and
lock the driver’s door with mechanical key
operation.
Refer to Chapter 5 “Operating door locks
from inside the vehicle” to lock from
inside the vehicle.
Information
When removing the cover, be careful not
to lose cover and any scratches.
When the key cover freezes and does not
open, lightly tap or indirectly warm(hand
temperature, etc.) it.
Do not apply excessive force to the door
and door handle. It may be damaged.
Page 175 of 570
05
5-39
Tilt Steering / Telescope Steering
When adjusting the steering wheel to a
comfortable position, adjust the steering
wheel so that it points toward your chest,
not toward your face. Make sure you can
see the instrument cluster warning lights
and gauges. After locking the lever, push
the steering wheel both up and down to
be certain it is locked in position. Always
adjust the position of the steering wheel
before driving.
WARNING
NEVER adjust the steering wheel while
driving. This may cause loss of vehicle
control resulting in an accident.
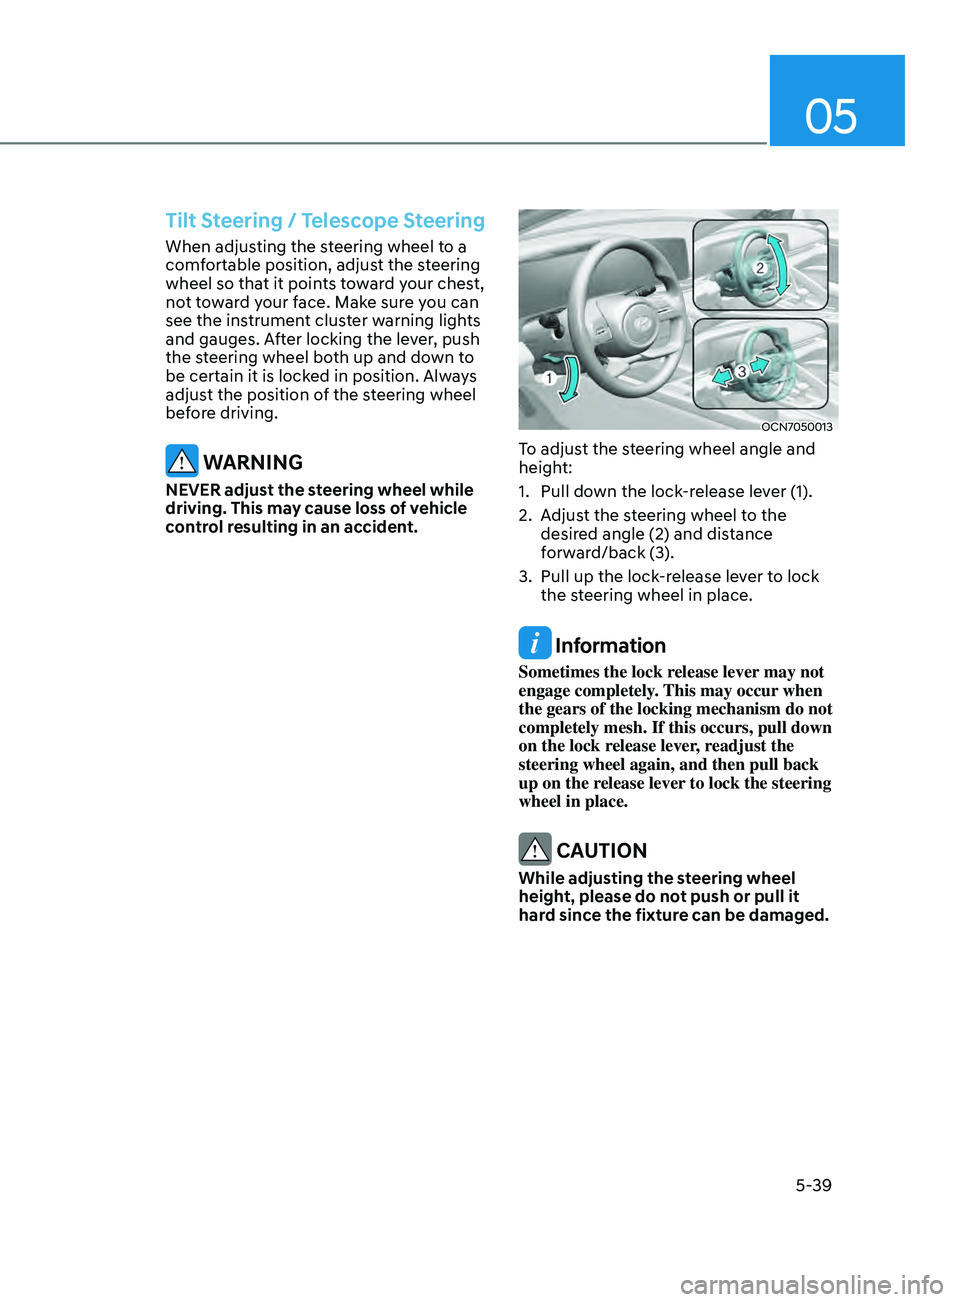
OCN7050013
To adjust the steering wheel angle and
height:
1.
Pull down the lock
-release lever (1).
2.
Adjus
t the steering wheel to the
desired angle (2) and distance
forward/back (3).
3.
Pull up the lock-r
elease lever to lock
the steering wheel in place.
Information
Sometimes the lock release lever may not
engage completely. This may occur when
the gears of the locking mechanism do not
completely mesh. If this occurs, pull down
on the lock release lever, readjust the
steering wheel again, and then pull back
up on the release lever to lock the steering
wheel in place.
CAUTION
While adjusting the steering wheel
height, please do not push or pull it
hard since the fixture can be damaged.