Hyundai Elantra GT 2013 Owner's Manual
Manufacturer: HYUNDAI, Model Year: 2013, Model line: Elantra GT, Model: Hyundai Elantra GT 2013Pages: 476, PDF Size: 31.71 MB
Page 211 of 476
Features of your vehicle
126 4
Navigation system (if equipped)
The navigation system ascertains
the present position of your vehicle
by using information from satellites
and guides you to the place you
assign as the destination.
Detailed information for the naviga-
tion system is described in a seper-
ate manual.
Bluetooth®Wireless
Technology hands-free
(if equipped)
You can use the phone wirelessly by
using the
Bluetooth®Wireless
Technology.
Detailed information for the
Bluetooth®Wireless Technology
hands-free is described in the “Audio
section” in this chapter or in the man-
ual supplied separately.
Cargo area cover (if equipped)
Use the cover to hide items stored in
the cargo area.
The cargo area cover will be lifted
when the tailgate is opened.
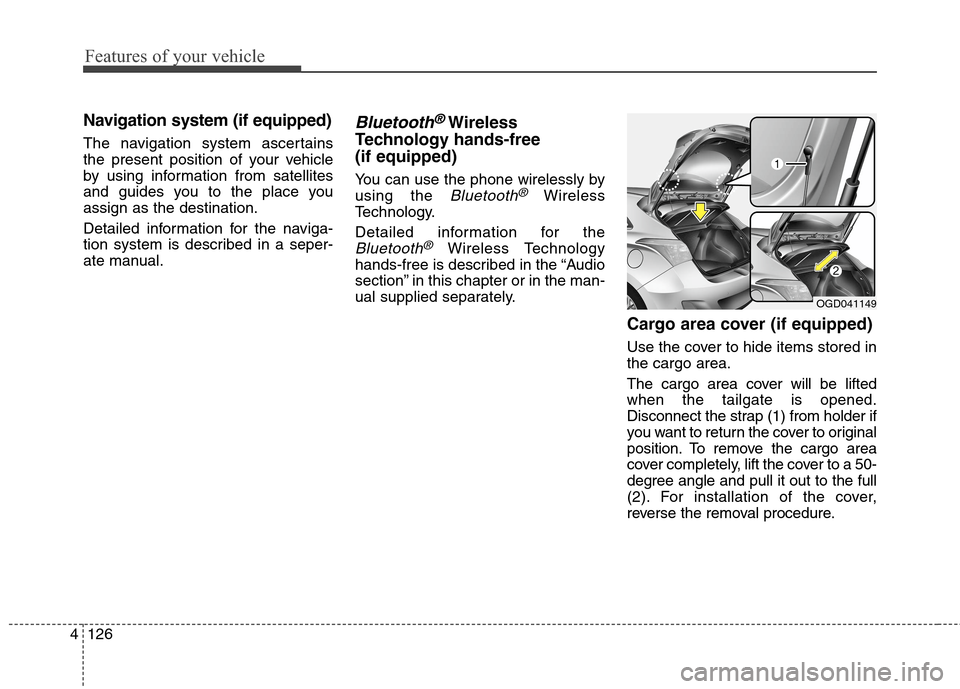
Disconnect the strap (1) from holder if
you want to return the cover to original
position. To remove the cargo area
cover completely, lift the cover to a 50-
degree angle and pull it out to the full
(2). For installation of the cover,
reverse the removal procedure.
OGD041149
Page 212 of 476
4127
Features of your vehicle
CAUTION
When you return the cargo area
cover to its original position,
hold the cover and lower it.
Do not operate the vehicle
with the cover removed. It may
damage to the cover.
The cargo area cover may be
lifted when the tailgate is
opened. Ensure that the lug-
gage on the cover is moved to
a safe place.
Since the cargo area cover
may be damaged or mal-
formed, do not apply exces-
sive force to the cover or do
not put the heavy loads on it.
WARNING
Do not place objects on the
cargo area cover while driv-
ing. Such objects may be
thrown about inside the vehi-
cle and possibly injure vehicle
occupants during an accident
or when braking.
Never allow anyone to ride in
the luggage compartment. It
is designed for luggage only.
Maintain the balance of the
vehicle and locate the weight
as far forward as possible.
Page 213 of 476
Features of your vehicle
128 4
Mounting bracket for roof carrier
(if equipped)
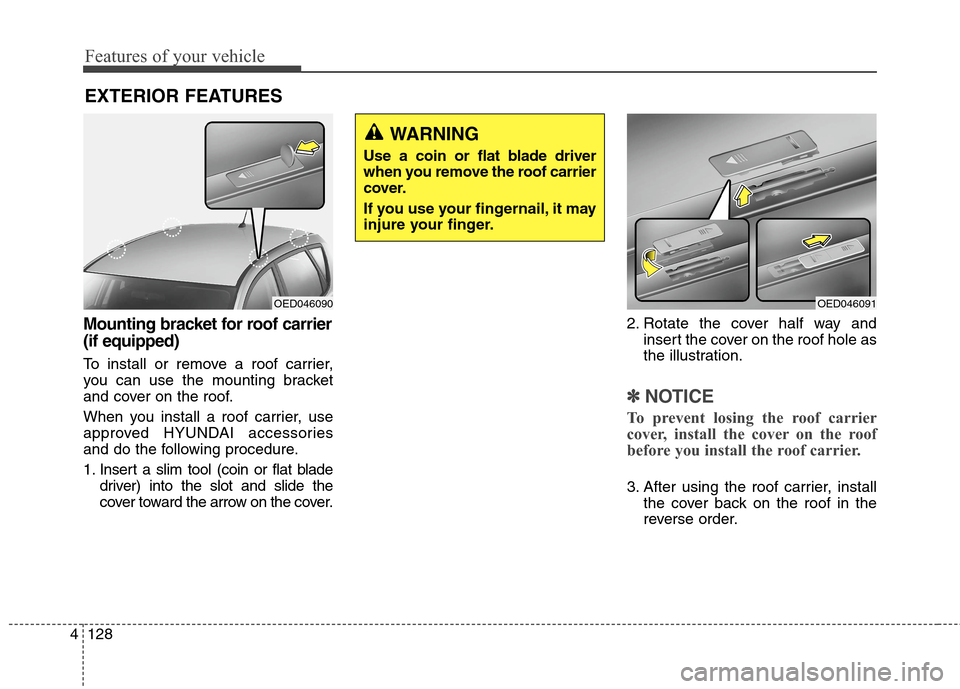
To install or remove a roof carrier,
you can use the mounting bracket
and cover on the roof.
When you install a roof carrier, use
approved HYUNDAI accessories
and do the following procedure.
1. Insert a slim tool (coin or flat blade
driver) into the slot and slide the
cover toward the arrow on the cover.2. Rotate the cover half way and
insert the cover on the roof hole as
the illustration.
✽ ✽
NOTICE
To prevent losing the roof carrier
cover, install the cover on the roof
before you install the roof carrier.
3. After using the roof carrier, install
the cover back on the roof in the
reverse order.
EXTERIOR FEATURES
OED046091OED046090
WARNING
Use a coin or flat blade driver
when you remove the roof carrier
cover.
If you use your fingernail, it may
injure your finger.
Page 214 of 476
4129
Features of your vehicle
✽ ✽
NOTICE
If the vehicle is equipped with a sun-
roof, be sure not to position cargo
onto the roof in such a way that it
could interfere with sunroof opera-
tion.WARNING
The vehicle center of gravity will
be higher when items are
loaded onto the roof. Avoid sud-
den starts, braking, sharp turns,
abrupt maneuvers or high
speeds that may result in loss
of vehicle control or rollover
resulting in an accident.
Always drive slowly and turn
corners carefully when carry-
ing items on the roof. Severe
wind updrafts, caused by pass-
ing vehicles or natural causes,
can cause sudden upward
pressure on items loaded on
the roof. This is especially true
when carrying large, flat items
such as wood panels or mat-
tresses. This could cause the
items to fall off the roof and
cause damage to your vehicle
or others around you.
To prevent damage or loss of
cargo while driving, check fre-
quently before or while driving
to make sure the items on the
roof are securely fastened.
CAUTION
When carrying cargo on the
roof, take the necessary pre-
cautions to make sure the
cargo does not damage the
roof of the vehicle.
When carrying large objects
on the roof, make sure they do
not exceed the overall roof
length or width.
Page 215 of 476
Features of your vehicle
130 4
✽
✽
NOTICE
If you install an aftermarket HID
headlamp, your vehicle's audio and
electronic device may malfunction.
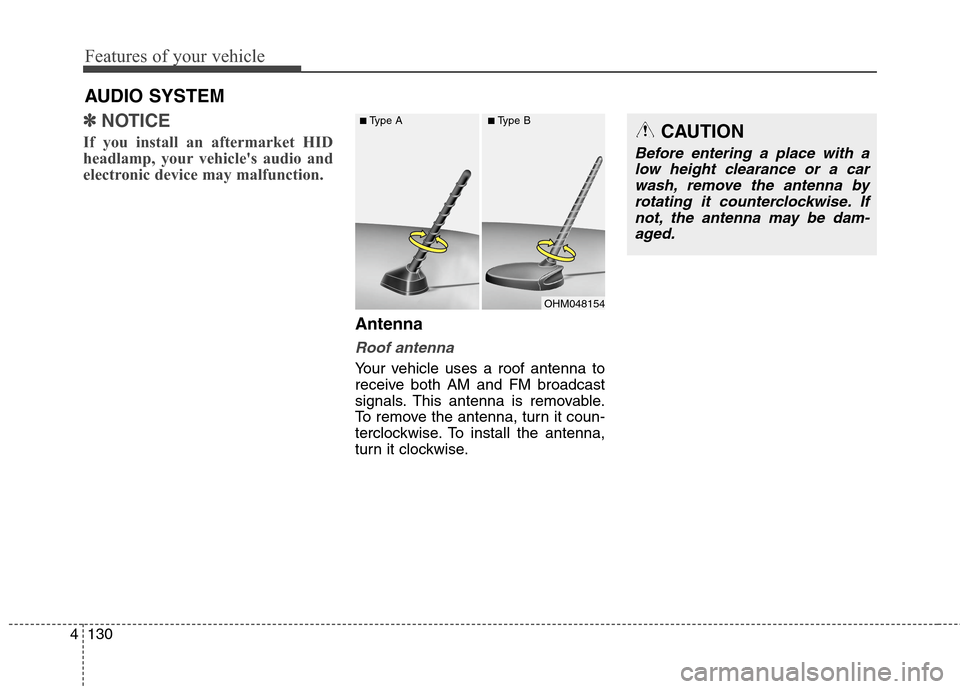
Antenna
Roof antenna
Your vehicle uses a roof antenna to
receive both AM and FM broadcast
signals. This antenna is removable.
To remove the antenna, turn it coun-
terclockwise. To install the antenna,
turn it clockwise.
AUDIO SYSTEM
OHM048154
■Type A■Type BCAUTION
Before entering a place with a
low height clearance or a car
wash, remove the antenna by
rotating it counterclockwise. If
not, the antenna may be dam-
aged.
Page 216 of 476
4131
Features of your vehicle
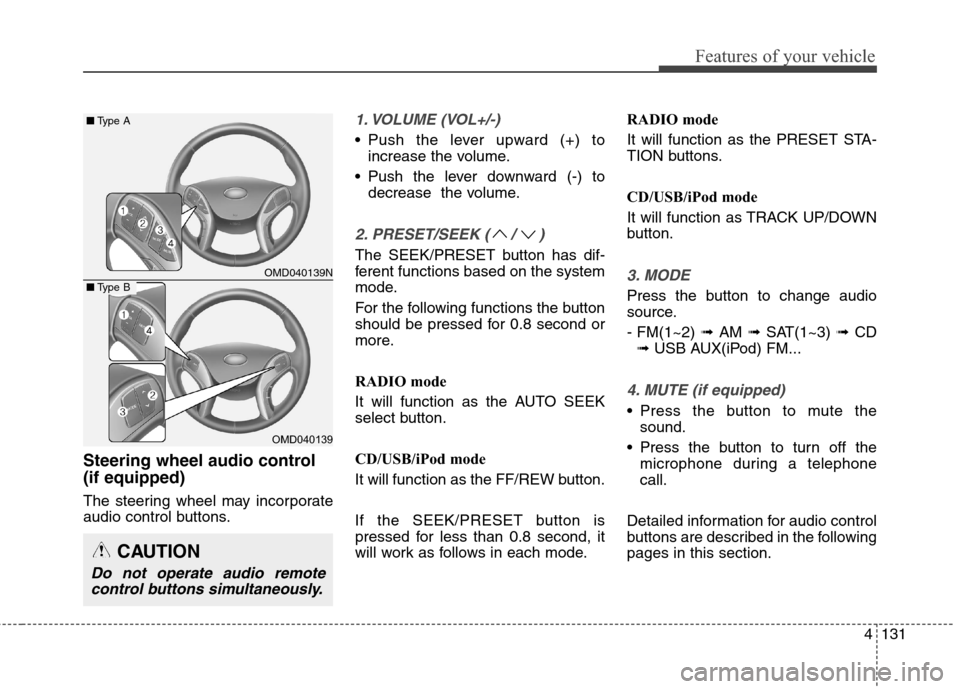
Steering wheel audio control
(if equipped)
The steering wheel may incorporate
audio control buttons.
1. VOLUME (VOL+/-)
• Push the lever upward (+) to
increase the volume.
Push the lever downward (-) to
decrease the volume.
2. PRESET/SEEK ( / )
The SEEK/PRESET button has dif-
ferent functions based on the system
mode.
For the following functions the button
should be pressed for 0.8 second or
more.
RADIO mode
It will function as the AUTO SEEK
select button.
CD/USB/iPod mode
It will function as the FF/REW button.
If the SEEK/PRESET button is
pressed for less than 0.8 second, it
will work as follows in each mode.RADIO mode
It will function as the PRESET STA-
TION buttons.
CD/USB/iPod mode
It will function as TRACK UP/DOWN
button.
3. MODE
Press the button to change audio
source.
- FM(1~2) ➟ AM ➟ SAT(1~3) ➟ CD
➟ USB AUX(iPod) FM...
4. MUTE (if equipped)
Press the button to mute the
sound.
Press the button to turn off the
microphone during a telephone
call.
Detailed information for audio control
buttons are described in the following
pages in this section.
OMD040139N
OMD040139
■Type A
■Type B
CAUTION
Do not operate audio remote
control buttons simultaneously.
Page 217 of 476
Features of your vehicle
132 4
■
■
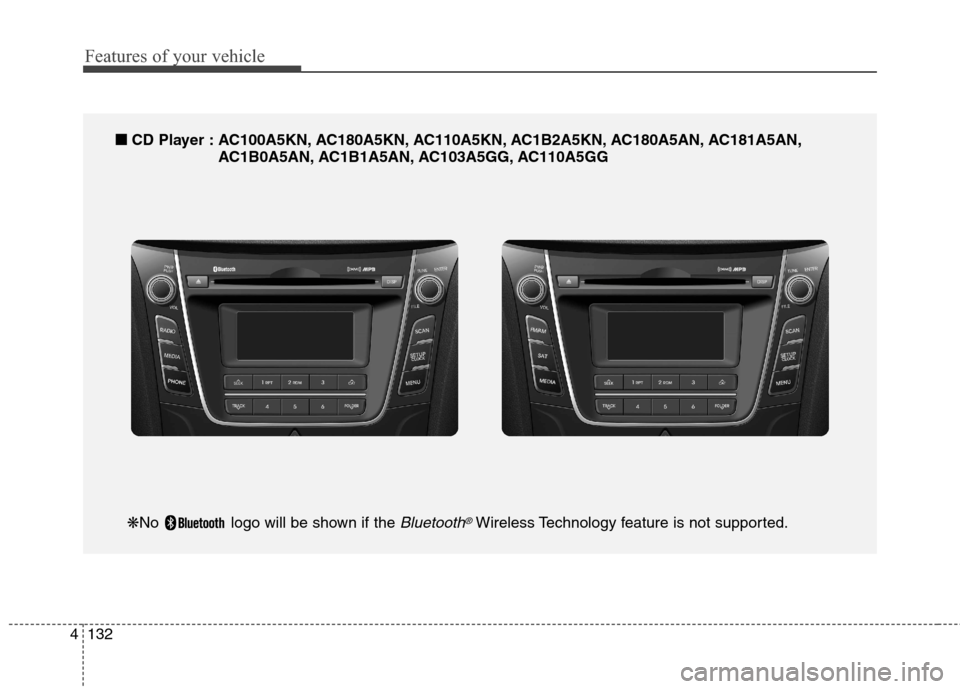
CD Player : AC100A5KN, AC180A5KN, AC110A5KN, AC1B2A5KN, AC180A5AN, AC181A5AN,
AC1B0A5AN, AC1B1A5AN, AC103A5GG, AC110A5GG
❋No logo will be shown if the Bluetooth®Wireless Technology feature is not supported.
Page 218 of 476
4133
Features of your vehicle
SYSTEM CONTROLLERS
AND FUNCTIONS
❈Display and settings may differ
depending on the selected audio.
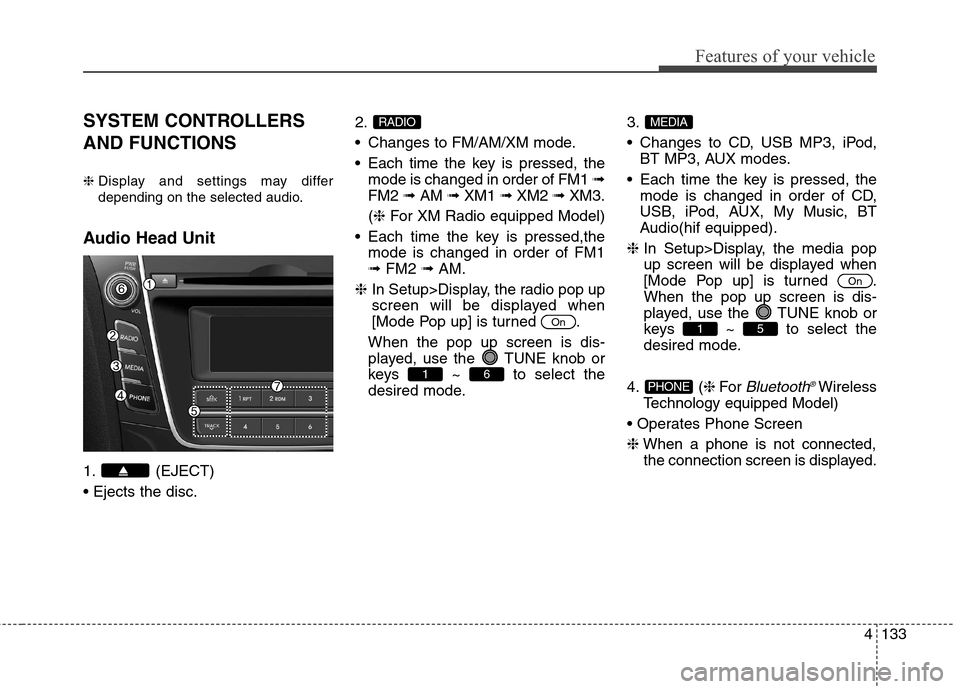
Audio Head Unit
1. (EJECT)
2.
Changes to FM/AM/XM mode.
Each time the key is pressed, the
mode is changed in order of FM1 ➟
FM2 ➟AM ➟XM1 ➟XM2 ➟XM3.
(❈For XM Radio equipped Model)
Each time the key is pressed,the
mode is changed in order of FM1
➟FM2 ➟AM.
❈In Setup>Display, the radio pop up
screen will be displayed when
[Mode Pop up] is turned .
When the pop up screen is dis-
played, use the TUNE knob or
keys ~ to select the
desired mode.3.
Changes to CD, USB MP3, iPod,
BT MP3, AUX modes.
Each time the key is pressed, the
mode is changed in order of CD,
USB, iPod, AUX, My Music, BT
Audio(hif equipped).
❈In Setup>Display, the media pop
up screen will be displayed when
[Mode Pop up] is turned .
When the pop up screen is dis-
played, use the TUNE knob or
keys ~ to select the
desired mode.
4. (❈For
Bluetooth®Wireless
Technology equipped Model)
❈When a phone is not connected,
the connection screen is displayed.PHONE
51
On
MEDIA
61
On
RADIO
Page 219 of 476
Features of your vehicle
134 4
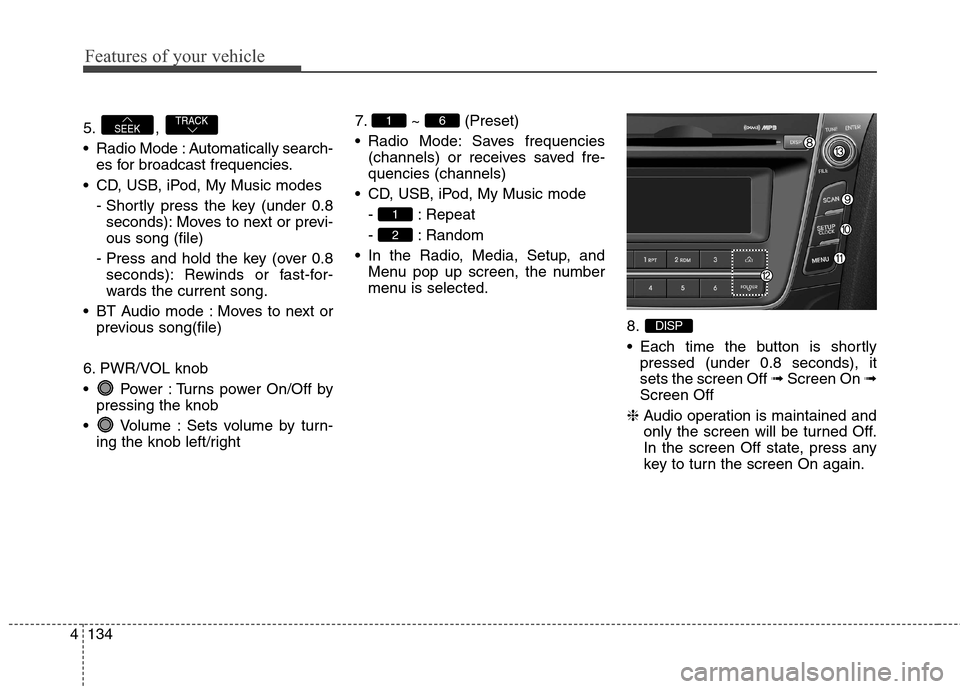
5. ,
Radio Mode : Automatically search-
es for broadcast frequencies.
CD, USB, iPod, My Music modes
- Shortly press the key (under 0.8
seconds): Moves to next or previ-
ous song (file)
- Press and hold the key (over 0.8
seconds): Rewinds or fast-for-
wards the current song.
BT Audio mode : Moves to next or
previous song(file)
6. PWR/VOL knob
Power : Turns power On/Off by
pressing the knob
Volume : Sets volume by turn-
ing the knob left/right7. ~ (Preset)
Radio Mode: Saves frequencies
(channels) or receives saved fre-
quencies (channels)
CD, USB, iPod, My Music mode
- : Repeat
- : Random
In the Radio, Media, Setup, and
Menu pop up screen, the number
menu is selected.
8.
Each time the button is shortly
pressed (under 0.8 seconds), it
sets the screen Off ➟Screen On ➟
Screen Off
❈Audio operation is maintained and
only the screen will be turned Off.
In the screen Off state, press any
key to turn the screen On again.
DISP
2
1
61TRACKSEEK
Page 220 of 476
4135
Features of your vehicle
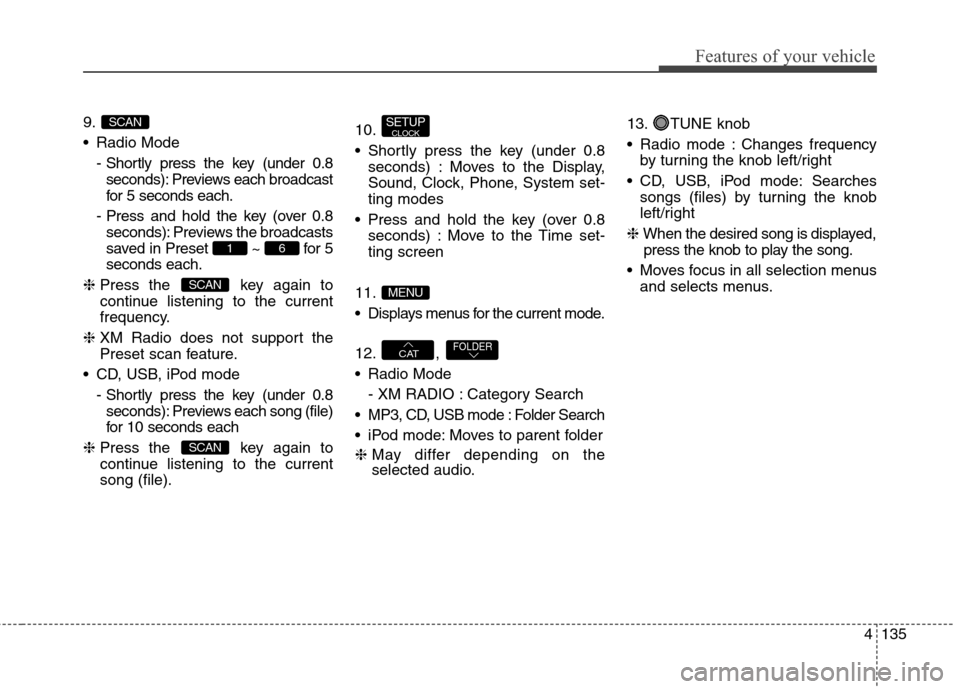
9.
Radio Mode
- Shortly press the key (under 0.8
seconds): Previews each broadcast
for 5 seconds each.
- Press and hold the key (over 0.8
seconds): Previews the broadcasts
saved in Preset ~ for 5
seconds each.
❈Press the key again to
continue listening to the current
frequency.
❈XM Radio does not support the
Preset scan feature.
CD, USB, iPod mode
- Shortly press the key (under 0.8
seconds): Previews each song (file)
for 10 seconds each
❈Press the key again to
continue listening to the current
song (file).10.
Shortly press the key (under 0.8
seconds) : Moves to the Display,
Sound, Clock, Phone, System set-
ting modes
Press and hold the key (over 0.8
seconds) : Move to the Time set-
ting screen
11.
Displays menus for the current mode.
12. ,
Radio Mode
- XM RADIO : Category Search
MP3, CD, USB mode : Folder Search
iPod mode: Moves to parent folder
❈May differ depending on the
selected audio.13. TUNE knob
Radio mode : Changes frequency
by turning the knob left/right
CD, USB, iPod mode: Searches
songs (files) by turning the knob
left/right
❈When the desired song is displayed,
press the knob to play the song.
Moves focus in all selection menus
and selects menus.
FOLDERCAT
MENU
SETUPCLOCK
SCAN
SCAN
61
SCAN