Hyundai Elantra GT 2016 Owner's Guide
Manufacturer: HYUNDAI, Model Year: 2016, Model line: Elantra GT, Model: Hyundai Elantra GT 2016Pages: 546, PDF Size: 14.04 MB
Page 31 of 546
Safety features of your vehicle
12
3
Seat cooler (Air ventilation
seat) (if equipped)
The temperature setting of the seat
changes according to the switch
position.
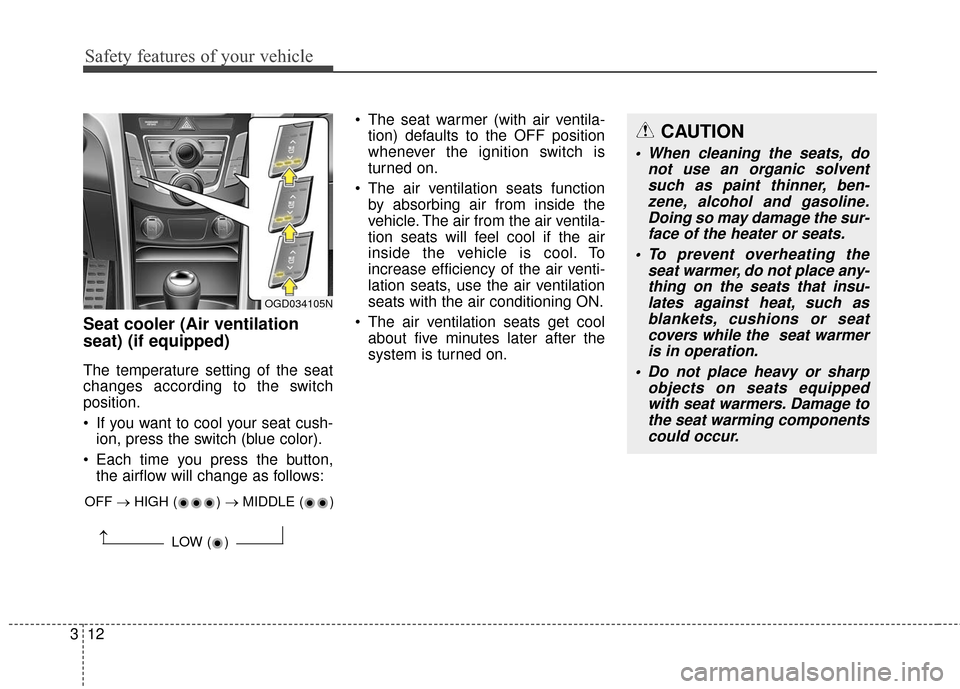
If you want to cool your seat cush-
ion, press the switch (blue color).
Each time you press the button, the airflow will change as follows: The seat warmer (with air ventila-
tion) defaults to the OFF position
whenever the ignition switch is
turned on.
The air ventilation seats function by absorbing air from inside the
vehicle. The air from the air ventila-
tion seats will feel cool if the air
inside the vehicle is cool. To
increase efficiency of the air venti-
lation seats, use the air ventilation
seats with the air conditioning ON.
The air ventilation seats get cool about five minutes later after the
system is turned on.
OGD034105N
CAUTION
When cleaning the seats, do not use an organic solventsuch as paint thinner, ben-zene, alcohol and gasoline.Doing so may damage the sur-face of the heater or seats.
To prevent overheating the seat warmer, do not place any-thing on the seats that insu-lates against heat, such asblankets, cushions or seatcovers while the seat warmeris in operation.
Do not place heavy or sharp objects on seats equippedwith seat warmers. Damage tothe seat warming componentscould occur.
OFF → HIGH ( ) → MIDDLE ( )
LOW ( )
→
Page 32 of 546
313
Safety features of your vehicle
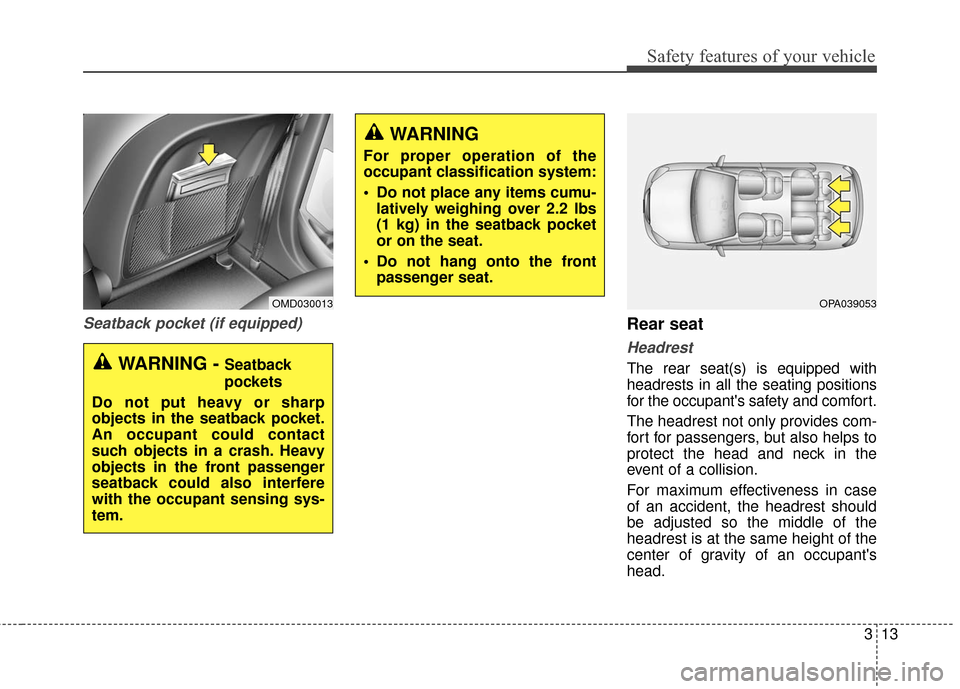
Seatback pocket (if equipped)Rear seat
Headrest
The rear seat(s) is equipped with
headrests in all the seating positions
for the occupant's safety and comfort.
The headrest not only provides com-
fort for passengers, but also helps to
protect the head and neck in the
event of a collision.
For maximum effectiveness in case
of an accident, the headrest should
be adjusted so the middle of the
headrest is at the same height of the
center of gravity of an occupant's
head.
WARNING
For proper operation of the
occupant classification system:
Do not place any items cumu-latively weighing over 2.2 lbs
(1 kg) in the seatback pocket
or on the seat.
Do not hang onto the front passenger seat.
OPA039053OMD030013
WARNING - Seatback
pockets
Do not put heavy or sharp
objects in the seatback pocket.
An occupant could contact
such objects in a crash. Heavy
objects in the front passenger
seatback could also interfere
with the occupant sensing sys-
tem.
Page 33 of 546
Safety features of your vehicle
14
3
Generally, the center of gravity of
most people's head is similar with
the height of the top of their eyes.
Also adjust the headrest as close to
your head as possible. For this rea-
son, the use of a cushion that holds
the body away from the seatback is
not recommended.
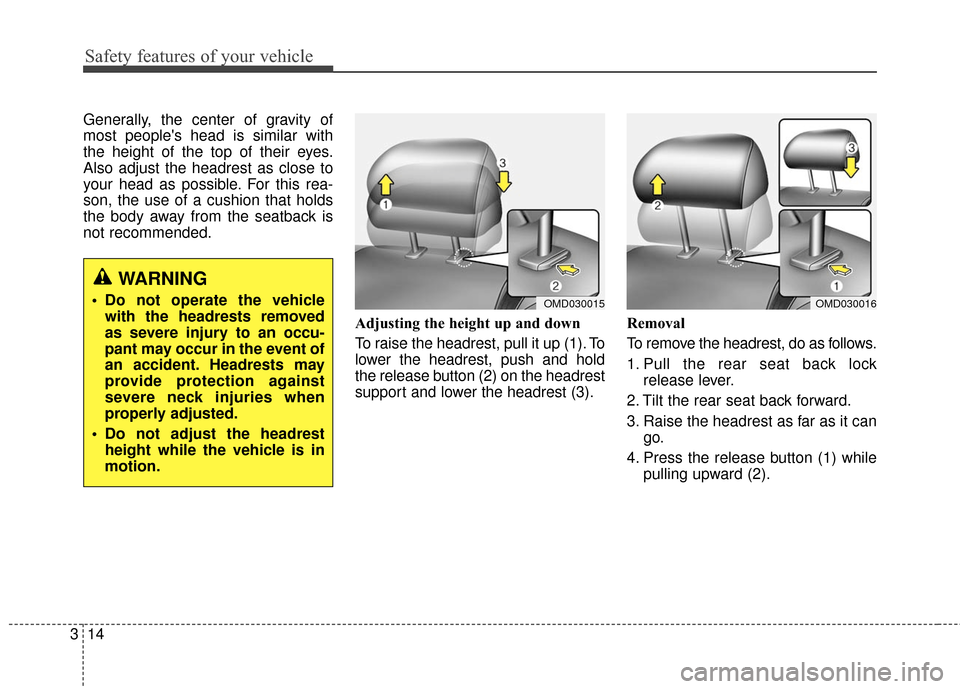
Adjusting the height up and down
To raise the headrest, pull it up (1). To
lower the headrest, push and hold
the release button (2) on the headrest
support and lower the headrest (3).Removal
To remove the headrest, do as follows.
1. Pull the rear seat back lock
release lever.
2. Tilt the rear seat back forward.
3. Raise the headrest as far as it can go.
4. Press the release button (1) while pulling upward (2).
OMD030016OMD030015
WARNING
Do not operate the vehiclewith the headrests removed
as severe injury to an occu-
pant may occur in the event of
an accident. Headrests may
provide protection against
severe neck injuries when
properly adjusted.
Do not adjust the headrest height while the vehicle is in
motion.
Page 34 of 546
315
Safety features of your vehicle
Reinstall
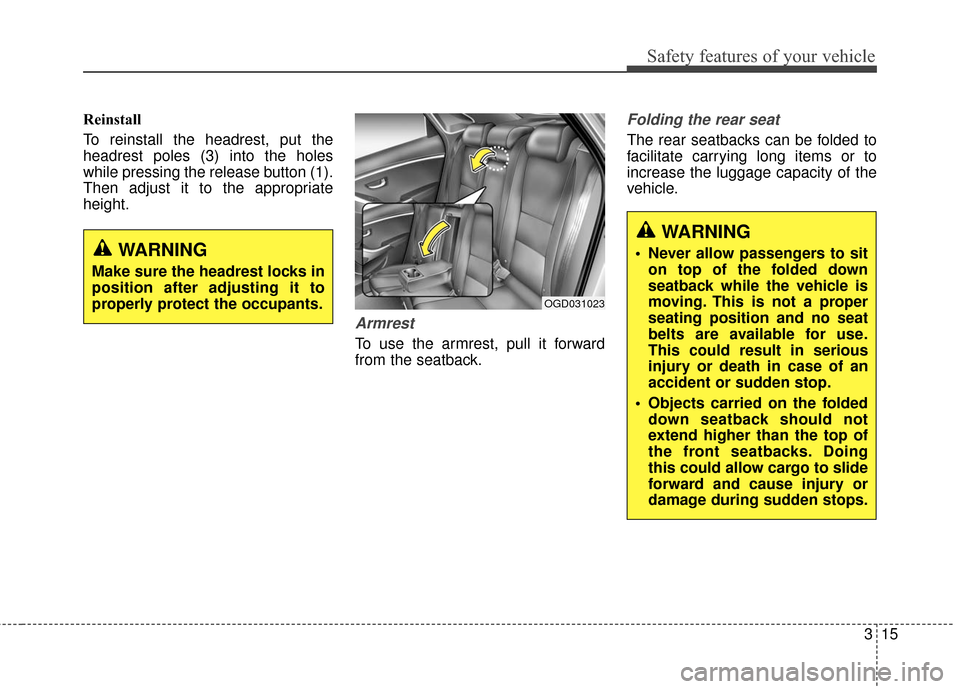
To reinstall the headrest, put the
headrest poles (3) into the holes
while pressing the release button (1).
Then adjust it to the appropriate
height.
Armrest
To use the armrest, pull it forward
from the seatback.
Folding the rear seat
The rear seatbacks can be folded to
facilitate carrying long items or to
increase the luggage capacity of the
vehicle.
OGD031023
WARNING
Never allow passengers to siton top of the folded down
seatback while the vehicle is
moving. This is not a proper
seating position and no seat
belts are available for use.
This could result in serious
injury or death in case of an
accident or sudden stop.
Objects carried on the folded down seatback should not
extend higher than the top of
the front seatbacks. Doing
this could allow cargo to slide
forward and cause injury or
damage during sudden stops.WARNING
Make sure the headrest locks in
position after adjusting it to
properly protect the occupants.
Page 35 of 546
Safety features of your vehicle
16
3
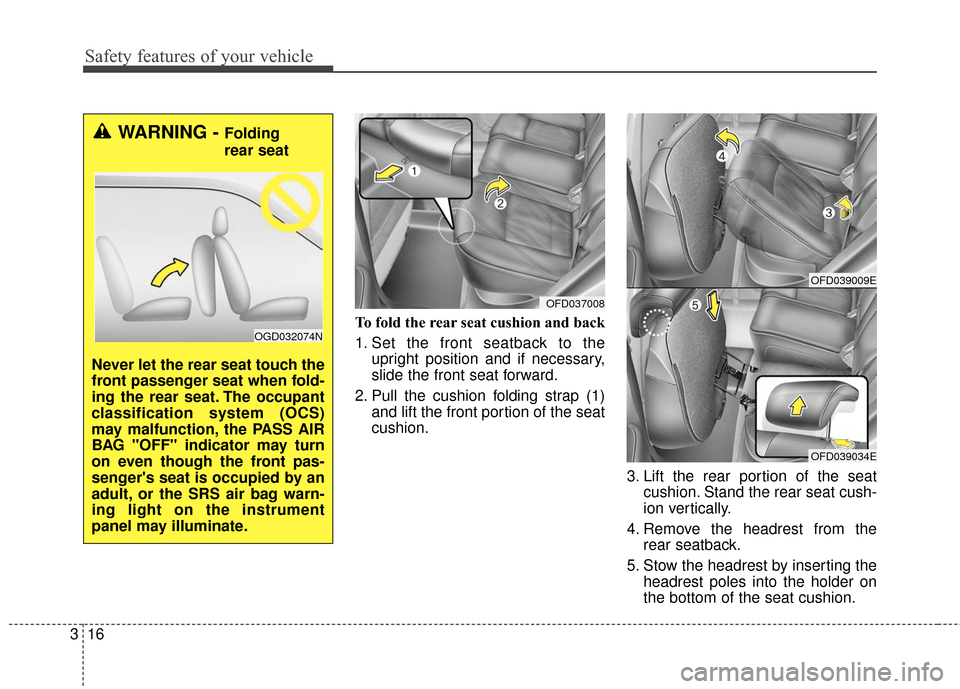
To fold the rear seat cushion and back
1. Set the front seatback to the
upright position and if necessary,
slide the front seat forward.
2. Pull the cushion folding strap (1) and lift the front portion of the seat
cushion.
3. Lift the rear portion of the seatcushion. Stand the rear seat cush-
ion vertically.
4. Remove the headrest from the rear seatback.
5. Stow the headrest by inserting the headrest poles into the holder on
the bottom of the seat cushion.
OFD039009E
OFD039034E
OFD037008
WARNING - Folding
rear seat
Never let the rear seat touch the
front passenger seat when fold-
ing the rear seat. The occupant
classification system (OCS)
may malfunction, the PASS AIR
BAG "OFF" indicator may turn
on even though the front pas-
senger's seat is occupied by an
adult, or the SRS air bag warn-
ing light on the instrument
panel may illuminate.
OGD032074N
Page 36 of 546
317
Safety features of your vehicle
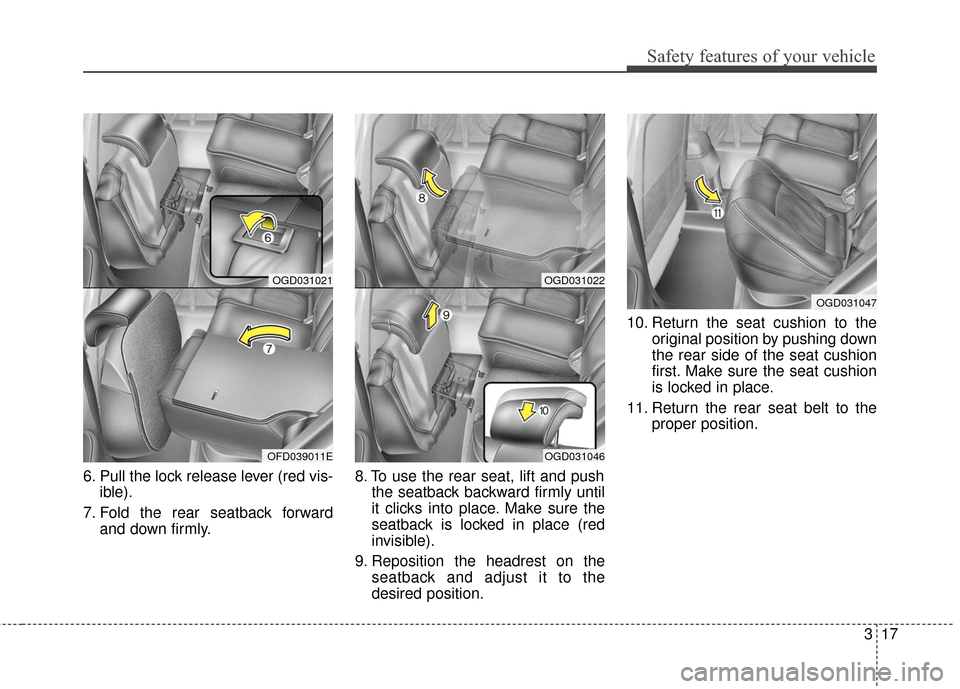
6. Pull the lock release lever (red vis-ible).
7. Fold the rear seatback forward and down firmly. 8. To use the rear seat, lift and push
the seatback backward firmly until
it clicks into place. Make sure the
seatback is locked in place (red
invisible).
9. Reposition the headrest on the seatback and adjust it to the
desired position. 10. Return the seat cushion to the
original position by pushing down
the rear side of the seat cushion
first. Make sure the seat cushion
is locked in place.
11. Return the rear seat belt to the proper position.
OGD031047
OGD031022
OGD031046
OGD031021
OFD039011E
Page 37 of 546
Safety features of your vehicle
18
3
✽
✽
NOTICE
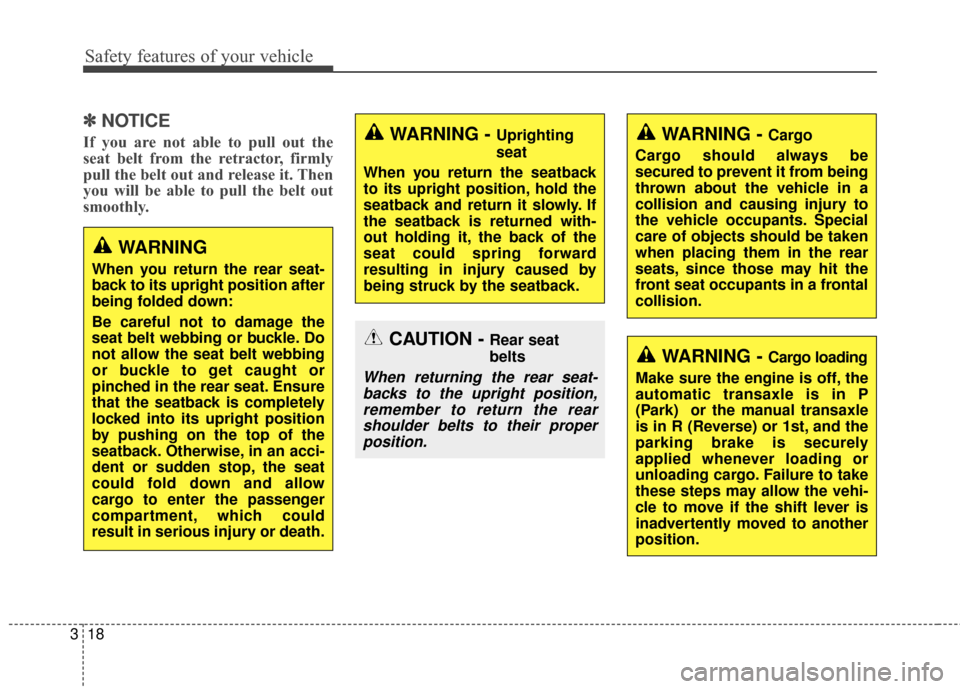
If you are not able to pull out the
seat belt from the retractor, firmly
pull the belt out and release it. Then
you will be able to pull the belt out
smoothly.
WARNING - Cargo loading
Make sure the engine is off, the
automatic transaxle is in P
(Park) or the manual transaxle
is in R (Reverse) or 1st, and the
parking brake is securely
applied whenever loading or
unloading cargo. Failure to take
these steps may allow the vehi-
cle to move if the shift lever is
inadvertently moved to another
position.
WARNING - Cargo
Cargo should always be
secured to prevent it from being
thrown about the vehicle in a
collision and causing injury to
the vehicle occupants. Special
care of objects should be taken
when placing them in the rear
seats, since those may hit the
front seat occupants in a frontal
collision.
CAUTION - Rear seat
belts
When returning the rear seat- backs to the upright position,remember to return the rearshoulder belts to their properposition.
WARNING - Uprighting
seat
When you return the seatback
to its upright position, hold the
seatback and return it slowly. If
the seatback is returned with-
out holding it, the back of the
seat could spring forward
resulting in injury caused by
being struck by the seatback.
WARNING
When you return the rear seat-
back to its upright position after
being folded down:
Be careful not to damage the
seat belt webbing or buckle. Do
not allow the seat belt webbing
or buckle to get caught or
pinched in the rear seat. Ensure
that the seatback is completely
locked into its upright position
by pushing on the top of the
seatback. Otherwise, in an acci-
dent or sudden stop, the seat
could fold down and allow
cargo to enter the passenger
compartment, which could
result in serious injury or death.
Page 38 of 546
319
Safety features of your vehicle
Seat belt restraint system
SEAT BELTS
(Continued)
Seat belts should be adjusted
as firmly as possible, consis-
tent with comfort, to provide the
protection for which they have
been designed.
A slack belt will greatly reduce
the protection afforded to the
occupant.
Care should be taken to avoid
contamination of the webbing
with polishes, oils and chemi-
cals and particularly battery
acid. Cleaning may safely be
carried out using mild soap and
water. The belt should be
replaced if webbing becomes
frayed, contaminated or dam-
aged. It is essential to replace
the entire assembly after it has
been worn in a severe impact
even if damage to the assembly
is not obvious. Belts should not
be worn with straps twisted.
Each seat belt assembly must
only be used by one occupant;
it is dangerous to put a belt
around a child being carried on
the occupant's lap.
WARNING
Seat belts are designed to bear
upon the bony structure of the
body, and should be worn low
across the front of the pelvis,
chest and shoulders, as appli-
cable; wearing the lap section
of the belt across the abdominal
area must be avoided.(Continued)
(Continued)
Always wear both the shoul-der portion and lap portion of
the lap/shoulder belt.
Avoid wearing twisted seat belts. A twisted belt can't do
its job as well. In a collision, it
could even cut into you. Be
sure the belt webbing is
straight and not twisted.
Be careful not to damage the belt webbing or hardware. If
the belt webbing or hardware
is damaged, replace it.
WARNING
For maximum restraint systemprotection, the seat belts must
always be used whenever the
car is moving.
Seat belts are most effective when seatbacks are in the
upright position.
Children age 12 and younger must always be properly
restrained in the rear seat.
Never allow children to ride in
the front passenger seat. If a
child over 12 must be seated
in the front seat, he/she must
be properly belted and the
seat should be moved as far
back as possible.
Never wear the shoulder belt under your arm or behind your
back. An improperly positioned
shoulder belt can cause seri-
ous injuries in a crash. The
shoulder belt should be posi-
tioned midway over your shoul-
der across your collarbone.
(Continued)
Page 39 of 546
Safety features of your vehicle
20
3
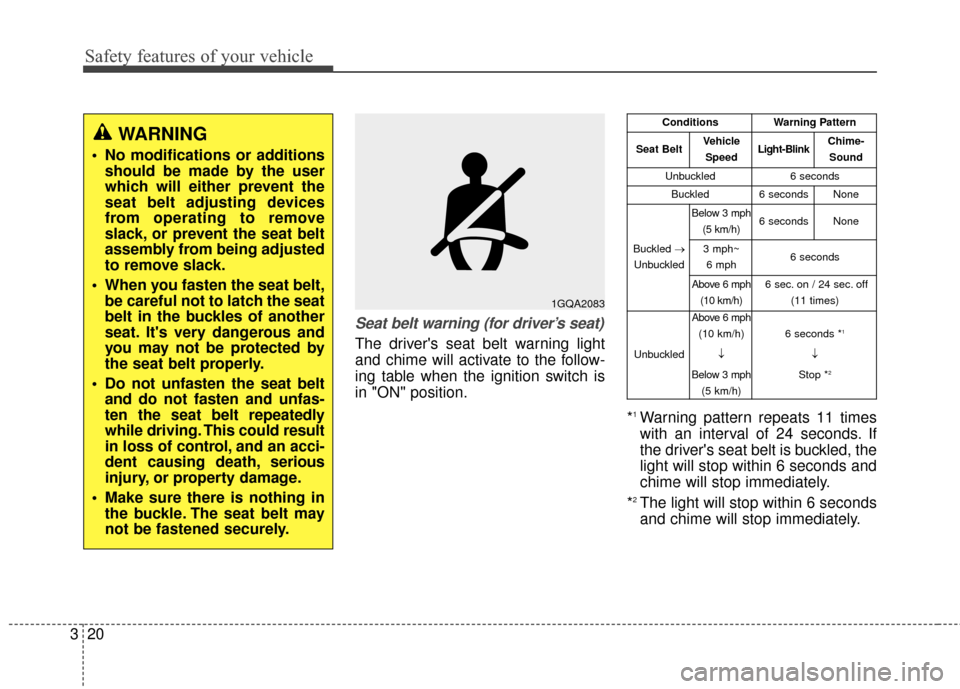
Seat belt warning (for driver’s seat)
The driver's seat belt warning light
and chime will activate to the follow-
ing table when the ignition switch is
in "ON" position.
*
1Warning pattern repeats 11 times
with an interval of 24 seconds. If
the driver's seat belt is buckled, the
light will stop within 6 seconds and
chime will stop immediately.
*
2The light will stop within 6 seconds
and chime will stop immediately.
1GQA2083
WARNING
No modifications or additions should be made by the user
which will either prevent the
seat belt adjusting devices
from operating to remove
slack, or prevent the seat belt
assembly from being adjusted
to remove slack.
When you fasten the seat belt, be careful not to latch the seat
belt in the buckles of another
seat. It's very dangerous and
you may not be protected by
the seat belt properly.
Do not unfasten the seat belt and do not fasten and unfas-
ten the seat belt repeatedly
while driving. This could result
in loss of control, and an acci-
dent causing death, serious
injury, or property damage.
Make sure there is nothing in the buckle. The seat belt may
not be fastened securely.
ConditionsWarning Pattern
Seat BeltVehicle
SpeedLight-BlinkChime-Sound
Unbuckled6 seconds
Buckled6 secondsNone
Buckled →
Unbuckled
Below 3 mph (5 km/h)6 secondsNone
3 mph~6 mph6 seconds
Above 6 mph (10 km/h)6 sec. on / 24 sec. off (11 times)
Unbuckled
Above 6 mph(10 km/h)
↓
Below 3 mph (5 km/h)
6 seconds *1
↓
Stop *
2
Page 40 of 546
321
Safety features of your vehicle
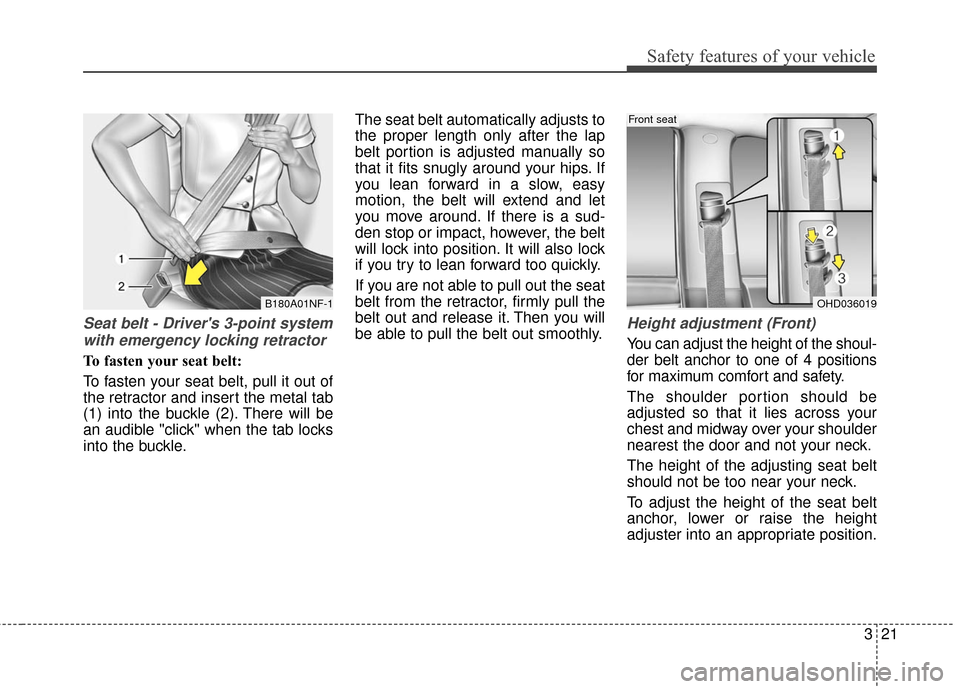
Seat belt - Driver's 3-point systemwith emergency locking retractor
To fasten your seat belt:
To fasten your seat belt, pull it out of
the retractor and insert the metal tab
(1) into the buckle (2). There will be
an audible "click" when the tab locks
into the buckle. The seat belt automatically adjusts to
the proper length only after the lap
belt portion is adjusted manually so
that it fits snugly around your hips. If
you lean forward in a slow, easy
motion, the belt will extend and let
you move around. If there is a sud-
den stop or impact, however, the belt
will lock into position. It will also lock
if you try to lean forward too quickly.
If you are not able to pull out the seat
belt from the retractor, firmly pull the
belt out and release it. Then you will
be able to pull the belt out smoothly.
Height adjustment (Front)
You can adjust the height of the shoul-
der belt anchor to one of 4 positions
for maximum comfort and safety.
The shoulder portion should be
adjusted so that it lies across your
chest and midway over your shoulder
nearest the door and not your neck.
The height of the adjusting seat belt
should not be too near your neck.
To adjust the height of the seat belt
anchor, lower or raise the height
adjuster into an appropriate position.
OHD036019
Front seat
B180A01NF-1